Category Archives: Programming

SaaS Application Design Discussion – Part IV

In the previous post, I discussed database design for saas application. To continue design discussion for our social pie saas application, in this post, we will discuss a few more ideas about how a user and user’s company will sign up for application. This will be a user story. We are building a SAAS application. To make it more viable, this application will use the freemium and pay model.

  1. In the freemium model – Any company can join and review what reports it will be able to see and what kind of marketing strategies it can design using those reports.
    1. 5 Reports
    2. Free Marketing Strategies
    3. Up to 3 users
    4. Limited usage of twitter and Instagram APIs
  2. In pay model – If a company opts to join a pay subscription, it will be able to get more advance reports, will be able to see reports in a different format, and can also get consultation about strategies for marketing.
    1. N number of reports – Your data, your freedom
    2. Marketing Consultation
    3. KPI tracker and notification
    4. Up to N users (won’t be implemented in first version)

User Flow

Once the user lands on the home page, he can opt for either model and sign up. An automated email will be sent to the user for a demo or sign up. Upon sign up, where the user will be entering details about himself and his company. This user will be an administrator and he can add other users with custom roles. The same user can go to reports tab and click on sync data. This will get the latest data from social media and update it in the database. Every new request will compare newly fetched data with current data in the database. If the new request has brought changes, it will be updated in the database. When generating reports, this data from the database will be cached.

We will not be fetching any on-the-fly data from Twitter and Instagram. Administrator users will have an option to send reports to other people from the company. There will be an email/download option.

There are some nitty-gritty details that I have not covered in this post. But with this post, we will be starting to develop a Saas application using java and spring-boot.


Blockchain for Web Developers

Yes, there might be a plethora of articles about blockchain and how web developers can use to build applications. And this might not be a much different article either. In this post, I describe the basics of blockchain and crypto technology.

Introduction

Blockchain has been the underlying technology for cryptocurrencies like bitcoin.

Firstly, this is a basic understanding of blockchain. We will cover the rest of the basics of blockchain soon. In most banking or financial systems, all bank accounts track through a ledger that keeps track of incomes and expenses.

Secondly, in current times, our centralized financial systems follow certain rules and regulations. A central authority defined these rules and that’s how trust was built. But blockchain is a decentralized system of the ledger where a peer-to-peer network is involved. Based on the peer-to-peer network, miners involved in the process, build trust in a decentralized form. All transactions are recorded on ledger and ledger is verified by nodes in the network. These nodes communicate with each other cryptographically for verification of transactions. When new transactions are added, there is a consensus formed in the network, this consensus is nothing but a block.

Proof-of-work

One reason why blockchain is popular is that it solves a double-spending problem that has been there for a long time in computer science. When it comes to a distributed system, there is no way to correctly verify the integrity of transactions. In relational database systems, we use referential integrity to verify integrity.

This is the foundational algorithm in the blockchain. In the mining process, miners compete with each other in the network to verify transactions and produce new blocks. For this work, miners get cryptocurrency.

In network, transactions happen all the time between users. A decentralized ledger will keep track of all these transactions. Miners will verify these transactions through proof of work algorithm.

Person A sends $10 to person B and not to person C. How do we verify that money went to Person B and not to Person C? This is a double-spending problem. Proof of work helps to solve this problem. There are other aspects to this algorithm like how to avoid any security threats, faster block generation(Power of network), storage capabilities. We will not be discussing those aspects here.

Drawbacks

There are few drawbacks to this algorithm and one of the major one is 51% attack. The idea of 51% is when a user or a group of users control the majority of mining power. If this happens, the group can monopolize generating new blocks and this will lose the advantage of the decentralization principal.

Blocks

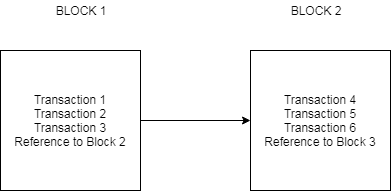
Blocks form the ledger which forms the basis of blockchain. Each block contains transaction information which we can call as a fact. A block is nothing but the arrangement of all these facts and each block will have a reference to the next block.

Blockchain for web developers

Before these facts get added to blocks, they are pending and as miners continue to work, they verify these facts to confirm.

Conclusion

In conclusion, I introduced blockchain with some basics of blockchain for the web developers. But this is just the tip of the iceberg, there is a lot to learn and bigger things to do in the cryptocurrency world. If you enjoyed this post, subscribe to my blog.

References

  1. Blockchain: A blueprint for the new economy by Melanie Swann – Blockchain
  2. Proof of work – Proof of work
  3. Ethereum for Web developers – Ethereum for web developers


Caching: How to use Redis Caching with Spring Boot

In this introductory post, we will show how to use Redis caching in a simple spring boot application. In subsequent posts, we will evaluate different factors of Redis caching. But for now, we will try to focus on the simple problem of providing caching to a rest service that provides companies-related data to the user interface. This data is in a database, but caching will help us improve the performance.


What you need

  • Java 8
  • MySQL Database
  • IntelliJ Editor
  • Gradle
  • Redis Server and Redis Desktop Manager

Spring Boot Based Rest Service

As part of this post, we will build a simple spring-boot based rest service. This rest service will provide data related to companies which will be stored in mysql database.

We will be using Gradle to build our dependencies in this project. Important dependencies for this project are spring-boot-starter, spring-boot-jpa and spring-boot-starter-data-redis With all the needed Gradle dependencies, our Gradle script will look like below:

buildscript {
  ext {
    springBootVersion = '1.5.10.RELEASE'
  }
  repositories {
    mavenCentral()
  }
  dependencies {
    classpath("org.springframework.boot:spring-boot-gradle-plugin:${springBootVersion}")
  }
}

apply plugin: 'java'
apply plugin: 'eclipse'
apply plugin: 'org.springframework.boot'

group = 'com.betterjavacode'
version = '0.0.1-SNAPSHOT'
sourceCompatibility = 1.8

repositories {
  mavenCentral()
}

jar {
    manifest {
        attributes 'Main-Class':'com.betterjavacode.SpringAppCache.SpringAppCacheApplication'
    }
    baseName= 'SpringAppCache'
    version='0.0.1-SNAPSHOT'
}

dependencies {
  compile('org.springframework.boot:spring-boot-starter')
  compile('org.springframework.data:spring-data-jpa')
  compile('org.springframework.boot:spring-boot-starter-data-redis')
  compile('org.springframework.boot:spring-boot-starter-web')
        compile('org.hibernate.javax.persistence:hibernate-jpa-2.1-api:1.0.0.Final')
        compile('mysql:mysql-connector-java:5.1.6')
        compile('org.hibernate:hibernate-core:5.2.13.Final')   
        compile('org.aspectj:aspectjweaver:1.8.13')
  testCompile('org.springframework.boot:spring-boot-starter-test')
}

Let’s build a model class for the object Company which will look like below:

package com.betterjavacode.models;

import javax.persistence.*;
import java.io.Serializable;

@Entity(name="Company")
@Table(name="company")
public class Company implements Serializable
{
    public Company()
    {

    }

    @Id
    @GeneratedValue(strategy = GenerationType.AUTO)
    private int id;
    @Column(nullable=false)
    private String name;
    @Column(nullable=false)
    private String type;

    public Company(int id, String name, String type)
    {
        this.id = id;
        this.type = type;
        this.name = name;
    }

    public int getId()
    {
        return id;
    }

    public void setId(int id)
    {
        this.id = id;
    }

    public String getName()
    {
        return name;
    }

    public void setName(String name)
    {
        this.name = name;
    }

    public String getType()
    {
        return type;
    }

    public void setType(String type)
    {
        this.type = type;
    }
}

We will not be showing any of the middle layer code which is mostly how the data is going to be built.

Our RestController will use an autowired CompanyManager to fetch company data from the database.

Before we build RestController, we will show the configuration that we have annotated in SpringAppCacheApplication main class.

package com.betterjavacode.SpringAppCache;

import org.springframework.boot.SpringApplication;
import org.springframework.boot.autoconfigure.EnableAutoConfiguration;
import org.springframework.boot.autoconfigure.SpringBootApplication;
import org.springframework.cache.annotation.EnableCaching;
import org.springframework.context.annotation.ComponentScan;
import org.springframework.data.jpa.repository.config.EnableJpaRepositories;

@SpringBootApplication
@EnableAutoConfiguration
@ComponentScan(basePackages = "com.betterjavacode")
@EnableJpaRepositories(basePackages = "com.betterjavacode.repositories")
@EnableCaching
public class SpringAppCacheApplication
{
  public static void main(String[] args) {
    SpringApplication.run(SpringAppCacheApplication.class, args);
  }
}

Here you can see, we have enabled caching with annotation @EnableCaching.

Now in our RestController class CompanyController , this will show annotation of @Cachable that helps decide when to cache data for the incoming request. This annotation caches data that has been fetched for the request based on configuration.

package com.betterjavacode.resources;

import java.util.List;

import com.betterjavacode.interfaces.CompanyManager;
import com.betterjavacode.models.Company;
import org.hibernate.annotations.Cache;
import org.springframework.beans.factory.annotation.Autowired;
import org.springframework.cache.annotation.Cacheable;
import org.springframework.http.HttpStatus;
import org.springframework.web.bind.annotation.*;


import javax.websocket.server.PathParam;

@RestController
@RequestMapping(value="/cachedemo/v1")
public class CompanyController
{


    @Autowired
    public CompanyManager companyManager;


    @RequestMapping(value = "/companies", method= RequestMethod.GET,
    produces = {"application/json"})
    @ResponseStatus(HttpStatus.OK)
    @ResponseBody
    @Cacheable("companies")
    public List<Company> getAllCompanies()
    {
        return companyManager.getAllCompanies();
    }


    @RequestMapping(value = "/companies/{id}/", method = RequestMethod.GET, produces = {"application/json"})
    @ResponseStatus(HttpStatus.OK)
    @ResponseBody
    @Cacheable(value = "company", key = "#id")
    public Company getCompany(@PathVariable("id") int id)
    {
        return companyManager.getCompany(id);
    }
}

Here is a controller, if you see we are caching the data coming from the database with annotation @Cacheable

To make sure data gets cached with Redis server, we will need certain properties where these annotations will help us to cache the data. The properties to configure Redis server are below:

#########################################################################################
## REDIS CACHE
#########################################################################################
spring.cache.type = redis
spring.redis.host = 127.0.0.1
spring.redis.port = 6379

Once you build the project and run it, we will be able to perform the REST requests to fetch data. If we perform the same requests multiple times, we will be able to see the data in redis.

Conclusion

In this post, we showed how to use redis-caching to cache the data for a spring boot based REST service. The code from this post is available to download github
 

One Tip to Avoid Bouncy Castle Error

java.lang.NoSuchMethodError: org.bouncycastle.math.ec.ECCurve$Fp – Issue

In this post, I will discuss one tip everyone can use to avoid bouncy castle error.

Problem

Recently I was working on building a SOAP webservice where we were using Apache CXF libraries along with Spring boot. We built the webservice, but when we were sending a SOAP request through the client, we kept getting following error:

Caused by: java.lang.NoSuchMethodError: org.bouncycastle.math.ec.ECCurve$Fp.<init>(Ljava/math/BigInteger;Ljava/math/BigInteger;Ljava/math/BigInteger;)V
  at org.bouncycastle.jcajce.provider.asymmetric.util.EC5Util.convertCurve(Unknown Source)
  at org.bouncycastle.jcajce.provider.asymmetric.util.EC5Util.convertPoint(Unknown Source)
  at org.bouncycastle.jcajce.provider.asymmetric.ec.BCECPublicKey.<init>(Unknown Source)
  at org.bouncycastle.jcajce.provider.asymmetric.ec.KeyFactorySpi.engineGeneratePublic(Unknown Source)
  at java.security.KeyFactory.generatePublic(KeyFactory.java:334)
  at sun.security.ssl.HandshakeMessage$ECDH_ServerKeyExchange.<init>(HandshakeMessage.java:1075)
  at sun.security.ssl.ClientHandshaker.processMessage(ClientHandshaker.java:284)
  at sun.security.ssl.Handshaker.processLoop(Handshaker.java:1026)
  at sun.security.ssl.Handshaker.process_record(Handshaker.java:961)
  at sun.security.ssl.SSLSocketImpl.readRecord(SSLSocketImpl.java:1062)
  at sun.security.ssl.SSLSocketImpl.performInitialHandshake(SSLSocketImpl.java:1375)
  at sun.security.ssl.SSLSocketImpl.startHandshake(SSLSocketImpl.java:1403)
  at sun.security.ssl.SSLSocketImpl.startHandshake(SSLSocketImpl.java:1387)
  at org.apache.http.conn.ssl.SSLSocketFactory.connectSocket(SSLSocketFactory.java:553)
  at org.apache.http.conn.ssl.SSLSocketFactory.connectSocket(SSLSocketFactory.java:412)
  at org.apache.http.impl.conn.DefaultClientConnectionOperator.openConnection(DefaultClientConnectionOperator.java:179)
  at org.apache.http.impl.conn.ManagedClientConnectionImpl.open(ManagedClientConnectionImpl.java:328)
  at org.apache.http.impl.client.DefaultRequestDirector.tryConnect(DefaultRequestDirector.java:612)
  at org.apache.http.impl.client.DefaultRequestDirector.execute(DefaultRequestDirector.java:447)
  at org.apache.http.impl.client.AbstractHttpClient.doExecute(AbstractHttpClient.java:884)
  at org.apache.http.impl.client.CloseableHttpClient.execute(CloseableHttpClient.java:82)
  at org.apache.http.impl.client.CloseableHttpClient.execute(CloseableHttpClient.java:107)
  at org.apache.http.impl.client.CloseableHttpClient.execute(CloseableHttpClient.java:55)
  at org.springframework.ws.transport.http.HttpComponentsConnection.onSendAfterWrite(HttpComponentsConnection.java:121)

A Simple tip to avoid this error

We tried different things to resolve this issue. We tried to exclude bouncycastle jars from cxf-rt-ws-security dependencies we were using as we were pulling them from other dependencies. But this error would still pop up intermittently. Eventually, I figured out the issue. We had to add this dependency of bouncycastle explicitly as below in our Gradle build file. That’s when the error went away.

compile (‘org.bouncycastle:bcprov-jdk15on:1.56’) 

Conclusion

In this post, I showed how to use this one tip to avoid the error caused by the bouncy castle. If you enjoyed this post, subscribe to my blog here.

Database design and discussion – Part II

In the previous post database design, we discussed what our database will look like. But that was just half of the database design discussion as we still have to cover the heart and soul of our SocialPie service. In this post, we will cover the other half and that is the APIs we will use from Twitter, Instagram, and Facebook.

Using Instagram APIs

So Instagram which is now part of Facebook offers a marketing API for businesses. You can find more detail on the Instagram API. This API is built on Facebook’s Graph API. An interesting thing to look at this API, we will find what kind of data we are actually looking to get and store in our database.

This API offers something called Insights API, it provides us the data for user metrics for business accounts and stories metrics. Considering Instagram API is linked with Facebook, we will be using the same API for Facebook data.

/media/insights/ –  This API gives us details about engagements, impressions, and reach about stories. A sample response looks like below:

{
  "data": [
    {
      "name": "impressions",
      "period": "lifetime",
      "values": [
        {
          "value": 264
        }
      ],
      "title": "Impressions",
      "description": "Total number of times the media object has been seen",
      "id": "17855590849148465/insights/impressions/lifetime"
    },
    {
      "name": "reach",
      "period": "lifetime",
      "values": [
        {
          "value": 103
        }
      ],
      "title": "Reach",
      "description": "Total number of unique accounts that have seen the media object",
      "id": "17855590849148465/insights/reach/lifetime"
    }
  ]
}

/user/insights/ – This API gives us different metrics data for business accounts. These metrics include impressions, follower counts, website clicks, text message clicks, profile views, online followers. A sample response looks like below:

{
  "data": [
    {
      "name": "impressions",
      "period": "day",
      "values": [
        {
          "value": 4,
          "end_time": "2017-05-04T07:00:00+0000"
        },
        {
          "value": 66,
          "end_time": "2017-05-05T07:00:00+0000"
        }
      ],
      "title": "Impressions",
      "description": "Total number of times this profile has been seen",
      "id": "17841400008460056/insights/impressions/day"
    },
    {
      "name": "reach",
      "period": "day",
      "values": [
        {
          "value": 3,
          "end_time": "2017-05-04T07:00:00+0000"
        },
        {
          "value": 36,
          "end_time": "2017-05-05T07:00:00+0000"
        }
      ],
      "title": "Reach",
      "description": "Total number of unique accounts that have seen this profile",
      "id": "17841400008460056/insights/reach/day"
    },
    {
      "name": "profile_views",
      "period": "day",
      "values": [
        {
          "value": 0,
          "end_time": "2017-05-04T07:00:00+0000"
        },
        {
          "value": 2,
          "end_time": "2017-05-05T07:00:00+0000"
        }
      ],
      "title": "Profile Views",
      "description": "Total number of unique accounts that have viewed this profile within the specified period",
      "id": "17841400008460056/insights/profile_views/day"
    }
  ]
}

What fields we will use and build our database?

So what data from this API we will be using to build our database. We will have a table called InstagramData This table will include the following fields

  • impressions
  • reach
  • profile_views
  • followers
  • audience_gender_age
  • email_contacts
  • video_views

Therefore, we showed how we will be using Facebook and Instagram APIs. In the next post, we will look into Twitter API. Currently, Twitter does offer an enterprise API at a premium price. But if there is no open-source API for developers, we will not be using it in this project.

References

  1. Instagram API documentation – Instagram API