Category Archives: Spring-boot

Spring Cloud Tutorial for Beginners

What is Spring Cloud? In this post, I will cover Spring Cloud Tutorial for beginners. If you are new to Spring Framework, I will suggest you start with Spring Boot and Microservices and Simplifying Spring Security.

As the official documentation on the Spring website says:

Spring Cloud provides tools for developers to quickly build common patterns in distributed systems – configuration management, service discovery,  circuit breakers, intelligent routing, microproxy, control bus, one-time tokens

Spring Cloud Tutorial - The Complete Guide

  • What is Spring Cloud?
  • Spring Cloud Features
  • Spring Cloud Example in action
  • Conclusion

What is Spring Cloud?

Spring Cloud provides readymade patterns to develop distributed system applications. Most of these patterns are common when building such applications.

One example is when there are multiple microservices and they interact with each other. You have to secure each service. Each service communicates with other services securely. Henceforth, how to secure these services? How do they communicate securely? And how do they get deployed seamlessly? What are the other automation tasks used for different requirements?

Using Spring Cloud, a developer can quickly build an application that implements these design patterns and deploy the application on cloud platforms( like Heroku or Cloud Foundry).

Spring Cloud Features

Spring framework is fundamental to building a Spring Cloud application. So what are the different features that Spring Cloud added?

Service Registration and Discovery

Spring Boot became popular with microservice architecture. When you have multiple services interacting with each other, you need a service to register each service, this is mostly Configuration Service. Then you need a discovery service to find other services.

Distributing Messaging

Basically, Spring cloud provides different tools to make our microservice-based architecture successful. Spring Boot helps rapid development of these applications. Spring Cloud assists in coordinating and deploying these applications. One such feature with Spring Cloud is distributed messaging.

Microservices communicate synchronously or asynchronously. Overall, Spring Cloud Bus offers a message broker that links nodes of a distributed system. Equally, Spring Cloud Stream offers a framework to build event-driven microservices. Nevertheless, this feature works well with messaging services like Kafka or ActiveMQ.

Service to Service Communication

Spring Cloud provides a feature for service-to-service communication. Usually, the flow goes like this

  • Register the service
  • Fetch the registry
  • Find the target downstream service
  • Call the REST endpoint of that service

Distributed Configuration

Particularly, the spring cloud config server allows externalized configuration on the client-side for the distributed systems.

Other than these features, Spring Cloud provides tools to build resilient and robust services. One such tool is circuit breakers.

As an illustration, we will create two microservices and one microservice will call another. We will use the feature of registry service (from Spring Cloud) to register these microservices.

Spring Cloud Example in Action

Build Eureka Server for Registry Service

First, we will create a service that will use the Eureka service and act as a registry service. As a result, add the following dependency in a new Spring Boot application:

plugins {
 id 'org.springframework.boot' version '2.5.5'
 id 'io.spring.dependency-management' version '1.0.11.RELEASE'
 id 'java'
}

group = 'com.betterjavacode'
version = '0.0.1-SNAPSHOT'
sourceCompatibility = '1.8'

repositories {
 mavenCentral()
}

ext {
 set('springCloudVersion', "2020.0.4")
}

dependencies {
 implementation 'org.springframework.cloud:spring-cloud-starter-netflix-eureka-server'
 testImplementation 'org.springframework.boot:spring-boot-starter-test'
}

dependencyManagement {
 imports {
  mavenBom "org.springframework.cloud:spring-cloud-dependencies:${springCloudVersion}"
 }
}

test {
 useJUnitPlatform()
}

Once we have that dependency, we can enable the eureka server in our main class.

package com.betterjavacode.eurekaserver;

import org.springframework.boot.SpringApplication;
import org.springframework.boot.autoconfigure.SpringBootApplication;
import org.springframework.cloud.netflix.eureka.server.EnableEurekaServer;

@SpringBootApplication
@EnableEurekaServer
public class EurekaserverApplication {

 public static void main(String[] args) {
  SpringApplication.run(EurekaserverApplication.class, args);
 }

}

Add the following properties to application.yml

server:
  port: 7000

# Discovery Server Access
eureka:
  instance:
    hostname: localhost
  client:
    registerWithEureka: false
    fetchRegistry: false
  serviceUrl:
    defaultZone: http://${eureka.instance.hostname}:${server.port}/eureka/

The properties eureka.instance.client.register-with-eureka=false and eureka.instance.client.fetch-registry=false indicates that this is a registry server and won’t use itself to register.

A microservice to return products

In order to show how we will use the registry service as part of the entire Spring Cloud integration, we will create a new microservice. This REST-based microservice will return a list of products.

plugins {
 id 'org.springframework.boot' version '2.5.5'
 id 'io.spring.dependency-management' version '1.0.11.RELEASE'
 id 'java'
}

group = 'com.betterjavacode'
version = '0.0.1-SNAPSHOT'
sourceCompatibility = '1.8'

repositories {
 mavenCentral()
}

ext {
 set('springCloudVersion', "2020.0.4")
}

dependencies {
 implementation 'org.springframework.boot:spring-boot-starter-web'
 implementation 'org.springframework.cloud:spring-cloud-starter-netflix-eureka-client'
 testImplementation 'org.springframework.boot:spring-boot-starter-test'
}

dependencyManagement {
 imports {
  mavenBom "org.springframework.cloud:spring-cloud-dependencies:${springCloudVersion}"
 }
}

test {
 useJUnitPlatform()
}

With this in mind, RESTController for this service will look like below:

package com.betterjavacode.productservice.controllers;

import org.springframework.web.bind.annotation.GetMapping;
import org.springframework.web.bind.annotation.RestController;

import java.util.ArrayList;
import java.util.List;

@RestController
public class ProductController
{
    @GetMapping("/products")
    public List getAllProducts ()
    {
        List products = new ArrayList<>();
        products.add("Shampoo");
        products.add("Soap");
        products.add("Cleaning Supplies");
        products.add("Dishes");

        return products;
    }
}

And the application.yml file for this application will be like this

spring:
  application:
    name: product-service

server:
  port: 8083

eureka:
  client:
    registerWithEureka: true
    fetchRegistry: true
    serviceUrl:
      defaultZone: http://localhost:7000/eureka/
  instance:
    hostname: localhost

Here we have eureka.client.registerWithEureka=true and eureka.client.fetchRegistry=true as we want our service to be registered with our Eureka server running registry service. Subsequently, our main class for this service will have an annotation @EnableDiscoveryClient that will allow this service to be discovered by Eureka Server.

Client Service to call Product Service

Now, let’s create another service which will be a client service to product service. It will be very similar to Product Service except it will be based on MVC, so we will use a thymeleaf template to call this service.

package com.betterjavacode.productserviceclient.controllers;

import org.springframework.beans.factory.annotation.Autowired;
import org.springframework.cloud.client.ServiceInstance;
import org.springframework.cloud.client.discovery.DiscoveryClient;
import org.springframework.stereotype.Controller;
import org.springframework.ui.Model;
import org.springframework.web.bind.annotation.GetMapping;
import org.springframework.web.client.RestTemplate;

import java.util.List;

@Controller
public class ProductController
{
    @Autowired
    private DiscoveryClient discoveryClient;

    @GetMapping("/")
    public String home(Model model)
    {
        List serviceInstances = discoveryClient.getInstances("product" +
                "-service");

        if(serviceInstances != null && !serviceInstances.isEmpty())
        {
            ServiceInstance serviceInstance = serviceInstances.get(0);
            String url = serviceInstance.getUri().toString();
            url = url + "/products";
            RestTemplate restTemplate = new RestTemplate();
            List products = restTemplate.getForObject(url, List.class);
            model.addAttribute("products", products);
        }

        return "home";
    }
}

application.yml for this service will look like below:


spring:
  application:
    name: product-service-client

server:
  port: 8084


eureka:
  client:
    registerWithEureka: true
    fetchRegistry: true
    serviceUrl:
      defaultZone: http://localhost:7000/eureka/
  instance:
    hostname: localhost

Thymeleaf template for home will basically list the products in a table form.

Run the services

Shortly, run all the services – starting with Eureka server, product service and product-service-client. Now if we access eureka server, we will see the list of services registered with it as below:
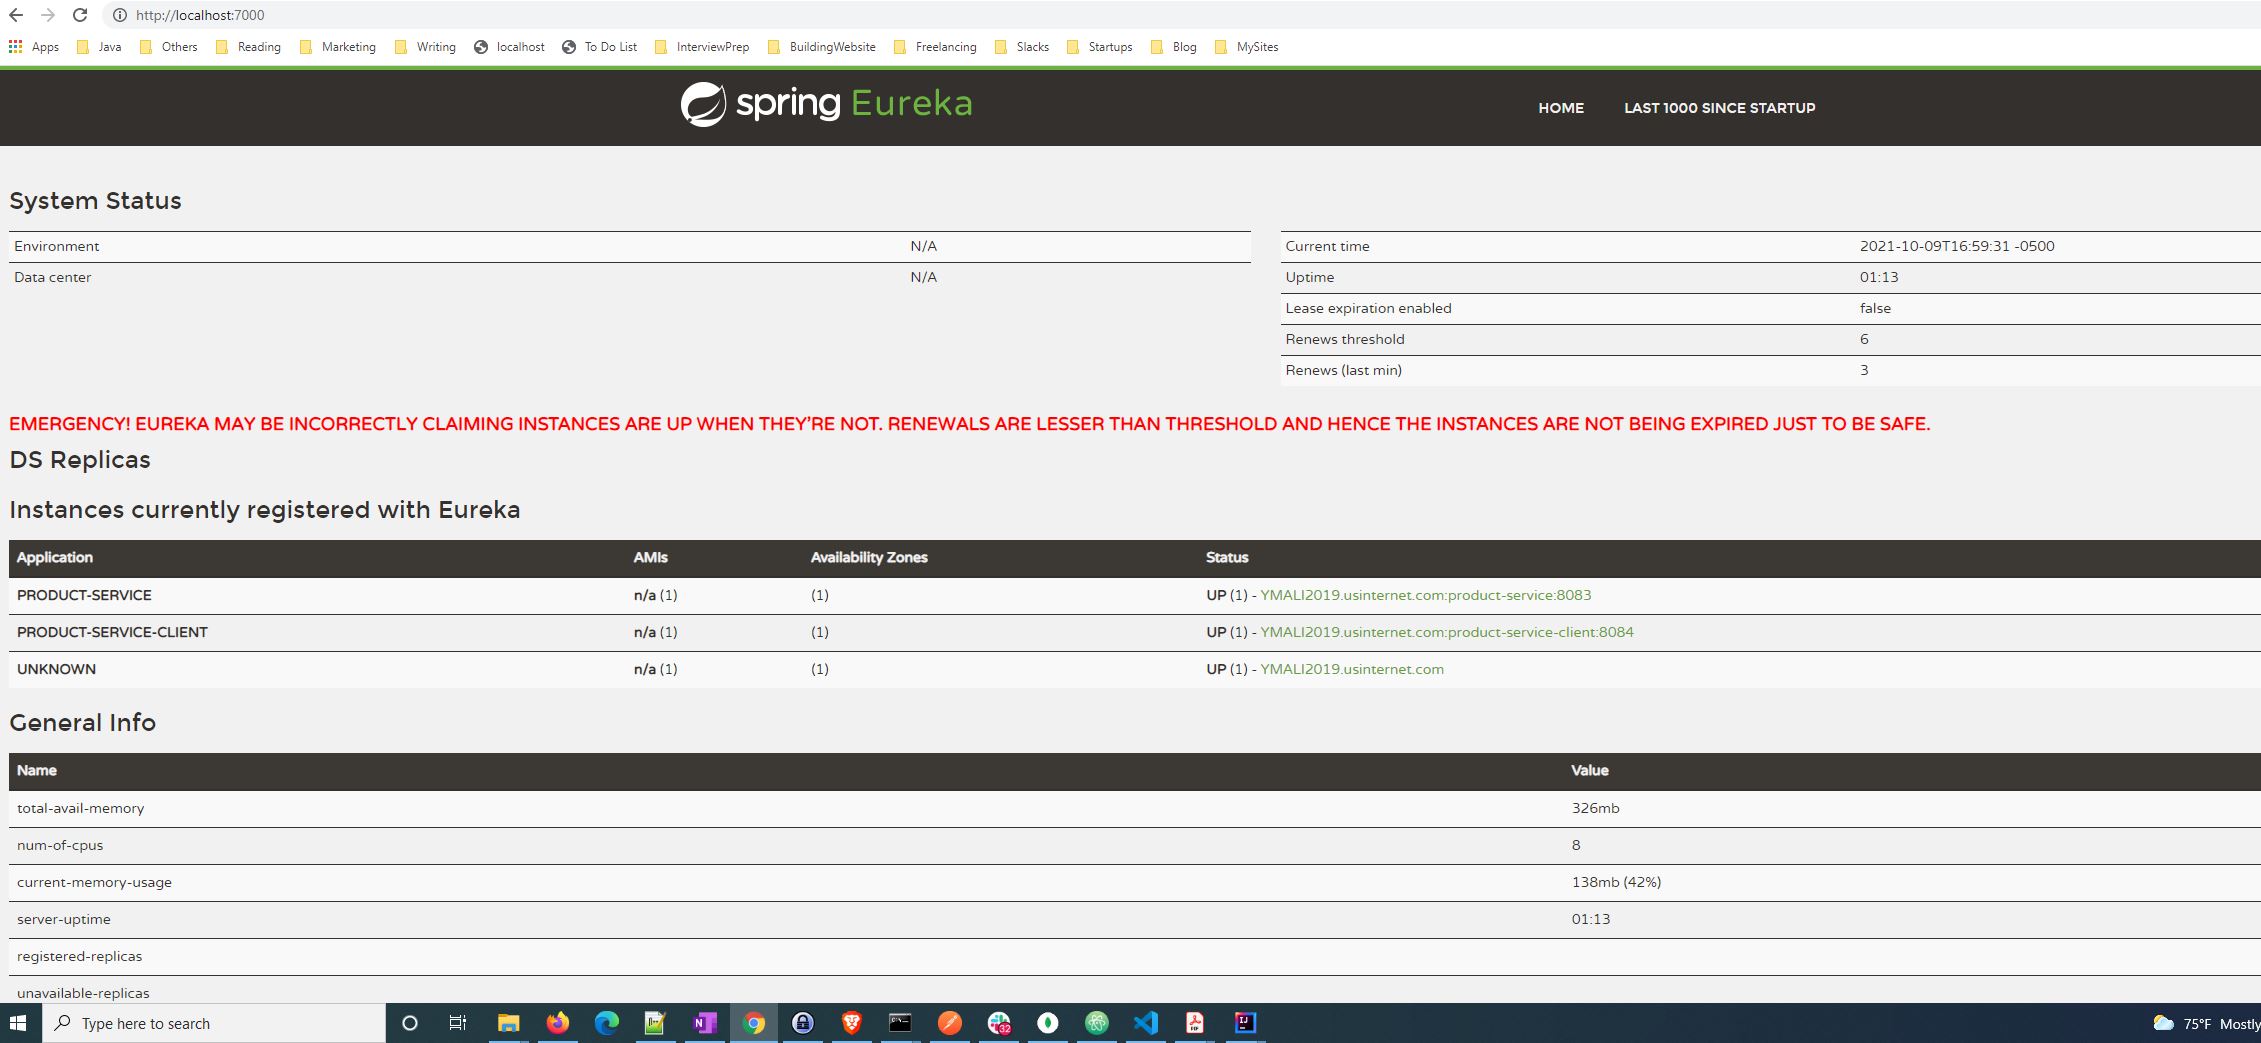
Spring Cloud Tutorial for Beginners

You can see both services registered. And if we access our product-service-client application at http://localhost:8084/, we will see the list of products
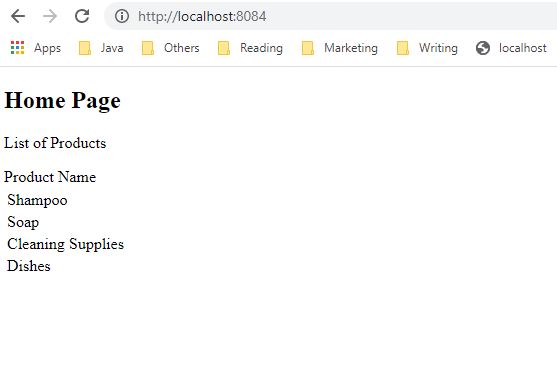
Spring Cloud Tutorial for Beginners - ProductServiceClient

At last, we saw a simple demo of using Eureka server as a registry service with Spring Cloud. If you want to learn more about Spring Cloud Config, I definitely recommend this course Distributed configuration with Spring Cloud Config from udemy.

Conclusion

In this post, we learned about Spring Cloud. There are a number of features to evaluate in Spring Cloud. I have covered only a feature that most developers have to use while using Spring Cloud. A developer can also combine Spring Cloud Function with AWS Lambda to learn more about Spring Cloud.

If you are still looking to learn about Spring Security, you can my book here.

Note – Links for Udemy or Educative courses are affiliate links. If you end up buying those courses, I get a percentage of the total price. I also recommend only those courses that I have taken or have learned about that topic myself.
Everything you need to know about Spring Data JPA

In this post, I cover everything you need to know about Spring Data JPA so you can use this library more confidently in your Spring Boot application. I have seen there are a lot of confusion about when to use CrudRepository or JpaRepository, so I will cover that as well.

What is Spring Data JPA?

As the official documentation from Spring says “Spring Data JPA makes it easy to implement JPA based repositories. It improves and eases the implementation of the JPA-based data access layer. Overall, data access applications are easier to implement.”

With Spring Data JPA, one can avoid a lot of boilerplate code for Java Persistent API (JPA) in the application.  The library also makes it easy to query the data from the database taking away a lot of implementation for SQL queries from a developer.

As a developer, you only write repository interfaces including any custom methods and Spring Data JPA will provide the most implementation automatically.

When to use Spring Data JPA?

When to use Spring Data JPA actually depends on your use case. But most Spring applications will need data objects. And if you have data objects, you will need a way to access them, and use them for transactions.

If you are building a database-based web application, then you will end up creating objects that represent your database entities. When one layer accesses these objects or creates the data to store in the database, you will need access APIs. You can implement repository interfaces and it will provide the basic CRUD operations. A programmer doesn’t even have to implement any of these interface methods.

You can also add a custom method in these repository interfaces.

  1. Create a new method in the interface
  2. Write the JPQL query with an annotation @Query at the beginning of the query.
  3. One can also write JPA Named queries

Some other major features of Spring Data JPA are:

  1. Auditing of domain classes
  2. Useful in batch loading, dynamical queries
  3. Support for XML Mapping of entities

Details of the Spring Data JPA library

In your application, you can include the dependency easily as follows:

implementation 'org.springframework.boot:spring-boot-starter-data-jpa'

Now to enable your JPA repositories, add the following annotation to your main application class:

@EnableJpaRepositories(basePackages = "com.betterjavacode.modelmapperdemo")

Now to add a repository for any of your domain objects, you can create an interface extending JpaRepository or CrudRepository.

This will look like below:


@Repository
public interface OrderRepository extends JpaRepository<Order, Long>
{
    List findAllByCustomer (Customer customer);
}

As you can see above, we have added a new interface that represents a domain object of Order. I have also added a custom method findAllByCustomer. JPA Named Queries will take care of the implementation of this method to fetch all the orders by a customer.

Configuration

Spring Boot configures Hibernate as the default JPA provider. If you want to customize this configuration or change the default JPA provider, you will have to create a entityManagerFactory bean in your Spring Configuration.


@Configuration
@EnableTransactionManagement
@EnableJpaRepositories("com.betterjavacode.modelmapperdemo")
@PropertySource("classpath:application.properties")
public class DataConfig {

 private final String PROPERTY_DRIVER = "driver";
 private final String PROPERTY_URL = "url";
 private final String PROPERTY_USERNAME = "user";
 private final String PROPERTY_PASSWORD = "password";
 private final String PROPERTY_SHOW_SQL = "hibernate.show_sql";
 private final String PROPERTY_DIALECT = "hibernate.dialect";

 @Autowired
 Environment environment;

 @Bean
 LocalContainerEntityManagerFactoryBean entityManagerFactory() {
  LocalContainerEntityManagerFactoryBean lfb = new LocalContainerEntityManagerFactoryBean();
  lfb.setDataSource(dataSource());
  lfb.setPersistenceProviderClass(HibernatePersistence.class);
  lfb.setPackagesToScan("com.betterjavacode.modelmapperdemo");
  lfb.setJpaProperties(hibernateProps());
  return lfb;
 }

 @Bean
 DataSource dataSource() {
  DriverManagerDataSource ds = new DriverManagerDataSource();
  ds.setUrl(environment.getProperty(PROPERTY_URL));
  ds.setUsername(environment.getProperty(PROPERTY_USERNAME));
  ds.setPassword(environment.getProperty(PROPERTY_PASSWORD));
  ds.setDriverClassName(environment.getProperty(PROPERTY_DRIVER));
  return ds;
 }

 Properties hibernateProps() {
  Properties properties = new Properties();
  properties.setProperty(PROPERTY_DIALECT, environment.getProperty(PROPERTY_DIALECT));
  properties.setProperty(PROPERTY_SHOW_SQL, environment.getProperty(PROPERTY_SHOW_SQL));
  return properties;
 }

 @Bean
 JpaTransactionManager transactionManager() {
  JpaTransactionManager transactionManager = new JpaTransactionManager();
  transactionManager.setEntityManagerFactory(entityManagerFactory().getObject());
  return transactionManager;
 }
}

The above code shows how to add configuration if you plan to customize the default hibernation configuration.

  • @EnableTransactionManagement – enables the transactions in the application, especially when creating or updating the data.
  • @PropertySource – reads the application properties that will be used in Datasource bean.

As mentioned previously, Spring Boot uses Hibernate as the default persistence provider. But there are few other persistence providers available like OpenJPA or EclipseLink.

Difference between CrudRepository and JpaRepository

We previously discussed about creating repository interfaces that extend JpaRepository or CrudRepository. But when do you use which one? In this section, I clarify more details about these repository interfaces.

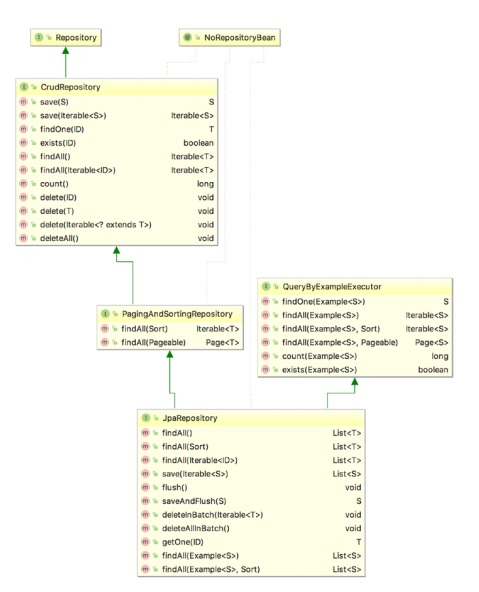
CrudRepository is the base interface. JpaRepository extends PagingAndSortingRepository which in turn extends CrudRepository.

Repositories in Spring Data JPA

  • CrudRepository – This provides CRUD functions.
  • PagingAndSortingRepository – This provides functions for sortable and pageable data.
  • JpaRepository – JpaRepository provides JPA-related functions to flush the persistence context as well as delete data in a batch.

In short, one can use JpaRepository as it will include all the other methods from CrudRepository and PagingAndSortingRepository.

Conclusion

In this post, I showed the details of Spring Data JPA library and how to use it. I also showed configuration details and what repository interface to use.


Conversion of Entity to DTO Using ModelMapper

In this post, I will show how we can achieve the conversion of entity to DTO using the ModelMapper library.  We will basically create a simple REST API for orders while showing the transformation of Entity to DTO and vice versa.

Understanding Enterprise Architecture

In most enterprise architecture, you will have REST APIs. A consumer of these APIs sends a request and the server responds with a response. The transformation of request to response happens behind the API. You perform business logic and modify these objects.

Traditionally, there are three layers in the architecture. Web layer, business layer, and database layer.

So, your object in the database layer will be completely different from the same object in the web layer. Database entities from the database layer contain certain fields that you don’t need in the web layer. More so, any object from the web layer should be user-friendly. Users don’t have to guess what they are dealing with. It should be self-explanatory. This will be more clear when I show the implementation of this.


Separation of Layers between Entity and DTO

Data Transfer Objects (DTO) are the objects that move from one layer to another. These objects are more user-friendly and contain only the most required fields.

On the other hand, database entities represent database tables. A lot of auto-generated fields can be unnecessary for users to know about. Nevertheless, they are part of database entities. In DTO, we ignore these fields. Since these fields are auto-generated, our database layer code can handle that.

But when the object travels from the web layer to the database layer, it needs to be transformed for that layer to use. In the next section, I will show how we can achieve this conversion from entity to DTO using the ModelMapper library.

The Entity to DTO Using ModelMapper

ModelMapper library provides an easier way to convert an entity object to DTO and vice versa.

In this demo, I have a scenario where a customer orders an item. An order for the item gets created. We save order details, customer details, and the address of the customer.

To able to use this library in our application, add the dependency as follows:

implementation 'org.modelmapper:modelmapper:2.3.0'

Also if we want to use ModelMapper library functions, we will add a bean for the same as follows:

        @Bean
 public ModelMapper modelMapper()
 {
  return new ModelMapper();
 }

Previously, I stated that a customer will be able to order. So, we will implement this by having a REST API that will create Order details, Customer details.

Domain Layer

In this architecture, we have orders that customers order at certain addresses.

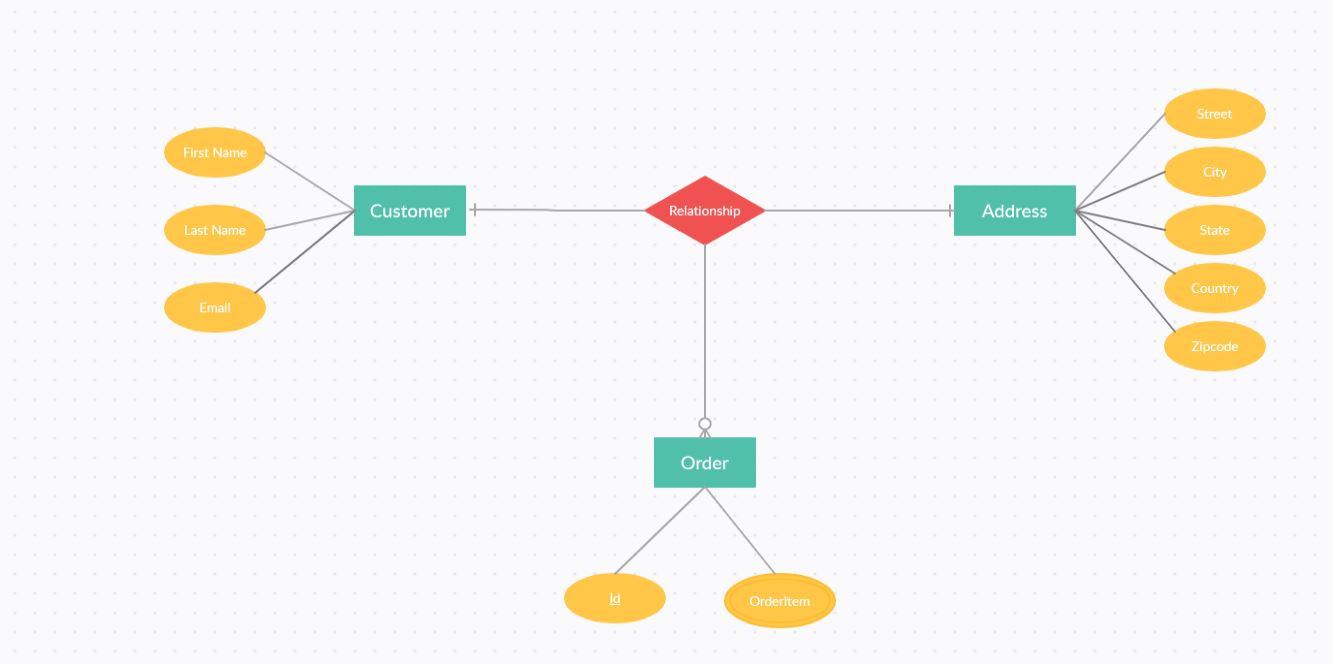
In a database entity diagram, it will look like below:

Entity to DTO using ModelMapper

A customer can order multiple items, so multiple orders. Multiple orders can go to a single address.

Our domain objects will look like below, starting with Order:


package com.betterjavacode.modelmapperdemo.models;

import javax.persistence.*;
import java.io.Serializable;

@Entity(name = "Order")
@Table(name = "orders")
public class Order implements Serializable
{
    private static final long serialVersionUID = 7385741327704693623L;

    public Order()
    {

    }

    @Id
    @GeneratedValue(strategy = GenerationType.IDENTITY)
    @Column(name = "id", nullable = false)
    private long id;

    @Column(name ="order_item")
    private String orderItem;

    @Column(name = "description")
    private String description;


    @ManyToOne
    @JoinColumn(name = "customer_id")
    private Customer customer;


    @ManyToOne
    @JoinColumn(name = "address_id")
    private Address address;
    
    // Getters and setters omitted for demo purposes


}

The address will be:


package com.betterjavacode.modelmapperdemo.models;

import javax.persistence.*;
import java.io.Serializable;
import java.util.ArrayList;
import java.util.List;

@Entity(name = "Address")
@Table(name = "address")
public class Address implements Serializable
{
    private static final long serialVersionUID = -439961851267007148L;

    public Address()
    {

    }

    @Id
    @GeneratedValue(strategy = GenerationType.IDENTITY)
    @Column(name = "id", nullable = false)
    private long id;

    @Column
    private String street;

    @Column
    private String city;

    @Column
    private String state;

    @Column
    private String country;

    @Column
    private int zipcode;

    @OneToMany(cascade = CascadeType.ALL, orphanRemoval = true)
    private List orderList = new ArrayList<>();


}

And Customer will be:


package com.betterjavacode.modelmapperdemo.models;

import javax.persistence.*;
import java.io.Serializable;
import java.util.ArrayList;
import java.util.List;

@Entity(name = "Customer")
@Table(name = "customer")
public class Customer implements Serializable
{
    private static final long serialVersionUID = -2205735699915701334L;

    public Customer()
    {

    }

    @Id
    @GeneratedValue(strategy = GenerationType.IDENTITY)
    @Column(name = "id", nullable = false)
    private long id;

    @Column(name = "first_name")
    private String firstName;

    @Column(name = "last_name")
    private String lastName;

    @Column
    private String email;

    @OneToMany(cascade = CascadeType.ALL, orphanRemoval = true)
    private List orderList = new ArrayList<>();


}

These three objects order, customer, and address represent our database entities and part of the database layer. The rest of the persistence is straightforward with repositories.

Web Layer

Web layer mostly focuses on the controllers that we create for our APIs. These controllers are responsible for receiving the request from the client. Also, the objects that we will expose through APIs will be DTO object. This DTO Object for Order will look like below:


package com.betterjavacode.modelmapperdemo.dtos;

public class OrderDTO
{
    String orderItem;
    String orderDescription;
    String customerFirstName;
    String customerLastName;
    String customerEmail;
    String streetAddress;
    String cityAddress;
    String stateAddress;
    String countryAddress;
    int zipcodeAddress;

   // Getters and Setters omitted for demo

}

This DTO object includes fields from Order, Customer, and Address. Our API will receive this object in POST request, we will transform that DTO object to an entity object using ModelMapper library and then pass that entity object to our Service class to process further.

OrderController will be as follows:


package com.betterjavacode.modelmapperdemo.controllers;

import com.betterjavacode.modelmapperdemo.dtos.OrderDTO;
import com.betterjavacode.modelmapperdemo.models.Order;
import com.betterjavacode.modelmapperdemo.service.IOrderService;
import org.modelmapper.ModelMapper;
import org.slf4j.Logger;
import org.slf4j.LoggerFactory;
import org.springframework.beans.factory.annotation.Autowired;
import org.springframework.web.bind.annotation.*;

import java.util.ArrayList;
import java.util.List;

@RestController
@RequestMapping("/v1/betterjavacode/orders")
public class OrderController
{
    private static final Logger LOGGER = LoggerFactory.getLogger(OrderController.class);

    @Autowired
    private IOrderService orderService;

    @Autowired
    private ModelMapper modelMapper;

    @PostMapping
    public OrderDTO createOrder(@RequestBody OrderDTO orderDTO)
    {
        Order order = convertToEntity(orderDTO);
        Order orderCreated = orderService.createOrder(order);

        return convertToDTO(orderCreated);
    }

    @GetMapping("/{customerId}")
    public List getAllOrders(@PathVariable("customerId") long customerId)
    {
        List orderList = orderService.getAllOrdersForCustomer(customerId);
        List orderDTOs = new ArrayList<>();
        for(Order order : orderList)
        {
            orderDTOs.add(convertToDTO(order));
        }
        return orderDTOs;
    }


    private Order convertToEntity (OrderDTO orderDTO)
    {
        LOGGER.info("DTO Object = {} ", orderDTO);

        Order order = modelMapper.map(orderDTO, Order.class);

        return order;
    }

    private OrderDTO convertToDTO (Order order)
    {
        OrderDTO orderDTO = modelMapper.map(order, OrderDTO.class);
        return orderDTO;
    }
}

We have a POST API to create orders and a GET API to retrieve orders for a customer.

ModelMapper Library

In our controller, we are using ModelMapper bean to convert DTO object to entity and entity object to DTO.

How does the ModelMapper library actually achieve this?

When a mapper calls the map method, it analyzes the source and destination types to determine which properties to match. It uses a matching strategy and configuration to map these properties. Once, the properties are mapped, it will map the data.

So if we look at our DTO class, we have properties like customerFirstName, customerLastName that match to Customer Entity object, while properties like streetAddress, cityAddress will match to properties from Address object.

ModelMapper also offers a way to explicitly map the properties if you choose to do that.


modelMapper.typeMap(Order.class, OrderDTO.class).addMappings(mapper -> {
  mapper.map(src -> src.getBillingAddress().getStreet(),
      Destination::setBillingStreet);
  mapper.map(src -> src.getBillingAddress().getCity(),
      Destination::setBillingCity);
});

The library offers three types of matching strategies:

  1. Standard – In this strategy, the library matches the source properties to destination properties intelligently. This strategy is configured by default. All destination property name tokens must match.
  2. Loose – Properties of source and destination are matched loosely. If the property hierarchies of source and destination objects are dissimilar, then the loose strategy can work. The last destination property name must have all tokens matched.
  3. Strict – Source properties should strictly match destination properties. Tokens match in a strict order. This strategy allows no ambiguity.

A Complete Demo of Entity to DTO using ModelMapper

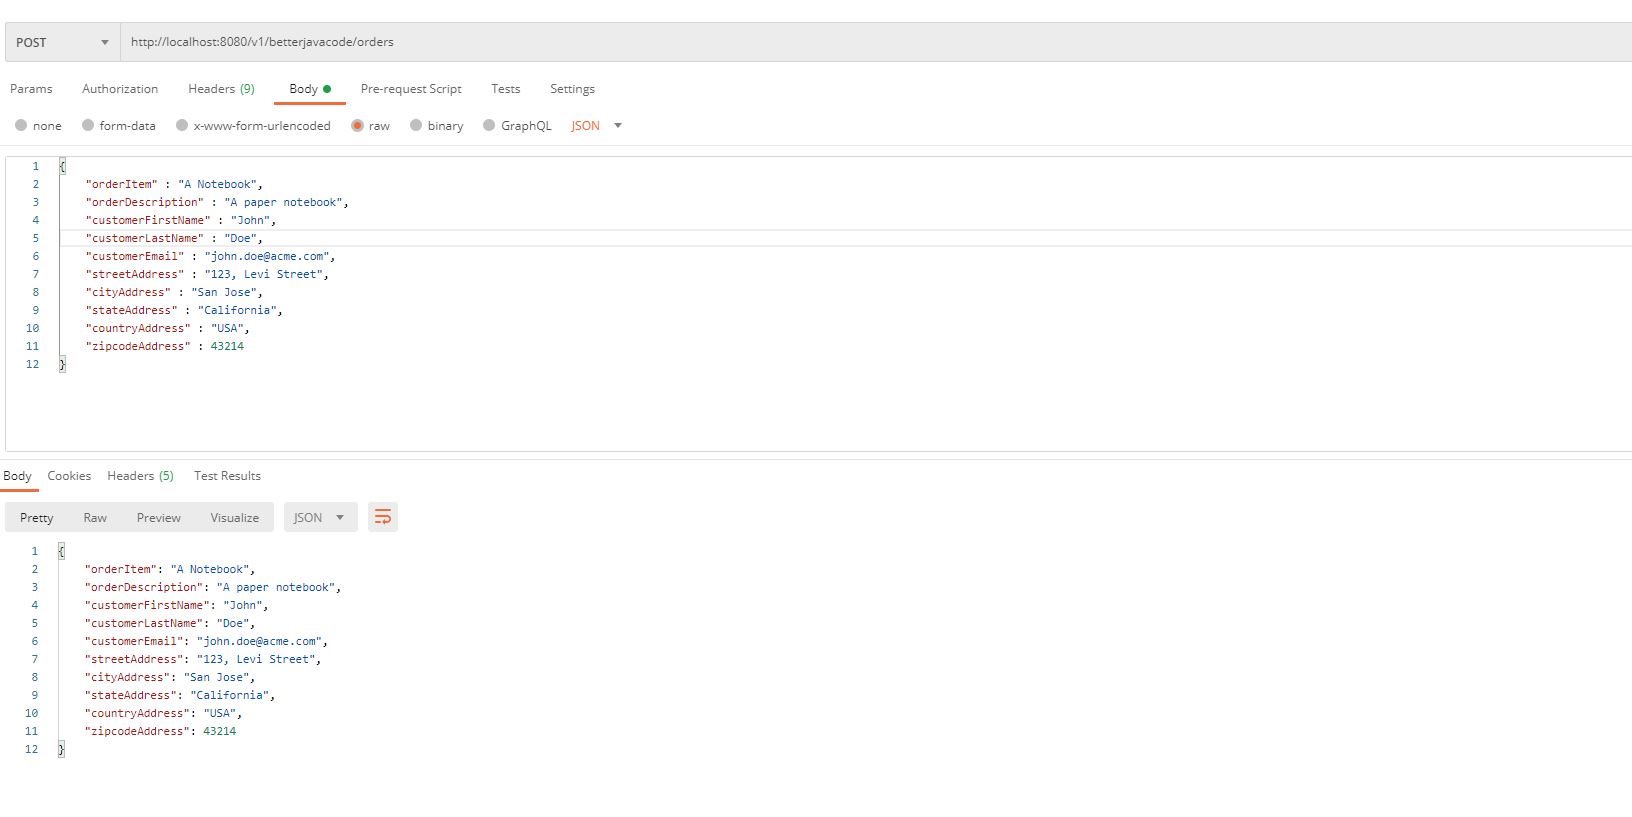
We have shown our REST Controller and Domain objects. Now, I will show how we can using postman to call this REST API by passing a DTO object to POST API.

We will create an order of an item that a customer orders.

Entity to DTO using ModelMapper

In the request, I passed a DTO object that contains information for order, customer, and address.

In our service layer, we process converted entity objects, validate business rules and save this information to create the order.

Avoiding Technical Debt

Understanding the concept of DTO and Entity objects is important. When to use what kind of object can help you avoid technical debt. From personal experience, I have seen a lot of junior developers make the mistake of using entity objects in a web layer. Depending on your application, this can increase the complexity of the system.

Conclusion

In this post, I showed how we can convert entity to DTO using modelmapper library.  You can download the modelmapper library here. The code for this demo is available in my GitLab repository. If you enjoyed this post, consider subscribing to my blog here.

References

  1. Model Mapper Library – ModelMapper

User Management with Okta SDK and Spring Boot

In this post, I will show how we can build user management and authentication with Okta SDK and Spring Boot.

Introduction

As part of any application, developers have to be careful how they build authentication. Despite we are using Form-Based authentication for a long time, it is not the most secure one. In this post, I plan to show Form-Based authentication where users are not necessarily authenticated by validating their encrypted password against the password stored in a database. If you want to learn more about Spring Security with different authentication flows, I recently released a book Simplifying Spring Security. You can buy the book here.

Okta is an identity provider. It’s an application that provides user management and authentication with different protocols.

Okta SDK APIs

Okta offers two libraries okta-sdk-java and okta-auth-java for user management APIs and authentication.

Are these libraries right for you? This depends on your use case. Okta also offers okta-spring-boot-starter library to use okta for different OAuth flows in your Spring Boot Application. We will not be using this library in this demo.

You can find more details about these libraries here and here.

Include these libraries in your project as follows:


 implementation 'com.okta.authn.sdk:okta-authn-sdk-api:2.0.1'
 runtimeOnly 'com.okta.authn.sdk:okta-authn-sdk-impl:2.0.1'
 runtimeOnly 'com.okta.sdk:okta-sdk-httpclient:3.0.1'

User Management with Okta SDK in Spring Boot Application

In this demo, I have a sample application of To-Do List. When a user launches the application, user will see a login screen. It has Sign up option. If the user doesn’t exist in the application, the user will have to create an account.

On Sign-up page, when a user enters the “Submit” button, we will save the user in our database and then call Okta SDK API to create the user on Okta side.

To achieve this, we need Okta Client.


    @Bean
    public Client client()
    {

        Client clientConfig =
                Clients.builder().setOrgUrl("https://oktadomainurl").setClientCredentials(new TokenClientCredentials(secret))
                        .build();


        return clientConfig;

    }

As you see above, we are creating a client that we will use to call Okta API. The `secret` is the API token you will be able to find in Okta admin UI. If you don’t find it, either you don’t have admin privileges or you have not created the token yet. There is another way to create this client with an access token.


    @Bean
    public Client client()
    {

        Client clientConfig =
                Clients.builder().setOrgUrl("https://oktadomainurl")
                      .setAuthorizationMode(AuthorizationMode.PRIVATE_KEY).setClientId("{clientId}")
                      .setScopes(new HashSet<>(Arrays.asList("okta.users.read", "okta.apps.read")))
                      .setPrivateKey("/path/to/yourPrivateKey.pem")


        return clientConfig;

    }

The advantage of this Client configuration is that you don’t need to know API access token created based on admin privileges.

Now on my Controller side, I will use this client to create user in Okta as below:


        UserDto userDto = new UserDto();
        userDto.setEmail(email);
        userDto.setFirstName(firstname);
        userDto.setLastName(lastname);
        userDto.setPassword(encodedPassword);
        userDto.setRole("ADMIN");
        userDto.setEnabled(true);

        UserDto returnedUser = usersManager.createUser(userDto);

        LOGGER.info("Create the user in Okta");

        User oktaUser = UserBuilder.instance().setEmail(returnedUser.getEmail())
                .setFirstName(returnedUser.getFirstName())
                .setLastName(returnedUser.getLastName())
                .buildAndCreate(client);

That covers the user management part. You can similarly call GET or DELETE API to manage users.

User Authentication

Now comes the critical part of authentication. In many enterprise applications, when using third-party identity provides, the trouble always comes with user data synchronization. Both applications need to store user data.

For authentication, we will need authenticationClient bean. This client will allow us to call Okta API for authentication.


    @Bean
    public AuthenticationClient authenticationClient()
    {
        AuthenticationClient authenticationClient =
                AuthenticationClients.builder()
                        .setOrgUrl("https://oktadomainurl")
                        .build();

        return authenticationClient;
    }

In our security config, I will override the form-based login with a custom login page.


    @Autowired
    private CustomAuthenticationProvider customAuthenticationProvider;

    @Bean(BeanIds.AUTHENTICATION_MANAGER)
    @Override
    public AuthenticationManager authenticationManagerBean() throws Exception
    {
        return super.authenticationManagerBean();
    }


    @Override
    protected void configure(HttpSecurity httpSecurity) throws Exception
    {

        httpSecurity.authorizeRequests()
                .antMatchers("/js/**","/css/**","/img/**").permitAll()
                .antMatchers("/signup","/forgotpassword").permitAll()
                .anyRequest().authenticated()
                .and()
                .formLogin()
                .loginPage("/login")
                .permitAll();

    }

As you see in above code, I am using customAuthenticationProvider, this provider will use authenticationClient to authentcate with Okta. This AuthenticationProvider will look like below:


package com.betterjavacode.sss.todolist.clients;

import com.betterjavacode.sss.todolist.security.AuthenticationStateHandler;
import com.okta.authn.sdk.client.AuthenticationClient;
import com.okta.authn.sdk.resource.AuthenticationResponse;
import org.slf4j.Logger;
import org.slf4j.LoggerFactory;
import org.springframework.beans.factory.annotation.Autowired;
import org.springframework.security.authentication.AuthenticationProvider;
import org.springframework.security.authentication.UsernamePasswordAuthenticationToken;
import org.springframework.security.core.Authentication;
import org.springframework.security.core.AuthenticationException;
import org.springframework.security.core.GrantedAuthority;
import org.springframework.security.core.authority.SimpleGrantedAuthority;
import org.springframework.security.core.userdetails.User;
import org.springframework.security.core.userdetails.UserDetails;
import org.springframework.stereotype.Component;

import java.util.ArrayList;
import java.util.List;

@Component
public class CustomAuthenticationProvider implements AuthenticationProvider
{

    private static final Logger LOGGER = LoggerFactory.getLogger(CustomAuthenticationProvider.class);

    @Autowired
    private AuthenticationClient authenticationClient;

    @Autowired
    private AuthenticationStateHandler authenticationStateHandler;

    @Override
    public Authentication authenticate (Authentication authentication) throws AuthenticationException
    {
        String username = authentication.getName();
        String password = authentication.getCredentials().toString();
        String relayState = "/index";
        AuthenticationResponse authnResponse = null;
        try
        {
            LOGGER.info("Going to connect to Okta");
            authnResponse = authenticationClient.authenticate(username, password.toCharArray(),
                    relayState,
                    authenticationStateHandler);
        }
        catch(com.okta.authn.sdk.AuthenticationException e)
        {
            LOGGER.error("Unable to authentcate the user", e);
        }

        if(authnResponse != null)
        {
            final List grantedAuths = new ArrayList<>();
            grantedAuths.add(new SimpleGrantedAuthority("ROLE_ADMIN"));
            final UserDetails principal = new User(username, password, grantedAuths);
            final Authentication authen = new UsernamePasswordAuthenticationToken(principal,
                    password, grantedAuths);
            return authen;
        }
        else
        {
            LOGGER.info("Unable to authenticate");
            return null;
        }

    }

    @Override
    public boolean supports (Class<?> authentication)
    {
        return true;
    }
}

We use authenticationClient to call authenticate method. AuthenticationStateHandler basically handles the status authentication. The implementation of this handle is as below:


package com.betterjavacode.sss.todolist.security;

import com.okta.authn.sdk.AuthenticationStateHandlerAdapter;
import com.okta.authn.sdk.resource.AuthenticationResponse;
import com.okta.commons.lang.Strings;
import org.slf4j.Logger;
import org.slf4j.LoggerFactory;
import org.springframework.stereotype.Component;

@Component
public class AuthenticationStateHandler extends AuthenticationStateHandlerAdapter
{
    private static final Logger LOGGER = LoggerFactory.getLogger(AuthenticationStateHandler.class);

    @Override
    public void handleUnknown (AuthenticationResponse unknownResponse)
    {
        // TO DO
    }

    @Override
    public void handleSuccess (AuthenticationResponse successResponse)
    {
        if (Strings.hasLength(successResponse.getSessionToken()))
        {
            LOGGER.info("Login successful");
            String relayState = successResponse.getRelayState();
            String dest = relayState != null ? relayState : "/";

        }
    }
}

That’s all. This covers user authentication. Remember this is still form based authentication where you are entering user credentials on your custom login page and behind the screen calling Okta API to authenticate.

In my book, Simplifying Spring Security, I have also added the demo for login with Okta OAuth.

Conclusion

In this post, I showed how to use Okta SDK for user management and authentication with the Spring Boot application. If you have any questions, feel free to send me an email by subscribing to my blog here.


How to Use Circuit Breaker in Spring Boot Application

In this post, I will show how we can use the Circuit Breaker pattern in a Spring Boot Application. When I say Circuit Breaker pattern, it is an architectural pattern. Netflix had published a library Hysterix for handling circuit breakers.  As part of this post, I will show how we can use a circuit breaker pattern using the resilence4j  library in a Spring Boot Application.

In other news, I recently released my book Simplifying Spring Security. If you are interested to learn about Spring Security, you can buy it here.

Circuit Breaker in Spring Boot - Pattern

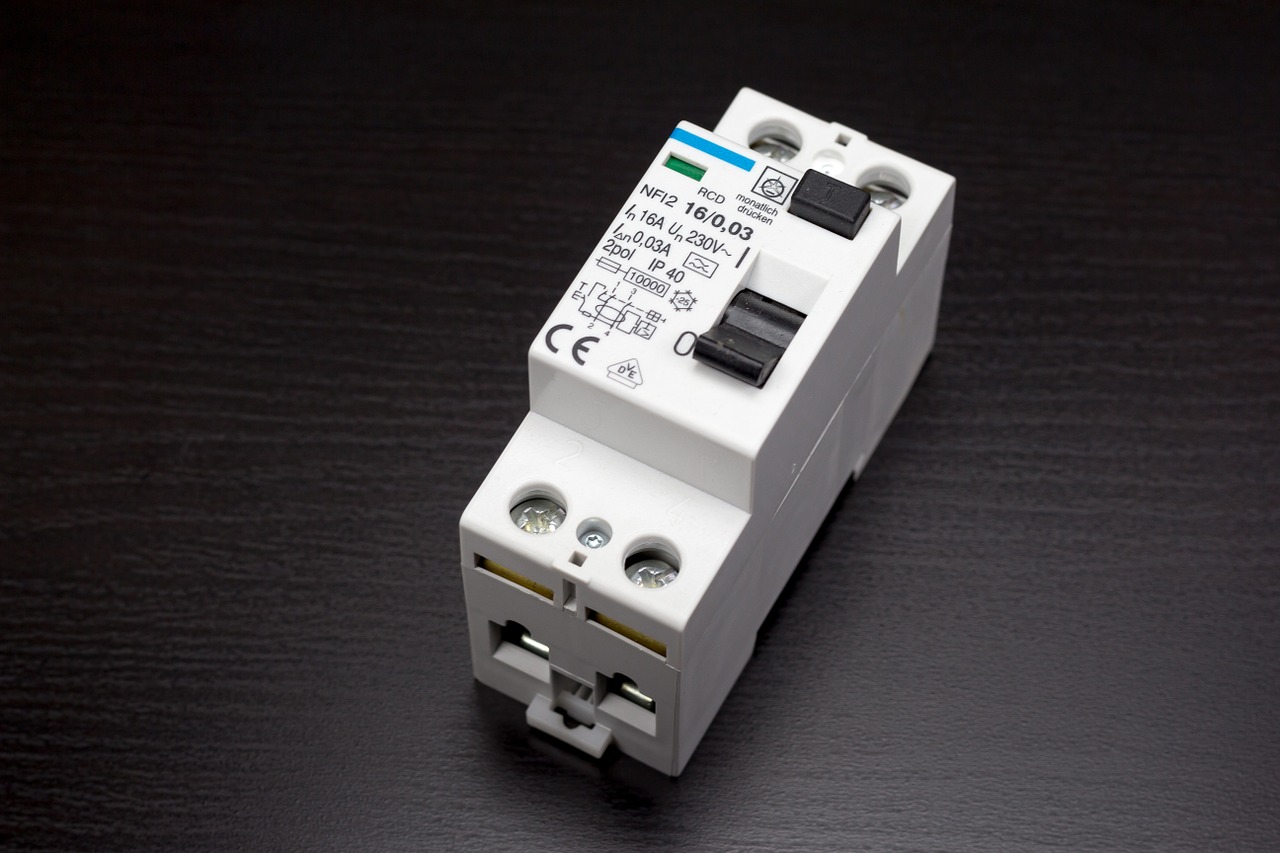
Image from Pixabay – By Jürgen Diermaier

What is Circuit Breaker?

The concept of Circuit Breaker comes from Electrical Engineering. In most electricity networks, circuit breakers are switches that protect the network from damage caused by an overload of current or short circuits.

Similarly, in software, a circuit breaker stops the call to a remote service if we know the call to that remote service is either going to fail or time out. The advantage of this is to save resources and be proactive in our troubleshooting of the remote procedure calls.

The circuit breaker makes the decision of stopping the call based on the previous history of the calls. But there are alternative ways how it can handle the calls. Usually, it will keep track of previous calls. Suppose 4 out of 5 calls have failed or timed out, then the next call will fail. This helps to be more proactive in handling the errors with the calling service and the caller service can handle the response in a different way, allowing users to experience the application differently than an error page.

Another way a circuit breaker can act is if calls to remote service are failing in particular time duration.  A circuit breaker will open and will not allow the next call till remote service improves on error.

Resilience4J Library

We have our code which we call remote service. The circuit breaker module from resilience4j library will have a lambda expression for a call to remote service OR a supplier to retrieve values from the remote service call. I will show this as part of the example. The circuit breaker decorates this remote service call in such a way that it can keep track of responses and switch states.

Different configurations of Resilience4j Library

To understand the circuit breaker concept, we will look at different configurations this library offers.

slidingWindowType() – This configuration basically helps in making a decision on how the circuit breaker will operate. There are two types COUNT_BASED and TIME_BASED. COUNT_BASED circuit breaker sliding window will take into account the number of calls to remote service while TIME_BASED circuit breaker sliding window will take into account the calls to remote service in certain time duration.

failureRateThreshold() – This configures the failure rate threshold in percentage. If x percentage of calls are failing, then the circuit breaker will open.

slidingWindowSize() – This setting helps in deciding the number of calls to take into account when closing a circuit breaker.

slowCallRateThreshold() – This configures the slow call rate threshold in percentage. If x percentage of calls are slow, then the circuit breaker will open.

slowCallDurationThreshold – Time duration threshold about which calls are considered slow.

minimumNumberOfCalls() – A minimum number of calls required before which circuit breaker can calculate the error rate.

ignoreException() – This setting allows you to configure an exception that a circuit breaker can ignore and will not count towards the success or failure of a call of remote service.

waitDurationInOpenState() – Duration for which the circuit breaker should remain in the open state before transitioning into a half-open state.  The default value is 60 seconds.

Count-Based Circuit Breaker

While using resilience4j library, one can always use the default configurations that the circuit breaker offers. Default configurations are based on the COUNT-BASED sliding window type.

So how do we create a circuit breaker for the COUNT-BASED sliding window type?


      CircuitBreakerConfig circuitBreakerConfig = CircuitBreakerConfig.custom()
                .slidingWindowType(CircuitBreakerConfig.SlidingWindowType.COUNT_BASED)
                .slidingWindowSize(10)
                .slowCallRateThreshold(65.0f)
                .slowCallDurationThreshold(Duration.ofSeconds(3))
                .build();

        CircuitBreakerRegistry circuitBreakerRegistry =
                CircuitBreakerRegistry.of(circuitBreakerConfig);

        CircuitBreaker cb = circuitBreakerRegistry.circuitBreaker("BooksSearchServiceBasedOnCount");

In the above example, we are creating a circuit breaker configuration that includes a sliding window of type COUNT_BASED. This circuit breaker will record the outcome of 10 calls to switch the circuit-breaker to the closed state.  If 65 percent of calls are slow with slow being of a duration of more than 3 seconds, the circuit breaker will open.

CircuitBreakerRegistry is a factory to create a circuit breaker.

Time-Based Circuit Breaker

Now on Time-Based circuit breaker.


       CircuitBreakerConfig circuitBreakerConfig = CircuitBreakerConfig.custom()
                .slidingWindowType(CircuitBreakerConfig.SlidingWindowType.TIME_BASED)
                .minimumNumberOfCalls(3)
                .slidingWindowSize(10)
                .failureRateThreshold(70.0f)
                .build();

        CircuitBreakerRegistry circuitBreakerRegistry =
                CircuitBreakerRegistry.of(circuitBreakerConfig);

        CircuitBreaker cb = circuitBreakerRegistry.circuitBreaker("BookSearchServiceBasedOnTime");

In the above example, we are creating a circuit breaker configuration that includes a sliding window of type TIME_BASED. Circuit breaker will record the failure of calls after a minimum of 3 calls.  If 70 percent of calls fail, the circuit breaker will open.

Example of Circuit Breaker in Spring Boot Application

We have covered the required concepts about the circuit breaker. Now, I will show we can use a circuit breaker in a Spring Boot application.

On one side, we have a REST application BooksApplication that basically stores details of library books. On the other side, we have an application Circuitbreakerdemo that calls the REST application using RestTemplate. We will decorate our REST call through the circuit breaker.

BooksApplication stores information about books in a MySQL database table librarybooks. The REST Controller for this application has GET and POST methods.


package com.betterjavacode.books.controllers;

import com.betterjavacode.books.daos.BookDao;
import com.betterjavacode.books.models.Book;
import org.springframework.beans.factory.annotation.Autowired;
import org.springframework.http.HttpStatus;
import org.springframework.http.ResponseEntity;
import org.springframework.web.bind.annotation.*;

import java.util.ArrayList;
import java.util.List;
import java.util.Optional;

@CrossOrigin("https://localhost:8443")
@RestController
@RequestMapping("/v1/library")
public class BookController
{
    @Autowired
    BookDao bookDao;

    @GetMapping("/books")
    public ResponseEntity<List> getAllBooks(@RequestParam(required = false) String bookTitle)
    {
        try
        {
            List listOfBooks = new ArrayList<>();
            if(bookTitle == null || bookTitle.isEmpty())
            {
                bookDao.findAll().forEach(listOfBooks::add);
            }
            else
            {
                bookDao.findByTitleContaining(bookTitle).forEach(listOfBooks::add);
            }

            if(listOfBooks.isEmpty())
            {
                return new ResponseEntity<>(HttpStatus.NO_CONTENT);
            }

            return new ResponseEntity<>(listOfBooks, HttpStatus.OK);
        }
        catch (Exception e)
        {
            return new ResponseEntity<>(null, HttpStatus.INTERNAL_SERVER_ERROR);
        }
    }

    @GetMapping("/books/{id}")
    public ResponseEntity getBookById(@PathVariable("id") long id)
    {
        try
        {
            Optional bookOptional = bookDao.findById(id);

            return new ResponseEntity<>(bookOptional.get(), HttpStatus.OK);
        }
        catch (Exception e)
        {
            return new ResponseEntity<>(null, HttpStatus.INTERNAL_SERVER_ERROR);
        }
    }

    @PostMapping("/books")
    public ResponseEntity addABookToLibrary(@RequestBody Book book)
    {
        try
        {
            Book createdBook = bookDao.save(new Book(book.getTitle(), book.getAuthor(),
                    book.getIsbn()));
            return new ResponseEntity<>(createdBook, HttpStatus.CREATED);
        }
        catch (Exception e)
        {
            return new ResponseEntity<>(null, HttpStatus.INTERNAL_SERVER_ERROR);
        }
    }

    @PutMapping("/books/{id}")
    public ResponseEntity updateABook(@PathVariable("id") long id, @RequestBody Book book)
    {
        Optional bookOptional = bookDao.findById(id);

        if(bookOptional.isPresent())
        {
            Book updatedBook = bookOptional.get();
            updatedBook.setTitle(book.getTitle());
            updatedBook.setAuthor(book.getAuthor());
            updatedBook.setIsbn(book.getIsbn());
            return new ResponseEntity<>(bookDao.save(updatedBook), HttpStatus.OK);
        }
        else
        {
            return new ResponseEntity<>(HttpStatus.NOT_FOUND);
        }
    }

    @DeleteMapping("/books/{id}")
    public ResponseEntity deleteABook(@PathVariable("id") long id)
    {
        try
        {
            bookDao.deleteById(id);
            return new ResponseEntity<>(HttpStatus.NO_CONTENT);
        }
        catch (Exception e)
        {
            return new ResponseEntity<>(HttpStatus.INTERNAL_SERVER_ERROR);
        }
    }
}

On the other side, our application Circuitbreakerdemo has a controller with thymeleaf template so a user can access the application in a browser.

For the demo purpose, I have defined CircuitBreaker in a separate bean that I will use in my service class.


    @Bean
    public CircuitBreaker countCircuitBreaker()
    {
        CircuitBreakerConfig circuitBreakerConfig = CircuitBreakerConfig.custom()
                .slidingWindowType(CircuitBreakerConfig.SlidingWindowType.COUNT_BASED)
                .slidingWindowSize(10)
                .slowCallRateThreshold(65.0f)
                .slowCallDurationThreshold(Duration.ofSeconds(3))
                .build();

        CircuitBreakerRegistry circuitBreakerRegistry =
                CircuitBreakerRegistry.of(circuitBreakerConfig);

        CircuitBreaker cb = circuitBreakerRegistry.circuitBreaker("BooksSearchServiceBasedOnCount");

        return cb;
    }

    @Bean
    public CircuitBreaker timeCircuitBreaker()
    {
        CircuitBreakerConfig circuitBreakerConfig = CircuitBreakerConfig.custom()
                .slidingWindowType(CircuitBreakerConfig.SlidingWindowType.TIME_BASED)
                .minimumNumberOfCalls(3)
                .slidingWindowSize(10)
                .failureRateThreshold(70.0f)
                .build();

        CircuitBreakerRegistry circuitBreakerRegistry =
                CircuitBreakerRegistry.of(circuitBreakerConfig);

        CircuitBreaker cb = circuitBreakerRegistry.circuitBreaker("BookSearchServiceBasedOnTime");
        return cb;
    }

I have defined two beans one for the count-based circuit breaker and another one for time-based.

The BookStoreService will contain a calling BooksApplication and show books that are available. This service will look like below:


@Controller
public class BookStoreService
{

    private static final Logger LOGGER = LoggerFactory.getLogger(BookStoreService.class);

    @Autowired
    public BookManager bookManager;

    @Autowired
    private CircuitBreaker countCircuitBreaker;

    @RequestMapping(value = "/home", method= RequestMethod.GET)
    public String home(HttpServletRequest request, Model model)
    {
        return "home";
    }

    @RequestMapping(value = "/books", method=RequestMethod.GET)
    public String books(HttpServletRequest request, Model model)
    {
        Supplier<List> booksSupplier =
                countCircuitBreaker.decorateSupplier(() -> bookManager.getAllBooksFromLibrary());

        LOGGER.info("Going to start calling the REST service with Circuit Breaker");
        List books = null;
        for(int i = 0; i < 15; i++)
        {
            try
            {
                LOGGER.info("Retrieving books from returned supplier");
                books = booksSupplier.get();
            }
            catch(Exception e)
            {
                LOGGER.error("Could not retrieve books from supplier", e);
            }
        }
        model.addAttribute("books", books);

        return "books";
    }
}

So when the user clicks on the books page, we retrieve books from our BooksApplication REST Service.

I have autowired the bean for countCircuitBreaker. For demo purposes – I will be calling the REST service 15 times in a loop to get all the books. This way, I can simulate interruption on my REST service side.

Our circuit breaker decorates a supplier that does REST call to remote service and the supplier stores the result of our remote service call.

In this demo, we are calling our REST service in a sequential manner, but remote service calls can happen parallelly also. The circuit breaker will still keep track of results irrespective of sequential or parallel calls.

Demo

Let’s look at how the circuit breaker will function in a live demo now. My REST service is running on port 8443 and my Circuitbreakerdemo application is running on port 8743.

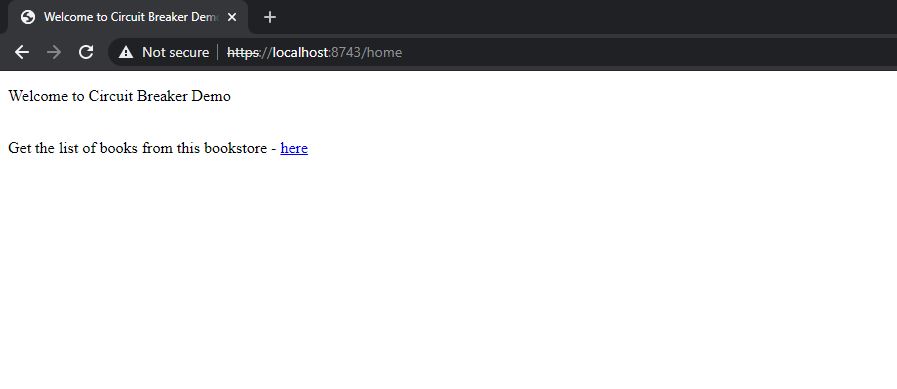
Initially, I start both of the applications and access the home page of Circuitbreakerdemo application. The home page contains the link for viewing all the books from the store.

Circuit Breaker in a Spring Boot

Now to simulate some errors, I have added the following code in my RestTemplate call that basically sleeps for 3 seconds before returning the result of the REST call.


    public List getAllBooksFromLibrary ()
    {
        HttpHeaders httpHeaders = new HttpHeaders();
        httpHeaders.setContentType(MediaType.APPLICATION_JSON);

        ResponseEntity<List> responseEntity;
        long startTime = System.currentTimeMillis();
        LOGGER.info("Start time = {}", startTime);
        try
        {
            responseEntity= restTemplate.exchange(buildUrl(),
                    HttpMethod.GET, null, new ParameterizedTypeReference<List>()
                    {});
            if(responseEntity != null && responseEntity.hasBody())
            {
                Thread.sleep(3000);
                LOGGER.info("Total time to retrieve results = {}",
                        System.currentTimeMillis() - startTime);
                return responseEntity.getBody();
            }
        }
        catch (URISyntaxException | InterruptedException e)
        {
            LOGGER.error("URI has a wrong syntax", e);
        }

        LOGGER.info("No result found, returning an empty list");
        return new ArrayList<>();
    }

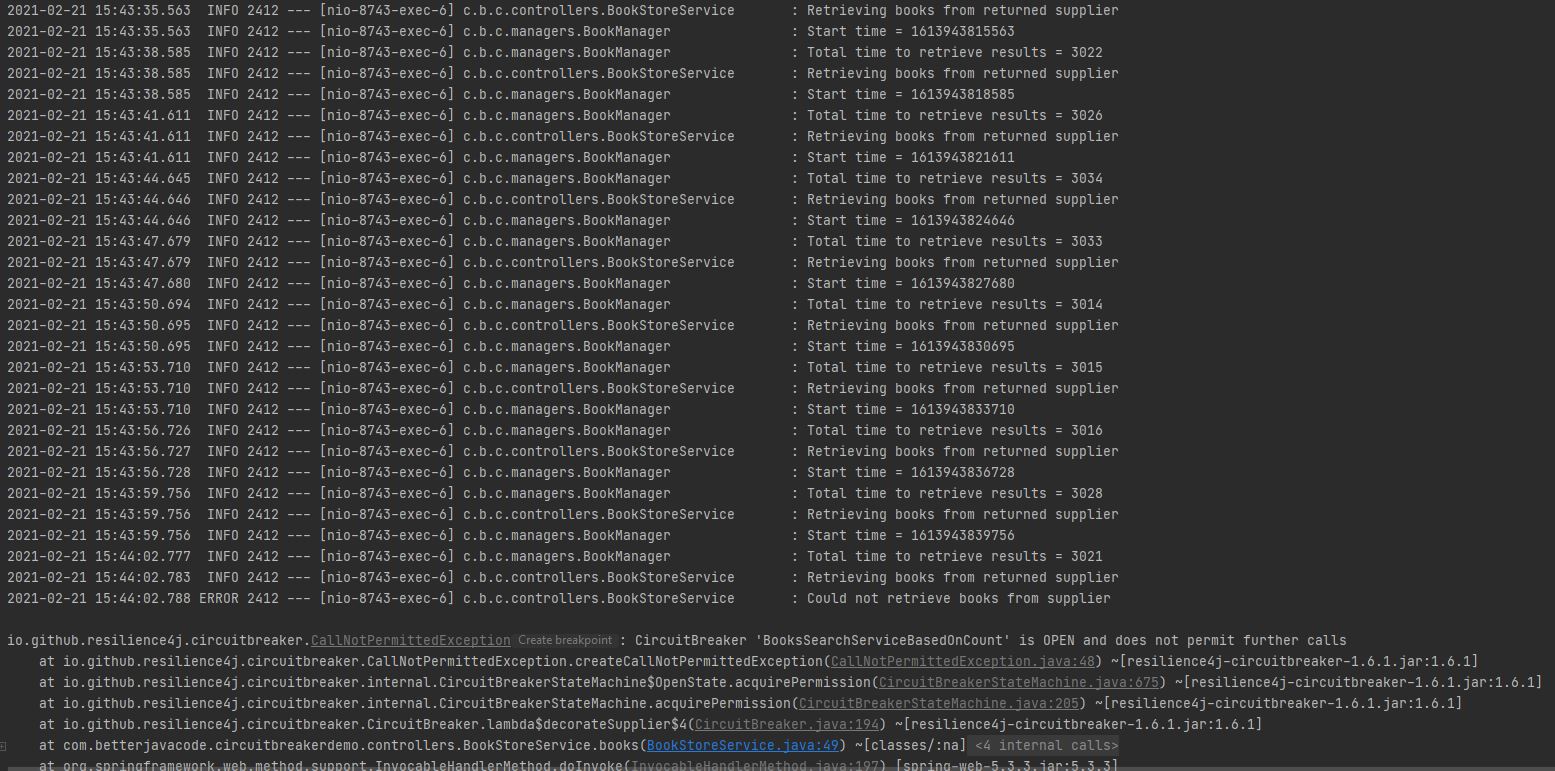
In short, my circuit breaker loop will call the service enough times to pass the threshold of 65 percent of slow calls that are of duration more than 3 seconds. Once I click on the link for here, I will receive the result, but my circuit breaker will be open and will not allow future calls till it is in either half-open state or closed state.

Circuit Breaker in a Spring Boot - Result

You will notice that we started getting an exception CallNotPermittedException when the circuit breaker was in the OPEN state. Also, the circuit breaker was opened when the 10 calls were performed. This is because our sliding window size is 10.

Another way, I can simulate the error by shutting down my REST service or database service. That way REST calls can take longer than required.

Now, let’s switch the COUNT_BASED circuit breaker to TIME_BASED circuit breaker. In TIME_BASED circuit breaker, we will switch off our REST service after a second, and then we will click on here link from the home page. If 70 percent of calls in the last 10 seconds fail, our circuit breaker will open.

Since REST Service is closed, we will see the following errors in Circuitbreakdemo application

Circuit Breaker in Spring Boot - Error

We will see the number of errors before the circuit breaker will be in OPEN state.

Circuit Breaker in Spring Boot

One configuration we can always add how long we want to keep the circuit breaker in the open state.  For the demo, I have added the circuit breaker will be in an open state for 10 seconds.

How to handle OPEN circuit breakers?

One question arises, how do you handle OPEN circuit breakers? Luckily, resilience4j offers a fallback configuration with Decorators utility. In most cases, you can always configure this to get the result from previous successful results so that users can still work with the application.

Conclusion

In this post, I have covered how to use a circuit breaker in a Spring Boot application. The code for this demo is available here.

In this demo, I have not covered how to monitor these circuit breaker events as resilience4j the library allows storing these events with metrics that one can monitor with a monitoring system.

If you enjoyed this post, consider subscribing to my blog here.

References

  1. Resilience4J Library – Resilience4J
  2. Circuit Breaker with Resilience4j – Circuit Breaker