In this post, we will discuss how to use Kubernetes and how to deploy your microservice in a Kubernetes cluster. I will cover the fundamentals, so if you are a beginner, this will be a good step-by-step guide to learn Kubernetes. Since we will be building a dockerized container application, you can get started with the complete guide to use docker-compose.
What is Kubernetes?
As per original source – Kubernetes is an open-source system for automating deployment, scaling, and management of containerized applications. Kubernetes is a container orchestration platform.
Basically, once you have a containerized application, you can deploy that on the Kubernetes cluster. Specifically, the cluster contains multiple machines or servers.
In a traditional Java application, one would build a jar file and deploy that on a server machine. Sometimes, even deploy the same application on multiple machines to scale horizontally. Above all, with Kubernetes, you do not have to worry about server machines. Obviously, Kubernetes allows creating a cluster of machines and deploying your containerized application on it.
Additionally, with Kubernetes, one can
- Orchestrate containers across multiple hosts machines
- Control and automate application deployment
- Manage server resources better
- Health-check and self-heal your apps with auto-placement, auto-restart, auto replication, and autoscaling
Moreover, the Kubernetes cluster contains two parts
- A control plane
- A computing machine
Particularly, the nodes (physical machines or virtual machines) interact with the control plane using Kubernetes API.
- Control Plane – The collection of processes that control the Kubernetes nodes.
- Nodes – The machines that perform the tasks that are assigned through processes.
- Pod – A group of one or more containers deployed on a single node. All containers on the pod share the resources and IP addresses.
- Service – An abstract way to expose an application running on a set of Pods as a network service.
- Kubelet – The Kubelet is a primary node agent that runs on each node. It reads the container manifests and keeps track of containers starting and running.
- kubectl – The command-line configuration tool for Kubernetes
How to create a cluster?
Thereafter, depending on your environment, download Minikube. I am using a Windows environment.
minikube start will create a new Kubernetes cluster.
Eventually, if you want to look at a more detailed dashboard, you can use the command minikube dashboard. This command will launch a Kubernetes dashboard in the browser. (http://127.0.0.1:60960/api/v1/namespaces/kubernetes-dashboard/services/http:kubernetes-dashboard:/proxy/)
Demo to deploy a microservice to Kubernetes
Create A Containerized Microservice
Moreover, let’s create a simple microservice that we will eventually deploy in the cluster. I will be using Spring Boot to create a microservice that returns a list of products for a REST API call.
This microservice will return a list of products on the call.
package com.betterjavacode.kubernetesdemo.controllers;

import com.betterjavacode.kubernetesdemo.dtos.ProductDTO;
import com.betterjavacode.kubernetesdemo.services.ProductService;
import org.springframework.beans.factory.annotation.Autowired;
import org.springframework.web.bind.annotation.GetMapping;
import org.springframework.web.bind.annotation.RequestMapping;
import org.springframework.web.bind.annotation.RestController;

import java.util.List;

@RestController
@RequestMapping("/v1/products")
public class ProductController
{
    @Autowired
    public ProductService productService;

    @GetMapping
    public List getAllProducts()
    {
        return productService.getAllProducts();
    }
}
Besides, the ProductService will have a single method to return all products.
package com.betterjavacode.kubernetesdemo.services;

import com.betterjavacode.kubernetesdemo.dtos.ProductDTO;
import org.springframework.stereotype.Component;

import java.util.ArrayList;
import java.util.List;

@Component
public class ProductService
{

    public List getAllProducts ()
    {
        List productDTOS = new ArrayList<>();

        ProductDTO toothbrushProductDTO = new ProductDTO("Toothbrush", "Colgate", "A toothbrush " +
                "for " +
                "all");
        ProductDTO batteryProductDTO = new ProductDTO("Battery", "Duracell", "Duracell batteries " +
                "last long");

        productDTOS.add(toothbrushProductDTO);
        productDTOS.add(batteryProductDTO);
        return productDTOS;

    }
}
I am deliberately not using any database and using a static list of products to return for demo purposes.
Before building a docker image, run
minikube docker-env
minikube docker-env | Invoke-Expression
Build docker image
Let’s build a docker image for our microservice that we just created. At first, create a dockerfile in the root directory of your project.
FROM openjdk:8-jdk-alpine
VOLUME /tmp
COPY ./build/libs/*.jar app.jar
ENTRYPOINT ["java", "-jar", "/app.jar"]
Now let’s build a docker image using this dockerfile.
docker build -t kubernetesdemo .
This will create a kubernetesdemo docker image with the latest tag.
If you want to try out this image on your local environment, you can run it with the command:
docker run --name kubernetesdemo -p 8080:8080 kubernetesdemo
This will run our microservice Docker image on port 8080. Regardless, before deploying to kubernetes, we need to push this docker image to the docker hub container registry so Kubernetes can pull from the hub.
docker login – Login to docker hub with your username and password from your terminal.
Once the login is successful, we need to create a tag for our docker image.
docker tag kubernetesdemo username/kubernetesdemo:1.0.0.
Use your docker hub username.
Now we will push this image to docker hub with the command:
docker push username/kubernetesdemo:1.0.0.
Now, our docker image is in the container registry.
Kubernetes Deployment
Kubernetes is a container orchestrator designed to run complex applications with scalability in mind.
The container orchestrator manages the containers around the servers. That’s the simple definition. As previously stated, we will create a local cluster on windows machine with the command
minikube start.
Once the cluster starts, we can look at the cluster-info with the command
kubectl get cluster-info.
Now to deploy our microservice in Kubernetes, we will use the declarative interface.
Declaring deployment file
Create a kube directory under your project’s root directory. Add a yaml file called deployment.yaml.
This file will look like below:
apiVersion: v1
kind: Service
metadata:
  name: kubernetesdemo
spec:
  selector:
    app: kubernetesdemo
  ports:
    - port: 80
      targetPort: 8080
  type: LoadBalancer

---
apiVersion: apps/v1
kind: Deployment
metadata:
  name: kubernetesdemo
spec:
  selector:
    matchLabels:
      app: kubernetesdemo
  replicas: 3
  template:
    metadata:
      labels:
        app: kubernetesdemo
    spec:
      containers:
      - name: kubernetesdemo
        image: username/kubernetesdemo:1.0.0
        imagePullPolicy: IfNotPresent
        ports:
        - containerPort: 8080
Shortly, we will go over each section of this deployment file.
Once we run this deployment file, it will create a container and a service. Let’s first look at Deployment .
apiVersion: apps/v1
kind: Deployment
metadata:
  name: kubernetesdemo
These lines declare that we create a resource of type Deployment using version v1 and of name kubernetesdemo.
replicas: 3 indicate that we are running 3 replicas of the container. But the container here is nothing but a pod. A pod is a wrapper around a container. A single pod can run multiple containers while the containers share the resources of the pod. Just remember that the pod is the smallest unit of deployment in Kubernetes.
The template.metadata.labels defines the label for the pod that runs the container for the application kubernetesdemo.
The section of containers is self-explanatory. If it is not clear, this is where we declare about the container that we plan to run in a pod. The name of the container kubernetesdemo and the image of this container is username/kubernetesdemo:1.0.0 . We will be exposing the port 8080 of this container where our microservice will be running.
Service Definition
Without delay, let’s look at the earlier part of this deployment file.
apiVersion: v1
kind: Service
metadata:
  name: kubernetesdemo
spec:
  selector:
    app: kubernetesdemo
  ports:
    - port: 80
      targetPort: 8080
  type: LoadBalancer
Here, we are creating a resource of type Service.
A Service allows pods to communicate with other pods. But it also allows external users to access pods. Without a service, one can not access pods. The kind of Service we are defining here will allow us to forward the traffic to a particular pod.
In this declaration, spec.selector.app allows us to select the pod with the name kubernetesdemo. Service will expose this pod. A request coming to port 80 will be forwarded to the target port of 8080 of the selected Pod.
And lastly, the service is of type LoadBalancer. Basically, in our Kubernetes cluster, a service will act as a load balancer that will forward the traffic to different pods. A Service ensures continuous availability of applications. If a pod crashes, another pod starts and the service makes sure to route the traffic accordingly.
Service keeps track of all the replicas you are running in the cluster.
Running the deployment
So far, we have built a deployment configuration to create resources in our cluster. But we have not deployed anything yet.
To run the deployment, use
kubectl apply -f deployment.yaml
You can also just run
kubectl apply -f kube and it will pick up deployment files from the kube directory.
The response for this command will be
 service/kubernetesdemo configured

deployment.apps/kubernetesdemo created
kubectl get pods will show the status of pods

Now to see the actual situation with cluster and services running, we can use
minikube dashboard.
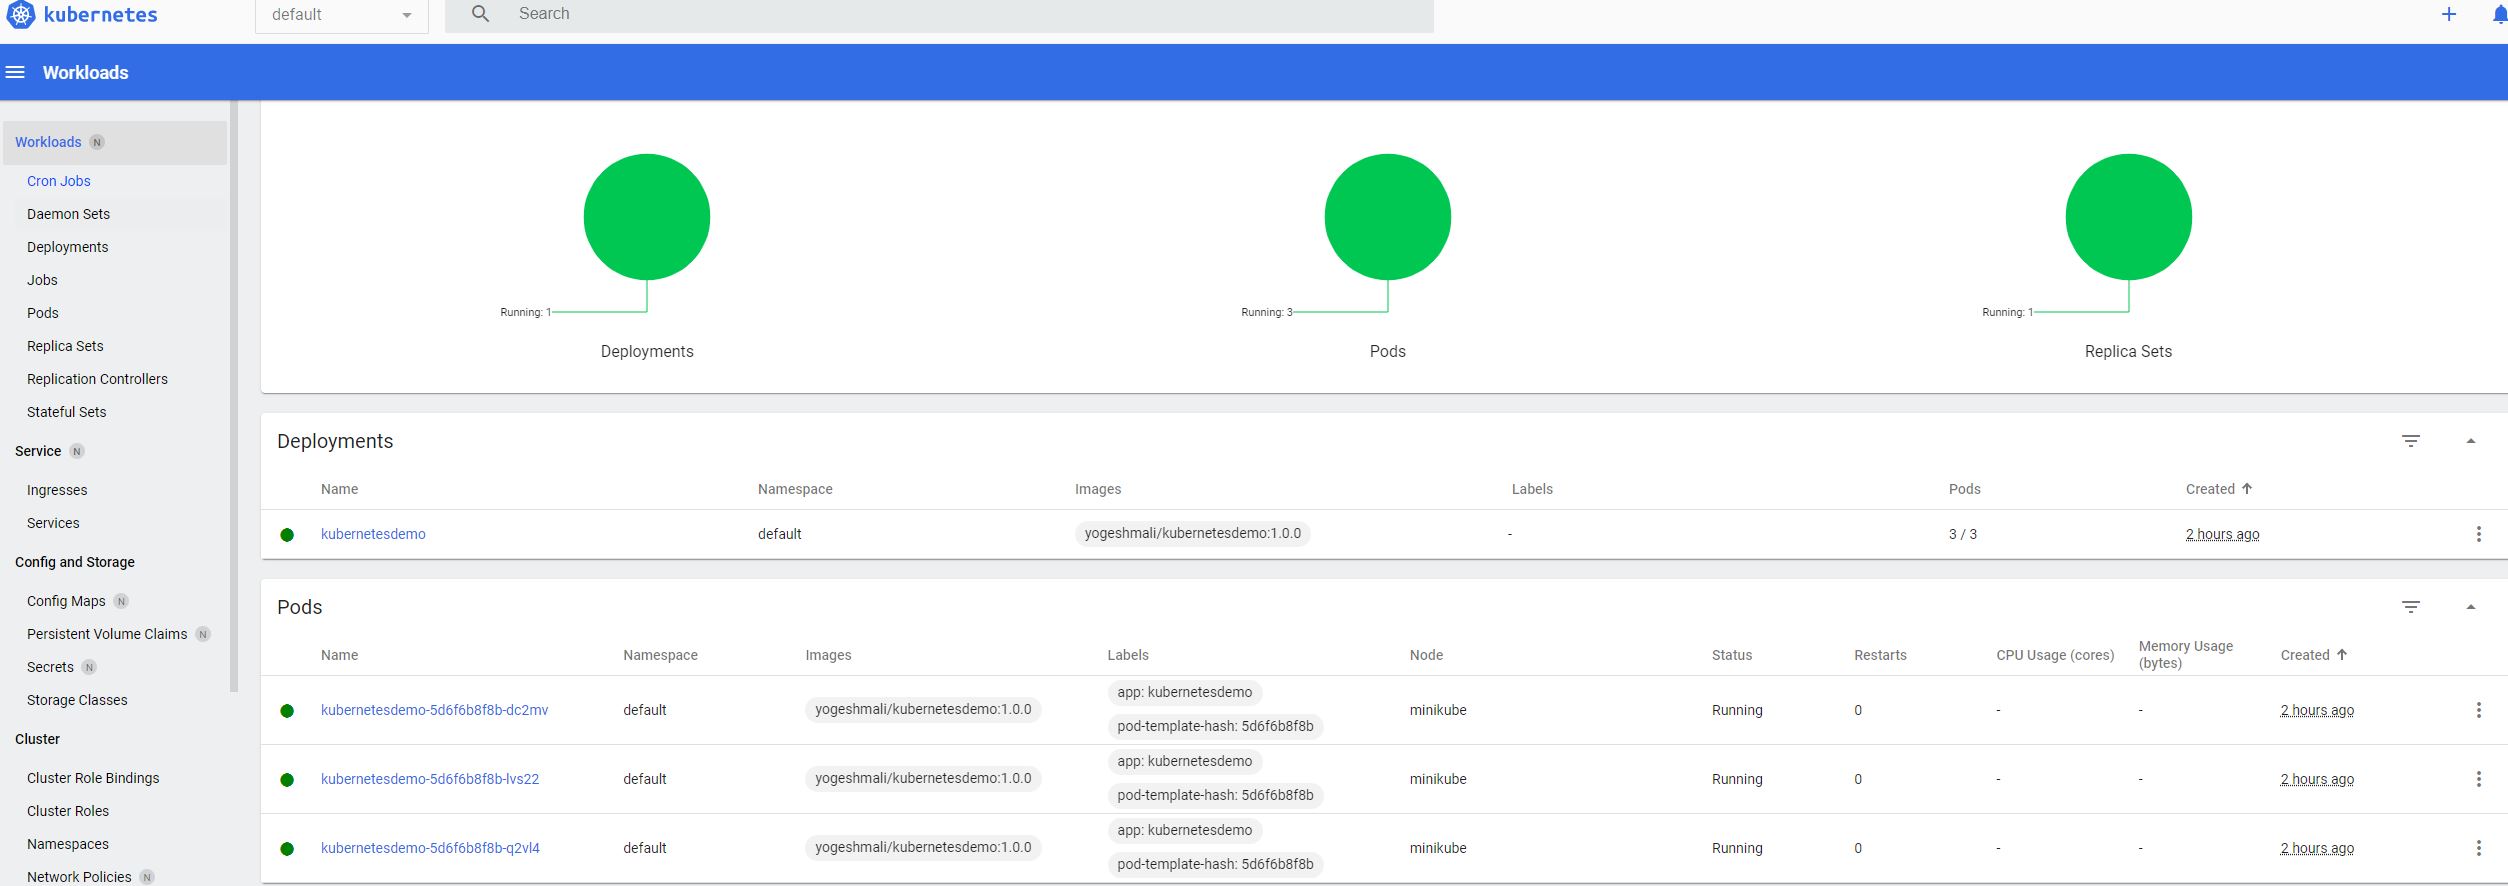
We can see there are 3 pods running for our microservice kubernetesdemo.
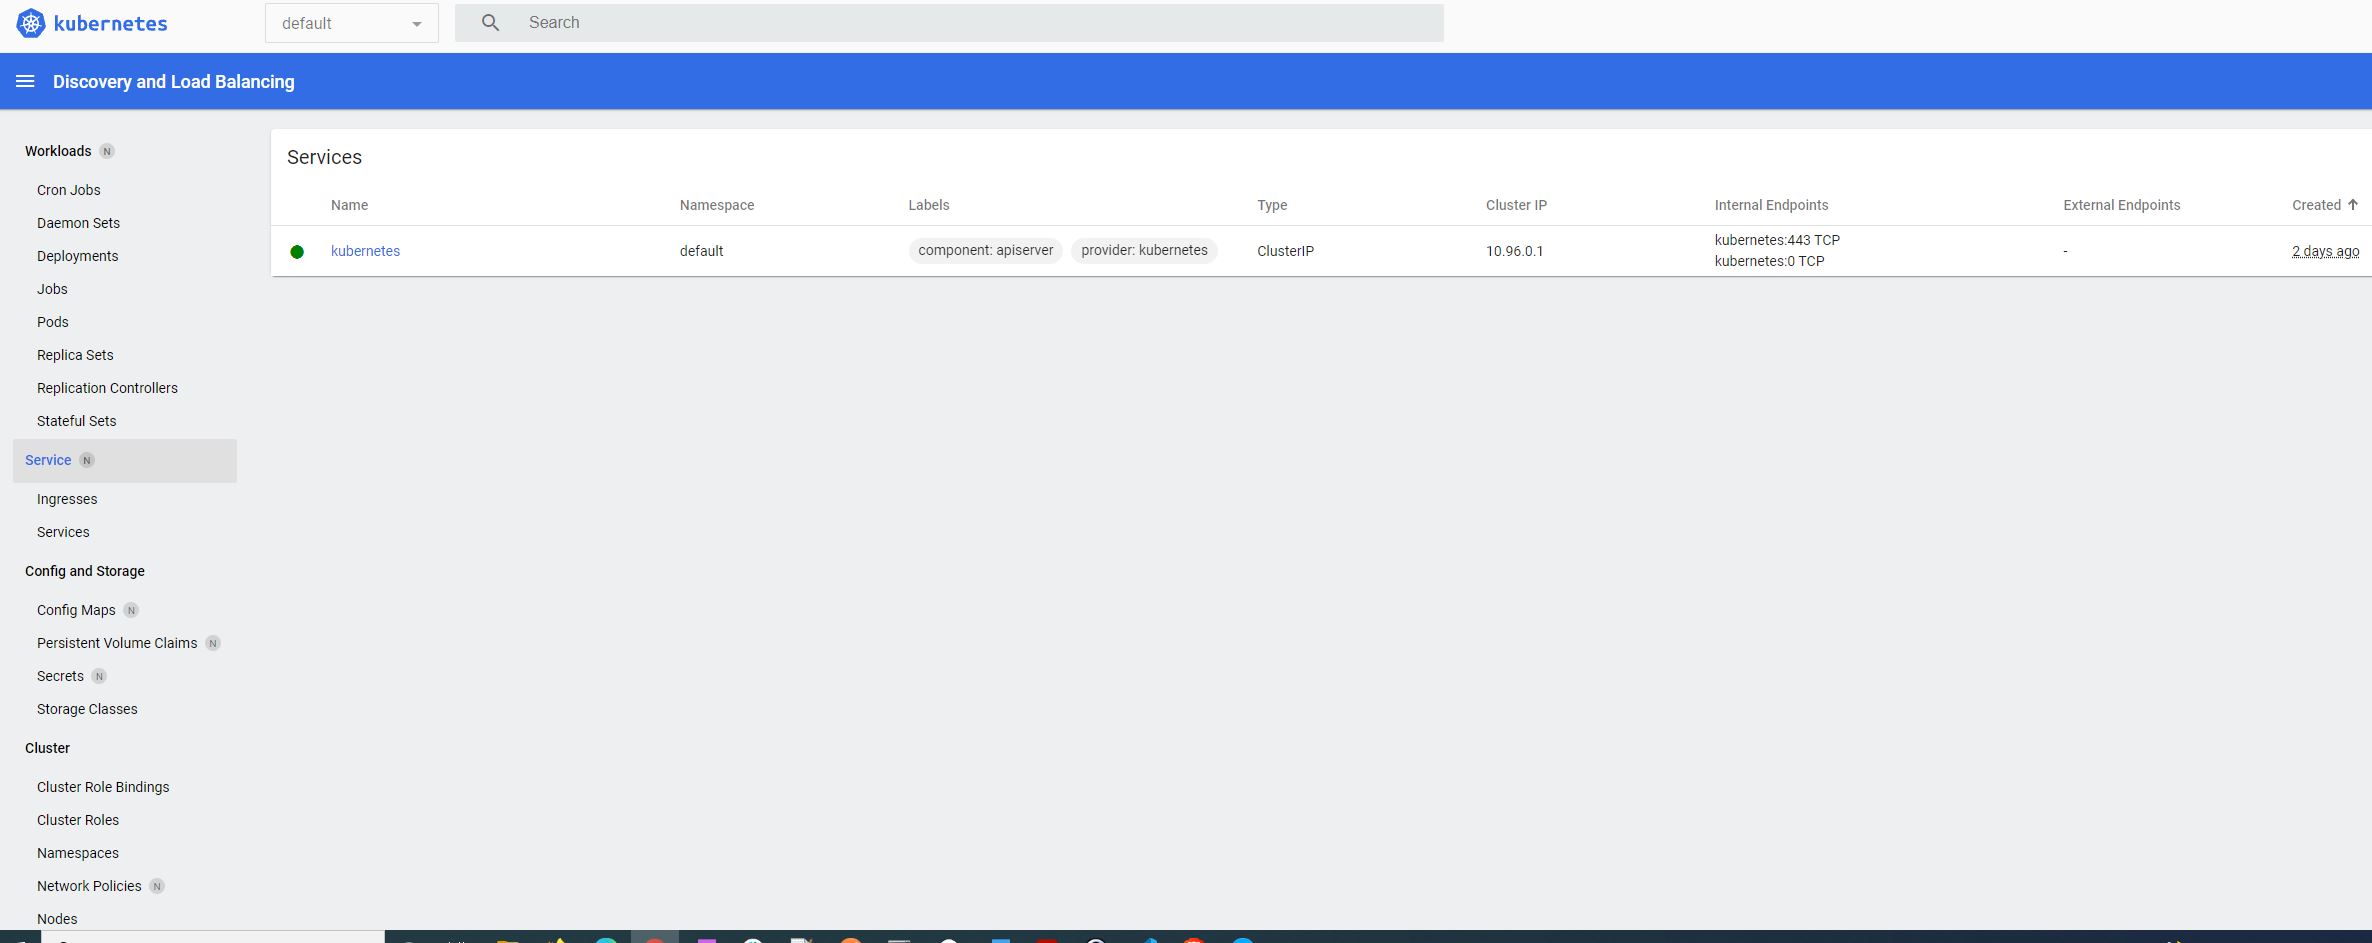
If you run kubectl get services, we will see all the services running. Now to access our application, we will have to find the service url. In this case the name of service (not microservice) is kubernetesdemo.
minikube service kubernetesdemo --url will show an URL in the terminal window.
Now if use this URL http://127.0.0.1:49715/v1/products, we can see the output in the browser

How to scale?
With Kubernetes, it’s easy to scale the application. We are already using 3 replicas, but we can reduce or increase the number with a command:
kubectl scale --replicas=4 deployment/kubernetesdemo.
If you have the dashboard, you will see the 4th replica starting. That’s all.
Conclusion
Wow, we have covered a lot in this demo. I hope I was able to explain the fundamental concepts of Kubernetes step by step. If you want to learn more, comment on this post. If you are looking to learn Spring Security concepts, you can buy my book Simplifying Spring Security.