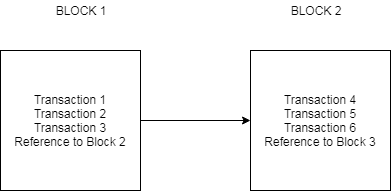
So I have talked about blockchain previously here. I will not be indulging in details about what is blockchain. But I will show how to build blockchain using Spring boot.
What will you need
- IntelliJ
- Java 8
- Spring boot
- Gradle
What is blockchain?
In short, blockchain is chain of records which are called blocks, containing any kind of data or transactions in these records. They are chained together using hashes.
Build a blockchain
We will need two model classes: one each for block and for transaction. We will also need a spring rest controller to provide 3 APIs for mining, transaction, and chaining. The heart of this blockchain will be a utility class to provide us Proof of work. If you don’t know what is Proof of work, then you can revisit the article I have linked in this post where I explained the algorithm used in building a blockchain, is called as Proof of work.
Model Classes
Each block will contain an index, timestamp, transactions, proof, and a hash for previous block. This model class will look like below:
package com.betterjavacode.blockchain.model;

import com.fasterxml.jackson.core.JsonProcessingException;
import com.fasterxml.jackson.databind.ObjectMapper;
import com.google.common.hash.Hashing;

import java.nio.charset.StandardCharsets;
import java.util.List;

public class Block
{

    public Block()
    {

    }
    private Long index;

    private Long timestamp;

    private List<Transaction> transactionList;

    private Long proof;

    private String previousBlockHash;

    public static final Long GENESIS_BLOCK_PROOF = 100L;
    public static final String GENESIS_BLOCK_PREV_HASH = "1";

    public Long getIndex()
    {
        return index;
    }

    public String getPreviousBlockHash()
    {
        return previousBlockHash;
    }

    public Long getProof()
    {
        return proof;
    }

    public List<Transaction> getTransactionList()
    {
        return transactionList;
    }

    public Block(Builder builder)
    {
        this.index = builder.index;
        this.timestamp = builder.timestamp;
        this.transactionList = builder.transactionList;
        this.proof = builder.proof;
        this.previousBlockHash = builder.previousBlockHash;
    }

    public static class Builder
    {
        private Long index;
        private Long timestamp;
        private List<Transaction> transactionList;
        private Long proof;
        private String previousBlockHash;


        public Builder setIndex(Long index)
        {
            this.index = index;
            return this;
        }

        public Builder setTimestamp(Long timestamp)
        {
            this.timestamp = timestamp;
            return this;
        }

        public Builder setTransactionList(List<Transaction> transactionList)
        {
            this.transactionList = transactionList;
            return this;
        }

        public Builder setProof(Long proof)
        {
            this.proof = proof;
            return this;
        }

        public Builder setPreviousBlockHash(String previousBlockHash)
        {
            this.previousBlockHash = previousBlockHash;
            return this;
        }

        public Block build()
        {
            return new Block(this);
        }
    }

    public String hash(ObjectMapper mapper) throws JsonProcessingException
    {
        String json = mapper.writeValueAsString(this);
        return Hashing.sha256().hashString(json, StandardCharsets.UTF_8).toString();
    }
}
It will look like below when we have some transaction
{
  "message": "New Block Added",
  "index": 2,
  "transactionList": [
    {
      "sender": "0",
      "recipient": "ef55403a23af46268fb5dfcee91329ae",
      "amount": 1
    }
  ],
  "proof": 33575,
  "previousHash": "58c63eba6e93523867369a865ee363a0c89a2b76a62c677e8acd27536415daf4"
}
Rest Controller
We will write a rest controller to retrieve the chain, mine or add a transaction. A REST controller for transactions will do a POST request to add a transaction to chain. Our REST controller will look like below:
package com.betterjavacode.blockchain.controller;


import com.betterjavacode.blockchain.model.Block;
import com.betterjavacode.blockchain.model.Transaction;
import com.betterjavacode.blockchain.response.ChainResponse;
import com.betterjavacode.blockchain.response.MineResponse;
import com.betterjavacode.blockchain.response.TransactionResponse;
import com.betterjavacode.blockchain.service.Blockchain;
import com.betterjavacode.blockchain.util.BlockProofOfWorkGenerator;
import com.fasterxml.jackson.core.JsonProcessingException;
import com.fasterxml.jackson.databind.ObjectMapper;
import org.springframework.beans.factory.annotation.Autowired;
import org.springframework.web.bind.annotation.*;

import javax.validation.Valid;
import java.math.BigDecimal;
import java.util.UUID;

@RestController
@RequestMapping("/")
public class BlockchainController
{
    @Autowired
    private Blockchain blockchain;

    @Autowired
    private ObjectMapper objectMapper;

    public static final String NODE_ID = UUID.randomUUID().toString().replace("-","");
    public static final String NODE_ACCOUNT_ADDRESS = "0";
    public static final BigDecimal MINING_CASH_REWARDS = BigDecimal.ONE;

    @GetMapping("mine")
    public MineResponse mine() throws JsonProcessingException
    {
        // Calculate Proof of work
        Block lastBlock = blockchain.lastBlock();

        Long lastProof = lastBlock.getProof();

        Long proof = BlockProofOfWorkGenerator.proofOfWork(lastProof);

        // Reward the miner by adding a transaction

        blockchain.addTransaction(NODE_ACCOUNT_ADDRESS, NODE_ID, MINING_CASH_REWARDS);

        // Add the new block to the chain
        Block newBlock = blockchain.createBlock(proof, lastBlock.hash(objectMapper));

        return new MineResponse.Builder().message("New Block Added").index(newBlock.getIndex()).transactions(newBlock.getTransactionList())
                .proof(newBlock.getProof()).previousHash(newBlock.getPreviousBlockHash()).build();
    }

    @GetMapping("chain")
    public ChainResponse fullChain()
    {
        return new ChainResponse.Builder().chain(blockchain.getChain()).length(blockchain.getChain().size()).build();
    }

    @PostMapping("transactions")
    public TransactionResponse newTransaction(@RequestBody @Valid Transaction transaction)
    {
        Long index = blockchain.addTransaction(transaction.getSender(), transaction.getRecipient(), transaction.getAmount());

        return new TransactionResponse.Builder().index(index).build();
    }
}
Transaction POST call basically adds the transaction to the list and returns the index of the block to which the transaction will be added to.
Proof of work
We will discuss how we have implemented the proof of work here. This will be the heart of entire blockchain that we have built.
When new blocks are mined on the blockchain, a proof of work algorithm is used to verify if the block is justifiable. Simple idea of Proof of Work is to find a number which solves a problem. This number must be difficult to find, but easy to verify by network.
Example – Hash of an integer multiplied by another integer must end in a particular number. In our implementation for this algorithm, we verify the proof is valid as below:
public static boolean validProof(Long lastProof, Long proof)
 {
     String s = "" + lastProof + "" + proof;

     String sha256 = Hashing.sha256().hashString(s, StandardCharsets.UTF_8).toString();

     return sha256.endsWith(PROOF_OF_WORK);
 }
This is the algorithm that miners try to solve fastest and whoever solves it first and compact manner gets rewarded with a coin as part of the transaction.
Swagger API
So now once we build our implementation and run the Spring Boot Application, I can access it through Swagger APIs. These APIs are as below:
/transactions– Creates a new transaction in the block/mine– mines the new block/chain– returns the full blockchain
Conclusion
In this post, we showed how to understand a blockchain by implementing one in Spring boot. Remember, one thing that I have not described is the consensus algorithm to verify the chain, though I have implemented that in my class Blockchain.
References
