With security threats rising, it becomes important to secure accounts. In my previous post, I showed how to sign up for two-factor authentication with spring security.
In this post, I show how to log in with two-factor authentication with spring security. Before a user can log in, the user needs to register for the application. Assuming you followed my previous post, we have a user who has registered for multi-factor authentication (MFA).
If you are getting started with Spring Security, I would recommend Simplifying Spring Security.
User flow for authentication
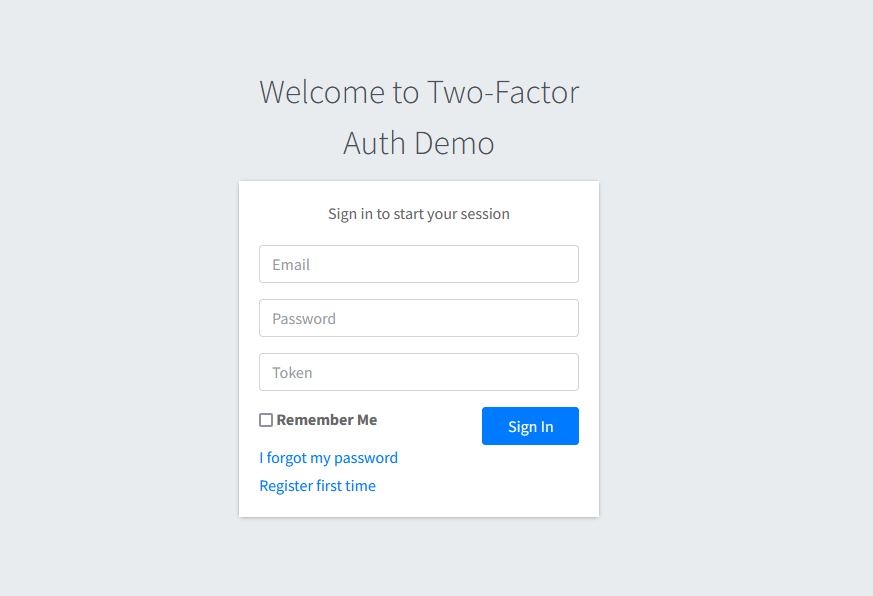
User will access our application and if not logged in, will get redirected to the login page. The login page looks like below:

User will have to enter a username, password, and a token from the GoogleAuthenticator App for this particular application.
In a previous post, I assume you register the application with GoogleAuthenticator App.
On our login page, we pass an extra parameter of token to the backend to verify.
The architecture of the Login Process
To understand the entire login process with Spring Security, it is good to see the overall picture of this process.
As we know, Spring Security works with filter chains. One of the filters UsernamePasswordAuthenticationFilter is used in Username and Password authentication flow. In this login flow as well, our authentication starts with that filter. Once the user has entered credentials and the token, it will pass through that filter.
We will need to implement a UserDetailsService to fetch user. This service is part of AuthenticationManager that UsernamePasswordAuthenticationFilter provides.
This UserDetailsService will load the user as follows:
    @Override
    public UserDetails loadUserByUsername (String email) throws UsernameNotFoundException
    {
        final UserEntity customer = userRepository.findByEmail(email);
        if (customer == null) {
            throw new UsernameNotFoundException(email);
        }
        LOG.info("Getting User", customer);

        CustomUser user = CustomUser.CustomUserBuilder.aCustomUser().
                withUsername(customer.getEmail())
                .withPassword(customer.getPassword())
                .withAuthorities(getAuthorities(customer))
                .withSecret(customer.getSecret())
                .withAccountNonLocked(false)
                .build();

        return user;
    }
Additionally, we call WebAuthenticationDetails implementation to build authentication details from the HttpServletRequest object. We will implement this interface with CustomWebAuthenticationDetails as follows:
public class CustomWebAuthenticationDetails extends WebAuthenticationDetails
{
    private String token;

    public CustomWebAuthenticationDetails (HttpServletRequest request)
    {
        super(request);
        this.token = request.getParameter("customToken");
    }
    @Override
    public String toString() {
        return "CustomWebAuthenticationDetails{" +
                "token='" + token + '\'' +
                '}';
    }

    @Override
    public boolean equals(Object o) {
        if (this == o) return true;
        if (o == null || getClass() != o.getClass()) return false;
        if (!super.equals(o)) return false;
        CustomWebAuthenticationDetails that = (CustomWebAuthenticationDetails) o;
        return Objects.equals(token, that.token);
    }

    @Override
    public int hashCode() {
        return Objects.hash(super.hashCode(), token);
    }

    public String getToken() {
        return token;
    }

    public void setToken(String token) {
        this.token = token;
    }

}
Furthermore, we fetched the customToken from our request and set in authentication details.
We have validated user credentials, fetched the user from the database, and also set the token. Moreover, all that is left is to validate if the token is still valid.
We implement a CustomAuthenticationProvider from DaoAuthenticationProvider to fetch user details and validate TOTP token. This looks like below:
@Component
public class CustomAuthenticationProvider extends DaoAuthenticationProvider
{

    private static final Logger LOG = LoggerFactory.getLogger(CustomAuthenticationProvider.class);
    @Resource
    private MfaTokenManager mfaTokenManager;

    @Resource
    private PasswordEncoder passwordEncoder;

    @Autowired
    public CustomAuthenticationProvider(UserDetailsService userDetailsService) {
        super.setUserDetailsService(userDetailsService);
    }

    protected void additionalAuthenticationChecks(UserDetails userDetails,
                                                  UsernamePasswordAuthenticationToken authentication)
            throws AuthenticationException
    {

        super.additionalAuthenticationChecks(userDetails, authentication);

        CustomWebAuthenticationDetails authenticationDetails = (CustomWebAuthenticationDetails) authentication.getDetails();
        CustomUser user = (CustomUser) userDetails;
        String mfaToken = authenticationDetails.getToken();

        if(!mfaTokenManager.verifyTotp(mfaToken,user.getSecret())){
            throw new BadCredentialsException(messages.getMessage(
                    "AbstractUserDetailsAuthenticationProvider.badCredentials",
                    "Bad credentials"));
        }
    }
}
MfaTokenManager calls TOTP library to verify the code. Nevertheless, take note that we are passing one time token along with the user secret that we created when the user registered for the application and scanned the QR Code.
If token validation is successful, SecurityConfiguration will proceed with calling CustomLoginSuccessHandler . This handler redirects the user with a right role to /home page.
This completes our two-factor authentication login flow with Spring Security.
If you want to learn more details about Spring Security Filters, you can read more about how spring security filter chain works.
Conclusion
In this post, I showed how to use Spring Security for the Two-Factor Authentication Login process. If you have feedback for this post, please post your comment.