Author Archives: yogesh.mali@gmail.com

Everything you need to know about Spring Data JPA

In this post, I cover everything you need to know about Spring Data JPA so you can use this library more confidently in your Spring Boot application. I have seen there are a lot of confusion about when to use CrudRepository or JpaRepository, so I will cover that as well.

What is Spring Data JPA?

As the official documentation from Spring says “Spring Data JPA makes it easy to implement JPA based repositories. It improves and eases the implementation of the JPA-based data access layer. Overall, data access applications are easier to implement.”

With Spring Data JPA, one can avoid a lot of boilerplate code for Java Persistent API (JPA) in the application.  The library also makes it easy to query the data from the database taking away a lot of implementation for SQL queries from a developer.

As a developer, you only write repository interfaces including any custom methods and Spring Data JPA will provide the most implementation automatically.

When to use Spring Data JPA?

When to use Spring Data JPA actually depends on your use case. But most Spring applications will need data objects. And if you have data objects, you will need a way to access them, and use them for transactions.

If you are building a database-based web application, then you will end up creating objects that represent your database entities. When one layer accesses these objects or creates the data to store in the database, you will need access APIs. You can implement repository interfaces and it will provide the basic CRUD operations. A programmer doesn’t even have to implement any of these interface methods.

You can also add a custom method in these repository interfaces.

  1. Create a new method in the interface
  2. Write the JPQL query with an annotation @Query at the beginning of the query.
  3. One can also write JPA Named queries

Some other major features of Spring Data JPA are:

  1. Auditing of domain classes
  2. Useful in batch loading, dynamical queries
  3. Support for XML Mapping of entities

Details of the Spring Data JPA library

In your application, you can include the dependency easily as follows:

implementation 'org.springframework.boot:spring-boot-starter-data-jpa'

Now to enable your JPA repositories, add the following annotation to your main application class:

@EnableJpaRepositories(basePackages = "com.betterjavacode.modelmapperdemo")

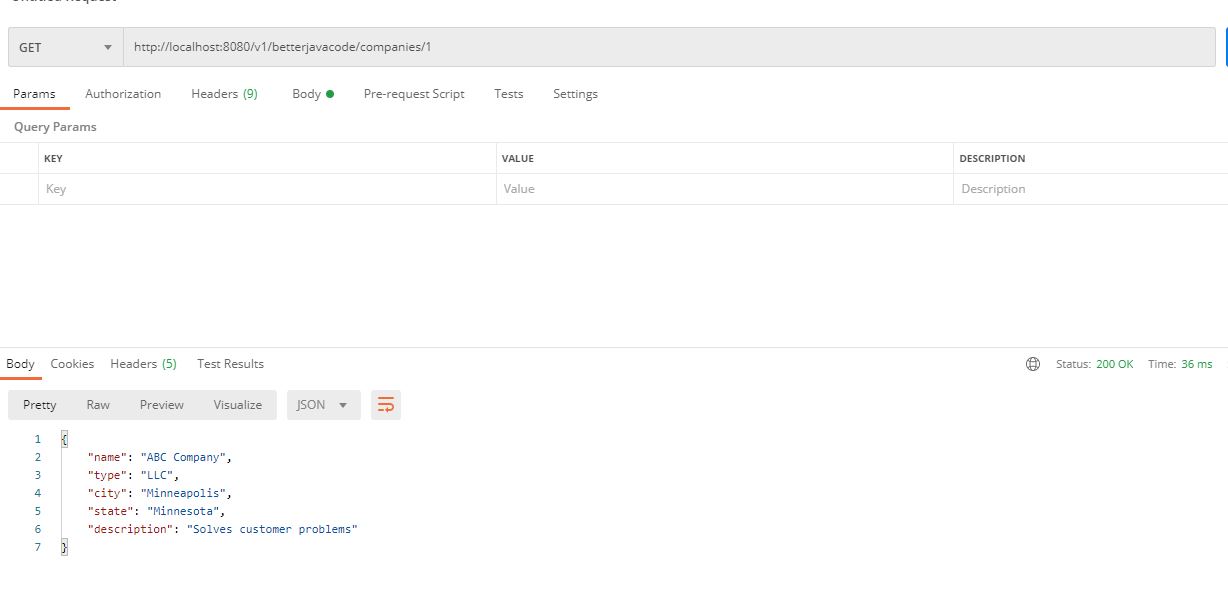
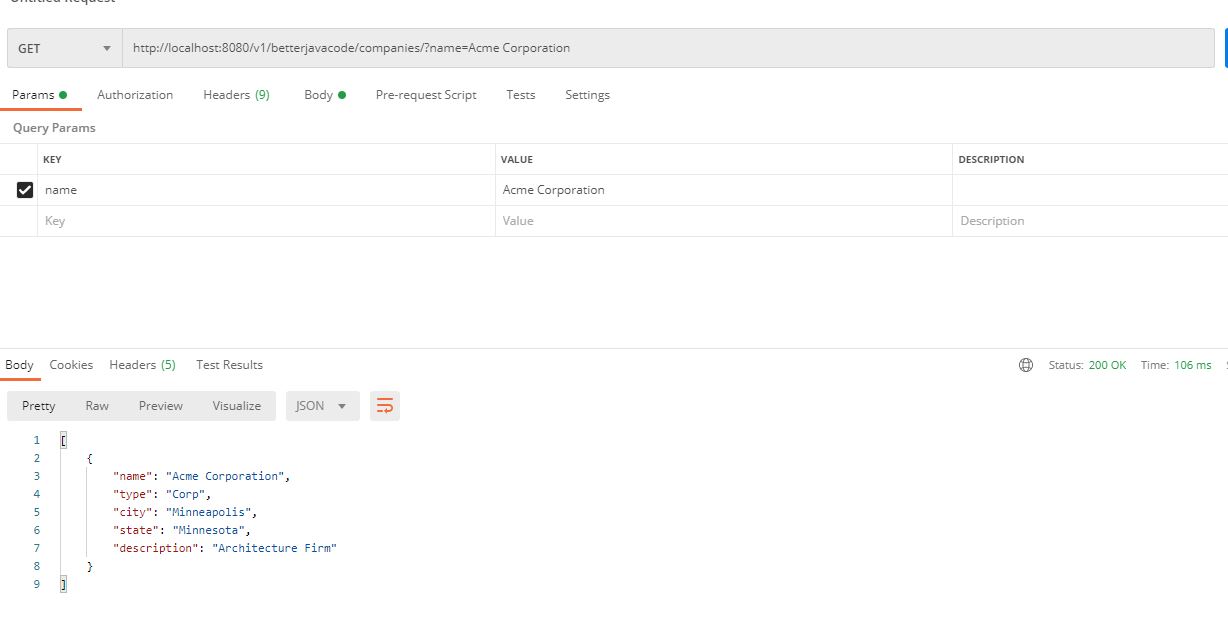
Now to add a repository for any of your domain objects, you can create an interface extending JpaRepository or CrudRepository.

This will look like below:


@Repository
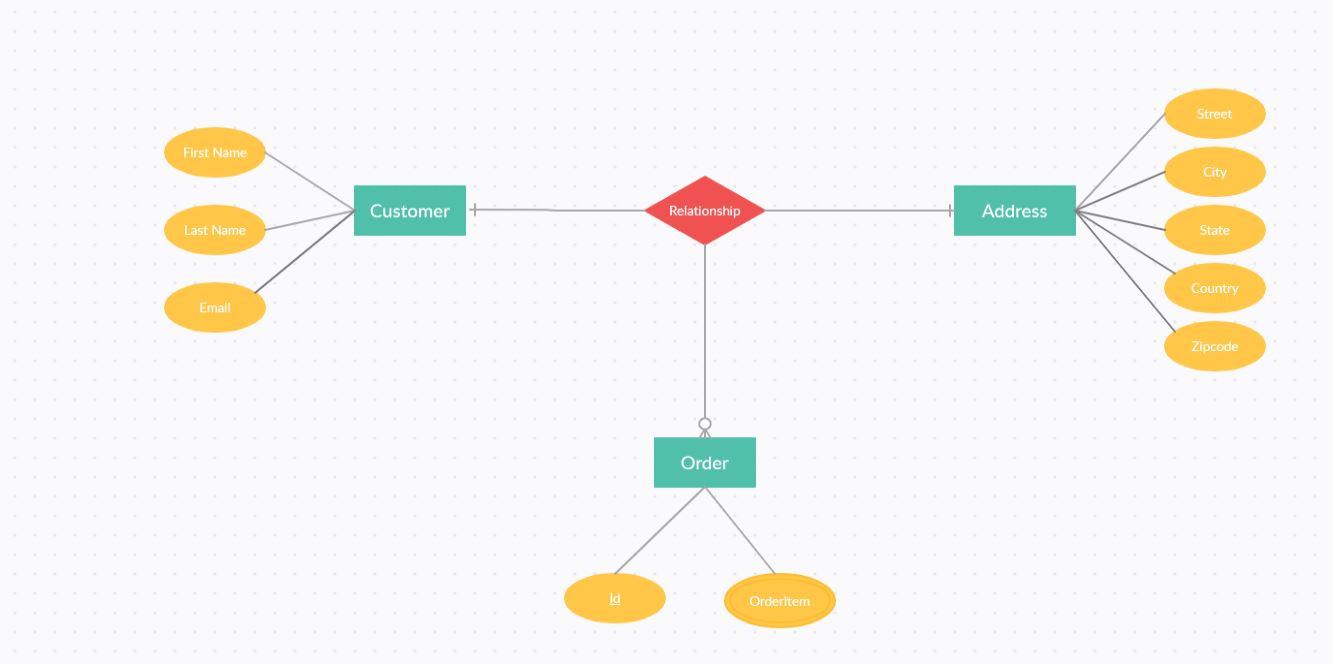
public interface OrderRepository extends JpaRepository<Order, Long>
{
    List findAllByCustomer (Customer customer);
}

As you can see above, we have added a new interface that represents a domain object of Order. I have also added a custom method findAllByCustomer. JPA Named Queries will take care of the implementation of this method to fetch all the orders by a customer.

Configuration

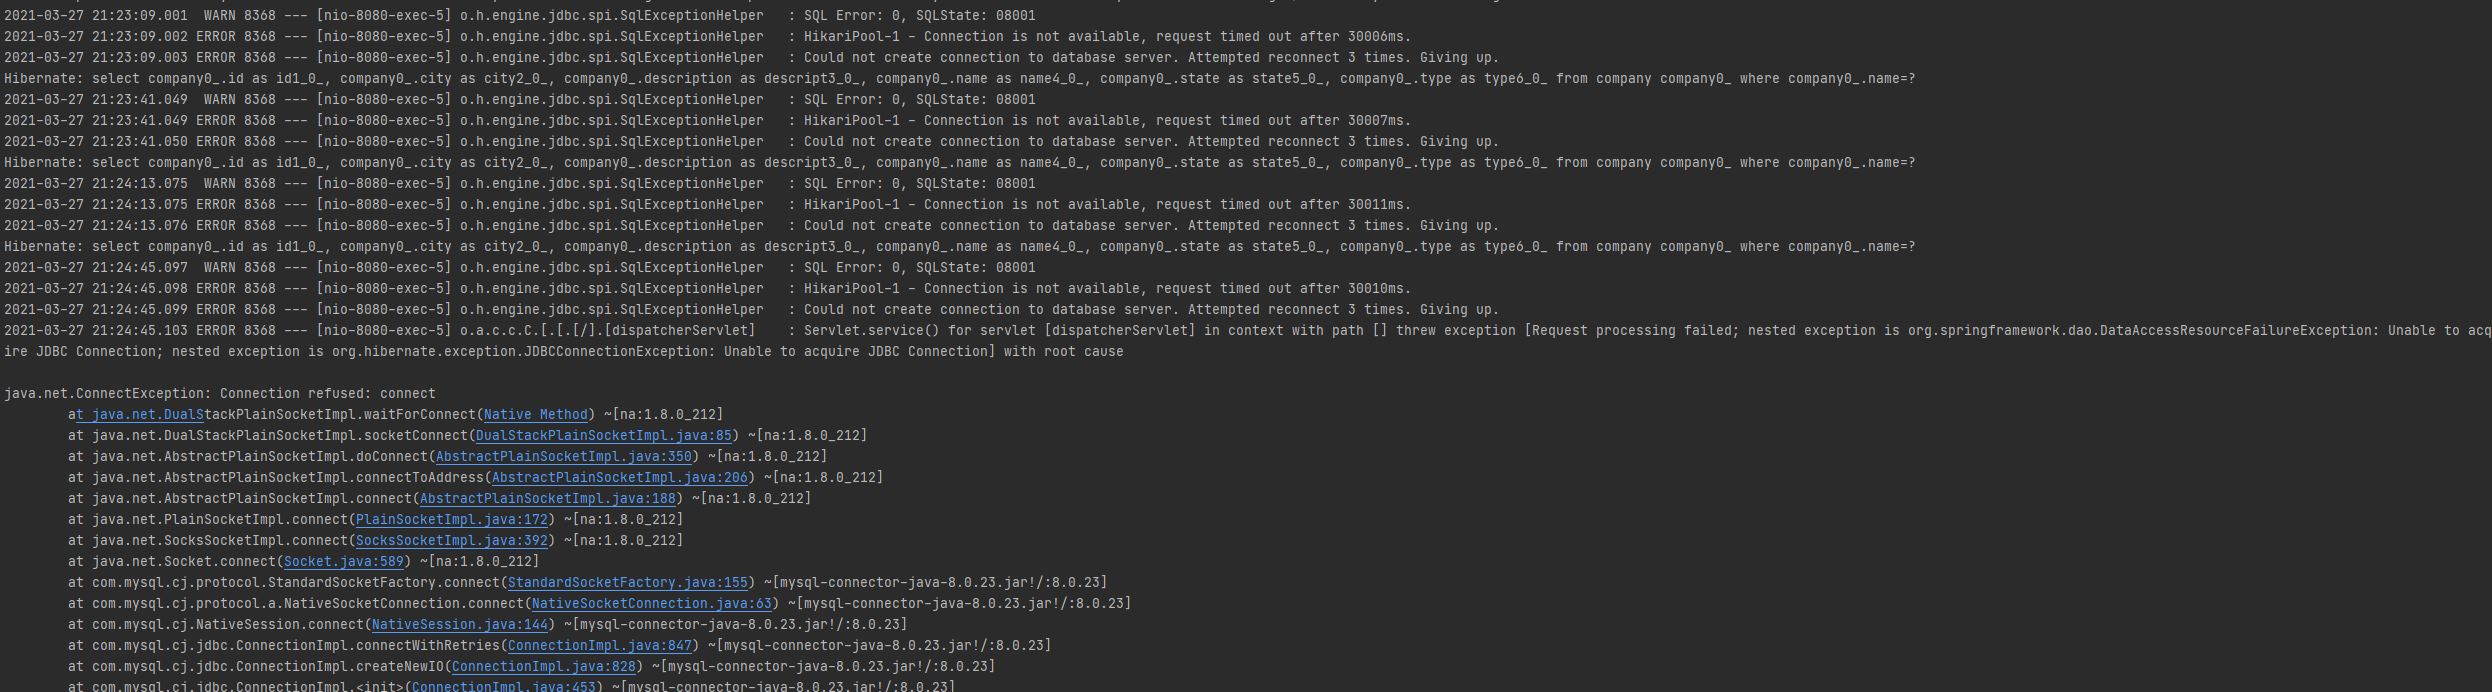
Spring Boot configures Hibernate as the default JPA provider. If you want to customize this configuration or change the default JPA provider, you will have to create a entityManagerFactory bean in your Spring Configuration.


@Configuration
@EnableTransactionManagement
@EnableJpaRepositories("com.betterjavacode.modelmapperdemo")
@PropertySource("classpath:application.properties")
public class DataConfig {

	private final String PROPERTY_DRIVER = "driver";
	private final String PROPERTY_URL = "url";
	private final String PROPERTY_USERNAME = "user";
	private final String PROPERTY_PASSWORD = "password";
	private final String PROPERTY_SHOW_SQL = "hibernate.show_sql";
	private final String PROPERTY_DIALECT = "hibernate.dialect";

	@Autowired
	Environment environment;

	@Bean
	LocalContainerEntityManagerFactoryBean entityManagerFactory() {
		LocalContainerEntityManagerFactoryBean lfb = new LocalContainerEntityManagerFactoryBean();
		lfb.setDataSource(dataSource());
		lfb.setPersistenceProviderClass(HibernatePersistence.class);
		lfb.setPackagesToScan("com.betterjavacode.modelmapperdemo");
		lfb.setJpaProperties(hibernateProps());
		return lfb;
	}

	@Bean
	DataSource dataSource() {
		DriverManagerDataSource ds = new DriverManagerDataSource();
		ds.setUrl(environment.getProperty(PROPERTY_URL));
		ds.setUsername(environment.getProperty(PROPERTY_USERNAME));
		ds.setPassword(environment.getProperty(PROPERTY_PASSWORD));
		ds.setDriverClassName(environment.getProperty(PROPERTY_DRIVER));
		return ds;
	}

	Properties hibernateProps() {
		Properties properties = new Properties();
		properties.setProperty(PROPERTY_DIALECT, environment.getProperty(PROPERTY_DIALECT));
		properties.setProperty(PROPERTY_SHOW_SQL, environment.getProperty(PROPERTY_SHOW_SQL));
		return properties;
	}

	@Bean
	JpaTransactionManager transactionManager() {
		JpaTransactionManager transactionManager = new JpaTransactionManager();
		transactionManager.setEntityManagerFactory(entityManagerFactory().getObject());
		return transactionManager;
	}
}

The above code shows how to add configuration if you plan to customize the default hibernation configuration.

  • @EnableTransactionManagement – enables the transactions in the application, especially when creating or updating the data.
  • @PropertySource – reads the application properties that will be used in Datasource bean.

As mentioned previously, Spring Boot uses Hibernate as the default persistence provider. But there are few other persistence providers available like OpenJPA or EclipseLink.

Difference between CrudRepository and JpaRepository

We previously discussed about creating repository interfaces that extend JpaRepository or CrudRepository. But when do you use which one? In this section, I clarify more details about these repository interfaces.

CrudRepository is the base interface. JpaRepository extends PagingAndSortingRepository which in turn extends CrudRepository.
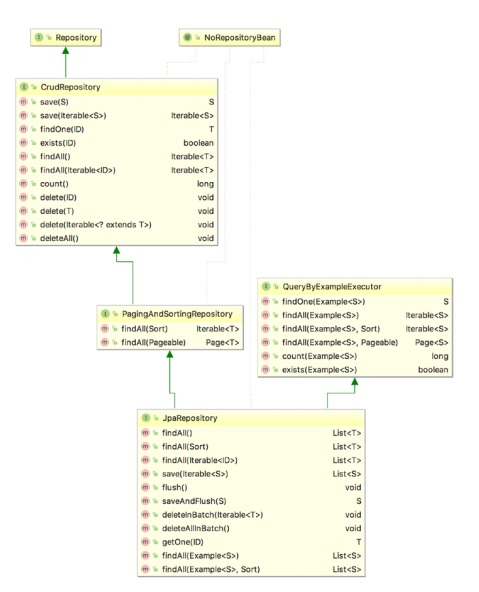
Repositories in Spring Data JPA

  • CrudRepository – This provides CRUD functions.
  • PagingAndSortingRepository – This provides functions for sortable and pageable data.
  • JpaRepository – JpaRepository provides JPA-related functions to flush the persistence context as well as delete data in a batch.

In short, one can use JpaRepository as it will include all the other methods from CrudRepository and PagingAndSortingRepository.

Conclusion

In this post, I showed the details of Spring Data JPA library and how to use it. I also showed configuration details and what repository interface to use.


Conversion of Entity to DTO Using ModelMapper

In this post, I will show how we can achieve the conversion of entity to DTO using the ModelMapper library.  We will basically create a simple REST API for orders while showing the transformation of Entity to DTO and vice versa.

Understanding Enterprise Architecture

In most enterprise architecture, you will have REST APIs. A consumer of these APIs sends a request and the server responds with a response. The transformation of request to response happens behind the API. You perform business logic and modify these objects.

Traditionally, there are three layers in the architecture. Web layer, business layer, and database layer.

So, your object in the database layer will be completely different from the same object in the web layer. Database entities from the database layer contain certain fields that you don’t need in the web layer. More so, any object from the web layer should be user-friendly. Users don’t have to guess what they are dealing with. It should be self-explanatory. This will be more clear when I show the implementation of this.


Separation of Layers between Entity and DTO

Data Transfer Objects (DTO) are the objects that move from one layer to another. These objects are more user-friendly and contain only the most required fields.

On the other hand, database entities represent database tables. A lot of auto-generated fields can be unnecessary for users to know about. Nevertheless, they are part of database entities. In DTO, we ignore these fields. Since these fields are auto-generated, our database layer code can handle that.

But when the object travels from the web layer to the database layer, it needs to be transformed for that layer to use. In the next section, I will show how we can achieve this conversion from entity to DTO using the ModelMapper library.

The Entity to DTO Using ModelMapper

ModelMapper library provides an easier way to convert an entity object to DTO and vice versa.

In this demo, I have a scenario where a customer orders an item. An order for the item gets created. We save order details, customer details, and the address of the customer.

To able to use this library in our application, add the dependency as follows:

implementation 'org.modelmapper:modelmapper:2.3.0'

Also if we want to use ModelMapper library functions, we will add a bean for the same as follows:

        @Bean
	public ModelMapper modelMapper()
	{
		return new ModelMapper();
	}

Previously, I stated that a customer will be able to order. So, we will implement this by having a REST API that will create Order details, Customer details.

Domain Layer

In this architecture, we have orders that customers order at certain addresses.

In a database entity diagram, it will look like below:

A customer can order multiple items, so multiple orders. Multiple orders can go to a single address.

Our domain objects will look like below, starting with Order:


package com.betterjavacode.modelmapperdemo.models;

import javax.persistence.*;
import java.io.Serializable;

@Entity(name = "Order")
@Table(name = "orders")
public class Order implements Serializable
{
    private static final long serialVersionUID = 7385741327704693623L;

    public Order()
    {

    }

    @Id
    @GeneratedValue(strategy = GenerationType.IDENTITY)
    @Column(name = "id", nullable = false)
    private long id;

    @Column(name ="order_item")
    private String orderItem;

    @Column(name = "description")
    private String description;


    @ManyToOne
    @JoinColumn(name = "customer_id")
    private Customer customer;


    @ManyToOne
    @JoinColumn(name = "address_id")
    private Address address;
    
    // Getters and setters omitted for demo purposes


}

The address will be:


package com.betterjavacode.modelmapperdemo.models;

import javax.persistence.*;
import java.io.Serializable;
import java.util.ArrayList;
import java.util.List;

@Entity(name = "Address")
@Table(name = "address")
public class Address implements Serializable
{
    private static final long serialVersionUID = -439961851267007148L;

    public Address()
    {

    }

    @Id
    @GeneratedValue(strategy = GenerationType.IDENTITY)
    @Column(name = "id", nullable = false)
    private long id;

    @Column
    private String street;

    @Column
    private String city;

    @Column
    private String state;

    @Column
    private String country;

    @Column
    private int zipcode;

    @OneToMany(cascade = CascadeType.ALL, orphanRemoval = true)
    private List orderList = new ArrayList<>();


}

And Customer will be:


package com.betterjavacode.modelmapperdemo.models;

import javax.persistence.*;
import java.io.Serializable;
import java.util.ArrayList;
import java.util.List;

@Entity(name = "Customer")
@Table(name = "customer")
public class Customer implements Serializable
{
    private static final long serialVersionUID = -2205735699915701334L;

    public Customer()
    {

    }

    @Id
    @GeneratedValue(strategy = GenerationType.IDENTITY)
    @Column(name = "id", nullable = false)
    private long id;

    @Column(name = "first_name")
    private String firstName;

    @Column(name = "last_name")
    private String lastName;

    @Column
    private String email;

    @OneToMany(cascade = CascadeType.ALL, orphanRemoval = true)
    private List orderList = new ArrayList<>();


}

These three objects order, customer, and address represent our database entities and part of the database layer. The rest of the persistence is straightforward with repositories.

Web Layer

Web layer mostly focuses on the controllers that we create for our APIs. These controllers are responsible for receiving the request from the client. Also, the objects that we will expose through APIs will be DTO object. This DTO Object for Order will look like below:


package com.betterjavacode.modelmapperdemo.dtos;

public class OrderDTO
{
    String orderItem;
    String orderDescription;
    String customerFirstName;
    String customerLastName;
    String customerEmail;
    String streetAddress;
    String cityAddress;
    String stateAddress;
    String countryAddress;
    int zipcodeAddress;

   // Getters and Setters omitted for demo

}

This DTO object includes fields from Order, Customer, and Address. Our API will receive this object in POST request, we will transform that DTO object to an entity object using ModelMapper library and then pass that entity object to our Service class to process further.

OrderController will be as follows:


package com.betterjavacode.modelmapperdemo.controllers;

import com.betterjavacode.modelmapperdemo.dtos.OrderDTO;
import com.betterjavacode.modelmapperdemo.models.Order;
import com.betterjavacode.modelmapperdemo.service.IOrderService;
import org.modelmapper.ModelMapper;
import org.slf4j.Logger;
import org.slf4j.LoggerFactory;
import org.springframework.beans.factory.annotation.Autowired;
import org.springframework.web.bind.annotation.*;

import java.util.ArrayList;
import java.util.List;

@RestController
@RequestMapping("/v1/betterjavacode/orders")
public class OrderController
{
    private static final Logger LOGGER = LoggerFactory.getLogger(OrderController.class);

    @Autowired
    private IOrderService orderService;

    @Autowired
    private ModelMapper modelMapper;

    @PostMapping
    public OrderDTO createOrder(@RequestBody OrderDTO orderDTO)
    {
        Order order = convertToEntity(orderDTO);
        Order orderCreated = orderService.createOrder(order);

        return convertToDTO(orderCreated);
    }

    @GetMapping("/{customerId}")
    public List getAllOrders(@PathVariable("customerId") long customerId)
    {
        List orderList = orderService.getAllOrdersForCustomer(customerId);
        List orderDTOs = new ArrayList<>();
        for(Order order : orderList)
        {
            orderDTOs.add(convertToDTO(order));
        }
        return orderDTOs;
    }


    private Order convertToEntity (OrderDTO orderDTO)
    {
        LOGGER.info("DTO Object = {} ", orderDTO);

        Order order = modelMapper.map(orderDTO, Order.class);

        return order;
    }

    private OrderDTO convertToDTO (Order order)
    {
        OrderDTO orderDTO = modelMapper.map(order, OrderDTO.class);
        return orderDTO;
    }
}

We have a POST API to create orders and a GET API to retrieve orders for a customer.

ModelMapper Library

In our controller, we are using ModelMapper bean to convert DTO object to entity and entity object to DTO.

How does the ModelMapper library actually achieve this?

When a mapper calls the map method, it analyzes the source and destination types to determine which properties to match. It uses a matching strategy and configuration to map these properties. Once, the properties are mapped, it will map the data.

So if we look at our DTO class, we have properties like customerFirstName, customerLastName that match to Customer Entity object, while properties like streetAddress, cityAddress will match to properties from Address object.

ModelMapper also offers a way to explicitly map the properties if you choose to do that.


modelMapper.typeMap(Order.class, OrderDTO.class).addMappings(mapper -> {
  mapper.map(src -> src.getBillingAddress().getStreet(),
      Destination::setBillingStreet);
  mapper.map(src -> src.getBillingAddress().getCity(),
      Destination::setBillingCity);
});

The library offers three types of matching strategies:

  1. Standard – In this strategy, the library matches the source properties to destination properties intelligently. This strategy is configured by default. All destination property name tokens must match.
  2. Loose – Properties of source and destination are matched loosely. If the property hierarchies of source and destination objects are dissimilar, then the loose strategy can work. The last destination property name must have all tokens matched.
  3. Strict – Source properties should strictly match destination properties. Tokens match in a strict order. This strategy allows no ambiguity.

A Complete Demo of Entity to DTO using ModelMapper

We have shown our REST Controller and Domain objects. Now, I will show how we can using postman to call this REST API by passing a DTO object to POST API.

We will create an order of an item that a customer orders.

In the request, I passed a DTO object that contains information for order, customer, and address.

In our service layer, we process converted entity objects, validate business rules and save this information to create the order.

Avoiding Technical Debt

Understanding the concept of DTO and Entity objects is important. When to use what kind of object can help you avoid technical debt. From personal experience, I have seen a lot of junior developers make the mistake of using entity objects in a web layer. Depending on your application, this can increase the complexity of the system.

Conclusion

In this post, I showed how we can convert entity to DTO using modelmapper library.  You can download the modelmapper library here. The code for this demo is available in my GitLab repository. If you enjoyed this post, consider subscribing to my blog here.

References

  1. Model Mapper Library – ModelMapper

Spring Retry vs Resilience4j Retry

In this post, I will show the comparison of the two retries – Spring Retry vs Resilience4j Retry. Usually, you can combine retry with a circuit breaker when implementing to make your application more robust. I already covered the circuit breaker demo. Also, I have updated my book Simplifying Spring Security with Okta Demo if you are interested to learn more about Spring Security.

Spring Retry vs Resilience4j Retry

Spring Retry allows applications to retry a failed operation automatically. In most cases, if your service is calling another service and another service is not responding for some reason, you can use Spring Retry to retry the same operation. This provides another way to make your service more available.

Retry makes your application more robust and less prone to failures. You can either configure Spring Retry on a method that you think can fail or you can configure a RetryTemplate. The ease of configuration makes Spring Retry an easier choice when writing code.

On other hand, the Resilience4j Retry module offers an equally easier configuration – either through code or through properties.

In this post, I will show how to use Spring Retry and Resilience4j Retry modules when calling any methods or services.

When to use Retry?

Usually, you should consider Retry operation in certain scenarios.

  1. HTTP call to a REST Endpoint
  2. Sending or retrieving messages from SQS
  3. Remote Procedure call or a web service
  4. Fetching or storing data from databases

In such cases, we can either throw an error if we fail to do the operation successfully. But with the availability of applications becoming more important, most of the time, these errors are trivial and most services come back online within a few milliseconds to seconds.

Therefore, it makes sense to apply retry. You must be careful that the operation that you are applying retry with must be idempotent. Suppose, your application sent a request and the target service received the request, but in between something happened and your target service couldn’t respond in time. Then, with retry, the target service should not treat the retry attempt as a separate or new request. This makes your system more resilient.

Spring Retry

In this section, I will show various ways to use Spring Retry. To start with, we will have a simple Spring Boot REST application to retrieve a list of companies from the database. As usual, I will not show how to build a Spring Boot application.

Gradle Dependencies

To use Spring Retry, we need two dependencies in our configuration.

        implementation 'org.springframework.retry:spring-retry:1.3.1'
	implementation 'org.springframework:spring-aspects:5.3.5'

EnableRetry Annotation

Once, we have spring-retry dependency, we will be able to annotate our main class with annotation @EnableRetry as follows:


package com.betterjavacode.retrydemo;

import org.springframework.boot.SpringApplication;
import org.springframework.boot.autoconfigure.SpringBootApplication;
import org.springframework.context.annotation.Bean;
import org.springframework.data.jpa.repository.config.EnableJpaRepositories;
import org.springframework.retry.annotation.EnableRetry;
import org.springframework.retry.backoff.FixedBackOffPolicy;
import org.springframework.retry.policy.SimpleRetryPolicy;
import org.springframework.retry.support.RetryTemplate;


@SpringBootApplication
@EnableRetry
@EnableJpaRepositories(basePackages = "com.betterjavacode.retrydemo.daos")
public class RetrydemoApplication {

	public static void main(String[] args) {
		SpringApplication.run(RetrydemoApplication.class, args);
	}

	@Bean
	public RetryTemplate retryTemplate()
	{
		RetryTemplate retryTemplate = new RetryTemplate();

		FixedBackOffPolicy backOffPolicy = new FixedBackOffPolicy();
		backOffPolicy.setBackOffPeriod(100);

		SimpleRetryPolicy simpleRetryPolicy = new SimpleRetryPolicy();
		simpleRetryPolicy.setMaxAttempts(2);

		retryTemplate.setRetryPolicy(simpleRetryPolicy);
		retryTemplate.setBackOffPolicy(backOffPolicy);
		return retryTemplate;
	}


}

I will explain the rest of the code as we go along, but just note here the annotation @EnableRetry. This will enable the retry in our application.

REST Controller

We will show Spring Retry in two different ways.

  1. Using @Retryable annotation
  2. Using RetryTemplate

Our REST Controller will fetch us a list of companies, a company by id, or a list of companies by name. It will look like below:


package com.betterjavacode.retrydemo.controllers;

import com.betterjavacode.retrydemo.dtos.CompanyDto;
import com.betterjavacode.retrydemo.service.CompanyService;
import org.springframework.beans.factory.annotation.Autowired;
import org.springframework.http.HttpStatus;
import org.springframework.http.ResponseEntity;
import org.springframework.web.bind.annotation.*;

import java.util.List;

@RestController
@RequestMapping("/v1/betterjavacode/companies")
public class CompanyController
{
    @Autowired
    CompanyService companyService;

    @GetMapping
    public ResponseEntity<List> getAllCompanies()
    {
        List companyDtos = companyService.getAllCompanies();

        if(companyDtos.isEmpty())
        {
            return new ResponseEntity<>(HttpStatus.NO_CONTENT);
        }

        return new ResponseEntity<>(companyDtos, HttpStatus.OK);
    }

    @GetMapping("/{id}")
    public ResponseEntity getCompanyById(@PathVariable("id") long id)
    {
        CompanyDto companyDto = companyService.getCompany(id);
        if(companyDto == null)
        {
            return new ResponseEntity<>(HttpStatus.NO_CONTENT);
        }
        return new ResponseEntity<>(companyDto, HttpStatus.OK);
    }

    @GetMapping("/")
    public ResponseEntity<List> searchCompanies(@RequestParam("name") String companyName)
    {
        List companyDtos = companyService.searchCompanyByName(companyName);
        if(companyDtos.isEmpty())
        {
            return new ResponseEntity<>(HttpStatus.NO_CONTENT);
        }

        return new ResponseEntity<>(companyDtos, HttpStatus.OK);
    }
}

In our controller, we are using a @Service object called CompanyService. This service object provides us with a way to implement our methods to fetch company data.

Service with various Retry Configuration

So, we will see how we can use annotation @Retryable:


    @Retryable(value = SQLException.class, maxAttempts = 2, backoff = @Backoff(delay = 100))
    public List getAllCompanies()
    {
        List companies =  companyRepository.findAll();
        List companyDtos = new ArrayList<>();
        for(Company company : companies)
        {
            CompanyDto companyDto = new CompanyDto(company.getName(), company.getType(),
                    company.getCity(), company.getState(), company.getDescription());
            companyDtos.add(companyDto);
        }

        return companyDtos;
    }

In the above code, we are fetching a list of companies. If this method fails to fetch the result with any exception related to SQLException, we will retry the fetching. We will retry this twice as configured with maxAttempts. Between each attempt, there will be a delay of 100 milliseconds. Now if we run our application and call this method, we will see how this retry works.

To simulate the error, I will stop SQL Service from Windows Services. I will show a successful response and a retried response below:

As you can see in the above screenshot, there were two attempts to retry. In each retry, it tried to connect to MySQL server thrice.

What is Spring Boot Retry Template?

Similarly, we can also use retry template that Spring-Retry offers. In the following code, I show a method that I have added in CompanyService to get company data for an id.


    public CompanyDto getCompany(long id)
    {
        CompanyDto companyDto = retryTemplate.execute(rt -> {
           Company company = companyRepository.findById(id).get();
           CompanyDto localCompanyDto = new CompanyDto(company.getName(), company.getType(),
                   company.getCity(),
                   company.getState(), company.getDescription());
           return localCompanyDto;
        });

        return companyDto;
    }

This retryTemplate bean is configured with simpleRetryPolicy with 2 attempts and 100 milliseconds delay between each attempt. Nevertheless, if I try to execute this method the same way I did for @Retryable, we will see the below output:

As mentioned above, all I am doing is stopping my MySQL service from windows services and it allows my method to get executed to retry.

Is Retry Template Thread Safe?

Retry Template class is thread-safe. It allows concurrent access. In return, one can execute multiple operations.

Resilience4j Retry

While using resilience4j-retry library, you can register a custom global RetryConfig with a RetryRegistry builder. Use this registry to build a Retry. In our demo to fetch company data, we added a new method to retrieve companies by name.

This method will look like below:


    public List searchCompanyByName(String name)
    {
        LOGGER.info("Search for company = {}", name);

        RetryConfig retryConfig =
                RetryConfig.custom().maxAttempts(4).waitDuration(Duration.of(2, SECONDS)).build();         

        RetryRegistry retryRegistry = RetryRegistry.of(retryConfig);

        Retry retryConfiguration = retryRegistry.retry("companySearchService", retryConfig);

        Supplier<List> companiesSupplier = () -> companyRepository.findAllByName(name);

        Supplier<List> retryingCompaniesSearch =
                Retry.decorateSupplier(retryConfiguration, companiesSupplier);

        List companyDtos = new ArrayList<>();
        List companies = retryingCompaniesSearch.get();
        LOGGER.info("Retrying..");
        for(Company company : companies)
        {
            CompanyDto companyDto = new CompanyDto(company.getName(), company.getType(),
                    company.getCity(), company.getState(), company.getDescription());
            companyDtos.add(companyDto);
        }

        return companyDtos;
    }

In the above method, we first create RetryConfig. We create a RetryRegistry and add RetryConfig in this registry. Then when we create our call to fetch a list of companies. We decorate this call with retryConfiguration.

Customizations with Resilience4j-Retry

RetryConfig offers different customization:

  1. maxAttempts – 3 is the default number of attempts for retries.
  2. waitDuration – a fixed wait duration between each retry attempt.
  3. intervalFunction – a function to modify the waiting interval after a failure.
  4. retryOnResultPredicate – configures a predicate that evaluates if a result should be retried.
  5. retryExceptions – Configures a list of throwable classes that are used for retrying
  6. ignoreExceptions – Configures a list of throwable classes that are ignored
  7. failAfterMaxRetries – A boolean to enable or disable throwing of MaxRetriesExceededException when the Retry has reached the configured maxAttempts

Demo

Now, let’s look at what happens when we execute this method with resilience4j-retry. The following screenshot shows the successful response when SQL service is still running.

If I stop SQL service, we will see the retry attempts 4 times as we have configured it for 4.

Code

The code for this demo can be found in my github repository.

Conclusion

In this post, I showed the comparison between Spring Retry vs Resilience4j Retry. When to use either of these libraries depends on your scenario. Usually, Resilience4j Retry goes well if you also plan to resilience4j circuit breaker module. Spring Retry can be handy with various configurations as well using RetryTemplate.

If you enjoyed this post, please subscribe to my blog here.

How to Deploy Spring Boot Application on AWS ECS

In this post, I will show how we can deploy a spring boot application on AWS ECS (Elastic Container Service). ECS is one of the amazon web services that is mainly used to run the applications. It is an alternative to use EC2 instances directly.

What is ECS?

ECS is a container orchestration service. ECS allows you to run your container. You can also easily build ECS cluster using AWS Farget. Farget removes the need to provision and manages a server. The advantage of using ECS is that you don’t have to decide which server EC2 instance to use, the service does that for you. It also improves security through application isolation.

As part of this demo, I will show step by step how you can deploy your spring boot application on the ECS cluster with AWS Fargate.

Spring Boot Application

I will not be showing you how to build a Spring Boot application, but you can visit my other posts about it. In this application, we will have a controller that will show a to-do list. We will also have form-based authentication using the MySQL database. The config method in security config will look like below:


    @Override
    protected void configure(HttpSecurity httpSecurity) throws Exception
    {
        httpSecurity
                .authorizeRequests()
                .antMatchers("/js/**","/css/**","/img/**").permitAll()
                .antMatchers("/signup","/forgotpassword")
                .permitAll()
                .anyRequest().authenticated()
                .and()
                .formLogin()
                .loginPage("/login")
                .permitAll()
                .and()
                .logout()
                .logoutUrl("/logout")
                .logoutSuccessHandler(logoutSuccessHandler)
                .deleteCookies("JSESSIONID")
                .permitAll()
                .and()
                .csrf();

    }

So, as you see above, we will allow anyone to access signup and forgotpassword pages.  Equally, anyone can access the login page. We will use our custom login form located on the login page.

If the user successfully logs in, the user will see a static TO-DO list page showing TO-DO list.

As part of this demo, we will also be creating a MySQL database in AWS RDS. Our application running in AWS Fargate ECS cluster will access this MySQL database for storing users and user authentication.

Building a docker container for Spring Boot Application

We will create a docker file.

FROM openjdk:8-jdk-alpine
COPY ./build/libs/todolist-0.0.1-SNAPSHOT.war todolist-0.0.1-SNAPSHOT.war
ENTRYPOINT ["java", "-jar","todolist-0.0.1-SNAPSHOT.war"]

Basically, we pull Java 8 image and copy the war file from our project into the docker instance. We also define the entry-point.

Command to create a docker image

docker build -t todolist .

If you want to run your application through docker locally, you can use the following command:

docker run -p 8743:8743 todolist

So to deploy our application on ECS, we will need to push this docker image to the elastic container repository (ECR).

Usually building a docker image and pushing it to ECR is all part of CI/CD. I will not be covering CI/CD in this post.

To push this docker image to ECR,

  1. You will need aws-cli tools installed on your machine.
  2. Create a repository in ECR

Now on the command line, execute this command to authenticate docker client to ECR repository

aws ecr get-login-password --region us-east-1 | docker login --username AWS --password-stdin XXXXXXX.dkr.ecr.us-east-1.amazonaws.com

Once we are authenticated, we can tag and push docker images to the ECR repository.

  1. Tag the docker image – docker tag IMAGEID XXXXXX.dkr.ecr.us-east-1.amazonaws.com/todolist
  2. Push the docker image – docker push XXXXX.dkr.ecr.us-east-1.amazonaws.com/todolist

Now our docker image is in ECR.

Deploying docker image in ECS

Before we can deploy our docker image in ECS, we will have to execute three steps.

  1. Create a database instance of MySQL in AWS RDS. The configuration to create this instance will look like below:
  2. Once you create the database, you will have database instance server and port available that you can use to connect to database server either through Database Administration UI or command line. Create a database simplifyingspringsecurity and database table users.
  3. Now let’s move to ECS service and create a task definition for AWS Fargate. It will look like below: Also remember to create a IAM role beforehand which should have a permission policy `AmazonECSTaskExecutionRolePolicy` . In the same task definition, we will have to add our container and the properties for this container. They will look like below: We have mapped two ports 8743 and 80 from our host to the container. In the same container, also add environment properties if you want to override properties for your data source. These properties include spring.datasource.url, spring.datasource.username, spring.datasource.password, spring.datasource.driver-class-name, and spring.jpa.properties.hibernate.dialect.  That should cover our configuration for the task.
  4. Ultimately, we will create an ECS cluster which we will use to run our task. As you see, we have chosen a AWS Fargate based cluster. On the next step you provide a name for the cluster and click “Create” and that should create a cluster.
  5. Once the cluster is configured and running, we can go on the tab “Tasks” and click “Run new task”. Here we will provide few more configurations that will allow us to run our task in a way so that we can access the application once the task starts running. We have security groups defined here, but it also provides the option to create a new security group when running. In this security group, you should choose which type of protocol and ports you want to allow for access. In this case, we want our port 8743 for internet and TCP. Now click ‘Run Task’ and that should start the task. Once the task starts, we will be able to see the logs from cloud watch as below: On this basis, if you look at logs, now our application is running successfully on port 8743. Now we can access the application using the public IP that the Fargate task provided. Here we go, we have our application up and running.

Learnings

ECS can be complicated with the number of configurations a user can do when deploying an application. To keep this simple, just think this way AWS Cloud -> VPC -> Subnet -> ECS -> Fargate -> Task.

Conclusion

In this post, I showed how to deploy a Spring Boot Application on AWS ECS. As much as it seems straightforward, the issue comes up with the combination of configurations you can do in AWS ECS. Once you understand how the cloud handles private networks, it becomes simpler.

User Management with Okta SDK and Spring Boot

In this post, I will show how we can build user management and authentication with Okta SDK and Spring Boot.

Introduction

As part of any application, developers have to be careful how they build authentication. Despite we are using Form-Based authentication for a long time, it is not the most secure one. In this post, I plan to show Form-Based authentication where users are not necessarily authenticated by validating their encrypted password against the password stored in a database. If you want to learn more about Spring Security with different authentication flows, I recently released a book Simplifying Spring Security. You can buy the book here.

Okta is an identity provider. It’s an application that provides user management and authentication with different protocols.

Okta SDK APIs

Okta offers two libraries okta-sdk-java and okta-auth-java for user management APIs and authentication.

Are these libraries right for you? This depends on your use case. Okta also offers okta-spring-boot-starter library to use okta for different OAuth flows in your Spring Boot Application. We will not be using this library in this demo.

You can find more details about these libraries here and here.

Include these libraries in your project as follows:


	implementation 'com.okta.authn.sdk:okta-authn-sdk-api:2.0.1'
	runtimeOnly 'com.okta.authn.sdk:okta-authn-sdk-impl:2.0.1'
	runtimeOnly 'com.okta.sdk:okta-sdk-httpclient:3.0.1'

User Management with Okta SDK in Spring Boot Application

In this demo, I have a sample application of To-Do List. When a user launches the application, user will see a login screen. It has Sign up option. If the user doesn’t exist in the application, the user will have to create an account.

On Sign-up page, when a user enters the “Submit” button, we will save the user in our database and then call Okta SDK API to create the user on Okta side.

To achieve this, we need Okta Client.


    @Bean
    public Client client()
    {

        Client clientConfig =
                Clients.builder().setOrgUrl("https://oktadomainurl").setClientCredentials(new TokenClientCredentials(secret))
                        .build();


        return clientConfig;

    }

As you see above, we are creating a client that we will use to call Okta API. The `secret` is the API token you will be able to find in Okta admin UI. If you don’t find it, either you don’t have admin privileges or you have not created the token yet. There is another way to create this client with an access token.


    @Bean
    public Client client()
    {

        Client clientConfig =
                Clients.builder().setOrgUrl("https://oktadomainurl")
                      .setAuthorizationMode(AuthorizationMode.PRIVATE_KEY).setClientId("{clientId}")
                      .setScopes(new HashSet<>(Arrays.asList("okta.users.read", "okta.apps.read")))
                      .setPrivateKey("/path/to/yourPrivateKey.pem")


        return clientConfig;

    }

The advantage of this Client configuration is that you don’t need to know API access token created based on admin privileges.

Now on my Controller side, I will use this client to create user in Okta as below:


        UserDto userDto = new UserDto();
        userDto.setEmail(email);
        userDto.setFirstName(firstname);
        userDto.setLastName(lastname);
        userDto.setPassword(encodedPassword);
        userDto.setRole("ADMIN");
        userDto.setEnabled(true);

        UserDto returnedUser = usersManager.createUser(userDto);

        LOGGER.info("Create the user in Okta");

        User oktaUser = UserBuilder.instance().setEmail(returnedUser.getEmail())
                .setFirstName(returnedUser.getFirstName())
                .setLastName(returnedUser.getLastName())
                .buildAndCreate(client);

That covers the user management part. You can similarly call GET or DELETE API to manage users.

User Authentication

Now comes the critical part of authentication. In many enterprise applications, when using third-party identity provides, the trouble always comes with user data synchronization. Both applications need to store user data.

For authentication, we will need authenticationClient bean. This client will allow us to call Okta API for authentication.


    @Bean
    public AuthenticationClient authenticationClient()
    {
        AuthenticationClient authenticationClient =
                AuthenticationClients.builder()
                        .setOrgUrl("https://oktadomainurl")
                        .build();

        return authenticationClient;
    }

In our security config, I will override the form-based login with a custom login page.


    @Autowired
    private CustomAuthenticationProvider customAuthenticationProvider;

    @Bean(BeanIds.AUTHENTICATION_MANAGER)
    @Override
    public AuthenticationManager authenticationManagerBean() throws Exception
    {
        return super.authenticationManagerBean();
    }


    @Override
    protected void configure(HttpSecurity httpSecurity) throws Exception
    {

        httpSecurity.authorizeRequests()
                .antMatchers("/js/**","/css/**","/img/**").permitAll()
                .antMatchers("/signup","/forgotpassword").permitAll()
                .anyRequest().authenticated()
                .and()
                .formLogin()
                .loginPage("/login")
                .permitAll();

    }

As you see in above code, I am using customAuthenticationProvider, this provider will use authenticationClient to authentcate with Okta. This AuthenticationProvider will look like below:


package com.betterjavacode.sss.todolist.clients;

import com.betterjavacode.sss.todolist.security.AuthenticationStateHandler;
import com.okta.authn.sdk.client.AuthenticationClient;
import com.okta.authn.sdk.resource.AuthenticationResponse;
import org.slf4j.Logger;
import org.slf4j.LoggerFactory;
import org.springframework.beans.factory.annotation.Autowired;
import org.springframework.security.authentication.AuthenticationProvider;
import org.springframework.security.authentication.UsernamePasswordAuthenticationToken;
import org.springframework.security.core.Authentication;
import org.springframework.security.core.AuthenticationException;
import org.springframework.security.core.GrantedAuthority;
import org.springframework.security.core.authority.SimpleGrantedAuthority;
import org.springframework.security.core.userdetails.User;
import org.springframework.security.core.userdetails.UserDetails;
import org.springframework.stereotype.Component;

import java.util.ArrayList;
import java.util.List;

@Component
public class CustomAuthenticationProvider implements AuthenticationProvider
{

    private static final Logger LOGGER = LoggerFactory.getLogger(CustomAuthenticationProvider.class);

    @Autowired
    private AuthenticationClient authenticationClient;

    @Autowired
    private AuthenticationStateHandler authenticationStateHandler;

    @Override
    public Authentication authenticate (Authentication authentication) throws AuthenticationException
    {
        String username = authentication.getName();
        String password = authentication.getCredentials().toString();
        String relayState = "/index";
        AuthenticationResponse authnResponse = null;
        try
        {
            LOGGER.info("Going to connect to Okta");
            authnResponse = authenticationClient.authenticate(username, password.toCharArray(),
                    relayState,
                    authenticationStateHandler);
        }
        catch(com.okta.authn.sdk.AuthenticationException e)
        {
            LOGGER.error("Unable to authentcate the user", e);
        }

        if(authnResponse != null)
        {
            final List grantedAuths = new ArrayList<>();
            grantedAuths.add(new SimpleGrantedAuthority("ROLE_ADMIN"));
            final UserDetails principal = new User(username, password, grantedAuths);
            final Authentication authen = new UsernamePasswordAuthenticationToken(principal,
                    password, grantedAuths);
            return authen;
        }
        else
        {
            LOGGER.info("Unable to authenticate");
            return null;
        }

    }

    @Override
    public boolean supports (Class<?> authentication)
    {
        return true;
    }
}

We use authenticationClient to call authenticate method. AuthenticationStateHandler basically handles the status authentication. The implementation of this handle is as below:


package com.betterjavacode.sss.todolist.security;

import com.okta.authn.sdk.AuthenticationStateHandlerAdapter;
import com.okta.authn.sdk.resource.AuthenticationResponse;
import com.okta.commons.lang.Strings;
import org.slf4j.Logger;
import org.slf4j.LoggerFactory;
import org.springframework.stereotype.Component;

@Component
public class AuthenticationStateHandler extends AuthenticationStateHandlerAdapter
{
    private static final Logger LOGGER = LoggerFactory.getLogger(AuthenticationStateHandler.class);

    @Override
    public void handleUnknown (AuthenticationResponse unknownResponse)
    {
        // TO DO
    }

    @Override
    public void handleSuccess (AuthenticationResponse successResponse)
    {
        if (Strings.hasLength(successResponse.getSessionToken()))
        {
            LOGGER.info("Login successful");
            String relayState = successResponse.getRelayState();
            String dest = relayState != null ? relayState : "/";

        }
    }
}

That’s all. This covers user authentication. Remember this is still form based authentication where you are entering user credentials on your custom login page and behind the screen calling Okta API to authenticate.

In my book, Simplifying Spring Security, I have also added the demo for login with Okta OAuth.

Conclusion

In this post, I showed how to use Okta SDK for user management and authentication with the Spring Boot application. If you have any questions, feel free to send me an email by subscribing to my blog here.