Tag Archives: Java

How to add Stripe Payment to Spring Boot Application

In this post, we will show how to add Stripe Payment to Spring boot application. Most enterprise applications offer a way where customer can pay online. Online payments are the backbone of internet world in current times. If you ever built an application for a customer, previously there were physical cheques OR credit card payments. With the applications becoming more web based, it has become utmost necessary to integrate your application with some kind of payment gateway. Payment gateway will handle all tax and financial regulation related complications which the application doesn’t have to deal with.

The functionality is part of the application Social KPI that I am building.

What are we trying to achieve here?

Story for Stripe Payment

An administrator comes on the billing page and pays the bill for that month. Once the bill is paid, the billing page will show that the bill has been paid for that month. So the option to enter credit card details will only be shown if the bill has not been paid.

As part of payment service, we will be using Stripe . Once the user enters credit card details and she can enter Pay Now button which will contact Stripe API to get token, this token will be used to create a charge on Stripe and Stripe will respond with success or failure of the charge.

Flow

To summarize the flow

  1. User clicks Pay Now to pay the charges
  2. Frontend Stripe javascript API contacts Stripe to create token using enter billing details
  3. Frontend Stripe javascript API sends this token to server to handle billing on server side
  4. On server side, controller uses the token and amount to create charge for that customer for application usage.
  5. For paid bills, the status is marked as paid for the customer for that month.

Frontend Implementation

To use Stripe APIs, we must first create account on stripe.com as a developer and get the keys. Good thing is Stripe offers API keys for test and live environments. For this post and demo, we will be using test keys only. Once we have API keys, we will use them in our frontend and backend implementation.

In following screenshot, you will see how the billing page will look:
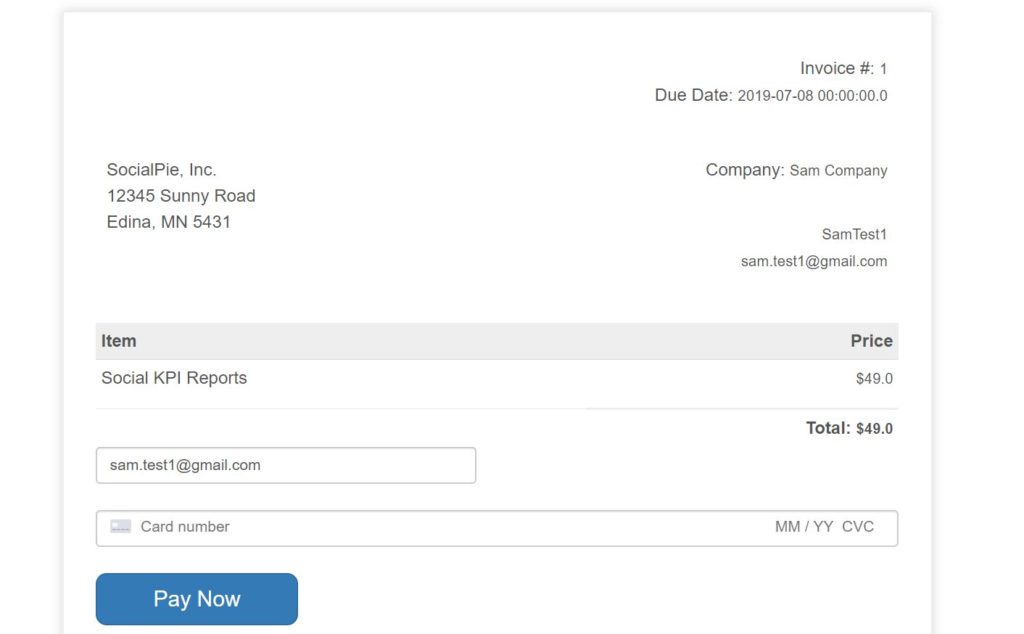
Billing Page

Once the user clicks on Pay Now, the javascript function from Stripe for mounting card and creating token will be called. Once the token is available, the same function will pass it server by submitting a POST request. Sample of this code will look like below:


            var form = document.getElementById('payment-form');
            form.addEventListener('submit',function(event){
                event.preventDefault();
                payTheBill();
            });

            function payTheBill(){
                stripe.createToken(card).then(function(result){
                    if(result.error){
                        var errorElement = document.getElementById('card-errors');
                        errorElement.textContent = result.error.message;
                    } else {
                        var token = result.token.id;
                        var email = $('#email').val();
                        var companyid = $('#companyid').val();
                        var amount = $('#amount').val();
                        $.get(
                            "/createcharge",
                            {email:email,token:token,companyid : companyid, amount:amount},
                            function(data){
                                alert(data.details);
                            },'json');
                    }
                })
            }

Backend Implementation

As part of the application Social KPI, I have a database table billing to track customer’s paid bills. The PaymentController is a REST controller which will have a POST request mapping for creating a charge and storing in the database table and mark the bill as paid. As shown above in javascript code, once the token is available it will be sent to server side to controller to handle the charge. This will be a REST call, so the controller is also RestController.


 @RequestMapping(value="/createcharge",method = RequestMethod.GET)
    @ResponseBody
    public Response createCharge(String email, String token, String companyid, double amount)
    {
        LOGGER.info("Enter >> createCharge() ");

        if(token == null)
        {
            throw new RuntimeException("Can't create a charge, try again");
        }

        Billing billing = billingRepository.findByCompanyId(Integer.parseInt(companyid));

        double billedAmount = amount * 100;

        String chargeId = paymentService.createCharge(email,token,billedAmount);

        if(chargeId != null && !chargeId.equals(""))
        {
            LOGGER.info("bill has been charged on consumer's account");
            billing.setStatus(true);
            billing.setPaiddate(new Date());
            billingRepository.save(billing);
        }

        LOGGER.info("Exit << createCharge() ");
        return new Response(true,"Congratulations, your card has been charged, chargeId= "+chargeId);
    }

As shown above, Service called paymentService will create a charge on Stripe. To implement paymentService, you will need to include stripe java library in your implementation.

compile('com.stripe:stripe-java:10.5.0')

So the service class PaymentService will look like below to create charge:


    public String createCharge(String email, String token, double amount)
    {
        String id = null;
        try
        {
            Stripe.apiKey = API_SECRET_KEY;
            Map chargeParams = new HashMap<>();
            chargeParams.put("amount", (int)(amount*100));
            chargeParams.put("currency", "USD");
            chargeParams.put("description", "Charge for " + email);
            chargeParams.put("source", token);
            Charge charge = Charge.create(chargeParams);
            id = charge.getId();
        }
        catch(StripeException e)
        {
            throw new RuntimeException("Unable to process the charge", e);
        }
        return id;
    }

Once the bill is paid, administrator will see this as the bill paid for that month.

Conclusion

In this post, we showed how to integrate Spring boot application with Stripe payment gateway.

References

  1. Stripe API reference - https://stripe.com/docs/api/charges
  2. Integrate Stripe with Spring boot - Stripe with Spring boot

How to file upload using Spring Boot

In this post, I will show how I added file upload functionality in my Spring Boot application, social KPI.

On the outskirts, it looks very simple functionality and it is indeed simple with Spring Boot. As part of this post, we will build a web form where an administrator will add additional users for his/her company by importing a CSV file in a particular format.

Basic functionality is to provide a way for an administrator to import a CSV file, read and validate the data, and save it in the database if proper data.

Now once we have defined our user story, let’s get started with the post.

Form For File Upload In a Spring Boot Application

We are using thymeleaf templates for our spring boot based application. So writing a simple html page with a form to upload a file is very straight forward as below:

<div class="container importuser">
    <div class="form-group">
    <form method="POST" th:action="@{/uploadUsers}" enctype="multipart/form-data">
        <input type="hidden" name="companyGuid" th:value="${companyGuid}"/>
        <input type="file" name="file"/></br></br>
        <button type="submit" class="btn btn-primary btn-lg" value="Import">Import
        </button>
    </form>
    </div>
</div>

As you see in this form, clicking on Import button will kick the action to upload users.

Controller to handle file upload on backend side

A controller to handle upload users functionality will look like below:

    @RequestMapping(value = "/uploadUsers",method= RequestMethod.POST)
    public String fileUpload (@RequestParam("file") MultipartFile file, @RequestParam(
            "companyGuid") String companyGuid,
                              RedirectAttributes redirectAttributes)
    {
        LOGGER.info("File is {}", file.getName());
        LOGGER.info("Company Guid is {}", companyGuid);

        if (file.isEmpty())
        {
            redirectAttributes.addFlashAttribute("message", "Please select a file to upload");
            return "redirect:/uploadStatus";
        }

        List userList = FileUtil.readAndValidateFile(file, roleRepository);
        for(User user: userList)
        {
            User createdUser = userManager.createUser(companyGuid, user);
        }

        redirectAttributes.addFlashAttribute("message",
                "You successfully uploaded " + file.getOriginalFilename() + " and added " + userList.size() + " users");


        return "redirect:/uploadStatus";
    }

The method to readAndValidateFile is simply reading the data from file, validating to make sure all the fields in CSV file exists, if wrong format, it will throw an error. If a valid file, it will create a list of users. UserManager will create each user.

The class FileUtil is as below:

package com.betterjavacode.socialpie.utils;

import com.betterjavacode.socialpie.models.Role;
import com.betterjavacode.socialpie.models.User;

import com.betterjavacode.socialpie.repositories.RoleRepository;
import org.springframework.beans.factory.annotation.Autowired;
import org.springframework.web.multipart.MultipartFile;

import java.io.BufferedReader;
import java.io.IOException;
import java.io.InputStream;
import java.io.InputStreamReader;
import java.util.ArrayList;
import java.util.List;

public class FileUtil
{
    private static final String FIRST_NAME = "firstname";
    private static final String LAST_NAME = "lastname";


    public static List readAndValidateFile (MultipartFile file, RoleRepository roleRepository)
    {
        BufferedReader bufferedReader;
        List result = new ArrayList<>();
        try
        {
            String line;
            InputStream inputStream = file.getInputStream();
            bufferedReader = new BufferedReader(new InputStreamReader(inputStream));
            while((line = bufferedReader.readLine()) != null)
            {
                String[] userData = line.split(",");
                if(userData == null || userData.length != 5)
                {
                    throw new RuntimeException("File data not in correct format");
                }
                if(FIRST_NAME.equalsIgnoreCase(userData[0]) && LAST_NAME.equalsIgnoreCase(userData[2]))
                {
                    continue; // first line is header
                }
                User user = new User();
                user.setFirstName(userData[0]);
                user.setMiddleName(userData[1]);
                user.setLastName(userData[2]);
                user.setEmail(userData[3]);
                Role role = roleRepository.findByRoleName(userData[4]);
                user.setRole(role);
                result.add(user);
            }
        }
        catch(IOException e)
        {
            throw new RuntimeException("Unable to open the file " + e.getMessage());
        }
        return result;
    }
}

A working demo

Once I log into the application Social KPI, I click on Add Users and it will take me to upload the users screen which will look below:

Spring Boot File Upload

Import Users

Once you choose a file in CSV format to upload and click on Import, it will show the screen as below:

Spring Boot File Upload - Upload Status

File Upload Status

Conclusion

So in this post, we showed how to import a file while using Spring Boot multipart form.

References

  1. Uploading files – uploading files

Monitoring your microservice with Micrometer

Spring Boot has made building a web application way easier.  It has also added a lot of other critical libraries that help enterprise applications in different ways. With enterprise applications moving to the cloud, Spring Boot has made it easier to deploy spring applications in the cloud with continuous integration. In this post, I will show how we can use a spring micrometer library to gather analytics related to your code.

As a result, these analytics can be transferred to different vendor databases for creating metrics-based dashboards. I showed how to use spring-boot-actuator to collect some metrics data.

As Spring defines Micrometer is a dimensional-first metrics collection facade. In simple words, it is similar to SLF4J, except for metrics.

Configure Micrometer for microservice

Firstly to use a micrometer, I have created a simple microservice with REST APIs and it is built using Spring Boot 2. Most importantly Spring Boot has added backward compatibility for Spring 1.x.

You can configure Micrometer in your Spring Boot 2.X based Microservice by adding the following dependency in your build file

runtime('io.micrometer:micrometer-registry-prometheus:1.0.4')

Adding Metrics

We will discuss different metrics that we can add through the micrometer. Dimensions and names identify a meter. You can use Meter for different types of metrics.

Counter

Counters are a cumulative metric. These are mostly used to count the number of requests, number of errors, number of tasks completed.

Gauges

A gauge represents a single value that can go up and down. The gauge measures memory usage.

Timers

Timers measure the rate at which we call a particular code or method. Subsequently we can also find out latencies when the execution of code is complete.

We talked about different metrics and how we can configure micrometers. Now we will show how to use this library to configure against a monitoring system. Spring micrometer supports the number of the monitoring system. In this post, I will be showing how to use against Prometheus monitoring system.

What is Prometheus?

Prometheus is an in-memory dimensional time-series database with a built-in UI, a custom query language, and math operations. To know more, you can visit here.

Meanwhile, we can add Prometheus in our microservice by adding the following dependency in the Gradle file

compile('org.springframework.boot:spring-boot-starter-actuator:2.0.3.RELEASE')
runtime('io.micrometer:micrometer-registry-prometheus:1.0.4')

For example, to understand where Prometheus lies in whole architecture, look at the below

Spring Boot microservice -> Spring Micrometer -> Prometheus

Once the above dependencies are added, Spring boot will automatically configure PrometheusMeterRegistry and CollectorRegistry to collect and export metrics data in a suitable format that Prometheus can scrape.

To enable Prometheus endpoints

Similarly, you enable Prometheus and actuator endpoints. Add following properties in application.properties file

management.security.enabled = false
management.endpoints.web.exposure.include=health,info,prometheus

Now if we run to start our webserver to see how these endpoints look, we can verify by going to endpoints http://localhost:8080/actuator/info , http://localhost:8080/actuator/health and http://localhost:8080/actuator/prometheus .  Prometheus endpoint looks like below :

Prometheus

Conclusion

In this post, we showed how to use Spring Micrometer to capture metrics data and configure with Prometheus. In the next post, I will show how to display this data in the human-readable format in nice UI using Prometheus.

References

  1. Production-Ready Metrics – Metrics
  2. Spring Micrometer – Spring Micrometer


Object Oriented Design Principles

A good software developer builds a software using right design principles. If you learn design patterns, object oriented concepts, but don’t learn principles, then you will do a disservice to yourself as a developer. Without design principles, you will build a software with no heart, no functionality to serve. I hope you don’t want to do that.

In this post, I will try to explain some design principles that I have come across or learned through my experience. If you do not understand any of these principles, please comment on the post and I will answer your questions.

Programming for interface and not for implementation

While building design, you can think how you can reuse or design your code in a way where you can extend it in future if needed. OR you have to minimal changes if you have to change. One design principle that can help in such cases is to Program interfaces instead of implementation directly.

For variables, method return types or argument type of methods – use interfaces. This will help to implement interfaces as you want.

Single Responsibility Principle

A class, a method should always implement single responsibility or single functionality. Putting more than one functionality in an object can disturb the functionality in future if there are any changes. To reduce future changes, always create implement your code with single responsibility principle.

Liskov Substitution Principle

This principle states that objects should be replaceable with instances of their subclasses without altering the correctness of the program.

To understand this, let’s look at a simple object and subclasses of that object Bird

public class Bird
{
    void fly()
    {
       // Fly function for bird
    }
}

public class Parrot extends Bird
{
    @Override
    void fly()
    {

    }
}

public class Ostrich extends Bird
{
   // can't implement fly since Ostrich doesn't fly
}

Parrot as a bird can fly, but Ostrich as a bird can’t fly. So if we end up using such an implementation, it will violate the principle of Liskov Substitution.

Open Closed Principle

Open Closed Principle makes that objects,methods should be open for extensions, but closed for modification. Many times, requirements are not clear at the beginning of design and implementation, we must use open closed principle to implement initial design and slowly if requirements change, it becomes easy to add them in design.

Interface Segregation Principle

This principle requires that client should not be forced to implement interface if it doesn’t use that. In another words, make sure your interfaces are concise and implement single functionality only. If interface has more than one functionality, it can be unnecessary for client to implement all the functionalities when it only needs one.

Delegation Principle

Don’t do all the stuff by yourself, but delegate the functionalities to respective classes. Delegation is kind of relationship between objects where an object can forward certain functions to do work to other objects (provided those objects implement those functions).

Dependency Inversion Principle

This principle is type of decoupling behavior for software modules. High level modules should not depend on low level modules. Generally while designing high level classes will depend on low level classes. But if you have to change low level classes after every design revision, it will warrant to be a bad design. To avoid such a problem, we create an abstraction layer. Low level classes will be created based on abstraction layer.

When this principle is used, high level classes use interfaces as an abstraction layer to work with low level classes, instead of working directly with low level classes.

References

  1. Ten object oriented design principles – SOLID Principles
  2. Design Principles – design principles


How to add SOAP headers to Request/Response

Use Case

In this post, I show how to add SOAP headers to SOAP request/response. If you have Code First Webservice OR WSDL Contract based WebService, you will be responding to your client requests with a SOAP response. In my case, it was a WS-Trust Security Token Web Service and the endpoint was correctly responding with a WS-Trust Response. This SOAP response will include SAMLv1.1 OR SAMLv2.0 token. Now consumer of this web service can either trust the server response or also validate the response for few things like time validity, signature validity, and even security header validity.

If you are supporting Transport Binding on this Web Service endpoint, it will be straight forward. Web Service response will have security headers

But as per my use case, if you are merely using UsernameToken Binding , Web Service response will not include security headers, especially if you are using Apache CXF libraries, these libraries will not always add security headers.

Likewise, if a consumer needs security headers for validation purposes, how do you add these security headers in response from your server endpoint?

Solution

In this particular case, the Web Service response needed Security header with timestamp only.

What is the security header and why Timestamp is required?

In a SOAP request or response, you will need Security header element based on security policy that Web Service will be using. This header in a request will look like below:


<wsse:Security soapenv:mustUnderstand="true" xmlns:wsse="http://docs.oasis-open.org/wss/2004/01/oasis-200401-wss-wssecurity-secext-1.0.xsd" xmlns:wsu="http://docs.oasis-open.org/wss/2004/01/oasis-200401-wss-wssecurity-utility-1.0.xsd">
     <wsu:Timestamp wsu:Id="TS-D3788B6EB508E3A553155173495342917">
         <wsu:Created>2019-03-04T21:29:13.429Z</wsu:Created>
         <wsu:Expires>2019-03-04T21:30:13.429Z</wsu:Expires>
     </wsu:Timestamp>
     <wsse:UsernameToken wsu:Id="UsernameToken-6CBAAFA3A8815F71FC15511581437664">
        <wsse:Username>john.doe@betterjavacode.com</wsse:Username>
        <wsse:Password Type="http://docs.oasis-open.org/wss/2004/01/oasis-200401-wss-username-token-profile-1.0#PasswordText">********</wsse:Password>
     </wsse:UsernameToken>
</wsse:Security>

Once a Web Service endpoint receives this request, it will validate the username and password and will verify if timestamp validity is accurate. On successful validation, Web Service will generate a response that will also include Security header with Timestamp. Consumer will validate that timestamp. Having a timestamp in SOAP header minimizes the risk of Replay attack as in an attacker can’t either use the SOAP response after Expiration time or even can’t send the same request after Expiration time.

How do you add this security header of timestamp if using Apache CXF libraries?

Apache CXF libraries offer few ways to achieve this:

  1. JAX-WS standard way is to write a SOAP handler that will add headers to the SOAP message. To simplify this, you will have to register the SOAP handler on the client or server-side.
  2. JAX-WS offers another way through annotation @WebParam(header = true, mode = Mode.OUT).
  3. wsdl first way wherein your WSDL operation you specify SOAPHeader as part of your SOAP binding.
  4. CXF offers its own way to add these headers. In this post, I will show how you can leverage CXF libraries to add these headers.

How to add Security headers using CXF libraries?

Assumption is that you have used apache CXF libraries to build Web Service endpoint. JAX-WS offers a WebServiceContext which makes a Web Service endpoint to access message context. This message context can help to retrieve details for username, password, and other security headers from the request.

Same way, this message context can be used to grab a list of headers List<org.apache.cxf.headers.Header> . We will create our Soap header for security element and then add this header in the list of headers. The code for this will look like below:


SOAPFactory soapFactory = SOAPFactory.newInstance(SOAPConstants.SOAP_1_2_PROTOCOL);

SOAPElement securityElement = soapFactory.createElement("Security",
        "wsse", "http://docs.oasis-open.org/wss/2004/01/oasis-200401-wss-wssecurity-secext-1.0.xsd");
SOAPElement timestampElement = soapFactory.createElement("Timestamp",
        "wsu", "http://docs.oasis-open.org/wss/2004/01/oasis-200401-wss-wssecurity-utility-1.0.xsd");
timestampElement.setAttribute(WSTrustConstants.WSU_ID, "_0");

String created = getCurrentDateTime();
String expires = getCurrentDateTimePlusDelay(300L);
SOAPElement createdSOAPElement = soapFactory.createElement("Created",
        "wsu", "http://docs.oasis-open.org/wss/2004/01/oasis-200401-wss-wssecurity-utility-1.0.xsd");
createdSOAPElement.addTextNode(created);
SOAPElement expiresSOAPElement = soapFactory.createElement("Expires",
        "wsu", "http://docs.oasis-open.org/wss/2004/01/oasis-200401-wss-wssecurity-utility-1.0.xsd");
expiresSOAPElement.addTextNode(expires);

timestampElement.addChildElement(createdSOAPElement);
timestampElement.addChildElement(expiresSOAPElement);
securityElement.addChildElement(timestampElement);
SoapHeader soapHeader = new SoapHeader(securityElement.getElementQName(), securityElement);

List<Header> headers = new ArrayList<>();
headers.add(soapHeader);
webServiceContext.getMessageContext().put(Header.HEADER_LIST, headers); 

Conclusion

In this post, I showed how we can leverage Apache CXF libraries to add SOAP headers in a web service response. Similarly, the same libraries can be used to add these headers to the request.

References

  1. Apache CXF Libraries – Apache CXF
  2. Adding SOAP header – Adding SOAP header
  3. Interceptors – interceptors