Tag Archives: Java

Design Pattern – Prototype Pattern – Part VI

In this post, I want to show how to use Prototype design pattern. If you want to read about previous posts related to design patterns, series of posts about design patterns are

  1. Introduction to design patterns
  2. Singleton Pattern
  3. Factory Pattern
  4. Abstract Factory Pattern
  5. Builder Pattern

The prototype design pattern will cover the creation design pattern that we have been writing about till now.

When to use?

Since this is a creational design pattern, this is used when decision is to reduce the creation cost of object in a standard way. There can be argument about how this is then different from abstract factory pattern. The key benefit of Prototype design pattern is that it optimizes the use case where multiple objects of same type will have mostly same data.

Major example is reading configuration data from a file/database over a network. Also if you want to hide the logic of creating new instance from the client.

How to use?

Firstly, in this pattern, there is an interface of Prototype that has method for clone and any concrete class implementing this interface, implements the method to clone the object.


public interface Car {

Car clone();

}

We have an interface Car which we will implement in our concrete classes.

package com.bettterjavacode.designpatterns.prototypeexample;

public class Toyota implements Car 
{

    private final String CARNAME = "Toyota";

    public Car clone() 
    {
       return new Toyota();
    }

    @Override
    public String toString() 
    {
      return CARNAME;
    }

}


We will have a factory class that will get us a prototype based on type of object we have passed. This will look like below:

package com.bettterjavacode.designpatterns.prototypeexample;

import java.util.HashMap;
import java.util.Map;

public class CarFactory
{

   private static final Map<String, Car> prototypes = new HashMap<String, Car>();

   static 
   {
     prototypes.put("toyota", new Toyota());
     prototypes.put("lexus", new Lexus());
     prototypes.put("bmw", new BMW());
   }

   public static Car getPrototype(String type) 
   {
      return prototypes.get(type).clone();
   }
}


Therefore, our demo class will pass the type of car as an argument to print the carname. That will look like below:

package com.betterjavacode.designpatterns;

import com.bettterjavacode.designpatterns.prototypeexample.Car;
import com.bettterjavacode.designpatterns.prototypeexample.CarFactory;

public class PrototypeDemo 
{
   public static void main(String[] args) 
   {
      if (args.length > 0) 
      {
         for (String type : args) 
         {
            Car prototype = CarFactory.getPrototype(type);
            if (prototype != null) 
            {
               System.out.println(prototype);
            }
         }
      } 
      else 
      {
         System.out.println(" Run again with arguments");
      }
   }
}

Conclusion

In conclusion, we showed how to use prototype design pattern. The code for this is available here
References

  1. Design Patterns – Prototype
  2. Prototype Pattern

Design Patterns – Builder Pattern – Part V

Continuing the series of posts about design patterns, we will talk about builder pattern in this post. Builder pattern is of type creational design pattern. One of the major uses of Builder pattern is when there are too many constructor parameters to handle.

In my previous post, I showed how to use factory pattern.

When to use Builder Pattern?

Builder pattern enforces a step-by-step approach to create a complex object. The object can not be used till it’s a finished product. It helps to encapsulate complex creation logic. One of the examples from real time is file creation with a format. If you are creating a file in certain format (example xml, csv), you can use builder pattern to create a simple logical approach to creating the file.

How to use Builder Pattern?

Lately working on a project to build an EDI file to transfer between customer, I have to create a file of format 834. So 834 file format varies according to different health insurance carrier. This file format contains headers, records and trailers. Headers indicate different paradigm about the file and the customer and who is sending it. To show example of this pattern, I will use one of the headers of this file format and how it can be created using builder pattern.

One of the headers is called the Transactional Group Header. This header looks like below in a real file

ST*834*5432853*005010X220A1~

First field “ST” indicates that it is a transactional group. All the records for one customer can lie between ST and SE. 834 is a transaction code for file format. Since this is 834 file format, code is 834. 5432853 is a unique transaction control number, this can be anything between 4 digits in length to a maximum 9 digits in length. 005010X220A1 is an implementation reference number.

Our implementation of the class with have fields for each of these fields from a header, a private constructor and a static builder class. This is shown below:

public class TransactionalHeader implements Serializable {
private static final long serialVersionUID = 7517644545656169045L;

private String st;

private String transactioncode;

private String transactioncontrolnumber;

private String implementationreference;

public static class Builder {

private String st;

private String transactioncode;

private String transactioncontrolnumber;

private String implementationreference;

public Builder st(String st) {

this.st = st; return this;

}

public Builder transactioncode(String transactioncode) {

this.transactioncode = transactioncode; return this;

}

public Builder transactioncontrolnumber(String transactioncontrolnumber) {                            this.transactioncontrolnumber = transactioncontrolnumber; return this;

}

public Builder implementationreference(String implementationreference) {                                this.implementationreference = implementationreference; return this;

}

public TransactionalHeader build() {

return new TransactionalHeader(this);

}

}

private TransactionalHeader(Builder builder) {

this.st = builder.st;

this.transactioncode = builder.transactioncode;

this.transactioncontrolnumber = builder.transactioncontrolnumber;

this.implementationreference = builder.implementationreference;

}

public String toString() {

String result = "";

StringBuffer sb = new StringBuffer();

sb.append(st);

sb.append(FileUtil.FIELD_SPLITTER);

sb.append(transactioncode);

sb.append(FileUtil.FIELD_SPLITTER);

sb.append(transactioncontrolnumber);

sb.append(FileUtil.FIELD_SPLITTER);

sb.append(implementationreference);

sb.append("~");

result = sb.toString();

return result;

}

}


This was our builder class. Let’s create a demo class that will use this builder class to build an object that will give us a transactional header in the file. This will look like below:

public String getTransactionalHeader() {

String result = "";

TransactionalHeader th = new TransactionalHeader.Builder()

.st("ST")

.transactioncode(TRANSACTION_IDENTIFIER_CODE)

.transactioncontrolnumber(FileUtil.getTransactionControlNumber())

.implementationreference("005010X220A1").build();

result = th.toString();

return result;

}


Conclusion

In this way, we can use builder design patterns to construct complex objects. One of the easy ways to identify when to use this design pattern is when you have more than 4 or more parameters in your constructor.

The code for this post is available to download here.


How To: AngularJS User Interface to CRUD Spring Boot REST API

In this post, we will add an user interface using AngularJS to the REST api we created here.

Controller for home page

First we will create a controller in Spring Boot rest API to call our home page. All the requests that will come to web server, will go through this controller and the controller will return a home page for the request based on path.

MainController.java will look like below:

package com.betterjavacode.benefits.controller;

import org.apache.logging.log4j.LogManager;
import org.apache.logging.log4j.Logger;
import org.springframework.stereotype.Controller;
import org.springframework.web.bind.annotation.RequestMapping;
import org.springframework.web.bind.annotation.RequestMethod;

@Controller
public class MainController 
{

     public static final Logger LOGGER = LogManager.getLogger(MainController.class);

     @RequestMapping(value = "/home", method = RequestMethod.GET)
     public String homepage() 
     {
         LOGGER.info(" Enter >> homepage() ");
         return "index";
     }
}

Any request coming to https://localhost:8443/home will return a page from index.html.

Create a Home Page

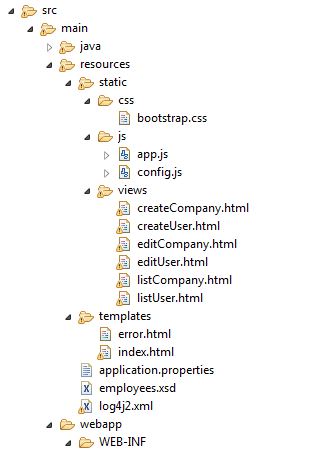
Now, we will create an index.html page. We will also be using angular JS framework as part of this home page so that we can build a single page application. If you are not aware of Angular JS or new to this framework, you can read about it AngularJS. One thing to remember while creating this page is a directory structure. Lot of issues that arise to create html pages are because of directory structure. Directory structure will look like below:

directorystructure

The home page index.html page is under main/resources/templates/ directory and it looks like below

<html ng-app="benefitApp">

<head><meta http-equiv="Content-Type" content="text/html; charset=ISO-8859-1" /><title>Benefit Application</title>

<script>document.write('<base href="' + document.location + '" />');</script>

<link rel="stylesheet" href="/css/bootstrap.css" />

<script src="https://code.angularjs.org/1.6.1/angular.js"></script>

<script src="https://cdnjs.cloudflare.com/ajax/libs/angular.js/1.6.1/angular-route.js"></script>

<script src="https://cdnjs.cloudflare.com/ajax/libs/angular.js/1.6.1/angular-resource.js"></script>

<script type="text/javascript" src="./js/app.js"></script>

</head>

<body ng-controller="MainCtrl">

Hello {{name}}!
<div>
<ul class="menu">
<li><a href="listUser">user-list</a></li>
<li><a href="listCompany">company-list</a></li>
</ul>
<div ng-view="ng-view"></div>
</div>
</body></html>

Home page shows that this is an angular app with name benefitApp. This also declares a controller MainCtrl with an angular view. Important to see we are importing angular.js, angular-route.js and angular-resource.js modules. Click on user-list or company-list, will show list of users and list of companies respectively.

Create a controller

Now to handle the controller (MainCtrl), we added in index.html, we will add app.js which will declare the controller. This javascript file also contains config data to handle all the routing of pages. That’s why we will be importing “ngRoute” and “ngResource” angular modules.

var app = angular.module('benefitApp', ['ngRoute','ngResource']);

var app = angular.module('benefitApp', ['ngRoute','ngResource']);
app.controller('MainCtrl', function($scope, $routeParams) {

$scope.name = 'World';

$scope.$routeParams = $routeParams;

})


Through out the interaction on web pages, we will be using different controllers for editing user or company information and creating user or company. The same file app.js will also handle routing of these pages which is shown below

app.config(function($routeProvider,$locationProvider) {

$locationProvider.html5Mode(true);

$routeProvider.when('/listUser',

{templateUrl: 'views/listUser.html', controller: 'userController'});

$routeProvider.when('/listCompany',

{templateUrl: 'views/listCompany.html', controller: 'companyController'});

$routeProvider .when('/editUser/:userId',

{ templateUrl : 'views/editUser.html' }) ;

$routeProvider .when('/editCompany/:companyId',

{ templateUrl : 'views/editCompany.html' }) ;

$routeProvider.when('/createUser',

{templateUrl:'views/createUser.html'});

$routeProvider.when('/createCompany',

{templateUrl:'views/createCompany.html'});

});

Rest of the code showing all controllers’ logic has been skipped for post purposes. It is available on github repository.

UserController or CompanyController are calling rest apis which we have built using Spring boot.

Demo

Now build the code and run our embedded tomcat webserver. Fire up the url https://localhost:8443/home – it will look like below:

Click on user-list and it will show list of users inside the same page as below:

Click on edit button and we will see a form to update user information:

Download –

In this post, we showed how to create a simple CRUD user interface using angular JS for Spring Boot REST API. The code for this is available in repository


Design Pattern – Abstract Factory Pattern – Part IV

In the continuation of design pattern series, we have covered IntroductionSingleton Pattern and Factory Pattern. In current post, we will cover the next creational type of design pattern and that is Abstract Design Pattern.

So what is an abstract factory pattern?

It’s an interface to create families of related or dependent objects without client knowing the implementation details.

Difference between abstract factory pattern and factory pattern

Firstly, one common theme between these two patterns is that they decouple the client system from implementation details.

  • Factory pattern creates object through inheritance.
  • Abstract factory pattern creates object through composition.
  • Abstract factory provides an interface to create family of related objects.
  • Factory pattern aka factory method pattern is inherited in subclasses to create concrete objects.

In previous post, we saw an interface vehicle, implemented by different classes Car, Bus, Motorcycle, Truck and a class VehicleFactory returned different classes.

Likewise, abstract Factory pattern gives a layer of abstraction over regular factory pattern. In the process it isolates factories. The pattern returns factories of related objects. So If I want a car of Toyoto types, it can return me factories of Camry, Corolla, Avalanche etc.

Therefore, to show Abstract Factory pattern, we will create an abstract class which will return car mileage. This will look like below:

public abstract class CarMileage 
{
   protected double distance;
   protected double gas;

   public abstract void getCarMileage(double dist, double gasfilled);

   public void calculateCarMileage(double dist, double gasfilled) 
   {
     double carmileage = dist / gasfilled;
     System.out.println(" Your car mileage is " + carmileage);
   }
}


Now each related concrete class will extend this class to return us car mileage. We will have Camry, Corolla and Avalanche as different car of types Toyota. However, as part of this pattern, we will add an abstract class that will return me factories of car mileage. This is shown as below:

public abstract class AbstractFactory 
{
   public abstract CarMileage getCarMileage(String car);
}


A concrete subclass CarFactory of AbstractFactory, will return us different car mileage based on the car name we have passed.

public class CarFactory extends AbstractFactory 
{

  @Override
  public CarMileage getCarMileage(String car) 
  {

     if (car == null || car.equals("")) 
     {
       return null;
     } 
     if (car.equalsIgnoreCase("camry")) 
     {
       return new CamryCarMileage();
     } 
     else if (car.equalsIgnoreCase("corolla")) 
     {
       return new CorollaCarMileage();
     } 
     else if (car.equalsIgnoreCase("avalanche")) 
     {
       return new AvalanceCarMileage();
     }
     return null;
  }

}


To demo this by implementing a client class which will ask user input for carname, distance covered and gas filled. Based on carname, AbstractFactory will return us a factory for CarMileage. This factory of CarMileage will return us calculated car mileage for that car.

public class AbstractFactoryPatternDemo 
{
   public static void main(String[] args) throws IOException 
   {
      BufferedReader br = new BufferedReader(new InputStreamReader(System.in));
      System.out.println(" Enter the car name you want mileage for: ");
      String carname = br.readLine();
      System.out.println("\n");
      System.out.println("Enter the distance covered: ");

      String distanceStr = br.readLine();
      double distance = Double.parseDouble(distanceStr);
      System.out.println("\n");
      System.out.println("Enter the gas you had filled: ");
      System.out.println("\n");
      String gasStr = br.readLine();
      double gas = Double.parseDouble(gasStr);

      AbstractFactory af = FactoryCreator.getFactory();
      CarMileage cm = af.getCarMileage(carname);

      cm.getCarMileage(distance, gas);

   }

}


In conclusion, we showed how to use abstract factory patterns. If we want to create a family of related objects but without specifying their concrete sub-classes, this is our go-to pattern.

Download

The code for this post is available github repo.

Design Patterns – Factory Pattern – Part III

In this article, we will see how to use a factory pattern. Factory pattern is a creational type of design pattern, in short, it provides a way to create objects. Another important point to note about this design pattern is that client who uses factory pattern is not aware of the implementation of the factory pattern.

Even in our previous post Spring Boot REST CRUD API, we have used factory pattern to implement managers at the service level. As part of this post, we will show another example of the factory pattern. Factory pattern mainly used in cases when a client just needs a class/object that can handle the job of doing the work at runtime without knowing any details of how it was implemented.

To show how to implement a factory pattern, let’s assume we have different types of vehicles and we want to know what their maximum speed is.

Create an interface –

Our interface of the vehicle will have a method to return the max speed of the vehicle.

package com.betterjavacode.designpatterns.factoryexample;

public interface Vehicle 
{
    void speed();
}

Now, we will have different classes (car, truck,bus,motorcycle) that will implement this interface to return their maximum speed. For article purposes, we will only be showing one class.

package com.betterjavacode.designpatterns.factoryexample;

public class Car implements Vehicle 
{
  public void speed()
  {
     System.out.println("Max Speed of this car is 100 mph");
   }
}

To get an instance of an object, we will create a factory class. This will return an appropriate instance of vehicle object based on vehicle type.

package com.betterjavacode.designpatterns.factoryexample;

public class VehicleFactory 
{

  public Vehicle getVehicle(String vehicleType)
  {
     if (vehicleType == null)
     {
        return null;
     }
     if (vehicleType.equalsIgnoreCase("car")) 
     {
        return new Car();
     }
     if (vehicleType.equalsIgnoreCase("bus")) 
     {
        return new Bus();
     }
     if (vehicleType.equalsIgnoreCase("motorcycle"))
     {
        return new Motorcycle();
     }
     if ( vehicleType.equalsIgnoreCase("truck"))
     {
        return new Truck();
     }
     return null;
}

}

A factory pattern demo class will get any of object of type vehicle at runtime.

package com.betterjavacode.designpatterns;

import com.betterjavacode.designpatterns.factoryexample.Vehicle;
import com.betterjavacode.designpatterns.factoryexample.VehicleFactory;

public class FactoryPatternDemo
{
    public static void getSpeed(String vehicleType) 
    {
       VehicleFactory vehicleFactory = new VehicleFactory();
       Vehicle veh1 = vehicleFactory.getVehicle(vehicleType);
       veh1.speed();
     }  
}

In this example, we have shown how to implement a design pattern type factory pattern. The code for this is available design patterns.

References

  1. Factory Pattern Example
  2. Factory Pattern