Category Archives: Spring-boot

Monitoring your microservice with Micrometer

Spring Boot has made building a web application way easier.  It has also added a lot of other critical libraries that help enterprise applications in different ways. With enterprise applications moving to the cloud, Spring Boot has made it easier to deploy spring applications in the cloud with continuous integration. In this post, I will show how we can use a spring micrometer library to gather analytics related to your code.

As a result, these analytics can be transferred to different vendor databases for creating metrics-based dashboards. I showed how to use spring-boot-actuator to collect some metrics data.

As Spring defines Micrometer is a dimensional-first metrics collection facade. In simple words, it is similar to SLF4J, except for metrics.

Configure Micrometer for microservice

Firstly to use a micrometer, I have created a simple microservice with REST APIs and it is built using Spring Boot 2. Most importantly Spring Boot has added backward compatibility for Spring 1.x.

You can configure Micrometer in your Spring Boot 2.X based Microservice by adding the following dependency in your build file

runtime('io.micrometer:micrometer-registry-prometheus:1.0.4')

Adding Metrics

We will discuss different metrics that we can add through the micrometer. Dimensions and names identify a meter. You can use Meter for different types of metrics.

Counter

Counters are a cumulative metric. These are mostly used to count the number of requests, number of errors, number of tasks completed.

Gauges

A gauge represents a single value that can go up and down. The gauge measures memory usage.

Timers

Timers measure the rate at which we call a particular code or method. Subsequently we can also find out latencies when the execution of code is complete.

We talked about different metrics and how we can configure micrometers. Now we will show how to use this library to configure against a monitoring system. Spring micrometer supports the number of the monitoring system. In this post, I will be showing how to use against Prometheus monitoring system.

What is Prometheus?

Prometheus is an in-memory dimensional time-series database with a built-in UI, a custom query language, and math operations. To know more, you can visit here.

Meanwhile, we can add Prometheus in our microservice by adding the following dependency in the Gradle file

compile('org.springframework.boot:spring-boot-starter-actuator:2.0.3.RELEASE')
runtime('io.micrometer:micrometer-registry-prometheus:1.0.4')

For example, to understand where Prometheus lies in whole architecture, look at the below

Spring Boot microservice -> Spring Micrometer -> Prometheus

Once the above dependencies are added, Spring boot will automatically configure PrometheusMeterRegistry and CollectorRegistry to collect and export metrics data in a suitable format that Prometheus can scrape.

To enable Prometheus endpoints

Similarly, you enable Prometheus and actuator endpoints. Add following properties in application.properties file

management.security.enabled = false
management.endpoints.web.exposure.include=health,info,prometheus

Now if we run to start our webserver to see how these endpoints look, we can verify by going to endpoints http://localhost:8080/actuator/info , http://localhost:8080/actuator/health and http://localhost:8080/actuator/prometheus .  Prometheus endpoint looks like below :
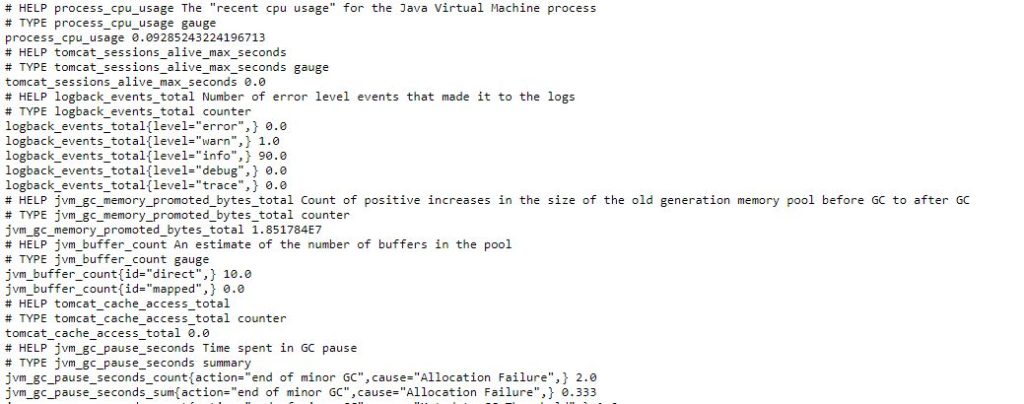
Prometheus

Conclusion

In this post, we showed how to use Spring Micrometer to capture metrics data and configure with Prometheus. In the next post, I will show how to display this data in the human-readable format in nice UI using Prometheus.

References

  1. Production-Ready Metrics – Metrics
  2. Spring Micrometer – Spring Micrometer


Social KPI Application Progress

In this post, I will be showing the progress of Social KPI Application so far through a screencast. This is my first screencast, so learning about OBS (Open Broadcast Software) along the way.


Future Sprint Stories

  1. Add Jasper Reports
  2. Integrate with Instagram and Twitter APIs
  3. User Management for administrators
  4. Role Management for users and reports according to roles
  5. Report Management according to account type

How to send email with Spring Boot

Scenario

In this post, I show how to use email configuration inside a spring boot application. The use case I want to discuss here is if you have Contact Us page on your web application where you allow users to send email to your sales team or support team, then how do you accomplish this feature about sending an email with contact us form using Spring Boot.

What will you need

  • Java 8
  • IntelliJ
  • A Spring boot based web application

Use case solution

As part of this post, I will not be describing how to build a spring boot based web application. You can visit some of my older posts Saas applicationWeb application with Spring boot security OR Spring boot application with docker. Even though none of these applications have Contact Us page, I will recommend to add that page with a simple form like below:

Contact Us

I have used Bootstrap template to build this form. This form is outside the web application, but I have similar form inside the web application for users to contact sales or support team. In this case, user who wants to sign up for the application can contact my sales team.

Now to use Spring provided facility for sending email from the application to your designated email, we will add following library:

compile('it.ozimov:spring-boot-email-core:0.6.3')

This library provides a EmailService which covers the spring library for spring-boot-starter-mail and do not have to write part of the code to send email. In this example, I will show this EmailService can be used to write a simple method to send email.

First we need to enable email tools by an annotation @EnableEmailTools in our main Spring application. Once we do that, I have written a simple method to send email. This method will look like below:

@Autowired
private EmailService emailService;

private void sendEmail(String emailAddress, String message, String phoneno) throws UnsupportedEncodingException, AddressException
{
    ArrayList<InternetAddress> emails = new ArrayList<>();
    emails.add(new InternetAddress("betterjavacode.com@gmail.com"));
    final Email email = DefaultEmail.builder()
            .from(new InternetAddress(emailAddress))
            .to(emails)
            .subject("Sales Support")
            .body(message + "\n" + phoneno)
            .encoding("UTF-8").build();

    emailService.send(email);
}

Now to make this email service to work, we still have to provide SMTP server properties and a from sender email and password. In this example above, I showed betterjavacode.com as my from gmail address.

Adding following properties in application.properties will set up our SMTP host for sending the email.

spring.mail.host = smtp.gmail.com
spring.mail.port = 587
spring.mail.username = betterjavacode.com@gmail.com
spring.mail.password =*****************
spring.mail.properties.mail.smtp.starttls.enable=true
spring.mail.properties.mail.smtp.starttls.required=true
spring.mail.properties.mail.smtp.auth=true
spring.mail.properties.mail.smtp.connectiontimeout=5000
spring.mail.properties.mail.smtp.timeout=5000
spring.mail.properties.mail.smtp.writetimeout=5000

Conclusion

In this post, I showed how to send email using the Spring boot email configuration feature.


Building user interface for Social KPI

As part of building the web application Social KPI SocialPie, we will be building the backend and frontend in module forms. Eventually, the plan is to deploy the application on the cloud. But backend and frontend are not different services as Microservice architecture generally dictates. In this post, I will show how we will be building a user interface for Social KPI using thymeleaf and angular JS.

The idea is to create a skeleton of UI by bringing different points in the discussion to make our decisions about choosing different parts of UI. In the previous post here, we discussed user flow.

User Story for user interface

  1. A user will access the application and will see the initial screen for login or sign up.
  2. If the user has not signed up before, he will sign up with the first name, last name, email, company name, password.
  3. Once the user signs up, the user will receive a confirmation email to sign in. This user will be the administrator to manage its company.
  4. A user can come back to the login screen through confirmation email. Then the user will enter credentials.
  5. User will see the company profile. User will have the option to modify company profile details as well as to add users with role REPORT.
  6. Administrator when adding these users will submit their first name, last name, email, and role as REPORT. Administrator will have an option to send emails to these users through portal or provide them username and password.
  7. Once the users with role REPORT login, they will have the option to change their temporary password. Once the password has been changed, he will be redirected to the reports screen.
  8. Administrator can also access reports screen any time.
  9. On Reports screen, user will have an option to synchronize the data with social media APIs to get the latest data. This will be once in a day option considering the limitation on access of APIs.
  10. On Reports screen, user will have an option to generate the report post-synchronization. User will be able to see Jasper reports in graph as well in data form. User will have an option to send these reports to other people in email.
  11. There will be logout and home screen options on the screen all the time.
  12. Home for user with Report role will be their profile information.

The skeleton of the user interface

Screen 1:

First Page

Screen 2:

Second Page

Screen 3:

Third Page

Screen 4:

Forth Page

Screen 5:

Fifth Page

Screen 6:

Sixth Page

Screen 7:

Seventh Page

Conclusion

In this post, we showed the skeleton of the user interface for the Social KPI web application. Of course, this is not a final design, but as we go on building it, we will have our changes and I will also show the code for this design. In future posts, I will be showing the functioning UI for login and sign-up pages.


Spring Boot Actuator

In this post, we will look at how we can use the spring boot actuator to add some metrics related endpoints in Spring Boot based microservice or application. Spring boot helps to monitor your production-ready application by offering a number of metrics related endpoints.

What do you need:

  • Java 8
  • Spring Boot
  • IntelliJ
  • Gradle

What are Spring boot actuator endpoints?

I will not be showing how to create a Spring boot REST in this article. You can refer my post to create a REST API based on Spring boot here.

As Spring documentation says – “Spring boot actuator let you monitor and interact with your application.” The endpoints that we will be discussing, are built in Spring Boot. Of course, the first question that comes to mind, is how do we activate these endpoints and what different endpoints are available there for what purposes.

How to activate actuator endpoints?

To activate these endpoints in a gradle-based project, we have to add the following dependency

dependencies {
  compile("org.springframework.boot:spring-boot-starter-actuator")
}

If you are using maven, this will be like below:

<dependencies>
  <dependency>
    <groupId>org.springframework.boot</groupId>
    <artifactId>spring-boot-starter-actuator</artifactId>
  </dependency>
</dependencies>

All the actuator endpoints are enabled by default.

  • auditevents – Audit events of your application
  • info– Displays information about your application – you can customize to show version information.
  • health – application’s health status
  • metrics – various metrics information of application
  • loggers – Displays and modifies configured loggers
  • logfile – Shows the contents of the log file
  • httptrace – Displays HTTP trace info for the last 100 HTTP request/response
  • env – Displays current environment information
  • flyway – Shows Flyway database migrations details
  • liquidbase – Shows details of liquibase database migrations
  • shutdown – Allows to shut down the application gracefully
  • mappings– Displays a list of all @RequestMapping paths
  • scheduledtasks – Displays the scheduled tasks in the application
  • threaddump – Performs a thread dump
  • headdump – Returns JVM head dump

Another way these endpoints can be enabled or disabled, is to add properties in application.properties as shown below:

management.endpoint.health.enabled=true

Running the spring boot application with actuator

Once we have added the required spring-boot-starter-actuator dependency, we can build our application. There is still one more change we need to add in our gradle build file to get application version information.

springBoot{
     buildInfo()
}

If you are using maven, this can be added as below:

<plugin>
    <groupId>org.springframework.boot</groupId>
    <artifactId>spring-boot-maven-plugin</artifactId>
    <executions>
        <execution>
            <goals>
                <goal>build-info</goal>
            </goals>
        </execution>
    </executions>
</plugin>

If you want to add some additional properties, add following properties in application.properties as below:

info.app.name = Reusable-Rest-Module
info.app.version = 0.1.0-SNAPSHOT
management.security.enabled=false

Now once you build the application and run it, this will give us following results:

http://localhost:8080/health

http://localhost:8080/info

http://localhost:8080/loggers

Conclusion

In this post, we showed how we can use Spring Boot Actuator to get different metrics data for your spring boot based service.