Category Archives: Programming

All about the skill of programming

Yes, this will be the post where we dissect the skill of programming. Recently I came across a lot of beginner’s questions from friends and families who want to get into programming. But also if I want to go back in time and want to give advice to 10 years younger me, what advice would I give? How would I approach programming skills differently compared to what I did?

Before I move forward, if you want to read design patterns, you can visit that link.

Why does programming matter?

Most of us are not born programmers or smart enough to gauge our ability to sit in front of a computer for hours and write something in a completely foreign language to mankind. Programming is definitely not foreign anymore, but there are still a lot of people in the world, who don’t know anything about how computers work. They want to use computers, but don’t care about how computers operate.

I will not cover how computers work in this topic, but want to remind everyone that when we designed computers back in 50s and 60s, one purpose was that it could help us to solve some of the complex problems we face. Computers have exceeded the expectations and there is a speculation that in near future, all mundane jobs will be replaced by artificial intelligence. Artificial intelligence is only possible when the programming continues to evolve and it has been. There are lot of curious people in our world and this mere mortal is one of them. For me, it was curiosity that drove towards computers and slowly i embraced the internals and ideas about computer. It was fascinating always. To answer the question, in short, to continually evolve as mankind, we need technology and technology is the fastest evolving paradigm which is majorly based on programming.

What’s your purpose for programming?

You don’t really need a purpose to program. I started with programming mundane algebraic functions . It was continuous improvement from that moment to solve some of the complex mathematics problems to engineering problems to real world business problems. Despite all that, there are lot of system level problems in computers that need attention. You can even choose a purpose of fun. Lot of programmers started programming for fun and built some of the coolest games. No purpose is still a purpose till the time you allocate certain time to improve your skill. It’s been 15 years from the time I have graduated from college, but I have not stopped programming and I am no where close to say that I am the best. You will never be the best, you will continually improve and that’s the aim you should have. Learn from all sources.

How to learn the skill of programming?

This is a broad topic. Learning how to learn itself covers lot of intricacies. How to learn programming. I will try to narrow down discussion about this in few steps

  1. Learn basic syntax, but not all of the syntax. You will learn this over the time.
  2. Learn programming principles, mostly object oriented principles.
  3. Find out common patterns and study them. In software engineering, we follow lot of design patterns and they get used all the time while designing any application.
  4. Find out common libraries in the language that you want to learn.
  5. If you are learning Java, definitely read Effective JavaClean code and Refactoring.
  6. Try pair programming where you work with another programmer.
  7. Read, read and read lots of code – bad code to good code both.
  8. Fall in love with learning to program, process over results.
  9. If you take up a project, start with MVP (Minimum Viable Product), get feedback from peers/customers and then improve on the product you are building. While following this process, you will improve your programming as well. You will hit road blocks, that will challenge you to find out the solution on your own. Balance long term process (learning programming) with short term goals (projects that you will work on).
  10. If you work with senior programmers, get a feedback for your code.

Resources for programming

  1. Solve problems on HackerRank
  2. Free code camp – Freecodecamp
  3. Participate in hackathons
  4. Write blogs about your insights

Conclusion

In this post, I tried to simplify a process about how to learn programming, and how to improve the skill of programming. I hope this post helps all those who are on the fence about programming to take up programming.

Spring Boot Actuator

In this post, we will look at how we can use the spring boot actuator to add some metrics related endpoints in Spring Boot based microservice or application. Spring boot helps to monitor your production-ready application by offering a number of metrics related endpoints.

What do you need:

  • Java 8
  • Spring Boot
  • IntelliJ
  • Gradle

What are Spring boot actuator endpoints?

I will not be showing how to create a Spring boot REST in this article. You can refer my post to create a REST API based on Spring boot here.

As Spring documentation says – “Spring boot actuator let you monitor and interact with your application.” The endpoints that we will be discussing, are built in Spring Boot. Of course, the first question that comes to mind, is how do we activate these endpoints and what different endpoints are available there for what purposes.

How to activate actuator endpoints?

To activate these endpoints in a gradle-based project, we have to add the following dependency

dependencies {
  compile("org.springframework.boot:spring-boot-starter-actuator")
}

If you are using maven, this will be like below:

<dependencies>
  <dependency>
    <groupId>org.springframework.boot</groupId>
    <artifactId>spring-boot-starter-actuator</artifactId>
  </dependency>
</dependencies>

All the actuator endpoints are enabled by default.

  • auditevents – Audit events of your application
  • info– Displays information about your application – you can customize to show version information.
  • health – application’s health status
  • metrics – various metrics information of application
  • loggers – Displays and modifies configured loggers
  • logfile – Shows the contents of the log file
  • httptrace – Displays HTTP trace info for the last 100 HTTP request/response
  • env – Displays current environment information
  • flyway – Shows Flyway database migrations details
  • liquidbase – Shows details of liquibase database migrations
  • shutdown – Allows to shut down the application gracefully
  • mappings– Displays a list of all @RequestMapping paths
  • scheduledtasks – Displays the scheduled tasks in the application
  • threaddump – Performs a thread dump
  • headdump – Returns JVM head dump

Another way these endpoints can be enabled or disabled, is to add properties in application.properties as shown below:

management.endpoint.health.enabled=true

Running the spring boot application with actuator

Once we have added the required spring-boot-starter-actuator dependency, we can build our application. There is still one more change we need to add in our gradle build file to get application version information.

springBoot{
     buildInfo()
}

If you are using maven, this can be added as below:

<plugin>
    <groupId>org.springframework.boot</groupId>
    <artifactId>spring-boot-maven-plugin</artifactId>
    <executions>
        <execution>
            <goals>
                <goal>build-info</goal>
            </goals>
        </execution>
    </executions>
</plugin>

If you want to add some additional properties, add following properties in application.properties as below:

info.app.name = Reusable-Rest-Module
info.app.version = 0.1.0-SNAPSHOT
management.security.enabled=false

Now once you build the application and run it, this will give us following results:

Healthcheck metrics using Spring Boot Actuator

http://localhost:8080/health

Info Metrics using Spring Boot Actuator

http://localhost:8080/info

Logging metrics using Spring Boot Actuator

http://localhost:8080/loggers

Conclusion

In this post, we showed how we can use Spring Boot Actuator to get different metrics data for your spring boot based service.


Java Memory Management

One topic that I have always been curious, is java memory management. How JVM allocates the memory to different objects and frees up the memory when needed? In this post, I will talk about Java Heap Memory and Stack Memory. Heap and Stack are the memories that JVM allocates as per the application requirements.

Java Heap Space

The most basic question that arises during this discussion, is how do you define both of these memories. So I will start with Java Heap Space. When JVM starts, it creates Java Heap Space and it is used by the application till the time the application is running. Java runtime uses heap space to allocate memory to objects and JRE classes.

The heap size is adjusted according to when the application runs. When the heap gets full, garbage collection takes place. During garbage collection, objects that are not being used, get cleaned, in-process making space for new objects.

Java Stack Memory

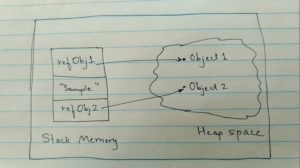
Stack memory is like a RAM, used by an executing thread for method-specific values or operations. Most of the values or operations in the stack are short-lived. It can also contain references to objects that reside in heap.

Whenever a method is invoked, a block is allocated in the stack for a method to hold local variables. The block gets cleared once the method finishes execution.

From these earlier definitions, it is clear that Stack memory is smaller in size compared to heap space.

Stack Memory and Heap Space

Differences between Heap space and Stack memory

  1. Heap memory is used by the entire application while the stack is used by execution thread only.
  2. When an object is created, it is stored in heap space, while the reference for that object is stored in stack memory.
  3. Since stack memory is thread-specific, it can’t be accessed by multiple threads or other threads than the one thread that created it. Heap space is global.
  4. Heap space is available till the time application is running, stack memory is short-lived.
  5. JVM can throw errors if both memories are full or the application doesn’t have either of memory remaining to continue running the application. StackOverfFowError if JVM is out of stack memory. If the application stops running provided there is no memory to store objects, it will throw OutOfMemoryError: Java Heap Space Error.

Conclusion

In this post, I discussed the differences between Java heap space and stack memory as part of Java memory management.

References

  1. Stack vs Heap
  2. Understanding memory management


HTTP Security Headers – XFrame Options and Content Security Policies

Have you ever traced an HTTP request in a browser or fiddler? You must have seen these HTTP security headers in the request or response header?

X-Frame-Options SAMEORIGIN

OR

Content-Security-Policy:frame-ancestors 'none'

Do you know what are these headers about? In this post, I will show why we use these headers. These security headers often come up when you are rendering an application within iframes.  Conclusively, these headers are important if you are loading applications with an iframe inside the main iframe.

Why are these headers required?

These headers help in avoiding clickjacking attacks. You can read more about clickjacking here. To defend against clickjacking, we implement frame-breaking using two methods.

   1. X-Frame-Options –

This header is used in response header to indicate whether or not a browser can be allowed to render a web page in a <frame> or <iframe>.

Possible values for this header:

  1. DENY – The recommended value for X-Frame-Options and it prevents any domain to frame the content.
  2. SAMEORIGIN – This allows only the current site to frame the content.
  3. ALLOW-FROM URI – This allows the specified URI to frame the content.

   2. Content-Security-Policy –

Similarly, X-Frame-Options is used by the browser to allow to render a page in a frame or iframe, the same way Content-Security-Policy header is used. Accordingly, some browsers support X-Frame-Options and some Content-Security-Policy. Nevertheless, one key feature between these two headers (X-Frame-Options and Content-Security-Policy) is that Content-Security-Policy can allow the listing of multiple domains to load the content from.

Possible values for this header are:

  • Content-Security-Policy: frame-ancestors ‘none’ – This prevents any domain to render the content.
  • Content-Security-Policy: frame-ancestors ‘self’ – This only allows the current site to frame the content.
  • Option of Content-Security-Policy: frame-ancestors ‘self’, ‘*.betterjavacode.com’, ‘https://www.mytest.com’ – This allows the current site, any subdomain of betterjavacode.com or the web page at www.mytest.com to load the page. Single quotes are important here.

Spring-Security

Likewise, Spring-security offers a feature to enable the X-Frame-Options and Content-Security-Policy directive.

http.headers().frameOptions().disable();

http.headers().frameOptions().sameOrigin();

Conclusion

In conclusion, I showed why and how to use HTTP security headers X-Frame-Options and Content-Security-Policy. Hence, if you enjoyed this post, subscribe to my blog here. You can find more details about X-Frame-Options and Content-Security-Policy headers on this page.

References

  1. Clickjacking cheat sheet – Clickjacking
  2. Clickjacking – Clickjacking-2


Build a blockchain using Spring boot

So I have talked about blockchain previously here. I will not be indulging in details about what is blockchain. But I will show how to build blockchain using Spring boot.

What will you need

  • IntelliJ
  • Java 8
  • Spring boot
  • Gradle

What is blockchain?

In short, blockchain is chain of records which are called blocks, containing any kind of data or transactions in these records. They are chained together using hashes.

Build a blockchain

We will need two model classes: one each for block and for transaction. We will also need a spring rest controller to provide 3 APIs for mining, transaction, and chaining. The heart of this blockchain will be a utility class to provide us Proof of work. If you don’t know what is Proof of work, then you can revisit the article I have linked in this post where I explained the algorithm used in building a blockchain, is called as Proof of work.

Model Classes

Each block will contain an index, timestamp, transactions, proof, and a hash for previous block. This model class will look like below:

package com.betterjavacode.blockchain.model;

import com.fasterxml.jackson.core.JsonProcessingException;
import com.fasterxml.jackson.databind.ObjectMapper;
import com.google.common.hash.Hashing;

import java.nio.charset.StandardCharsets;
import java.util.List;

public class Block
{

    public Block()
    {

    }
    private Long index;

    private Long timestamp;

    private List<Transaction> transactionList;

    private Long proof;

    private String previousBlockHash;

    public static final Long GENESIS_BLOCK_PROOF = 100L;
    public static final String GENESIS_BLOCK_PREV_HASH = "1";

    public Long getIndex()
    {
        return index;
    }

    public String getPreviousBlockHash()
    {
        return previousBlockHash;
    }

    public Long getProof()
    {
        return proof;
    }

    public List<Transaction> getTransactionList()
    {
        return transactionList;
    }

    public Block(Builder builder)
    {
        this.index = builder.index;
        this.timestamp = builder.timestamp;
        this.transactionList = builder.transactionList;
        this.proof = builder.proof;
        this.previousBlockHash = builder.previousBlockHash;
    }

    public static class Builder
    {
        private Long index;
        private Long timestamp;
        private List<Transaction> transactionList;
        private Long proof;
        private String previousBlockHash;


        public Builder setIndex(Long index)
        {
            this.index = index;
            return this;
        }

        public Builder setTimestamp(Long timestamp)
        {
            this.timestamp = timestamp;
            return this;
        }

        public Builder setTransactionList(List<Transaction> transactionList)
        {
            this.transactionList = transactionList;
            return this;
        }

        public Builder setProof(Long proof)
        {
            this.proof = proof;
            return this;
        }

        public Builder setPreviousBlockHash(String previousBlockHash)
        {
            this.previousBlockHash = previousBlockHash;
            return this;
        }

        public Block build()
        {
            return new Block(this);
        }
    }

    public String hash(ObjectMapper mapper) throws JsonProcessingException
    {
        String json = mapper.writeValueAsString(this);
        return Hashing.sha256().hashString(json, StandardCharsets.UTF_8).toString();
    }
}

It will look like below when we have some transaction


{
  "message": "New Block Added",
  "index": 2,
  "transactionList": [
    {
      "sender": "0",
      "recipient": "ef55403a23af46268fb5dfcee91329ae",
      "amount": 1
    }
  ],
  "proof": 33575,
  "previousHash": "58c63eba6e93523867369a865ee363a0c89a2b76a62c677e8acd27536415daf4"
}

Rest Controller

We will write a rest controller to retrieve the chain, mine or add a transaction. A REST controller for transactions will do a POST request to add a transaction to chain. Our REST controller will look like below:

package com.betterjavacode.blockchain.controller;


import com.betterjavacode.blockchain.model.Block;
import com.betterjavacode.blockchain.model.Transaction;
import com.betterjavacode.blockchain.response.ChainResponse;
import com.betterjavacode.blockchain.response.MineResponse;
import com.betterjavacode.blockchain.response.TransactionResponse;
import com.betterjavacode.blockchain.service.Blockchain;
import com.betterjavacode.blockchain.util.BlockProofOfWorkGenerator;
import com.fasterxml.jackson.core.JsonProcessingException;
import com.fasterxml.jackson.databind.ObjectMapper;
import org.springframework.beans.factory.annotation.Autowired;
import org.springframework.web.bind.annotation.*;

import javax.validation.Valid;
import java.math.BigDecimal;
import java.util.UUID;

@RestController
@RequestMapping("/")
public class BlockchainController
{
    @Autowired
    private Blockchain blockchain;

    @Autowired
    private ObjectMapper objectMapper;

    public static final String NODE_ID = UUID.randomUUID().toString().replace("-","");
    public static final String NODE_ACCOUNT_ADDRESS = "0";
    public static final BigDecimal MINING_CASH_REWARDS = BigDecimal.ONE;

    @GetMapping("mine")
    public MineResponse mine() throws JsonProcessingException
    {
        // Calculate Proof of work
        Block lastBlock = blockchain.lastBlock();

        Long lastProof = lastBlock.getProof();

        Long proof = BlockProofOfWorkGenerator.proofOfWork(lastProof);

        // Reward the miner by adding a transaction

        blockchain.addTransaction(NODE_ACCOUNT_ADDRESS, NODE_ID, MINING_CASH_REWARDS);

        // Add the new block to the chain
        Block newBlock = blockchain.createBlock(proof, lastBlock.hash(objectMapper));

        return new MineResponse.Builder().message("New Block Added").index(newBlock.getIndex()).transactions(newBlock.getTransactionList())
                .proof(newBlock.getProof()).previousHash(newBlock.getPreviousBlockHash()).build();
    }

    @GetMapping("chain")
    public ChainResponse fullChain()
    {
        return new ChainResponse.Builder().chain(blockchain.getChain()).length(blockchain.getChain().size()).build();
    }

    @PostMapping("transactions")
    public TransactionResponse newTransaction(@RequestBody @Valid Transaction transaction)
    {
        Long index = blockchain.addTransaction(transaction.getSender(), transaction.getRecipient(), transaction.getAmount());

        return new TransactionResponse.Builder().index(index).build();
    }
}

Transaction POST call basically adds the transaction to the list and returns the index of the block to which the transaction will be added to.

Proof of work

We will discuss how we have implemented the proof of work here. This will be the heart of entire blockchain that we have built.

When new blocks are mined on the blockchain, a proof of work algorithm is used to verify if the block is justifiable. Simple idea of Proof of Work is to find a number which solves a problem. This number must be difficult to find, but easy to verify by network.

Example – Hash of an integer multiplied by another integer must end in a particular number. In our implementation for this algorithm, we verify the proof is valid as below:

public static boolean validProof(Long lastProof, Long proof)
 {
     String s = "" + lastProof + "" + proof;

     String sha256 = Hashing.sha256().hashString(s, StandardCharsets.UTF_8).toString();

     return sha256.endsWith(PROOF_OF_WORK);
 }

This is the algorithm that miners try to solve fastest and whoever solves it first and compact manner gets rewarded with a coin as part of the transaction.

Swagger API

So now once we build our implementation and run the Spring Boot Application, I can access it through Swagger APIs. These APIs are as below:

  1. /transactions – Creates a new transaction in the block
  2. /mine – mines the new block
  3. /chain – returns the full blockchain

Conclusion

In this post, we showed how to understand a blockchain by implementing one in Spring boot. Remember, one thing that I have not described is the consensus algorithm to verify the chain, though I have implemented that in my class Blockchain.

References

  1. Build Blockchain
  2. Blockchain Github