Category Archives: Programming

Migrate Android Project from Eclipse to Android Studio

I remember downloading Android Studio back in 2013 to work on an Android project. But after playing around for an hour or two, I got frustrated. I had to delete Android Studio and go back to Eclipse. One reason why Eclipse was never successful with android because of patchy user interface for building Android applications, unfortunately that’s still the case in 2018.

Well, at least Google has made significant changes with Android Studio from 2015. It is almost compulsory to use Android Studio to build any new android applications. But there are few eclipse devotes like me who were still using eclipse to build android applications.

In this post, I will show how to migrate an android project from Eclipse to Android Studio. Warning: Even though the post looks very simple, it took me sizable efforts to figure out this migration. Hope it will be easier for readers.

Steps to migrate from Eclipse to Android Studio

  1. Download Android Studio from here. I had downloaded Android Studio version 3.3 RC2, but for it kept giving me syncing error when I imported the project. So I downgraded Android Studio version 3.2.1. Install Android Studio on your environment.
  2. On starting screen of Android Studio, you will see an option to import existing ADT project. Here you choose your eclipse based android project.
    1. Other option in this scenario, is to export android project from eclipse as gradle based project and it will also make life easier to import that project in Android Studio.
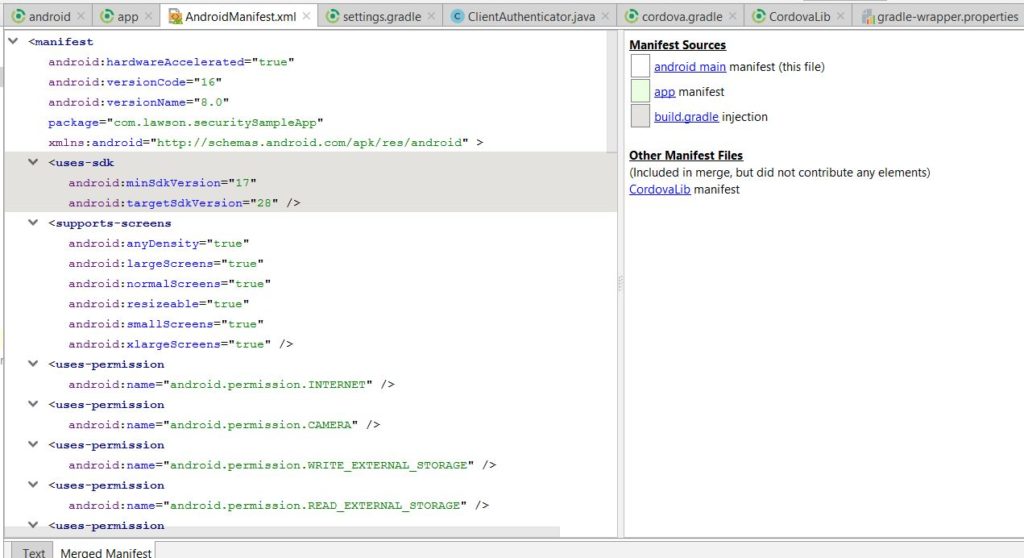
  3. Once you import the project in Android Studio, it will take some time to sync. In sync, Android Studio is basically creating gradle build file for your project. Converting all your library jars into dependencies. Other task it will be doing is to merge all your AndroidManifest.xml files. If there are any errors, it will show those errors during sync. Easiest way to fix AndroidManifest.xml errors are to go to this screen:

 4. Once the sync is successful, you can still face some issue to build the project. One major change with android studio gradle build is that in dependencies compile has been replaced by implementation project OR implementation files. Also to pull most of your dependencies, you will have to add google() as maven URL. minSdkVersion and targetSdkVersion should be moved to build file now and you can remove that from AndroidManifest.xml . Most of this should let you build your project successfully.
Conclusion

In this post, I showed how to migrate from eclipse to android studio for your android project. It is straight forward, but definitely depending on the project, you will run into few issues that you will have to resolve while building the project. Send me email or comment on this post if you have any questions.


How to use JMeter for load testing

Any enterprise application has to perform well under load. So performance of such application can be tracked. There are tools that help to track this performance. Apache JMeter is one such tool. In this post, we will use Apache JMeter to do a load test on a sample application and see how we can measure the performance.

Depending on your application, you can track different functionality for load tests. Database heavy operations would be the most affected by this tracking. That’s where load tests can help us to point out flaws in our design and code and how we can improve. One major difference to note is that load tests are different from stress tests. In stress tests, we try to measure how much load the application can tolerate before it breaks. In load tests, we are measuring the performance from a time perspective.

What you will need

  • Apache JMeter
  • A running web application
  • Browser of your choice

Load Test Process

Start Apache JMeter and record the test script. Let’s create a test plan that we will execute for our load test. As part of this post, I will be load testing login to a Spring boot based web application that I am running at https://localhost:8443/home

Create a test plan

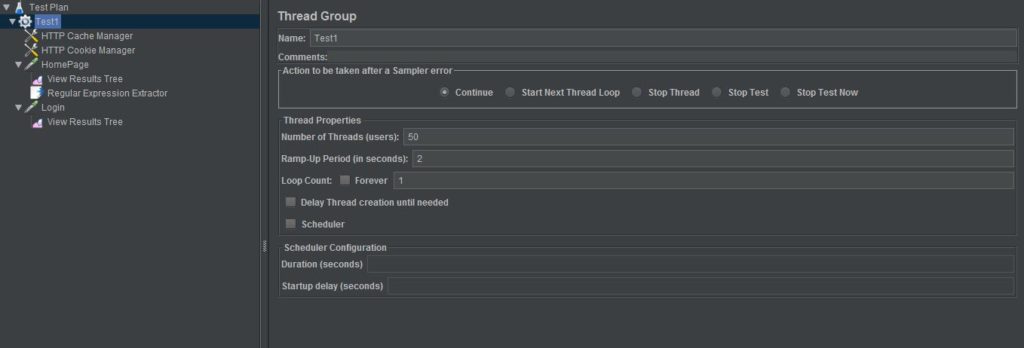
Once you launch JMeter, on left hand side window you will see an option for test plan. Create a test plan and let’s name it Test1 as shown below:

Test Plan for JMeter Script

Once you create the test plan, select how many threads (number of users) you want to run for this test, what’s the ramp-up period for one thread and what’s the loop count. For this post, I have selected 50 threads with each thread ramping up in 2 seconds with a single loop.

Add Config Elements

Right click on test plan and add config elements for HTTP Cache Manager and HTTP Cookie Manager.  This is required for handling CSRF tokens in our request that we will need later.

Add a Sampler

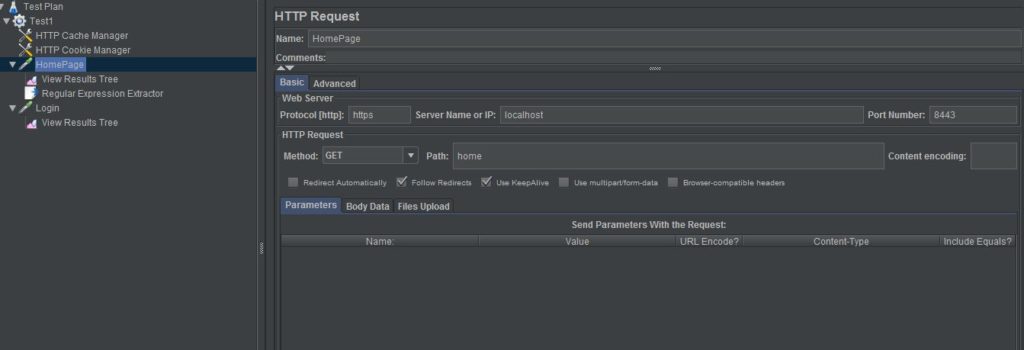
Now to test our web application, we will add a sampler with HTTP Request. We will name this HomePage. This is displayed as below:

Http Request Sampler

We will have to provide protocol, server name, port number and path as shown above.

Add a Listener

Now we will add a listener to our sampler to view results as a tree.

Add a Post Processor

We will need _csrf token from our home page so we can pass this token in POST request to login page of web application.

This Post Processor will have a regular expression extractor which will extract _csrf token from home page and will pass to next HTTP Request Sampler for Login Page.

Regular Expression Extractor

Add another Sampler for Login Page

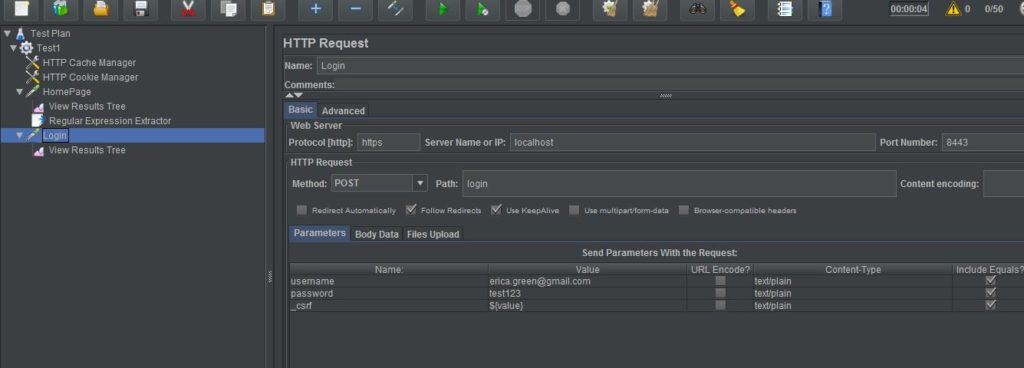
Now we will add Sampler for Login Page which will be a POST request to login endpoint of our web application. We will also pass username and password along with _csrf token whose value will be populated from extractor.

Login Page

Run the test script for load test

Now if we run our script in JMeter, it will run 50 threads at the same time to test login for application. Depending on performance, it might take a long time, but considering this a simple application, JMeter will run this test within few seconds.

Review the results

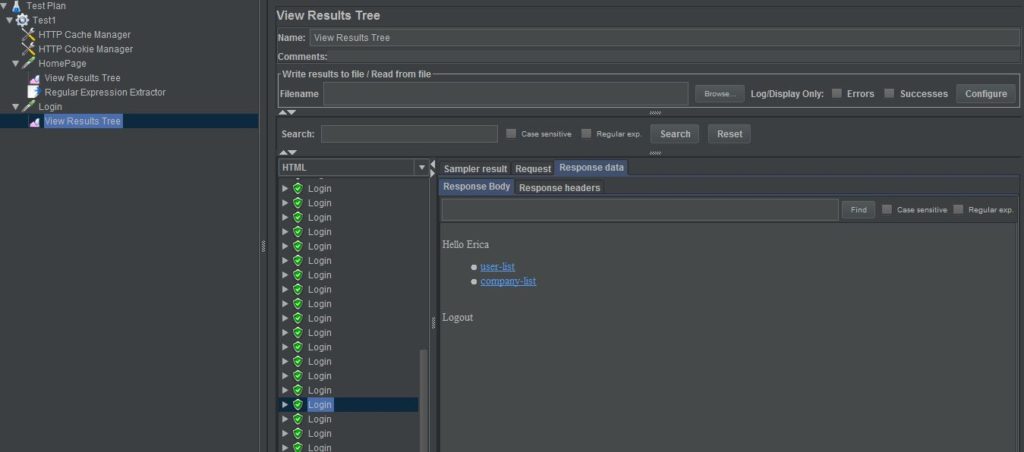
Once the test is complete, you can check the View Results Tree  and it will show you the results of our each individual test thread. In Response Data tab, you can view if our test was successful or not. It should show the result of our page in html format.

Results

Conclusion

In this post, we used Apache JMeter for load testing and how it can help us to design our application from performance perspective.

References

  1. JMeter with Blazemeter
  2. Load Testing using JMeter

Could not find or load main class org.apache.maven.surefire.booter.ForkedBooter

Problem with Surefire library

Recently one of my Jenkins build failed with an error Could not find or load main class org.apache.maven.surefire.booter.ForkedBooter . A surefire plugin that maven was using to run JUnit tests was failing.

surefire library issue

A solution to fix the issue with Surefire library

I found two solutions to this problem. But first, let’s try to understand what exactly caused this problem.

In OpenJDK version 1.8.181, there were some behavioral changes that might be the reason for this issue. I had updated the Java version to use based on the system in my Jenkins build. This will make a system to get the latest open JDK. Also, there is a bug in the surefire plugin that is using absolute paths while Java will allow only relative paths. You can find more details about this issue here.

So to fix this issue, the easiest solution is Djdk.net.URLClassPath.disableClassPathURLCheck=true .

Another solution that worked for me was to go back to the older JDK version that I was using in Jenkins build before I shifted to System option. I went back to open JDK version 1.8.118 version and it did the trick also.

Conclusion

In conclusion, I showed how to fix an error during Jenkins build “Could not find or load main class”. If you enjoyed this post, subscribe to my blog here.

References

  1. Could not find forkedbooter class – here
  2. Surefire bug


Use of clockskew in SAML Assertion in SAML Protocol

In this post, I will explain how we can use clockskew in SAML Assertion to avoid a general problem when a Service Provider (SP) receives a SAML response from Identity Provider (IdP) and if both of them are on different machines which is generally the scenario.

So when a user accesses a SP application, SP sends an authentication request to IdP and IdP sends a SAML response to SP. The typical SAML response looks like below:

<saml2p:Response Destination="https://localhost:8443/spring-security-saml2-sample/saml/SSO"
                 ID="_8ced26c57648ea420c5e27ac7f3d78b3"
                 InResponseTo="a3ei0bej41ie0dg738jji60271f1bca"
                 IssueInstant="2018-10-31T18:39:05.109Z"
                 Version="2.0"
                 xmlns:saml2p="urn:oasis:names:tc:SAML:2.0:protocol"
                 xmlns:xsd="http://www.w3.org/2001/XMLSchema"
                 >
    <saml2:Issuer xmlns:saml2="urn:oasis:names:tc:SAML:2.0:assertion">https://sts.betterjavacode.com/sts</saml2:Issuer>
    <ds:Signature xmlns:ds="http://www.w3.org/2000/09/xmldsig#">
        <ds:SignedInfo>
            <ds:CanonicalizationMethod Algorithm="http://www.w3.org/2001/10/xml-exc-c14n#" />
            <ds:SignatureMethod Algorithm="http://www.w3.org/2000/09/xmldsig#rsa-sha1" />
            <ds:Reference URI="#_8ced26c57648ea420c5e27ac7f3d78b3">
                <ds:Transforms>
                    <ds:Transform Algorithm="http://www.w3.org/2000/09/xmldsig#enveloped-signature" />
                    <ds:Transform Algorithm="http://www.w3.org/2001/10/xml-exc-c14n#">
                        <ec:InclusiveNamespaces PrefixList="xsd"
                                                xmlns:ec="http://www.w3.org/2001/10/xml-exc-c14n#"
                                                />
                    </ds:Transform>
                </ds:Transforms>
                <ds:DigestMethod Algorithm="http://www.w3.org/2001/04/xmlenc#sha256" />
                <ds:DigestValue>k6k9seVwZT8qEfainB+HDUJmv7wLwPjJxRARgrFLk3E=</ds:DigestValue>
            </ds:Reference>
        </ds:SignedInfo>
        <ds:SignatureValue>
eYl7/5Bg4f2ZtXYl1Tp/ZW4CIqna1sjHjVSB/zhj3NHncQu7pq9PBTdWz0JEaE8+efICz7trDQvI
J0tih35Vg7NqDtOeps7vMttV0XvrnWKIXEqrscyNgkhwy+KW2oprKIWTJq6y3Z0kQ7n2DlTRkfAE
yLRPxqr8AZU+77Tbv4DmTQVp934ivibUaMNU79nkhMMo7vf0ldpeNCe5Ll5Q7nxgNBCrL4mhbGdU
DNJDVqJIhQZDJUYhBVZSgLo6mYLxf0ndQr5+GdcvO3i8VlooH49I5ZO6LfsBlNiSU6WezC0Fcz8J
biodrT3h62Jny8FKUgYfXA8i0ZoAerCxHmLGFQ==
</ds:SignatureValue>
        <ds:KeyInfo>
            <ds:X509Data>
                <ds:X509Certificate>MIICpTCCAY2gAwIBAgIHAKQk/Tty7TANBgkqhkiG9w0BAQsFADATMREwDwYDVQQDDAhJbmZvclNU
UzAeFw0xNzExMTAxNjIwMjVaFw0xOTExMTAxNjIwMjZaMBMxETAPBgNVBAMMCEluZm9yU1RTMIIB
IjANBgkqhkiG9w0BAQEFAAOCAQ8AMIIBCgKCAQEAuy40GofgfSldiu7AXRSWQZo8YIUmdJOXV5gd
YUiIBggcm5J+jttd21av9AWBDLtvekIqgG+nM1SEarDNlCgrnThqDtdsBDnT+B5FQowLwqNQZb0C
6PSWccp484OLHhv3YwbjV/IxgW6wlv2EejPF93NTPc5TkkpIKIEARJwKiUvuwzkcX1atD8HESj8/
5wZhK3g3MSv+CaJb1Y732U2aa34RI6HYRNlKRsqRj55SZnPs3AmIBL/rdVbt5eYJdK+jXSOMQ9Sb
TNkgTAYKnlSQP8NhsNc1Y5ZJ231KD3rSqHEXwpKVXFuEgtBnCL9utqyUU0Fu9PNJJj0hf9otMJw2
pQIDAQABMA0GCSqGSIb3DQEBCwUAA4IBAQAsqxA/+llqNtJq/VPtAa0XwtldB7/4Gew5LgfU5Yj7
/ruHuxCh03xfnLyjo0bxrFeMbhHMg4MzJhgah0zTIl4WMRI781CiMxGfMdvQAHhY5hgpryqKUTbH
qcIoW1WkTEL+TrOSk2gjL/n/4KsUJ3XKeI4j4h2RDvbIF8u9cbrB5RupEwJlo/pK3mCr3GQGFxVX
4yli+AysMmz8JWz2hWQad0QQr9KIYmZdgauNt7uYn4u+7cngtTtQF/EMoZU1pAFI5lDP13mxI1rR
eYGzoKhGfHIy7TiXYvqX0vFomzkgr6D0DnRlRkQR8J5EVtnGZ7sF50KlNviG+IxrPNndUdeX</ds:X509Certificate>
            </ds:X509Data>
        </ds:KeyInfo>
    </ds:Signature>
    <saml2p:Status>
        <saml2p:StatusCode Value="urn:oasis:names:tc:SAML:2.0:status:Success" />
    </saml2p:Status>
    <saml2:Assertion ID="_43514fee402111bfa8ef07e2bb3e1816"
                     IssueInstant="2018-10-31T18:39:05.109Z"
                     Version="2.0"
                     xmlns:saml2="urn:oasis:names:tc:SAML:2.0:assertion"
                     >
        <saml2:Issuer>https://sts.betterjavacode.com/sts</saml2:Issuer>
        <saml2:Subject>
            <saml2:NameID Format="urn:oasis:names:tc:SAML:2.0:nameid-format:transient"
                          NameQualifier="https://sts.betterjavacode.com/sts"
                          SPNameQualifier="https://localhost:8443/spring-security-saml2-sample/saml/metadata"
                          >-74375301938178262591541011144180</saml2:NameID>
            <saml2:SubjectConfirmation Method="urn:oasis:names:tc:SAML:2.0:cm:bearer">
                <saml2:SubjectConfirmationData InResponseTo="a3ei0bej41ie0dg738jji60271f1bca"
                                               NotOnOrAfter="2018-10-31T18:44:05.109Z"
                                               Recipient="https://localhost:8443/spring-security-saml2-sample/saml/SSO"
                                               />
            </saml2:SubjectConfirmation>
        </saml2:Subject>
        <saml2:Conditions NotBefore="2018-10-31T18:39:05.109Z"
                          NotOnOrAfter="2018-10-31T18:44:04.109Z"
                          >
            <saml2:AudienceRestriction>
                <saml2:Audience>https://localhost:8443/spring-security-saml2-sample/saml/metadata</saml2:Audience>
            </saml2:AudienceRestriction>
        </saml2:Conditions>
        <saml2:AttributeStatement>
            <saml2:Attribute Name="http://schemas.microsoft.com/claims/Tenant">
                <saml2:AttributeValue xmlns:xsi="http://www.w3.org/2001/XMLSchema-instance"
                                      xsi:type="xsd:string"
                                      >ABC Company</saml2:AttributeValue>
            </saml2:Attribute>
            <saml2:Attribute Name="http://schemas.microsoft.com/claims/Identity">
                <saml2:AttributeValue xmlns:xsi="http://www.w3.org/2001/XMLSchema-instance"
                                      xsi:type="xsd:string"
                                      >testuser</saml2:AttributeValue>
            </saml2:Attribute>
            <saml2:Attribute Name="http://schemas.xmlsoap.org/claims/CommonName">
                <saml2:AttributeValue xmlns:xsi="http://www.w3.org/2001/XMLSchema-instance"
                                      xsi:type="xsd:string"
                                      >Test User</saml2:AttributeValue>
            </saml2:Attribute>

            <saml2:Attribute Name="http://schemas.microsoft.com/claims/Email">
                <saml2:AttributeValue xmlns:xsi="http://www.w3.org/2001/XMLSchema-instance"
                                      xsi:type="xsd:string"
                                      >test.user@betterjavacode.com</saml2:AttributeValue>
            </saml2:Attribute>
            <saml2:Attribute Name="http://schemas.microsoft.com/claims/Session">
                <saml2:AttributeValue xmlns:xsi="http://www.w3.org/2001/XMLSchema-instance"
                                      xsi:type="xsd:string"
                                      >-65311121040491585821541011144177</saml2:AttributeValue>
            </saml2:Attribute>                        
        </saml2:AttributeStatement>
        <saml2:AuthnStatement AuthnInstant="2018-10-31T18:39:05.109Z"
                              SessionIndex="31079178551135950171541011144177"
                              >
            <saml2:AuthnContext>
                <saml2:AuthnContextClassRef>urn:oasis:names:tc:SAML:2.0:ac:classes:PasswordProtectedTransport</saml2:AuthnContextClassRef>
            </saml2:AuthnContext>
        </saml2:AuthnStatement>
    </saml2:Assertion>
</saml2p:Response>

Now SP and IdP are on different machine. And there can be a case that their clocks are not synced. So when IdP generates the response, it has an element SubjectConfirmationData that contains NotBefore and NotOnOrAfter. Subject indicates details about the user and relying party who is receiving the assertion. Relying party has to verify that the assertion is coming from the right issuer.

NotBefore – Time before which subject can not be validated.

NotOnOrAfter – Time on or after which subject has expired.

Similarly, there will be Conditions element in the assertion and this element will also contain attributes NotBefore or NotOnOrAfter. These two attributes indicate at what time assertion will be valid and after what time, it will be expired.

Problem

Now if we take into account a scenario where system clocks of IdP and SP are not in sync and if Idp clock is ahead of Sp clock, how do we handle this scenario?

Solution

So as described in above scenario, then assertion validation will fail because of NotBefore time will be greater than the time on SP machine.

To solve this issue, we can either make sure IdP and SP clocks are in sync. But this seems human-dependent solution and getting clocks in sync is not always practical solution.

Another way this can be solved by adding a clockskew in SAML assertion. A relying party that is consuming the assertion should apply small clockskew to time to accommodate small changes in time.

private int clockSkew = 120;

SubconfirmationData subjectConfirmationData = subjectConfirmation.getSubjectConfirmationData();

if(subjectConfirmationData.getNotOnOrAfter().plusSeconds(clockSkew).isBeforeNow())
{
 // throw error - Subject Confirmation Data has expired
}

/***
*
*
*/

if (conditions.getNotBefore() != null && conditions.getNotBefore().minusSeconds(clockSkew).isAfterNow()) 
{
      throw new SAMLException("Assertion condition notBefore is not valid");
}

if (conditions.getNotOnOrAfter() != null && conditions.getNotOnOrAfter().plusSeconds(clockSkew).isBeforeNow()) 
{
      throw new SAMLException("Assertion condition notOnOrAfter is not valid");
}


References

  1. SAML Specification
  2. SAML assertion with NotBefore and NotOnOrAfter

Building user interface for Social KPI

As part of building the web application Social KPI SocialPie, we will be building the backend and frontend in module forms. Eventually, the plan is to deploy the application on the cloud. But backend and frontend are not different services as Microservice architecture generally dictates. In this post, I will show how we will be building a user interface for Social KPI using thymeleaf and angular JS.

The idea is to create a skeleton of UI by bringing different points in the discussion to make our decisions about choosing different parts of UI. In the previous post here, we discussed user flow.

User Story for user interface

  1. A user will access the application and will see the initial screen for login or sign up.
  2. If the user has not signed up before, he will sign up with the first name, last name, email, company name, password.
  3. Once the user signs up, the user will receive a confirmation email to sign in. This user will be the administrator to manage its company.
  4. A user can come back to the login screen through confirmation email. Then the user will enter credentials.
  5. User will see the company profile. User will have the option to modify company profile details as well as to add users with role REPORT.
  6. Administrator when adding these users will submit their first name, last name, email, and role as REPORT. Administrator will have an option to send emails to these users through portal or provide them username and password.
  7. Once the users with role REPORT login, they will have the option to change their temporary password. Once the password has been changed, he will be redirected to the reports screen.
  8. Administrator can also access reports screen any time.
  9. On Reports screen, user will have an option to synchronize the data with social media APIs to get the latest data. This will be once in a day option considering the limitation on access of APIs.
  10. On Reports screen, user will have an option to generate the report post-synchronization. User will be able to see Jasper reports in graph as well in data form. User will have an option to send these reports to other people in email.
  11. There will be logout and home screen options on the screen all the time.
  12. Home for user with Report role will be their profile information.

The skeleton of the user interface

Screen 1:

First Page

Screen 2:

Second Page

Screen 3:

Third Page

Screen 4:

Forth Page

Screen 5:

Fifth Page

Screen 6:

Sixth Page

Screen 7:

Seventh Page

Conclusion

In this post, we showed the skeleton of the user interface for the Social KPI web application. Of course, this is not a final design, but as we go on building it, we will have our changes and I will also show the code for this design. In future posts, I will be showing the functioning UI for login and sign-up pages.