Author Archives: yogesh.mali@gmail.com

Example of Spring Cloud Function with AWS Lambda

In this post, we will learn about Spring Cloud Function and will deploy an example of Spring Cloud Function on AWS Lambda. By end of this post, we will have more understanding of serverless functions. If you want to learn more about serverless architecture, this post will get you started.

What is Spring Cloud Function?

Spring Cloud Function is one of the features of Spring Cloud. It allows developers to write cloud-agnostic functions with Spring features. These functions can be stand-alone classes and one can easily deploy on any cloud platform to build a serverless framework. Spring Cloud offers a library spring-cloud-starter-function-web allows to build functions with Spring features and it brings all the necessary dependencies.

Why use Spring Cloud Function?

This question is more when to use Spring Cloud Function. Basically, Spring Cloud Function library allows to the creation of functional applications that can be deployed easily on AWS Lambda. These functions follow the Java 8 pattern of Supplier, Consumer, and Function.

spring-cloud-starter-function-web library provides native interaction for handling requests, streams.

Features of Spring Cloud Function

The major advantage of Spring Cloud Function is it provides all the features of Spring Boot like autoconfiguration, dependency injection. But there are more features:

  • Transparent type conversions of input and output
  • POJO Functions
  • REST Support to expose functions as HTTP endpoints
  • Streaming data to/from functions via Spring Cloud Stream framework
  • Deploying functions as isolated jar files
  • Adapter for AWS Lambda, Google Cloud Platform, Microsoft Azure

Demo

As part of this post, we will create Spring Cloud Function and deploy it in AWS Lambda. Once we create a regular spring boot application, add the following dependencies in your Gradle file:

dependencies {
	implementation 'org.springframework.boot:spring-boot-starter'
	implementation 'org.springframework.boot:spring-boot-starter-data-jpa'
	implementation 'org.springframework.cloud:spring-cloud-function-adapter-aws:3.2.1'
	implementation "com.amazonaws:aws-lambda-java-events:${awsLambdaEventsVersion}"
	implementation "com.amazonaws:aws-lambda-java-core:${awsLambdaCoreVersion}"
	runtimeOnly 'com.h2database:h2'
	testImplementation 'org.springframework.boot:spring-boot-starter-test'
}

Note the dependency spring-cloud-function-adapter-aws allows us to integrate Spring Cloud Function with AWS Lambda.

One main class for the application will look like below:

package com.betterjavacode.springcloudfunctiondemo;

import org.springframework.boot.autoconfigure.SpringBootApplication;
import org.springframework.cloud.function.context.FunctionalSpringApplication;

@SpringBootApplication
public class SpringcloudfunctiondemoApplication {

	public static void main(String[] args) {
		FunctionalSpringApplication.run(SpringcloudfunctiondemoApplication.class, args);
	}

}

Compare this to a regular Spring Boot application, there is one difference. We are using FunctionalSpringApplication as an entry point. This is a functional approach to writing beans and helps with startup time.

Now, we can write three types of functions Function, Consumer OR Supplier. We will see what each function does and how we can use as part of this demo.

Furthermore, let’s create a POJO model class Customer.

package com.betterjavacode.springcloudfunctiondemo.models;

import javax.persistence.Entity;
import javax.persistence.GeneratedValue;
import javax.persistence.Id;
import javax.persistence.Table;

@Entity
@Table(name= "customer")
public class Customer
{
    @Id
    @GeneratedValue(generator = "UUID")
    private Long id;

    private String name;

    private int customerIdentifier;

    private String email;

    private String contactPerson;

    public Customer(String name, int customerIdentifier, String email, String contactPerson)
    {
        this.name = name;
        this.customerIdentifier = customerIdentifier;
        this.email = email;
        this.contactPerson = contactPerson;
    }

    public String getName ()
    {
        return name;
    }

    public void setName (String name)
    {
        this.name = name;
    }

    public int getCustomerIdentifier ()
    {
        return customerIdentifier;
    }

    public void setCustomerIdentifier (int customerIdentifier)
    {
        this.customerIdentifier = customerIdentifier;
    }

    public String getEmail ()
    {
        return email;
    }

    public void setEmail (String email)
    {
        this.email = email;
    }

    public String getContactPerson ()
    {
        return contactPerson;
    }

    public void setContactPerson (String contactPerson)
    {
        this.contactPerson = contactPerson;
    }

    public Long getId ()
    {
        return id;
    }

    public void setId (Long id)
    {
        this.id = id;
    }
}

Certainly, our spring cloud function will perform some business logic related to this model Customer.

Consumer Function

Let’s create a Consumer function. Consumer function usually takes an input and performs some business logic that will have a side-effect on the data. It will not produce any output. So it is more like a void method.

For our demo, it will look like below:

package com.betterjavacode.springcloudfunctiondemo.functions;

import com.betterjavacode.springcloudfunctiondemo.models.Customer;
import com.betterjavacode.springcloudfunctiondemo.repositories.CustomerRepository;
import org.slf4j.Logger;
import org.slf4j.LoggerFactory;
import org.springframework.beans.factory.annotation.Autowired;
import org.springframework.stereotype.Component;
import java.util.Map;
import java.util.function.Consumer;

@Component
public class CustomerConsumer implements Consumer<Map<String, String>>
{
    public static final Logger LOGGER = LoggerFactory.getLogger(CustomerConsumer.class);

    @Autowired
    private CustomerRepository customerRepository;

    @Override
    public void accept (Map<String, String> map)
    {
        LOGGER.info("Creating the customer", map);
        Customer customer = new Customer(map.get("name"), Integer.parseInt(map.get(
                "customerIdentifier")), map.get("email"), map.get("contactPerson"));
        customerRepository.save(customer);
    }

}

This CustomerConsumer function implements Consumer function type and takes an input of type Map<String, String>. As part of the interface contract, one needs to implement the method accept. This method will take map input and perform some business logic. One thing to understand is that Spring Cloud Function will handle type conversion from raw input stream and types declared by the function. If the function is not able to infer tye information, it will convert to a generic type of map.

This function takes a map of DTO object for the customer and saves it in the database. For the database, we are using H2 in-memory database. One can always add more business logic, but for demo purposes, we are showing a simple example.

Supplier Function

The supplier function acts like a GET endpoint. This function takes no input but returns data.

package com.betterjavacode.springcloudfunctiondemo.functions;

import com.betterjavacode.springcloudfunctiondemo.models.Customer;
import com.betterjavacode.springcloudfunctiondemo.repositories.CustomerRepository;
import org.slf4j.Logger;
import org.slf4j.LoggerFactory;
import org.springframework.beans.factory.annotation.Autowired;
import org.springframework.stereotype.Component;

import java.util.List;
import java.util.function.Supplier;

@Component
public class CustomerSupplier implements Supplier
{
    public static final Logger LOGGER = LoggerFactory.getLogger(CustomerSupplier.class);

    @Autowired
    private CustomerRepository customerRepository;

    @Override
    public Customer get ()
    {
        List customers = customerRepository.findAll();
        LOGGER.info("Getting the customer of our choice - ", customers);
        return customers.get(0);
    }
}

Configuring Spring Cloud Function with AWS Lambda

One AWS Lambda will execute only one function. If there are multiple Spring Cloud Function beans, one can configure which function to execute through a lambda. Add the property in application.properties as follows:

spring.cloud.function.definition=customerConsumer

One can easily deploy a single jar file with AWS Lambda and use Spring Profiles to pass different functions in application.properties.

Building Shaded Jar

To deploy the application in AWS Lambda with Spring Cloud Function, you will need a shaded jar. To build this jar, we will use gradle shadow plugin. The build file will look like below:


buildscript {
	ext {
		springBootVersion = '2.6.2'
		wrapperVersion = '1.0.17.RELEASE'
		shadowVersion = '5.1.0'
	}
	repositories {
		mavenLocal()
		jcenter()
		mavenCentral()
		maven { url "https://repo.spring.io/snapshot" }
		maven { url "https://repo.spring.io/milestone" }
	}
	dependencies {
		classpath "com.github.jengelman.gradle.plugins:shadow:${shadowVersion}"
		classpath("org.springframework.boot.experimental:spring-boot-thin-gradle-plugin:${wrapperVersion}")
		classpath("org.springframework.boot:spring-boot-gradle-plugin:${springBootVersion}")
		classpath("io.spring.gradle:dependency-management-plugin:1.0.8.RELEASE")
	}
}
apply plugin: 'java'
apply plugin: 'maven-publish'
apply plugin: 'eclipse'
apply plugin: 'com.github.johnrengelman.shadow'
apply plugin: 'org.springframework.boot'
apply plugin: 'io.spring.dependency-management'

group = 'com.betterjavacode'
version = '0.0.1-SNAPSHOT'
sourceCompatibility = '1.8'
targetCompatibility = '1.8'

repositories {
	mavenLocal()
	mavenCentral()
	maven { url "https://repo.spring.io/snapshot" }
	maven { url "https://repo.spring.io/milestone" }
}

ext {
	springCloudFunctionVersion = "3.2.1"
	awsLambdaEventsVersion = "2.0.2"
	awsLambdaCoreVersion = "1.2.1"
}

assemble.dependsOn = [shadowJar]

jar {
	manifest {
		attributes 'Main-Class': 'com.betterjavacode.springcloudfunctiondemo.SpringcloudfunctiondemoApplication'
	}
}

import com.github.jengelman.gradle.plugins.shadow.transformers.*

shadowJar {
	classifier = 'aws'
	dependencies {
		exclude(
				dependency("org.springframework.cloud:spring-cloud-function-web:${springCloudFunctionVersion}"))
	}
	// Required for Spring
	mergeServiceFiles()
	append 'META-INF/spring.handlers'
	append 'META-INF/spring.schemas'
	append 'META-INF/spring.tooling'
	transform(PropertiesFileTransformer) {
		paths = ['META-INF/spring.factories']
		mergeStrategy = "append"
	}
}

dependencyManagement {
	imports {
		mavenBom "org.springframework.cloud:spring-cloud-function-dependencies:${springCloudFunctionVersion}"
	}
}

dependencies {
	implementation 'org.springframework.boot:spring-boot-starter'
	implementation 'org.springframework.boot:spring-boot-starter-data-jpa'
	implementation 'org.springframework.cloud:spring-cloud-function-adapter-aws:3.2.1'
	implementation "com.amazonaws:aws-lambda-java-events:${awsLambdaEventsVersion}"
	implementation "com.amazonaws:aws-lambda-java-core:${awsLambdaCoreVersion}"
	runtimeOnly 'com.h2database:h2'
	testImplementation 'org.springframework.boot:spring-boot-starter-test'
}

test {
	useJUnitPlatform()
}

Run the command ./gradlew clean build and it will build a shaded jar. An Uber Jar contains the contents of multiple jars from dependencies. A shaded jar provides a way of creating an uber jar and renaming the packages from Uber Jar. Now to deploy our jar in AWS Lambda, we have to make sure to include a dependency com.amazonaws:aws-lambda-java-core.

Creating an AWS Lambda in AWS

Regardless, let’s create an AWS Lambda in AWS.Example of Spring Cloud Function - Create Lambda

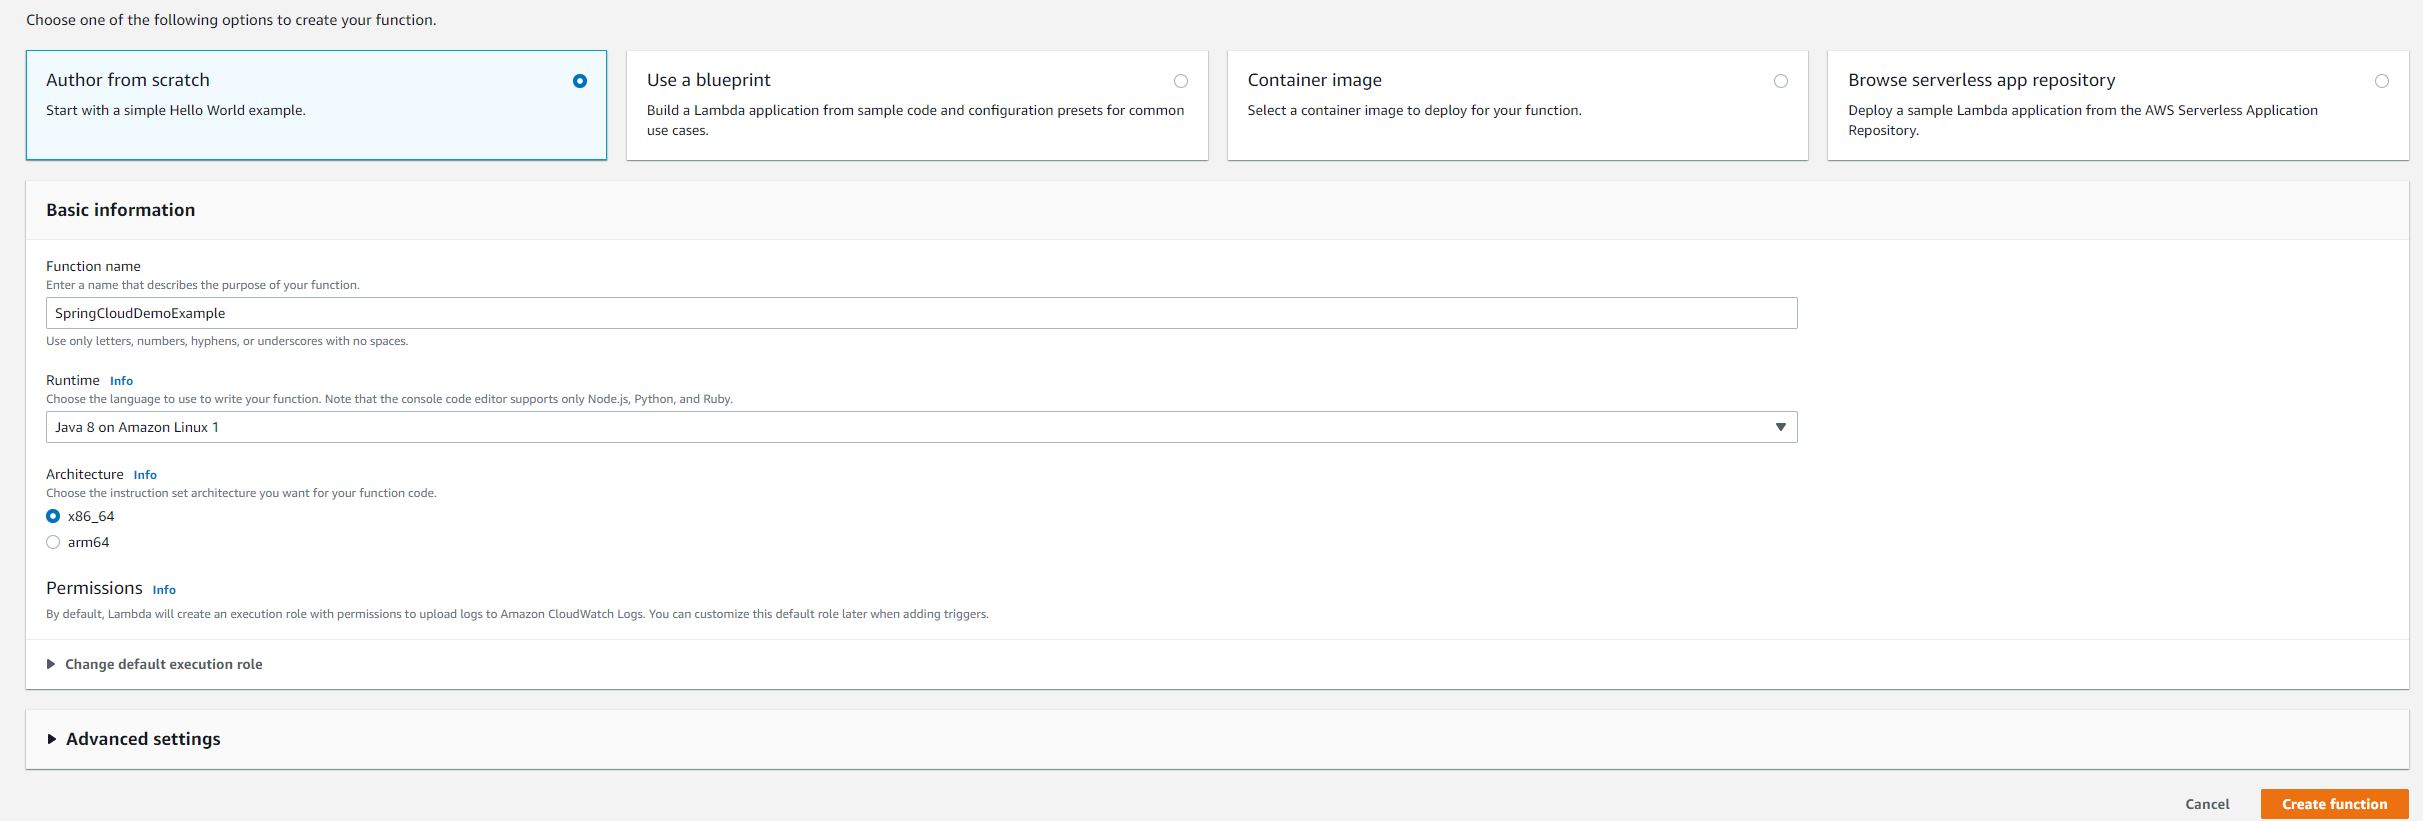
Provide a descriptive name – SpringCloudFunctionDemo.

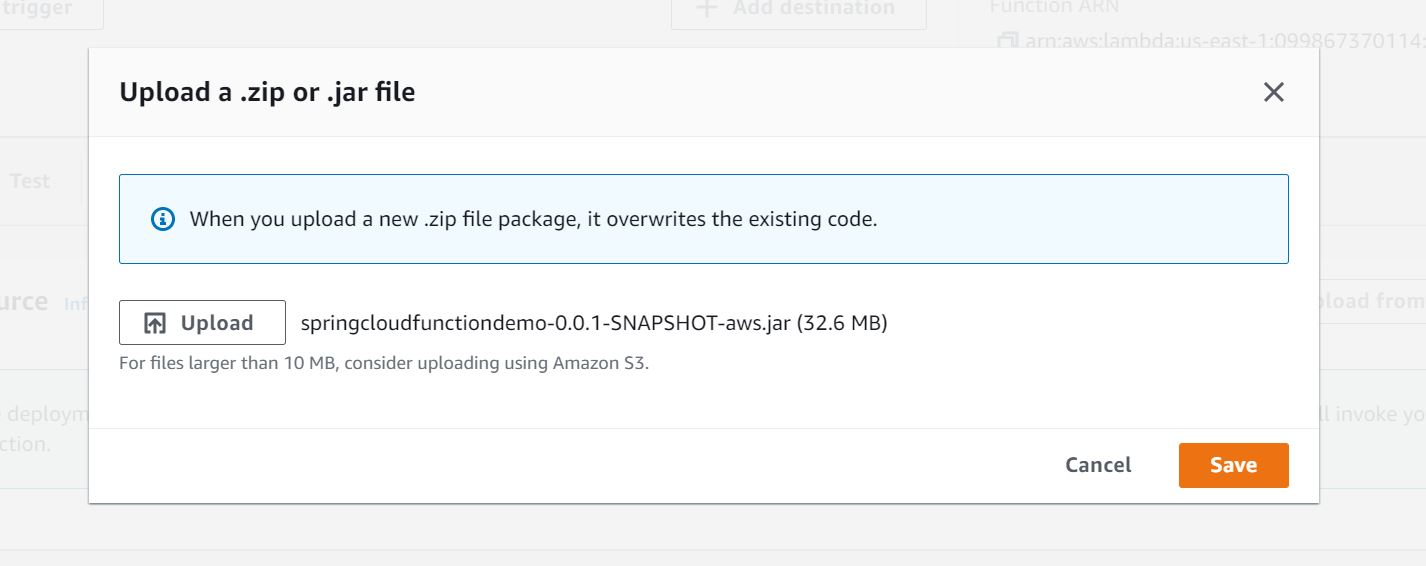
Upload the shaded jar.

Now update Runtime Settings in AWS Lambda to indicate how the lambda will invoke our function. Spring provides a classFunctionInvoker with generic method handleRequest as part of the library spring-cloud-function-aws-adapter.

Now if we run the AWS Lambda, we will see the execution of our consumer function. We will test our consumer function with a JSON data load:

{
  "name": "ABC Company",
  "customerIdentifier": "1",
  "email": "support@abccompany.com",
  "contactPerson": "John Doe"
}


2022-01-23 06:45:08.987  INFO 9 --- [           main] com.zaxxer.hikari.HikariDataSource       : HikariPool-1 - Starting...
2022-01-23 06:45:09.391  INFO 9 --- [           main] com.zaxxer.hikari.HikariDataSource       : HikariPool-1 - Start completed.
2022-01-23 06:45:09.455  INFO 9 --- [           main] org.hibernate.dialect.Dialect            : HHH000400: Using dialect: org.hibernate.dialect.H2Dialect
2022-01-23 06:45:10.289  INFO 9 --- [           main] org.hibernate.tuple.PojoInstantiator     : HHH000182: No default (no-argument) constructor for class: com.betterjavacode.springcloudfunctiondemo.models.Customer (class must be instantiated by Interceptor)
2022-01-23 06:45:10.777  INFO 9 --- [           main] o.h.e.t.j.p.i.JtaPlatformInitiator       : HHH000490: Using JtaPlatform implementation: [org.hibernate.engine.transaction.jta.platform.internal.NoJtaPlatform]
2022-01-23 06:45:10.800  INFO 9 --- [           main] j.LocalContainerEntityManagerFactoryBean : Initialized JPA EntityManagerFactory for persistence unit 'default'
2022-01-23 06:45:12.832  INFO 9 --- [           main] lambdainternal.LambdaRTEntry             : Started LambdaRTEntry in 8.239 seconds (JVM running for 8.868)
2022-01-23 06:45:12.919  INFO 9 --- [           main] o.s.c.f.adapter.aws.FunctionInvoker      : Locating function: 'customerConsumer'
2022-01-23 06:45:12.931  INFO 9 --- [           main] o.s.c.f.adapter.aws.FunctionInvoker      : Located function: 'customerConsumer'
2022-01-23 06:45:12.940  INFO 9 --- [           main] o.s.c.f.adapter.aws.FunctionInvoker      : Received: {"name":"ABC Company","customerIdentifier":"1","email":"support@abccompany.com","contactPerson":"John Doe"}
2022-01-23 06:45:13.146  INFO 9 --- [           main] o.s.c.f.adapter.aws.AWSLambdaUtils       : Incoming JSON Event: {"name":"ABC Company","customerIdentifier":"1","email":"support@abccompany.com","contactPerson":"John Doe"}
2022-01-23 06:45:13.146  INFO 9 --- [           main] o.s.c.f.adapter.aws.AWSLambdaUtils       : Incoming MAP: {name=ABC Company, customerIdentifier=1, email=support@abccompany.com, contactPerson=John Doe}
2022-01-23 06:45:13.166  INFO 9 --- [           main] o.s.c.f.adapter.aws.AWSLambdaUtils       : Incoming request headers: {id=042ab9bc-211d-fa47-839c-888720ec35d4, timestamp=1642920313144}
2022-01-23 06:45:13.184  INFO 9 --- [           main] c.b.s.functions.CustomerConsumer         : Creating the customer
END RequestId: b8352114-77f6-414c-a2dc-63d522a9eef4
REPORT RequestId: b8352114-77f6-414c-a2dc-63d522a9eef4	Duration: 710.53 ms	Billed Duration: 711 ms	Memory Size: 512 MB	Max Memory Used: 251 MB	Init Duration: 8986.65 ms	

As you can see in the above log, there is a log Creating the customer from our code. Also, you will see the response as Ok from Lambda execution.

The code for this demo is available here.

Conclusion

AWS Lambda is a very powerful service to build a serverless framework. With the combination of Spring Cloud and AWS, one can leverage multiple features to build simpler services for handling complex business requirements. Here is another post about connecting Spring Boot application with AWS Dynamo DB.

How to Use Pub/Sub with NodeJS

In this post, I show how to use pub/sub pattern with the NodeJS application. We will use the Google Cloud Pub/Sub module for building this sample application.

What is Pub/Sub?

Most architectures used to be synchronous previously. But with the advent of microservices, asynchronous communication is an equal part of the design. Pub/Sub is one such model that allows asynchronous communication. Usually, in event-driven architecture, one service publishes an event and another service consumes that event.

A message broker plays a relay role when it comes to publishing and consuming the messages. Both Google Cloud(Pub-Sub) and AWS offer a service (SNS & SQS) that allows applications to use the Pub-Sub model. Another advantage of Pub/Sub is that it allows to set up a retry policy, covers idempotency. You can learn more about event-driven architecture here.

Push-Pull

In any pub-sub model, there are two patterns of implementation. One is Push and the other is Pull.

In Pull Model

  • The consumer sends a request to pull any messages.
  • Pub/Sub server responds with a message if there are any messages available and not previously consumed.
  • The consumer sends an acknowledgment.

In Push Model

  • The publisher publishes a message to Pub/Sub Server
  • The Pub/Sub server sends the message to the specified endpoint on the consumer side.
  • Once the consumer receives the messages, it sends an acknowledgment.

NodeJS Application

As part of the post, we will create a nodejs application that will use the pub-sub model. This application will send simple messages to Google Cloud pub/sub. We will have another consumer application that will consume this message.

Accordingly, before we write our application, let’s make sure you have installed gcloud emulator on your environment. First, install gcloud sdk depending on what OS you have.

Now initialize the gcloud on your environment and you will have to log in for this

gcloud init

Gcloud will ask a bunch of questions to choose a project and configure a cloud environment.

Now, we will install a pub-sub component emulator for gcloud on our local environment.

gcloud components install pubsub-emulator

Now to get started with pub-sub service, use the following command

gcloud beta emulators pubsub start --project=pubsubdemo --host-port=localhost:8085

This command will start the pubsub service on your machine at localhost:8085. Since we will have to use this service in our application, we will need to know where the service is located. So set two environment variables

PUBSUB_EMULATOR_HOST=localhost:8085

PUBSUB_PROJECT_ID=pubsubdemo

Publisher Application

In general, we have a Publisher application. This application checks if the topic exists in Pub-Sub service and if not, then creates that topic. Once it creates the topic, it sends the data through a message to Pub-Sub service topic.

The code for this application will look like below:


const { PubSub } = require('@google-cloud/pubsub');
require('dotenv').config();

const pubsubClient = new PubSub();

const data = JSON.stringify({
  "userId": "50001",
  "companyId": "acme",
  "companyName": "Acme Company",
  "firstName": "John",
  "lastName": "Doe",
  "email": "john.doe@acme.com",
  "country": "US",
  "city": "Austin",
  "status": "Active",
  "effectiveDate": "11/11/2021",
  "department": "sales",
  "title": "Sales Lead"
});
const topicName = "PubSubExample";

async function createTopic() {
  // Creates a new topic
  await pubsubClient.createTopic(topicName);
  console.log(`Topic ${topicName} created.`);
}

async function doesTopicExist() {
  const topics = await pubsubClient.getTopics();
  const topicExists = topics.find((topic) => topic.name === topicName);
  return (topics && topicExists);
}

if(!doesTopicExist()) {
  createTopic();
}

async function publishMessage() {
    const dataBuffer = Buffer.from(data);

    try {
      const messageId = await pubsubClient.topic(topicName).publish(dataBuffer);
      console.log(`Message ${messageId} published`);
    } catch(error) {
      console.error(`Received error while publishing: ${error.message}`);
      process.exitCode = 1;
    }
}

publishMessage();

Conversely, let’s look at the consumer application.


require('dotenv').config();

const { PubSub } = require(`@google-cloud/pubsub`);

const pubsubClient = new PubSub();
const subscriptionName = 'consumeUserData';
const timeout = 60;
const topicName = 'PubSubExample';

async function createSubscription() {
  // Creates a new subscription
  await pubsubClient.topic(topicName).createSubscription(subscriptionName);
  console.log(`Subscription ${subscriptionName} created.`);
}

async function doesSubscriptionExist() {
  const subscriptions = await pubsubClient.getSubscriptions();
  const subscriptionExist = subscriptions.find((sub) => sub.name === subscriptionName);
  return (subscriptions && subscriptionExist);
}

if(!doesSubscriptionExist()) {
    createSubscription().catch(console.error);
}

const subscription = pubsubClient.subscription(subscriptionName);

let messageCount = 0;

const messageHandler = message => {
  console.log(`message received ${message.id}`);
  console.log(`Data: ${message.data}`);
  messageCount += 1;

  message.ack();
};

subscription.on(`message`, messageHandler);
setTimeout(() => {
  subscription.removeListener('message', messageHandler);
  console.log(`${messageCount} message(s) received`);
}, timeout * 1000);

Basically, this consumer application verifies if the subscription exists, if not it creates a subscription against the topic where our publisher application is sending messages. Once the message arrives in pub-sub topic, the consumer application pulls that message. This application implements the PULL model of pub-sub.

Demo

On starting pubsub service emulator, we will see the log like below:

Now, let’s execute the publisher application and we will see a console log of message publishing

If you execute the same application, you will not see the message Topic PubSubExample created.

Now if execute the consumer application, we will pull the message that publisher sent to topic.

Same demo with a simple loom video here.

Conclusion

In this post, I showed how to use Pub Sub with NodeJS application. Pub-Sub is a powerful model to use in enterprise applications. It allows us to build services that can communicate asynchronously. If you have more questions about this topic, feel free to reach out to me.

Logging in Spring Boot Microservices

Logging is a key part of enterprise applications. Logging not only helps to investigate a problem but also helps to build relevant metrics. These metrics are important from a business perspective. In fact, businesses write service level agreements (SLA) using these metrics. In this post, we will talk about logging in Spring Boot-based Microservices.

If you are new to Spring Boot and Microservices, I will recommend reading about Spring Boot and Microservices.

Why do we log and what do we log?

The Production Level applications can fail anytime for various reasons. For a developer to investigate such issues in a timely manner, it becomes critical to have logs available. Logs are a key for applications to recover.

The question comes what do we log? Developers, software architects invest enough time to decide what to log. It’s equally important to not log a lot of information. You do not want to lose critical information. Evidently, one should not log any of PII (Personal Identifiable Information). A paradigm that developers can use is “What will help me to investigate issues in the code if the application fails?”. Especially,  if a critical business decision needs comment in the code, it is an equally viable option to log that decision.

Concurrently, one can use a randomly generated trace id in the logs to trace the request-response. The harder part is to maintain this idea throughout the application’s life.

Logging and Observability

Microservices communicate with external APIs, other microservices. Henceforth, it is important to log the details of such communication. In event-driven microservices, one can log details of events. With cloud infrastructure, it has become easier to log details from microservices. Cloud infrastructure like AWS offers CloudWatch to collect these logs and then use the ELK stack to monitor the logs. However, observability tools like New Relic, Sumo Logic connect with different cloud infrastructures. They collect logs and offer flexibility to display, query, and build metrics based on logs.

Accordingly, developers have enough tools to log the data from applications to improve traceability and debugging.

Logging In Spring Boot Based Microservices

Let’s look at the logging in a Spring Boot-based Microservice. We will create a simple microservice and show what kind of logging configuration we can use.

Our main class looks like below:

package com.betterjavacode.loggingdemo;

import org.springframework.boot.SpringApplication;
import org.springframework.boot.autoconfigure.SpringBootApplication;

@SpringBootApplication
public class LoggingdemoApplication {

	public static void main(String[] args) {
		SpringApplication.run(LoggingdemoApplication.class, args);
	}

}

Basically, the microservice does not have anything at the moment. Regardless, we have a main class and we will see how the logging comes into the picture.

As part of the application, I have included a single dependency

implementation 'org.springframework.boot:spring-boot-starter-web'

This dependency also includes spring-boot-starter-logging . spring-boot-starter-logging is a default logging configuration that Spring Boot offers. We will look into more details.

Default Logging Configuration

spring-boot-stater-logging dependency includes slf4j as a logging facade with logback as logging framework.

SLF4J is a logging facade that a number of frameworks support. The advantage of using this facade is that we can switch from one framework to another easily. Logback is the default framework in any spring boot application, but we can switch to Log4j, Log4J2, or Java Util Logging easily.

spring-boot-starter-logging includes the required bridges that take logs from other dependencies and delegate them to the logging framework.

Logback Logging Configuration

Analogous to what we added as a microservice and the default logging, we will see how we can use logback logging configuration. If we do not provide any configuration, spring boot will use the default configuration for logback. It will append the logs to console with the log level as info. Logging frameworks help us to propagate the logs to different targets like consoles, files, databases, or even Kafka.

With the configuration file (logback-spring.xml), we can also set the pattern of messages. If you want to use log4j2 instead logback, you can read this post about logging and error handling.

The following configuration file shows how we will be logging:

<configuration>
    <property name="LOGDIRECTORY" value="./logs" />
    <appender name="Console" class="ch.qos.logback.core.ConsoleAppender">
        <layout class="ch.qos.logback.classic.PatternLayout">
            <Pattern>
                %black(%d{ISO8601}) %highlight(%-5level) [%blue(%t)] %yellow(%C{1.}): %msg%n%throwable
            </Pattern>
        </layout>
    </appender>
    <appender name="RollingFile" class="ch.qos.logback.core.rolling.RollingFileAppender">
        <file>${LOGDIRECTORY}/microservice.log</file>
        <encoder
                class="ch.qos.logback.classic.encoder.PatternLayoutEncoder">
            <Pattern>%d %p %C{1.} [%t] %m%n</Pattern>
        </encoder>

        <rollingPolicy
                class="ch.qos.logback.core.rolling.TimeBasedRollingPolicy">
            <fileNamePattern>${LOGDIRECTORY}/archived/microservice-%d{yyyy-MM-dd}.%i.log
            </fileNamePattern>
            <timeBasedFileNamingAndTriggeringPolicy
                    class="ch.qos.logback.core.rolling.SizeAndTimeBasedFNATP">
                <maxFileSize>5MB</maxFileSize>
            </timeBasedFileNamingAndTriggeringPolicy>
        </rollingPolicy>
    </appender>
    <root level="info">
        <appender-ref ref="RollingFile" />
        <appender-ref ref="Console" />
    </root>

    <logger name="com.betterjavacode" level="debug" additivity="false">
        <appender-ref ref="RollingFile" />
        <appender-ref ref="Console" />
    </logger>
</configuration>

We will dissect this file to understand what each line in the configuration does.

At first, we configured a property LOGDIRECTORY pointing to a physical directory on the machine where log files will be saved. We use this property in appender and rollingPolicy.

Different options for logging

Subsequently, we are using appender from Logback configuration to configure where we want to append our logs. In this case, we have configured for Console and File.

For ConsoleAppnder, we are using a pattern of messages that includes a date and time in black color, log level in blue, package in yellow color. The log message will be of the default color.

For RollingFileAppender, we have a line indicating what will be the file name and where it will be stored. In this case, we are logging in microservice.log in LOGDIRECTORY. The next line indicates the pattern for the log message.

  • %d – DateTime
  • %p – log-level pattern
  • %C – ClassName
  • %t – thread
  • %m – message
  • %n – line separator

Thereafter, we define RollingPolicy. We want to make sure that we do not log the information in a single file and that keeps growing in size. We trigger the rolling out of the log file after it reaches a file size of 5 MB and save the old file in the archive directory with a name microservice-date-number.log.

Moving on, we will discuss the log level in the next section.

Configuring Log Level

The last part of the configuration file indicates log level. At the root level, we are logging everything at INFO level. Basically, our application will log all those messages that are written with INFO log level in the code.

But the next configuration allows us to set the log level at the package. In the package starting with com.betterjavacode, log all those messages that are on DEBUG level.

Executing the Spring Boot Application

Now, we will look at how this will be in our demo microservice.

I have a simple RestController in my application that retrieves company information as below:

 package com.betterjavacode.loggingdemo.controller;

import org.slf4j.Logger;
import org.slf4j.LoggerFactory;
import org.springframework.web.bind.annotation.GetMapping;
import org.springframework.web.bind.annotation.RequestMapping;
import org.springframework.web.bind.annotation.RestController;

import java.util.ArrayList;
import java.util.List;

@RestController
@RequestMapping("/v1/companies")
public class CompanyController
{
    private static final Logger LOGGER = LoggerFactory.getLogger(CompanyController.class);
    @GetMapping
    public List getAllCompanies()
    {
        LOGGER.debug("Getting all companies");

        List result = new ArrayList<>();

        result.add("Google");
        result.add("Alphabet");
        result.add("SpaceX");

        LOGGER.debug("Got all companies - ", result);

        return result;
    }
}

Now if execute our application and access the API http://localhost:8080/v1/companies/, we will get the list of companies, but also we will be able to view log on console as below:

The log  file will look like below:


2021-12-04 18:20:32,221 INFO org.springframework.boot.StartupInfoLogger [main] Starting LoggingdemoApplication using Java 1.8.0_212 on YMALI2019 with PID 3560
2021-12-04 18:20:32,223 DEBUG org.springframework.boot.StartupInfoLogger [main] Running with Spring Boot v2.6.0, Spring v5.3.13
2021-12-04 18:20:32,224 INFO org.springframework.boot.SpringApplication [main] No active profile set, falling back to default profiles: default
2021-12-04 18:20:33,789 INFO org.springframework.boot.web.embedded.tomcat.TomcatWebServer [main] Tomcat initialized with port(s): 8080 (http)
2021-12-04 18:20:33,798 INFO org.apache.juli.logging.DirectJDKLog [main] Initializing ProtocolHandler ["http-nio-8080"]
2021-12-04 18:20:33,799 INFO org.apache.juli.logging.DirectJDKLog [main] Starting service [Tomcat]
2021-12-04 18:20:33,799 INFO org.apache.juli.logging.DirectJDKLog [main] Starting Servlet engine: [Apache Tomcat/9.0.55]
2021-12-04 18:20:33,875 INFO org.apache.juli.logging.DirectJDKLog [main] Initializing Spring embedded WebApplicationContext
2021-12-04 18:20:33,875 INFO org.springframework.boot.web.servlet.context.ServletWebServerApplicationContext [main] Root WebApplicationContext: initialization completed in 1580 ms
2021-12-04 18:20:34,212 INFO org.apache.juli.logging.DirectJDKLog [main] Starting ProtocolHandler ["http-nio-8080"]
2021-12-04 18:20:34,230 INFO org.springframework.boot.web.embedded.tomcat.TomcatWebServer [main] Tomcat started on port(s): 8080 (http) with context path ''
2021-12-04 18:20:34,239 INFO org.springframework.boot.StartupInfoLogger [main] Started LoggingdemoApplication in 2.564 seconds (JVM running for 3.039)
2021-12-04 18:20:34,242 INFO com.betterjavacode.loggingdemo.LoggingdemoApplication [main] After starting the application.........
2021-12-04 18:20:39,526 INFO org.apache.juli.logging.DirectJDKLog [http-nio-8080-exec-1] Initializing Spring DispatcherServlet 'dispatcherServlet'
2021-12-04 18:20:39,526 INFO org.springframework.web.servlet.FrameworkServlet [http-nio-8080-exec-1] Initializing Servlet 'dispatcherServlet'
2021-12-04 18:20:39,527 INFO org.springframework.web.servlet.FrameworkServlet [http-nio-8080-exec-1] Completed initialization in 0 ms
2021-12-04 18:20:39,551 DEBUG com.betterjavacode.loggingdemo.controller.CompanyController [http-nio-8080-exec-1] Getting all companies
2021-12-04 18:20:39,551 DEBUG com.betterjavacode.loggingdemo.controller.CompanyController [http-nio-8080-exec-1] Got all companies - [Google, Alphabet, SpaceX]

Tracing the Requests

Previously, I stated why we log. When there are multiple microservices and each microservice is communicating with other and external APIs, it is important to have a way to trace the request. One of the ways is to configure a pattern in logback-spring.xml .

Another option is to use Filter and MDC (Mapping Diagnostic Context). Basically, each request coming to API will be intercepted through Filter. In Filter, you can add a unique id to MDC map. Use the logging pattern that uses the key from MDC map. This way, your request will have tracking information. One thing to remember is to clear the context from MDC once your API has responded to the client.

Configuring Logs for Monitoring

In the enterprise world, one way to configure logs is to store the logs in files and stash these files on a central location on a cloud server. AWS offers easier flexibility to pull this information in cloud watch from storage S3 and then one can use tools like Kibana and Elastic search for monitoring the logs and metrics.

Conclusion

In this post, we detailed how to use logging in spring boot-based microservices. We also discussed Logback configuration that one can use while using Logback framework in the Spring Boot application.

Most of these practices are standard and if followed properly, ensure the troubleshooting and monitoring of applications in a production environment.

Implementing Domain-Driven Design

Implementing Domain-Driven Design is a software design approach. How do you start to design any software? A complex problem can be overwhelming. Even if you want to look at the existing code base and figure out the design, it can be a lot of work. As you build, the distributed system can get complex. This post is part of Distributed System Design.

The domain-driven approach of software development works in sync with domain experts. Usually, one would discuss the problem with domain experts to figure out what domains and rules can be created and how they are changed in the application. Object-oriented design is nothing but domain-driven design. Domains are objects. Irrespective of what language you choose, you need to create domain objects.

Discussing with domain experts

A complex problem needs a discussion with domain experts. Once you have collected all the information about rules and conditions, you can start representing the real-life problem in a domain object. Rules and conditions can help on how to represent the domain and how the domain would interact with other domain objects.

The first step is to choose domain model names. Again, this depends on your domain.

If we have to take an example of a local library, we will have domain objects like Book, Author, User and Address. A user of the library borrows the book of a particular author from the library. Of course, you can also add Genre. Either you would talk to a local library and see what they need to build an online system to track their books inventory. This discussion will give you an idea about what your end-user wants and how the user wants to use the system.

Basic Building Blocks

Once we have enough information about the domain, we create basic building blocks. The reason to start with domain-driven design as basic building blocks is that this part of the design is least changeable. Over the course of the application lifespan, this will not change. That’s why it is important to build this as accurately as possible.

Entities

Entities are domain objects. We identify these domain objects uniquely. A general way to identify these objects is to create a field id which can be of type UUID.

As discussed in our example for building an online library system to manage books, Book, Author, Genre will be different entities and We will add a field id in each of these entities to identify them uniquely.


public class Book
{
   private UUID id;
   
   private String title;

   private String isbn;

   private Date created;

   private Date updated;
   
}

Value Objects

Value objects are attributes or properties of entities. Like above where we created Book entity, title, isbn are value objects of this entity.

Repositories

Nevertheless, repositories are an intermediate layer between Services that need to access domain object data from the persistence technologies like a database.

Aggregates

Aggregates are a collection of entities. This collection is bound together by a root entity. Entities within aggregates have a local identity, but outside that border, they have no identity.

Services

Services drive the domain-driven design. They are the doer of the entire system. All your business logic relies on services. When you get a request to fetch or insert data, services carry out the validation of rules and data with the help of entities, repositories, and aggregates.

Factories

How do you create aggregates? Usually, factories provide help in creating aggregates. If an aggregate is simple enough, one can use aggregate’s constructor to create aggregate.

One of the ways to implement factories is to use Factory Pattern. We can also use an abstract factory pattern to build hierarchies of classes.

In conclusion, to understand all of this

  • Aggregates – are made of entities.
  • Aggregates – use services.
  • Factories – create new aggregates.
  • Repositories – retrieval, search, deletion of aggregates. 

Understanding Bounded Context in Domain-Driven Design

The challenging part of any design is how to make sure that our efforts are not duplicated. If you create feature A with certain domains and another feature B that includes part of domains from feature A, then we are duplicating the efforts. That’s why it’s important to understand the bounded context when designing your application architecture. In such cases, one can easily use Liskov Substitution Principle.

The more features you add, the more complex the design gets. With increasing models, it is even harder to guess what you will need in the future. Overall, in such scenarios, you build a bounded context. The bounded context contains unrelated models but also shares the common models. This helps in dividing the complex and large models which can share some models.

Conclusion

In this post, we learned how to use domain-driven design to build a scalable system. If you want to learn more about this topic, you can get this course on domain-driven design.

Good news for readers – a Black Friday sale on my book Simplifying Spring Security till Nov 30th. Buy it here.

A Step By Step Guide to Kubernetes

In this post, we will discuss how to use Kubernetes and how to deploy your microservice in a Kubernetes cluster. I will cover the fundamentals, so if you are a beginner, this will be a good step-by-step guide to learn Kubernetes. Since we will be building a dockerized container application, you can get started with the complete guide to use docker-compose.

What is Kubernetes?

As per original sourceKubernetes is an open-source system for automating deployment, scaling, and management of containerized applications. Kubernetes is a container orchestration platform.

Basically, once you have a containerized application, you can deploy that on the Kubernetes cluster. Specifically, the cluster contains multiple machines or servers.

In a traditional Java application, one would build a jar file and deploy that on a server machine. Sometimes, even deploy the same application on multiple machines to scale horizontally. Above all, with Kubernetes, you do not have to worry about server machines. Obviously, Kubernetes allows creating a cluster of machines and deploying your containerized application on it.

Additionally, with Kubernetes, one can

  • Orchestrate containers across multiple hosts machines
  • Control and automate application deployment
  • Manage server resources better
  • Health-check and self-heal your apps with auto-placement, auto-restart, auto replication, and autoscaling

Moreover, the Kubernetes cluster contains two parts

  1. A control plane
  2. A computing machine

Particularly, the nodes (physical machines or virtual machines) interact with the control plane using Kubernetes API.

  • Control Plane – The collection of processes that control the Kubernetes nodes.
  • Nodes – The machines that perform the tasks that are assigned through processes.
  • Pod – A group of one or more containers deployed on a single node. All containers on the pod share the resources and IP addresses.
  • Service – An abstract way to expose an application running on a set of Pods as a network service.
  • Kubelet – The Kubelet is a primary node agent that runs on each node. It reads the container manifests and keeps track of containers starting and running.
  • kubectl – The command-line configuration tool for Kubernetes

How to create a cluster?

Thereafter, depending on your environment, download Minikube. I am using a Windows environment.

minikube start will create a new Kubernetes cluster.

Eventually, if you want to look at a more detailed dashboard, you can use the command minikube dashboard. This command will launch a Kubernetes dashboard in the browser. (http://127.0.0.1:60960/api/v1/namespaces/kubernetes-dashboard/services/http:kubernetes-dashboard:/proxy/)

Demo to deploy a microservice to Kubernetes

Create A Containerized Microservice

Moreover, let’s create a simple microservice that we will eventually deploy in the cluster. I will be using Spring Boot to create a microservice that returns a list of products for a REST API call.

This microservice will return a list of products on the call.


package com.betterjavacode.kubernetesdemo.controllers;

import com.betterjavacode.kubernetesdemo.dtos.ProductDTO;
import com.betterjavacode.kubernetesdemo.services.ProductService;
import org.springframework.beans.factory.annotation.Autowired;
import org.springframework.web.bind.annotation.GetMapping;
import org.springframework.web.bind.annotation.RequestMapping;
import org.springframework.web.bind.annotation.RestController;

import java.util.List;

@RestController
@RequestMapping("/v1/products")
public class ProductController
{
    @Autowired
    public ProductService productService;

    @GetMapping
    public List getAllProducts()
    {
        return productService.getAllProducts();
    }
}

Besides, the ProductService will have a single method to return all products.


package com.betterjavacode.kubernetesdemo.services;

import com.betterjavacode.kubernetesdemo.dtos.ProductDTO;
import org.springframework.stereotype.Component;

import java.util.ArrayList;
import java.util.List;

@Component
public class ProductService
{

    public List getAllProducts ()
    {
        List productDTOS = new ArrayList<>();

        ProductDTO toothbrushProductDTO = new ProductDTO("Toothbrush", "Colgate", "A toothbrush " +
                "for " +
                "all");
        ProductDTO batteryProductDTO = new ProductDTO("Battery", "Duracell", "Duracell batteries " +
                "last long");

        productDTOS.add(toothbrushProductDTO);
        productDTOS.add(batteryProductDTO);
        return productDTOS;

    }
}

I am deliberately not using any database and using a static list of products to return for demo purposes.

Before building a docker image, run

minikube docker-env

minikube docker-env | Invoke-Expression

Build docker image

Let’s build a docker image for our microservice that we just created. At first, create a dockerfile in the root directory of your project.

FROM openjdk:8-jdk-alpine
VOLUME /tmp
COPY ./build/libs/*.jar app.jar
ENTRYPOINT ["java", "-jar", "/app.jar"]

Now let’s build a docker image using this dockerfile.

docker build -t kubernetesdemo .

This will create a kubernetesdemo docker image with the latest tag.

If you want to try out this image on your local environment, you can run it with the command:

docker run --name kubernetesdemo -p 8080:8080 kubernetesdemo

This will run our microservice Docker image on port 8080. Regardless, before deploying to kubernetes, we need to push this docker image to the docker hub container registry so Kubernetes can pull from the hub.

docker login – Login to docker hub with your username and password from your terminal.

Once the login is successful, we need to create a tag for our docker image.

docker tag kubernetesdemo username/kubernetesdemo:1.0.0.

Use your docker hub username.

Now we will push this image to docker hub with the command:

docker push username/kubernetesdemo:1.0.0.

Now, our docker image is in the container registry.

Kubernetes Deployment

Kubernetes is a container orchestrator designed to run complex applications with scalability in mind.

The container orchestrator manages the containers around the servers. That’s the simple definition. As previously stated, we will create a local cluster on windows machine with the command

minikube start.

Once the cluster starts, we can look at the cluster-info with the command

kubectl get cluster-info.

Now to deploy our microservice in Kubernetes, we will use the declarative interface.

Declaring deployment file

Create a kube directory under your project’s root directory. Add a yaml file called deployment.yaml.

This file will look like below:

apiVersion: v1
kind: Service
metadata:
  name: kubernetesdemo
spec:
  selector:
    app: kubernetesdemo
  ports:
    - port: 80
      targetPort: 8080
  type: LoadBalancer

---
apiVersion: apps/v1
kind: Deployment
metadata:
  name: kubernetesdemo
spec:
  selector:
    matchLabels:
      app: kubernetesdemo
  replicas: 3
  template:
    metadata:
      labels:
        app: kubernetesdemo
    spec:
      containers:
      - name: kubernetesdemo
        image: username/kubernetesdemo:1.0.0
        imagePullPolicy: IfNotPresent
        ports:
        - containerPort: 8080

Shortly, we will go over each section of this deployment file.

Once we run this deployment file, it will create a container and a service. Let’s first look at Deployment .

apiVersion: apps/v1 
kind: Deployment 
metadata: 
  name: kubernetesdemo

These lines declare that we create a resource of type Deployment using version v1 and of name kubernetesdemo.

replicas: 3 indicate that we are running 3 replicas of the container. But the container here is nothing but a pod. A pod is a wrapper around a container. A single pod can run multiple containers while the containers share the resources of the pod. Just remember that the pod is the smallest unit of deployment in Kubernetes.

The template.metadata.labels defines the label for the pod that runs the container for the application kubernetesdemo.

The section of containers is self-explanatory. If it is not clear, this is where we declare about the container that we plan to run in a pod. The name of the container kubernetesdemo and the image of this container is username/kubernetesdemo:1.0.0 . We will be exposing the port 8080 of this container where our microservice will be running.

Service Definition

Without delay, let’s look at the earlier part of this deployment file.

apiVersion: v1
kind: Service
metadata:
  name: kubernetesdemo
spec:
  selector:
    app: kubernetesdemo
  ports:
    - port: 80
      targetPort: 8080
  type: LoadBalancer

Here, we are creating a resource of type Service.

A Service allows pods to communicate with other pods. But it also allows external users to access pods. Without a service, one can not access pods. The kind of Service we are defining here will allow us to forward the traffic to a particular pod.

In this declaration, spec.selector.app allows us to select the pod with the name kubernetesdemo. Service will expose this pod. A request coming to port 80 will be forwarded to the target port of 8080 of the selected Pod.

And lastly, the service is of type LoadBalancer. Basically, in our Kubernetes cluster, a service will act as a load balancer that will forward the traffic to different pods. A Service ensures continuous availability of applications. If a pod crashes, another pod starts and the service makes sure to route the traffic accordingly.

Service keeps track of all the replicas you are running in the cluster.

Running the deployment

So far, we have built a deployment configuration to create resources in our cluster. But we have not deployed anything yet.

To run the deployment, use

kubectl apply -f deployment.yaml

You can also just run

kubectl apply -f kube and it will pick up deployment files from the kube directory.

The response for this command will be

service/kubernetesdemo configured
deployment.apps/kubernetesdemo created

kubectl get pods will show the status of pods

Now to see the actual situation with cluster and services running, we can use

minikube dashboard.

We can see there are 3 pods running for our microservice kubernetesdemo.

If you run kubectl get services, we will see all the services running. Now to access our application, we will have to find the service url. In this case the name of service (not microservice) is kubernetesdemo.

minikube service kubernetesdemo --url will show an URL in the terminal window.

Now if use this URL http://127.0.0.1:49715/v1/products, we can see the output in the browser

How to scale?

With Kubernetes, it’s easy to scale the application. We are already using 3 replicas, but we can reduce or increase the number with a command:

kubectl scale --replicas=4 deployment/kubernetesdemo.

If you have the dashboard, you will see the 4th replica starting. That’s all.

Conclusion

Wow, we have covered a lot in this demo. I hope I was able to explain the fundamental concepts of Kubernetes step by step. If you want to learn more, comment on this post. If you are looking to learn Spring Security concepts, you can buy my book Simplifying Spring Security.