Author Archives: yogesh.mali@gmail.com

How to Use Basic Authentication for Rest Template

In this post, I will show how to use Rest Template to consume RESTful API secured with Basic Authentication. As part of this post, I will show how to build a REST API that is secured with Basic Authentication.

Overview

Basic Authentication is one of the mechanisms that you can use to secure your REST API. In my previous post, I showed how to secure REST API with Json Web Token.

Secure a REST API with Basic Authentication

Configure a REST API

Firstly, we will show a simple REST API to create users or retrieve users from the database. Then, we will secure this REST API with a Basic Authentication mechanism. Lastly, we will show how to use Basic Authentication with Rest Template to call this REST API.

Our REST controller class for this API to create or retrieve users will look like below:


package com.betterjavacode.restdemo.controllers;

import com.betterjavacode.restdemo.dto.UserDto;
import com.betterjavacode.restdemo.managers.UserManager;
import org.springframework.beans.factory.annotation.Autowired;
import org.springframework.http.HttpStatus;
import org.springframework.http.MediaType;
import org.springframework.http.ResponseEntity;
import org.springframework.web.bind.annotation.*;

import java.util.List;

@RestController
public class UserController
{
    @Autowired
    private UserManager userManager;

    @RequestMapping(value = "/user/", method = RequestMethod.GET)
    public ResponseEntity<List> listAllUsers()
    {
        List users = userManager.getAllUsers();
        if(users.isEmpty())
        {
            return new ResponseEntity<List>(HttpStatus.NO_CONTENT);
        }

        return new ResponseEntity<>(users, HttpStatus.OK);
    }

    @RequestMapping(value = "/user/{id}", method = RequestMethod.GET, produces =
            MediaType.APPLICATION_JSON_VALUE)
    public ResponseEntity getUser(@PathVariable("id") long id)
    {
        UserDto userDto = userManager.getUser(id);
        if(userDto == null)
        {
            return new ResponseEntity<>(HttpStatus.NOT_FOUND);
        }
        return new ResponseEntity<>(userDto, HttpStatus.OK);
    }


    @RequestMapping(value = "/user/", method= RequestMethod.POST)
    public ResponseEntity createUser(@RequestBody UserDto userDto)
    {
        UserDto user = userManager.createUser(userDto);

        return new ResponseEntity<>(user, HttpStatus.OK);
    }

    @RequestMapping(value = "/user/{id}", method=RequestMethod.DELETE)
    public ResponseEntity deleteUser(@PathVariable("id") long id)
    {
        UserDto user = userManager.getUser(id);

        if(user == null)
        {
            return new ResponseEntity<>(HttpStatus.NOT_FOUND);
        }

        userManager.deleteUser(id);

        return new ResponseEntity<>(HttpStatus.NO_CONTENT);
    }
}

Our database model class for User will look like below:


package com.betterjavacode.restdemo.models;

import javax.persistence.*;
import java.io.Serializable;

@Entity(name = "User")
@Table(name = "users")
public class User implements Serializable
{
    private static final long serialVersionUID = 20200816121023L;

    public User()
    {

    }

    @Id
    @GeneratedValue(strategy = GenerationType.IDENTITY)
    @Column(name="id", nullable=false)
    private long id;

    @Column(name="firstname", length=100)
    private String firstname;

    @Column(name="lastname", length=100)
    private String lastname;

    @Column(name="email", length=100)
    private String email;

    @Column(name="role", length=45)
    private String role;

    @Column(name="enabled")
    private boolean enabled;

    public long getId ()
    {
        return id;
    }

    public void setId (long id)
    {
        this.id = id;
    }

    public String getFirstname ()
    {
        return firstname;
    }

    public void setFirstname (String firstname)
    {
        this.firstname = firstname;
    }

    public String getLastname ()
    {
        return lastname;
    }

    public void setLastname (String lastname)
    {
        this.lastname = lastname;
    }

    public String getEmail ()
    {
        return email;
    }

    public void setEmail (String email)
    {
        this.email = email;
    }

    public String getRole ()
    {
        return role;
    }

    public void setRole (String role)
    {
        this.role = role;
    }

    public boolean isEnabled ()
    {
        return enabled;
    }

    public void setEnabled (boolean enabled)
    {
        this.enabled = enabled;
    }
}

Just to make sure we understand here that, we are using a DTO object UserDto to create and retrieve the data from the database. User is our database model object.

The UserDto object will be as follows:


package com.betterjavacode.restdemo.dto;

import com.betterjavacode.restdemo.models.User;
import com.fasterxml.jackson.annotation.JsonIgnoreProperties;

@JsonIgnoreProperties(ignoreUnknown = true)
public class UserDto
{
    private String firstname;
    private String lastname;
    private String email;

    public UserDto(){}

    public UserDto(User user)
    {
        this.setEmail(user.getEmail());
        this.setFirstname(user.getFirstname());
        this.setLastname(user.getLastname());
    }

    public String getFirstname ()
    {
        return firstname;
    }

    public void setFirstname (String firstname)
    {
        this.firstname = firstname;
    }

    public String getLastname ()
    {
        return lastname;
    }

    public void setLastname (String lastname)
    {
        this.lastname = lastname;
    }

    public String getEmail ()
    {
        return email;
    }

    public void setEmail (String email)
    {
        this.email = email;
    }

}

Once we configure our application properties and create the required database table, we will start the application.

Now if we execute the API through a client like Postman, we will be able to retrieve or create the User object.

The goal is to secure this API.

So add Spring-Security in our project build.

implementation "org.springframework.boot:spring-boot-starter-security"

Now, if we add the annotation @EnableWebSecurity in our main application class like below:


package com.betterjavacode.restdemo;

import org.springframework.boot.SpringApplication;
import org.springframework.boot.autoconfigure.SpringBootApplication;
import org.springframework.security.config.annotation.web.configuration.EnableWebSecurity;

@SpringBootApplication
@EnableWebSecurity
public class RestdemoApplication
{
	public static void main(String[] args)
	{
		SpringApplication.run(RestdemoApplication.class, args);
	}
}

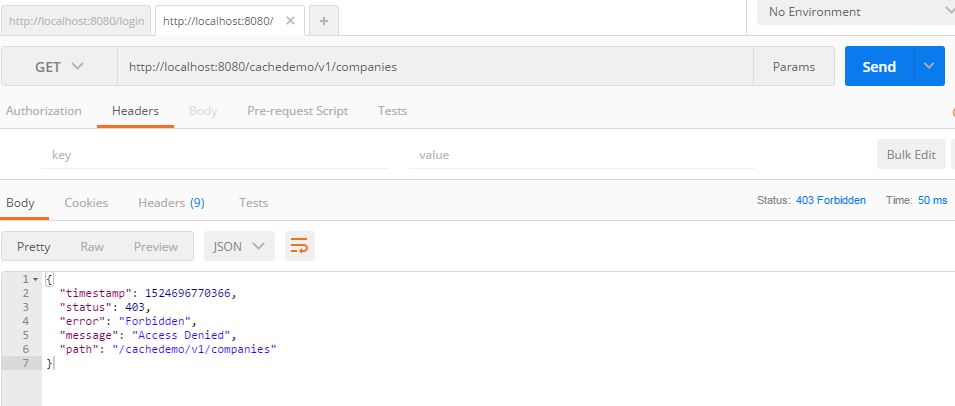
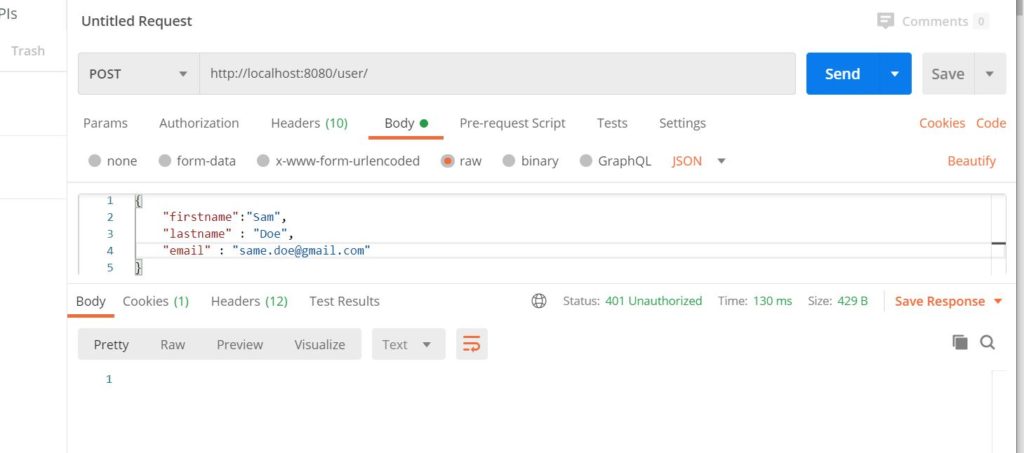
and if we access the API to create user, we will get 401 unauthorized error like below:

Basic Authentication with Rest Template

Basic Authentication

Traditionally, access to REST API will happen on the server-side once the user has logged in with authentication.

Basic authentication provides one of the ways to secure REST API. It’s not the most secure way compared to OAuth or JWT based security. In Basic Authentication, a client sends Base64 encoded credentials with each request using HTTP Authorization Header.

The client will send the Authorization header with each request. There is always a possibility of compromising these credentials even when they are Base64 encoded. To avoid that, we can use HTTPS.

Now from our implementation perspective, we will add a SecurityConfig class to configure security for our REST API.


package com.betterjavacode.restdemo;

import org.springframework.beans.factory.annotation.Autowired;
import org.springframework.context.annotation.Configuration;
import org.springframework.security.config.annotation.authentication.builders.AuthenticationManagerBuilder;
import org.springframework.security.config.annotation.web.builders.HttpSecurity;
import org.springframework.security.config.annotation.web.configuration.EnableWebSecurity;
import org.springframework.security.config.annotation.web.configuration.WebSecurityConfigurerAdapter;

@Configuration
@EnableWebSecurity
public class SecurityConfig extends WebSecurityConfigurerAdapter
{
    @Override
    protected void configure(HttpSecurity httpSecurity) throws Exception
    {
        httpSecurity
                .csrf().disable()
                .authorizeRequests().anyRequest().authenticated()
                .and()
                .httpBasic();
    }

    @Autowired
    public void configureGlobal(AuthenticationManagerBuilder auth)
            throws Exception
    {
        auth.inMemoryAuthentication()
                .withUser("adminuser")
                .password("{noop}adminpassword")
                .roles("USER");
    }
}

configure method in this class will configure basic authentication and every request coming to our controller will need to be authorized.

configureGlobal method will add authentication of the incoming request. The requests coming through the controller will be validated for these credentials that we have configured for in-memory authentication.

WARNING – This is not the most secure way to secure your API. Definitely not with in-memory authentication. Do not use it in production.

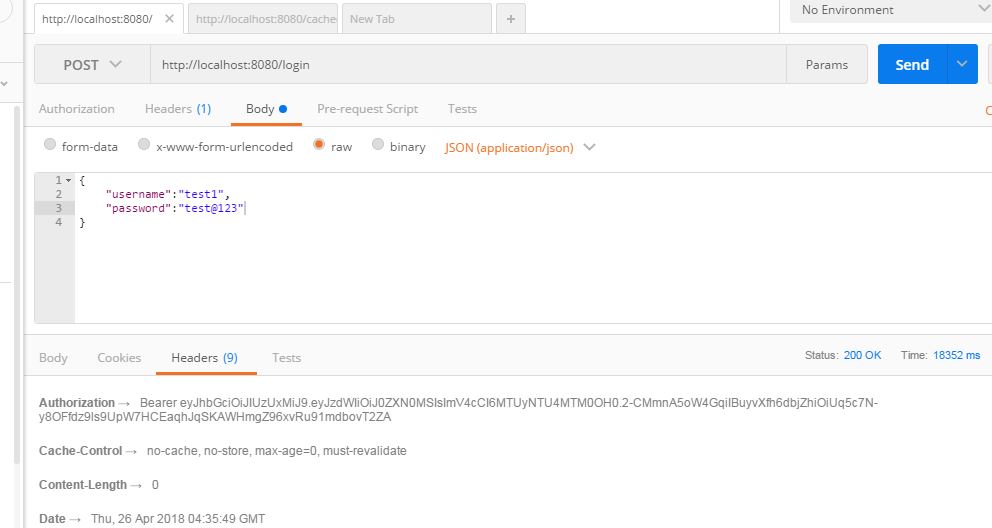
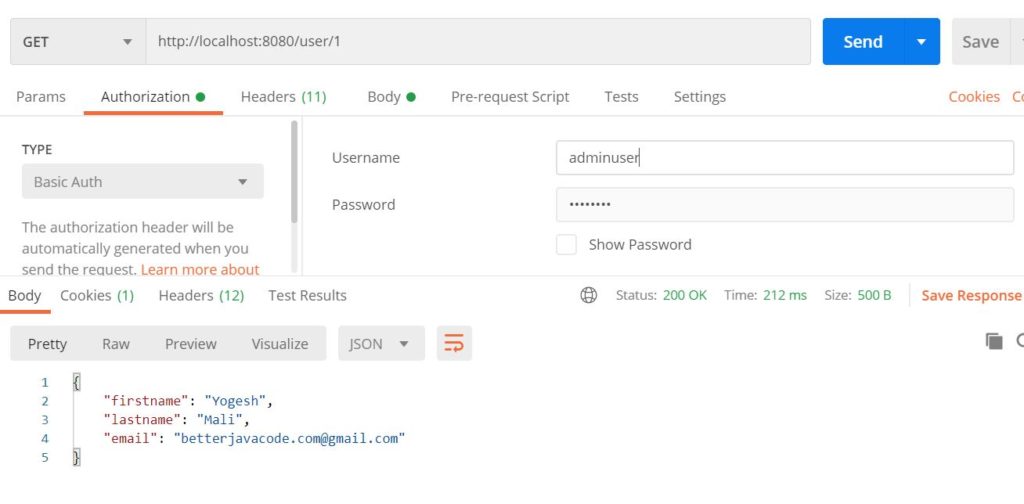
Now if we execute REST API through POSTMAN, we will see the successful response as below:

Rest Template with Basic Authentication Example

Initially, we used POSTMAN as a client to call our REST APIs. But in a real scenario, we won’t be using POSTMAN, you will have to call these APIs programmatically.

We will create a class RestClient and that will call our APIs while building Basic Authentication.

While using RestTemplate that Spring Boot provides, you need to pass HttpHeaders with a RequestEntity.


    private static HttpHeaders getHeaders ()
    {
        String adminuserCredentials = "adminuser:adminpassword";
        String encodedCredentials =
                new String(Base64.encodeBase64(adminuserCredentials.getBytes()));

        HttpHeaders httpHeaders = new HttpHeaders();
        httpHeaders.add("Authorization", "Basic " + encodedCredentials);
        httpHeaders.setAccept(Arrays.asList(MediaType.APPLICATION_JSON));
        return httpHeaders;
    }

We use exchange method from RestTemplate to call our API and HttpHeaders that contain Basic Authentication.

The whole class  RestClient will look like below:


package com.betterjavacode.restdemo;


import com.betterjavacode.restdemo.dto.UserDto;
import org.apache.tomcat.util.codec.binary.Base64;
import org.json.JSONObject;
import org.springframework.http.*;
import org.springframework.web.client.RestTemplate;

import java.util.Arrays;
import java.util.LinkedHashMap;
import java.util.List;

public class RestClient
{
    public static final String REST_SERVICE_URL = "http://localhost:8080/user/";

    private static HttpHeaders getHeaders ()
    {
        String adminuserCredentials = "adminuser:adminpassword";
        String encodedCredentials =
                new String(Base64.encodeBase64(adminuserCredentials.getBytes()));

        HttpHeaders httpHeaders = new HttpHeaders();
        httpHeaders.add("Authorization", "Basic " + encodedCredentials);
        httpHeaders.setAccept(Arrays.asList(MediaType.APPLICATION_JSON));
        return httpHeaders;
    }

    private static void listAllUsers()
    {
        System.out.println("Getting all users");
        RestTemplate restTemplate = new RestTemplate();

        HttpHeaders httpHeaders = getHeaders();

        HttpEntity httpEntity = new HttpEntity<>(httpHeaders);

        ResponseEntity responseEntity = restTemplate.exchange(REST_SERVICE_URL,
                HttpMethod.GET, httpEntity, List.class);

        if(responseEntity.hasBody())
        {
            List<LinkedHashMap<String, Object>> users = responseEntity.getBody();

            if(users != null)
            {
                for(LinkedHashMap<String, Object> userMap: users)
                {
                    System.out.println("User is " + userMap.get("firstname") + " " + userMap.get(
                            "lastname"));
                }
            }
        }
        else
        {
            System.out.println("User not found");
        }

    }

    public static void main (String[] args)
    {
        listAllUsers();

        getUser(1);
    }


    private static void getUser(long id)
    {
        System.out.println("Getting a user ");

        String restUrl = REST_SERVICE_URL  + id;

        RestTemplate restTemplate = new RestTemplate();

        HttpHeaders httpHeaders = getHeaders();

        HttpEntity httpEntity = new HttpEntity<>(httpHeaders);

        ResponseEntity responseEntity = restTemplate.exchange(restUrl,
                HttpMethod.GET, httpEntity, String.class);

        if(responseEntity.hasBody())
        {
            JSONObject jsonObject = new JSONObject(responseEntity.getBody());

            System.out.println(jsonObject.get("firstname"));
            System.out.println(jsonObject.get("lastname"));
        }
        else
        {
            System.out.println("User not found");
        }

    }
}

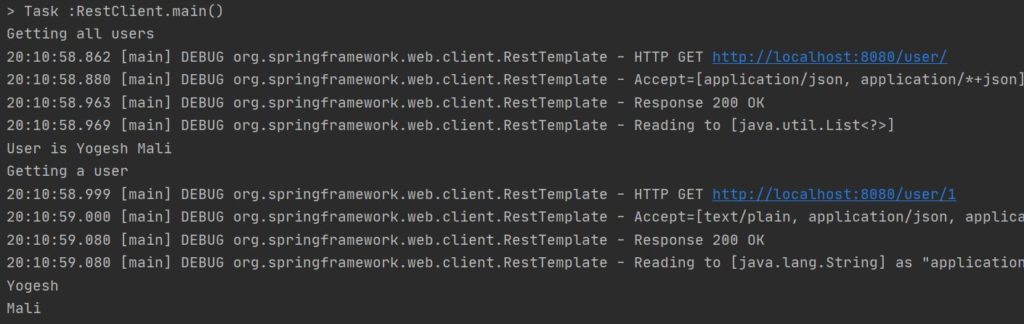
Now if we execute the program, we will see the output as below:

In this post, we showed how to secure REST API with Basic Authentication. If you enjoyed this post, subscribe to my blog here.

Do you want to know the fundamentals of Spring Security? I’m launching my new book “Simplifying Spring Security” soon. Get on my launch list to get updates and discount codes.

References

  1. Spring Rest Template –  documentation
  2. Spring Boot Rest Template – Usage

Json Web Token: How to Secure Spring Boot REST API

In this post, I will show how to secure your spring boot based REST API. It has been more of a trend to secure REST APIs to avoid any unnecessary calls to public APIs. We will be using some Spring boot features for Spring security along with JSON WebTokens for authorization. You can learn more about basic authentication here.

User flow in this case is

  1. User logs in
  2. We validate user credentials
  3. A token is sent back to user agent.
  4. User tries to access a protected resource.
  5. User sends JWT when accessing the protected resource. We validate JWT.
  6. If JWT is valid, we allow the user to access the resource.

JSON WebTokens, known as JWTs are used for forming authorization for users. This helps us to build secure APIs and it is also easy to scale. During authentication, a JSON web token is returned. Whenever the user wants to access a protected resource, the browser must send JWTs in the Authorization header along with the request. One thing to understand here is that it is a good security practice to secure REST API.

Basically, we will show

  1. Verify JSON WebToken
  2. Validate the signature
  3. Check the client permissions

What you will need?

  1. Java 8,
  2. MySQL Database
  3. IntelliJ Editor
  4. Gradle

Note – This won’t be a full-fledged app, but REST APIs based on Spring Boot, and Spring security.

Spring Boot Based REST API

Since I have already shown this before on my blog, I won’t be creating any new APIs. I will be securing REST API for company that I created in this blog post REST API. This API also includes caching. A user will try to access /cachedemo/v1/companies/ and since APIs are protected, he will get a response like below:

Response from protected API

Now we will implement how to protect this API and how to access it.

Adding User and User Registration

Since we want to add authorization for APIs, we will need where the user is able to log in and send credentials. These credentials will be validated and a token will be generated. This token then will be transmitted in a request to an API call. The token will be validated in the Spring security authorization filter that we will add. If a valid token, the user will be able to access the API.

Create a user model


package com.betterjavacode.models;

import javax.persistence.*;
import java.io.Serializable;

@Entity(name = "User")
@Table(name = "user")
public class User implements Serializable
{
    public User()
    {

    }

    @Id
    @GeneratedValue(strategy =  GenerationType.IDENTITY)
    private long id;

    @Column(name = "username")
    private String username;

    @Column(name = "password")
    private String password;

    public long getId()
    {
        return id;
    }

    public void setId(long id)
    {
        this.id = id;
    }

    public String getUsername()
    {
        return username;
    }

    public void setUsername(String username)
    {
        this.username = username;
    }

    public String getPassword()
    {
        return password;
    }

    public void setPassword(String password)
    {
        this.password = password;
    }
}

We will add a controller where a user can register with its details for username and password.


package com.betterjavacode.resources;

import com.betterjavacode.models.User;
import com.betterjavacode.repositories.UserRepository;
import org.springframework.security.crypto.bcrypt.BCryptPasswordEncoder;
import org.springframework.web.bind.annotation.PostMapping;
import org.springframework.web.bind.annotation.RequestBody;
import org.springframework.web.bind.annotation.RequestMapping;
import org.springframework.web.bind.annotation.RestController;

@RestController
@RequestMapping(value = "/cachedemo/v1/users")
public class UserController
{
    private UserRepository userRepository;
    private BCryptPasswordEncoder bCryptPasswordEncoder;

    public UserController(UserRepository userRepository, BCryptPasswordEncoder bCryptPasswordEncoder)
    {
        this.userRepository = userRepository;
        this.bCryptPasswordEncoder = bCryptPasswordEncoder;
    }

    @PostMapping("/signup")
    public void signUp(@RequestBody User user)
    {
        user.setPassword(bCryptPasswordEncoder.encode(user.getPassword()));
        userRepository.save(user);
    }

}

Now when we POST a request to /cachedemo/v1/users/signup , a user will be saved in the database. Password for the user will be saved in encrypted format as we are using BCryptPasswordEncoder. We will show how a user can log in to create a token.

User Login

To handle user login, we will add an AuthenticationFilter which will get added in FilterChain and Spring boot will handle the execution of it appropriately. This filter will look like below:


package com.betterjavacode.SpringAppCache;


import com.fasterxml.jackson.databind.ObjectMapper;
import io.jsonwebtoken.Jwts;
import io.jsonwebtoken.SignatureAlgorithm;
import org.springframework.security.authentication.AuthenticationManager;
import org.springframework.security.authentication.UsernamePasswordAuthenticationToken;
import org.springframework.security.core.Authentication;
import org.springframework.security.core.AuthenticationException;
import org.springframework.security.core.userdetails.User;
import org.springframework.security.web.authentication.UsernamePasswordAuthenticationFilter;

import javax.servlet.FilterChain;
import javax.servlet.http.HttpServletRequest;
import javax.servlet.http.HttpServletResponse;
import java.io.IOException;
import java.util.ArrayList;
import java.util.Date;

public class AuthenticationFilter extends UsernamePasswordAuthenticationFilter
{
    private AuthenticationManager authenticationManager;

    public AuthenticationFilter(AuthenticationManager authenticationManager)
    {
        this.authenticationManager = authenticationManager;
        setFilterProcessesUrl("/login");
    }

    @Override
    public Authentication attemptAuthentication(HttpServletRequest request, HttpServletResponse response) throws AuthenticationException
    {
        try
        {
            com.betterjavacode.models.User creds = new ObjectMapper().readValue(request.getInputStream(), com.betterjavacode .models.User.class);
            return authenticationManager.authenticate(new UsernamePasswordAuthenticationToken(creds.getUsername(), creds.getPassword(),new ArrayList<>()));
        }
        catch(IOException e)
        {
            throw new RuntimeException("Could not read request" + e);
        }
    }

    protected void successfulAuthentication(HttpServletRequest request, HttpServletResponse response, FilterChain filterChain, Authentication authentication)
    {
        String token = Jwts.builder()
                .setSubject(((User) authentication.getPrincipal()).getUsername())
                .setExpiration(new Date(System.currentTimeMillis() + 864_000_000))
                .signWith(SignatureAlgorithm.HS512, "SecretKeyToGenJWTs".getBytes())
                .compact();
        response.addHeader("Authorization","Bearer " + token);
    }
}

Basically, a user will send credentials in a request to URL ending with /login . This filter will help to authenticate the user, if there is successful authentication, a Token will be added in response header with the key Authorization.

Token Validation and Authorization

We add another filter AuthorizationFilter to validate the token that we passed through AuthenticationFilter earlier. This filter will look like below:


package com.betterjavacode.SpringAppCache;

import io.jsonwebtoken.Jwts;
import org.springframework.security.authentication.AuthenticationManager;
import org.springframework.security.authentication.UsernamePasswordAuthenticationToken;
import org.springframework.security.core.context.SecurityContextHolder;
import org.springframework.security.web.authentication.www.BasicAuthenticationFilter;

import javax.servlet.FilterChain;
import javax.servlet.ServletException;
import javax.servlet.http.HttpServletRequest;
import javax.servlet.http.HttpServletResponse;
import java.io.IOException;
import java.util.ArrayList;


public class AuthorizationFilter extends BasicAuthenticationFilter
{
    public AuthorizationFilter(AuthenticationManager authenticationManager)
    {
        super(authenticationManager);
    }

    protected void doFilterInternal(HttpServletRequest request, HttpServletResponse response, FilterChain filterChain)
            throws IOException, ServletException
    {
        String header = request.getHeader("Authorization");
        if(header == null || !header.startsWith("Bearer"))
        {
            filterChain.doFilter(request,response);
            return;
        }

        UsernamePasswordAuthenticationToken authenticationToken = getAuthentication(request);
        SecurityContextHolder.getContext().setAuthentication(authenticationToken);
        filterChain.doFilter(request,response);
    }

    private UsernamePasswordAuthenticationToken getAuthentication(HttpServletRequest request)
    {
        String token = request.getHeader("Authorization");
        if(token != null)
        {
            String user = Jwts.parser().setSigningKey("SecretKeyToGenJWTs".getBytes())
                    .parseClaimsJws(token.replace("Bearer",""))
                    .getBody()
                    .getSubject();
            if(user != null)
            {
                return new UsernamePasswordAuthenticationToken(user, null, new ArrayList<>());
            }
            return null;
        }
        return null;
    }
}

If the validation of the token is successful, the application returns a user and assigns it to a security context.

To enable Spring security, we will add a new class WebSecurityConfiguration with annotation @EnableWebSecurity. This class will extend the standard WebSecurityConfigurerAdapter . In this class, we will restrict our APIs and also add some whitelisted URLs that we will need to access without any authorization token. This will look like below:


package com.betterjavacode.SpringAppCache;

import org.springframework.context.annotation.Bean;
import org.springframework.http.HttpMethod;
import org.springframework.security.config.annotation.authentication.builders.AuthenticationManagerBuilder;
import org.springframework.security.config.annotation.web.builders.HttpSecurity;
import org.springframework.security.config.annotation.web.builders.WebSecurity;
import org.springframework.security.config.annotation.web.configuration.EnableWebSecurity;
import org.springframework.security.config.annotation.web.configuration.WebSecurityConfigurerAdapter;
import org.springframework.security.config.http.SessionCreationPolicy;
import org.springframework.security.core.userdetails.UserDetailsService;
import org.springframework.security.crypto.bcrypt.BCryptPasswordEncoder;
import org.springframework.web.cors.CorsConfiguration;
import org.springframework.web.cors.CorsConfigurationSource;
import org.springframework.web.cors.UrlBasedCorsConfigurationSource;

@EnableWebSecurity
public class WebSecurityConfiguration extends WebSecurityConfigurerAdapter
{
    private BCryptPasswordEncoder bCryptPasswordEncoder;
    private UserDetailsService userDetailsService;

    private static final String[] AUTH_WHITELIST = {
            "/v2/api-docs",
            "/swagger-resources",
            "/swagger-resources/**",
            "/configuration/ui",
            "/configuration/security",
            "/swagger-ui.html",
            "/webjars/**"
    };

    public WebSecurityConfiguration(UserDetailsService userDetailsService, BCryptPasswordEncoder bCryptPasswordEncoder)
    {
        this.bCryptPasswordEncoder = bCryptPasswordEncoder;
        this.userDetailsService = userDetailsService;
    }


    protected void configure(HttpSecurity httpSecurity) throws Exception
    {
        httpSecurity.cors().and().csrf().disable().authorizeRequests()
                .antMatchers(AUTH_WHITELIST).permitAll()
                .antMatchers(HttpMethod.POST, "/cachedemo/v1/users/signup").permitAll()
                .anyRequest().authenticated()
                .and().addFilter(new AuthenticationFilter(authenticationManager()))
                .addFilter(new AuthorizationFilter(authenticationManager()))
                .sessionManagement().sessionCreationPolicy(SessionCreationPolicy.STATELESS);
    }

    public void configure(AuthenticationManagerBuilder authenticationManagerBuilder) throws Exception
    {
        authenticationManagerBuilder.userDetailsService(userDetailsService).passwordEncoder(bCryptPasswordEncoder);
    }

    @Bean
    CorsConfigurationSource corsConfigurationSource()
    {
        final UrlBasedCorsConfigurationSource source = new UrlBasedCorsConfigurationSource();
        source.registerCorsConfiguration("/**",new CorsConfiguration().applyPermitDefaultValues());
        return source;
    }
}

In method configure we have restricted most APIs, only allowing Swagger URLs and signup URL. We also add filters to HttpSecurity. We will add our own UserDetailsServiceImpl class to validate user credentials.


package com.betterjavacode.services;

import com.betterjavacode.models.User;
import com.betterjavacode.repositories.UserRepository;
import org.springframework.security.core.userdetails.UserDetails;
import org.springframework.security.core.userdetails.UserDetailsService;
import org.springframework.security.core.userdetails.UsernameNotFoundException;
import org.springframework.stereotype.Component;

import java.util.Collections;

@Component
public class UserDetailsServiceImpl implements UserDetailsService
{
    private UserRepository userRepository;

    public UserDetailsServiceImpl(UserRepository userRepository)
    {
        this.userRepository = userRepository;
    }

    @Override
    public UserDetails loadUserByUsername(String username) throws UsernameNotFoundException
    {
        User user = userRepository.findByUsername(username);
        if(user == null)
        {
            throw new UsernameNotFoundException(username);
        }
        return new org.springframework.security.core.userdetails.User(user.getUsername(), user.getPassword(), Collections.emptyList());
    }
}

Demo

With all the code changes, now we are ready to create a user, login and access secured REST APIs. From the image above, a user gets Access Denied error for accessing secured APIs. To demo this, I have already registered a user with username `test1` and password test@123.

This POST request will give us Authorization token in response as shown above. Now using this token in our GET request to retrieve companies data. This GET request will look like below:

In this way, we showed how to secure REST API using JSON web token.

I will be launching the book “Simplifying Spring Security“. Do you want to get updates on launch? Sign up

References

  1. Implementing JWTs Authentication on Spring Boot API – JWT Authentication
  2. How to secure REST APIs – Secure REST APIs

Liquibase – Handling Database in Spring Boot

If you are building an application with Spring Boot, handling the database changes becomes a nightmare over time. The more changes you add, the more changes you have to maintain for your database. Liquibase is the best solution out there. In this post, we will show how to handle database changes using liquibase.

What is Liquibase?

Liquibase is an open-source library to track, manage, and apply database changes. Liquibase tracks the changes to database through an XML configuration where a developer will usually add changesets.

Each changeset will have an id and author attributes. Liquibase uses a changelog to track the database changes. Every changeset you add, that will get added in the changelog. Changelog is a ledger of all the changes you are doing to database.

How does Liquibase work?

To track database changes, you will write an XML file that is platform-independent. This XML file will be used on the command line to translate into scripts for your database engine.

We can also use a maven or Gradle plugin to include database changes in the build configuration.

Liquibase uses its own tables to track changes. Those tables will be part of the schema you are building for consistency purposes. It records the hash of each changeset.

How to write a changeset?

Previously, I mentioned you can write a changeset using XML. But liquibase also offers the support for JSON or YAML.

As part of this post, I will show how I add a changeset and generate scripts for the database.

Create an XML changelog file db.changelog-master.xml for our database under folder src\main\resources\db. Usually, if you start using liquibase from the start of the project, you will create an initial changelog file that will generate initial scripts. You can track every change after that through a change set.

The file without any changeset will look like below:


<databaseChangeLog xmlns="http://www.liquibase.org/xml/ns/dbchangelog"
                   xmlns:xsi="http://www.w3.org/2001/XMLSchema-instance" xmlns:ext="http://www.liquibase.org/xml/ns/dbchangelog-ext"
                   xsi:schemaLocation="http://www.liquibase.org/xml/ns/dbchangelog http://www.liquibase.org/xml/ns/dbchangelog/dbchangelog-3.1.xsd
    http://www.liquibase.org/xml/ns/dbchangelog-ext http://www.liquibase.org/xml/ns/dbchangelog/dbchangelog-ext.xsd">
</databaseChangeLog>

Now I can handle this master file in two ways. For each changeset, I can create a separate file and include that file in the master file OR I can add every changeset in the same master file.

Each changeset needs an author and unique id.

Now we will add changeset to this changelog file and it will look like below:


<databaseChangeLog xmlns="http://www.liquibase.org/xml/ns/dbchangelog"
                   xmlns:xsi="http://www.w3.org/2001/XMLSchema-instance" xmlns:ext="http://www.liquibase.org/xml/ns/dbchangelog-ext"
                   xsi:schemaLocation="http://www.liquibase.org/xml/ns/dbchangelog http://www.liquibase.org/xml/ns/dbchangelog/dbchangelog-3.1.xsd
    http://www.liquibase.org/xml/ns/dbchangelog-ext http://www.liquibase.org/xml/ns/dbchangelog/dbchangelog-ext.xsd">

    <changeSet author="Yogesh Mali" id="jira-ticket-01">
        <createTable tableName="user">
            <column name="id" type="int">
                <constraints primaryKey="true" nullable="false"/>
            </column>
            <column name="guid" type="varchar(50)">
            </column>
            <column name="firstname" type="varchar(100)">
                <constraints nullable="false"/>
            </column>
            <column name="middlename" type="varchar(100)"></column>
            <column name="lastname" type="varchar(100)"></column>
            <column name="email" type="varchar(100)">
                <constraints nullable="false"/>
            </column>
            <column name="companyid" type="int"></column>
            <column name="roleid" type="int"></column>
        </createTable>
        <createTable tableName="company">
            <column name="id" type="int">
                <constraints primaryKey="true" nullable="false"/>
            </column>
            <column name="guid" type="varchar(50)">
                <constraints nullable="false"/>
            </column>
            <column name="name" type="varchar(50)">
                <constraints nullable="false"/>
            </column>
            <column name="type" type="varchar(10)"></column>
        </createTable>
        <createTable tableName="role">
            <column name="id" type="int">
                <constraints primaryKey="true" nullable="false"/>
            </column>
            <column name="role_name" type="varchar(20)">
                <constraints nullable="false"/>
            </column>
        </createTable>
        <addForeignKeyConstraint baseTableName="user" baseColumnNames="companyid"
                                  constraintName="company_fk" referencedTableName="company"
                                  referencedColumnNames="id" />
        <addForeignKeyConstraint baseTableName="user" baseColumnNames="roleid"
                                  constraintName="role_fk" referencedTableName="role"
                                  referencedColumnNames="id"/>
    </changeSet>
</databaseChangeLog>

Now we are ready to create liquibase Bean in our Spring Boot project. We will have to add the following property in our application.properties file.

spring.liquibase.changeLog=classpath:/db/db.changelog-master.xml.

Also, don’t forget to add database properties in application.properties file.


spring.datasource.url=jdbc:mysql://127.0.0.1/demo
spring.datasource.username = sa
spring.datasource.password=password
spring.datasource.driver-class-name=com.mysql.jdbc.Driver
spring.liquibase.changeLog=classpath:/db/db.changelog-master.xml

Before we run our Spring Boot Project, add liquibase dependency in our gradle project.

compile('org.liquibase:liquibase-core:4.0.0').

Now if we run our Spring Boot project, we will see the database tables created in the log messages as follows:


2020-07-26 12:22:24.362  INFO 32412 --- [           main] liquibase.lockservice                    : Successfully acquired change log lock
2020-07-26 12:22:25.314  INFO 32412 --- [           main] liquibase.changelog                      : Creating database history table with name: blogdemo.DATABASECHANGELOG
2020-07-26 12:22:25.345  INFO 32412 --- [           main] liquibase.changelog                      : Reading from blogdemo.DATABASECHANGELOG
2020-07-26 12:22:25.427  INFO 32412 --- [           main] liquibase.changelog                      : Table user created
2020-07-26 12:22:25.443  INFO 32412 --- [           main] liquibase.changelog                      : Table company created
2020-07-26 12:22:25.458  INFO 32412 --- [           main] liquibase.changelog                      : Table role created
2020-07-26 12:22:25.520  INFO 32412 --- [           main] liquibase.changelog                      : Foreign key constraint added to user (companyid)
2020-07-26 12:22:25.588  INFO 32412 --- [           main] liquibase.changelog                      : Foreign key constraint added to user (roleid)
2020-07-26 12:22:25.588  INFO 32412 --- [           main] liquibase.changelog                      : ChangeSet db/db.changelog-master.xml::jira-ticket-01::Yogesh Mali ran successfully in 186ms
2020-07-26 12:22:25.600  INFO 32412 --- [           main] liquibase.lockservice                    : Successfully released change log lock


As part of this execution, liquibase also created the tables databasechangelog and databasechangeloglock. Liquibase uses these tables to track the changes for the database. If you add another changeset in the changelog file, liquibase will identify that changeset based on previous changes and will perform appropriate action next time you run the application.

Conclusion

In this post, I showed how to use liquibase to handle database changes in a Spring Boot project.

One thing, I didn’t discuss in this post is another database migration tool Flyway. Flyway is also an open-source database migration tool.

If you enjoyed this post, subscribe to my blog here.

References

How to Create an Application with Spring Boot and ReactJS

In this post, I will show how we can create an application with Spring Boot and ReactJS.

We will use ReactJS for frontend and Spring Boot for handling business logic in the backend. We will use MySQL as a database. The application we are building is a to-do list application.

We will cover the following instructions in this post:

  • Set up Spring Boot application
  • Set up MySQL Database
  • Details of Spring Boot Application
  • Install ReactJS and set up frontend
  • Test the application on the local environment

Set up Spring Boot Application

I usually use https://start.spring.io/ to set up a boilerplate Spring Boot application with required dependencies. As part of this project, we will use spring-data-jpa, spring-data-rest, jdbc, and web dependencies. Our Gradle file will look like below:


plugins {
	id 'org.springframework.boot' version '2.3.1.RELEASE'
	id 'io.spring.dependency-management' version '1.0.9.RELEASE'
	id 'java'
}

group = 'com.betterjavacode.'
version = '0.0.1-SNAPSHOT'
sourceCompatibility = '1.8'

repositories {
	mavenCentral()
}

dependencies {
	implementation 'org.springframework.boot:spring-boot-starter-data-jpa'
	implementation 'org.springframework.boot:spring-boot-starter-data-rest'
	implementation 'org.springframework.boot:spring-boot-starter-jdbc'	
	implementation 'org.springframework.boot:spring-boot-starter-web'
	runtimeOnly 'mysql:mysql-connector-java'
	testImplementation('org.springframework.boot:spring-boot-starter-test') {
		exclude group: 'org.junit.vintage', module: 'junit-vintage-engine'
	}
}

test {
	useJUnitPlatform()
}

Once we created the project at https://start.spring.io, we can download it and import it in IntelliJ or Eclipse.

Set up MySQL Database

For the To-Do list application, we will need a database and a single table. This demo is a barebone application, so we won’t have any login or registration screen.

Since we will be connecting to the database from our Spring Boot application, we will need to set up our application.properties as follows:


spring.datasource.url=jdbc:mysql://127.0.0.1/todolist?autoReconnect=true&useSSL=false
spring.datasource.username = sa
spring.datasource.password=********
spring.datasource.driver-class-name=com.mysql.cj.jdbc.Driver
spring.jpa.show-sql=true
spring.jpa.properties.hibernate.dialect = org.hibernate.dialect.MySQL5Dialect
spring.datasource.hikari.connection-test-query=SELECT 1

You can use GUI to connect to your MySQL database, I usually prefer the command-line approach.

Once you login to your MySQL database on the command line, create a database for our application.

create database todolist

We will create a database table task.

create table task (id int(6) unsigned not null auto_increment, taskname varchar(100) not null, duedate date default null, status int(1), primary key(id));

We can either have some data inserted or have our home page of the application showing the form to insert the data.

Details of Spring Boot Application

Firstly, we will create a model class for task. This class will look like below:


package com.betterjavacode.demo.models;

import com.fasterxml.jackson.annotation.JsonFormat;

import javax.persistence.*;
import java.io.Serializable;
import java.util.Date;

@Entity(name="Task")
@Table(name="task")
public class Task implements Serializable
{
    private static final long serialVersionUID = 1L;

    public Task()
    {

    }

    @Id
    @GeneratedValue(strategy = GenerationType.IDENTITY)
    @Column(name="id", nullable = false)
    private int id;

    @Column(name = "taskname", nullable=false)
    private String taskname;

    @Column(name = "duedate")
    @JsonFormat(pattern="yyyy-MM-dd")
    private Date dueDate;

    @Column(name = "status")
    private String status;

    @Override
    public String toString()
    {
        return "Task = { id = " + id + ", taskname = " + taskname + ", duedate = " + dueDate
                + ", status = " + status + "}";
    }

    public int getId ()
    {
        return id;
    }

    public void setId (int id)
    {
        this.id = id;
    }

    public String getTaskname ()
    {
        return taskname;
    }

    public void setTaskname (String taskname)
    {
        this.taskname = taskname;
    }

    public Date getDueDate ()
    {
        return dueDate;
    }

    public void setDueDate (Date dueDate)
    {
        this.dueDate = dueDate;
    }

    public String getStatus ()
    {
        return status;
    }

    public void setStatus (String status)
    {
        this.status = status;
    }
}

In this development, we will have a Controller that will handle our rest service and a manager that will handle business layer logic.

The implementation of the manager will look like below:


package com.betterjavacode.demo.managers;

import com.betterjavacode.demo.models.Task;
import com.betterjavacode.demo.repositories.TaskRepository;
import org.springframework.beans.factory.annotation.Autowired;

import java.util.List;
import java.util.Optional;

public class TaskManagerImpl implements TaskManager
{

    @Autowired
    private TaskRepository taskRepository;

    @Override
    public Task createTask (Task task)
    {
        Task t = taskRepository.save(task);
        return t;
    }

    @Override
    public Task updateTask (Task task)
    {
        Task t = taskRepository.save(task);
        return t;
    }

    @Override
    public Task getTask (int id)
    {
        Optional task = taskRepository.findById(id);
        return task.get();
    }

    @Override
    public List getAllTasks ()
    {
        List tasks = (List) taskRepository.findAll();
        return tasks;
    }

    @Override
    public void deleteTask (int id)
    {
        taskRepository.deleteById(id);
    }
}


And our RestController will look like below:


package com.betterjavacode.demo.controllers;


import com.betterjavacode.demo.managers.TaskManager;
import com.betterjavacode.demo.models.Task;
import org.springframework.beans.factory.annotation.Autowired;
import org.springframework.web.bind.annotation.*;

import java.util.List;

@RestController
@RequestMapping("/api")
@CrossOrigin(origins = "http://localhost:8080")
public class TaskController
{
    @Autowired
    private TaskManager taskManager;

    @GetMapping("/tasks")
    public List get()
    {
        return taskManager.getAllTasks();
    }

    @PostMapping("/task")
    public Task save(@RequestBody Task task)
    {
        return taskManager.createTask(task);
    }

    @GetMapping("/task/{id}")
    public Task get(@PathVariable int id)
    {
        return taskManager.getTask(id);
    }

    @DeleteMapping("/task/{id}")
    public String delete(@PathVariable int id)
    {
        taskManager.deleteTask(id);
        return "Task with id " + id + " removed";
    }

}


Now we can test these REST APIs through POSTMAN. I will not be showing that, but if you are interested you can download postman.

Install ReactJS and Set up Frontend

For frontend UI, we will be using ReactJS. Few things, you will need to use ReactJS are npm, nodejs, and create-react-app.

Once you install these three components, we are ready to use ReactJS for our current Spring Boot application.

On command-line, go to the root directory where we have the Spring Boot application. Create a react app using the following command:

npx create-react-app frontend

If you go into frontend directory on command-line, you will be able to start the frontend and it will show you the default screen of ReactJS application.

To make sure the application works smoothly, we will need couple of libraries. We will install them as follows:

npm install react-router
npm install @material-ui/core
npm install @material-ui/icons

react-router is a standard library from React that keeps your UI in sync with the URL, provides dynamic route matching, location transitioning, and lazy code handling features.

core and icons are libraries for frontend components.

We will add a proxy in package.json so that we don’t have to write an entire URL when we make call to backend API.

proxy: http://localhost:8080

Now let’s look at component files.

  1. App.jsIn this file, we will define our app route using react router. AddTask will serve as the homepage. We will redirect a user to view page to see a list of tasks.

import React, {Component} from 'react';
import AddTask from "./Component/AddTask";
import { Route,BrowserRouter as Router} from 'react-router-dom';
import Table from "./Component/Table"

class App extends Component{
	render(){
		return(


			);
	}
}

export default App;

2. AddTask.js

This will be the entry of our application. In this file, we will have a form to add a task. Once the user enters all the required information, we will send a POST request to server-side code. This file will look like below:


import React from "react";
import Avatar from "@material-ui/core/Avatar";
import Button from "@material-ui/core/Button";
import CssBaseline from "@material-ui/core/CssBaseline";
import TextField from "@material-ui/core/TextField";
import { Link } from "react-router-dom";
import Grid from "@material-ui/core/Grid";
import GroupIcon from "@material-ui/icons/Group";
import Typography from "@material-ui/core/Typography";
import { makeStyles } from "@material-ui/core/styles";
import Container from "@material-ui/core/Container";

const useStyles = makeStyles(theme => ({
  paper: {
    marginTop: theme.spacing(7),
    display: "flex",
    flexDirection: "column",
    alignItems: "center"
  },
  avatar: {
    margin: theme.spacing(1),
    backgroundColor: theme.palette.secondary.main
  },
  form: {
    width: "100%", // Fix IE 11 issue.
    marginTop: theme.spacing(3)
  },
  submit: {
    margin: theme.spacing(3, 0, 2)
  },
  textField: {
    marginLeft: theme.spacing(1),
    marginRight: theme.spacing(1),
    width: "100%"
  }
}));

export default function AddTask(){
    const classes = useStyles();
    const[firstLoad, setLoad] = React.useState(true);

    const [selectedDate, setSelectedDate] = React.useState(
        new Date()
    );

    const [taskname, setTaskname] = React.useState("Write Code");
    const [status, setStatus] = React.useState("Active");

    const handleDateChange = event => setSelectedDate(event.target.value);
    const handleTasknameChange = event => setTaskname(event.target.value);
    const handleStatusChange = event => setStatus(event.target.value);

    const [message, setMessage] = React.useState("Nothing saved in the session");

    async function sampleFunc(toInput){
    	const response = await fetch("/api/task",{
			method : "POST",
			cache : "no-cache",
			credentials : "include",
			headers : {
				"Content-Type":"application/json"
			},
			redirect : "follow",
			referrerPolicy: "no-referrer", // no-referrer, *client
	      	body: JSON.stringify(toInput)

    	});
    	let body = await response.json();
    	//console.log(body.id);
    	setMessage(body.id ? "Data successfully updated" : "Data updation failed");
    }

    const handleSubmit = variables => {
    	const toInput = {taskname,status, dueDate:selectedDate};
    	sampleFunc(toInput);
    	setTaskname("");
    	setStatus("");
    };

    if(firstLoad){
    	setLoad(false);
    }

    return(
    	<Container component="main" maxWidth="xs">
    	   <CssBaseline />
    	   <div className={classes.paper}>
    	   	<Avatar className={classes.paper}>
    	   	   <GroupIcon />
    	   	</Avatar>
    	   	<Typography component="h1" variant="h5">
    	   	  Tasks
    	   	</Typography>
    	   	<form className={classes.form} noValidate>
    	   	   <Grid container spacing={2}>
    	   	    <Grid item xs={12}>
    	   	      <TextField
    	   	         variant = "outlined"
    	   	         required
			 	     fullWidth
			         id="taskname"
			         value={taskname.text}
			         label="Taskname"
			         name="taskname"
			         autoComplete="taskname"
			         onChange={handleTasknameChange}
              		/>
		   </Grid>
		   <Grid item xs={12} sm={6}>
		                 <TextField
		                   autoComplete="status"
		                   name="status"
		                   variant="outlined"
		                   required
		                   fullWidth
		                   value={status.text}
		                   id="status"
		                   label="Status"
		                   onChange={handleStatusChange}
		                 />
                   </Grid>
                   <Grid item xs={12}>
		                 <TextField
		                   id="date"
		                   label="Due Date"
		                   type="date"
		                   defaultValue={""}
		                   className={classes.textField}
		                   InputLabelProps={{
		                     shrink: true
		                   }}
		                   onChange={handleDateChange}
		                 />
                  </Grid>
                 </Grid>
                 <Button
		             // type="submit"
		             fullWidth
		             variant="contained"
		             color="primary"
		             preventDefault
		             className={classes.submit}
		             onClick={handleSubmit}
		           >
		             Save
                 </Button>
                 <Grid container justify="center">
		            <Grid item>
		               <Link to="/view">View Tasks</Link>
		            </Grid>
		 </Grid>
              </form>
    	      <Typography style={{ margin: 7 }} variant="body1">
	              Status: {message}
	      </Typography>
	    </div>
       </Container>    );
}

3. Table.js

This file we get the list of tasks from our database table through an API call to Spring Boot REST API. It will also show all the entries in table form.


import React from "react";
import { makeStyles } from "@material-ui/core/styles";
import Table from "@material-ui/core/Table";
import TableBody from "@material-ui/core/TableBody";
import TableCell from "@material-ui/core/TableCell";
import TableContainer from "@material-ui/core/TableContainer";
import TableHead from "@material-ui/core/TableHead";
import TableRow from "@material-ui/core/TableRow";
import Paper from "@material-ui/core/Paper";
import Avatar from "@material-ui/core/Avatar";
import GroupIcon from "@material-ui/icons/Group";
import { Link } from "react-router-dom";
import Typography from "@material-ui/core/Typography";
import CircularProgress from "@material-ui/core/CircularProgress";

const useStyles = makeStyles(theme => ({
  table: {
    minWidth: 600
  },
  avatar: {
    margin: theme.spacing(1),
    backgroundColor: theme.palette.secondary.main
  },
  paper: {
    display: "flex",
    flexDirection: "column",
    justifyContent: "center",
    alignItems: "center",
    margin: `10px`,
    height: "100%",
    width: "99%",
    marginTop: theme.spacing(7)
  },
  link: {
    color: "rgba(0,0,0,0.65)",
    textDecoration: "none",
    marginLeft: "10%",
    alignSelf: "flex-start",
    "&:hover": {
      color: "rgba(0,0,0,1)"
    }
  }
}));

export default function SimpleTable() {
  const classes = useStyles();

  const [data, upDateData] = React.useState([]);
  const [firstLoad, setLoad] = React.useState(true);
  let isLoading = true;

  async function sampleFunc() {
    let response = await fetch("/api/tasks");
    let body = await response.json();
    upDateData(body);
  }

  if (firstLoad) {
    sampleFunc();
    setLoad(false);
  }

  if (data.length > 0) isLoading = false;

  return (
    <div className={classes.paper}>
      <Avatar className={classes.avatar}>
        <GroupIcon />
      </Avatar>
      <Typography component="h1" variant="h5">
        All Tasks
      </Typography>

      {isLoading ? (
        <CircularProgress />
      ) : (
        <TableContainer
          style={{ width: "80%", margin: "0 10px" }}
          component={Paper}
        >
          <Table className={classes.table} aria-label="simple table">
            <TableHead>
              <TableRow>
              	<TableCell align="center">No.</TableCell>
                <TableCell align="center">Taskname</TableCell>
                <TableCell align="center">Status</TableCell>
                <TableCell align="center">Due Date</TableCell>
              </TableRow>
            </TableHead>
            <TableBody>
              {data?.map(row => (
                <TableRow key={row.taskname}>
                  <TableCell align="center">{row.id}</TableCell>
                  <TableCell align="center">{row.taskname}</TableCell>
                  <TableCell align="center">{row.status}</TableCell>
                  <TableCell align="center">{row.dueDate}</TableCell>
                </TableRow>
              ))}
            </TableBody>
          </Table>
        </TableContainer>
      )}
      <Link className={classes.link} to="/">
        {" "}
        <Typography align="left">
          &#x2190; Head back to save data
        </Typography>{" "}
      </Link>
    </div>
  );
}


With that change, we complete most of our code changes on the frontend and backend side.

Test the application in the local environment

Now to run the application, start Spring Boot application either on command-line or in your editor

To start the frontend, use the following command from the frontend folder:

npm start

This will start the localhost at 3000 port as below:

Now if I click on View Tasks, it will take me to list of tasks as follows:

Conclusion

In this post, we showed how to create an application with Spring Boot and ReactJS.  You can follow me on twitter if you have any questions. The code for this is available on Github repository. If you are looking for how to create a similar application with AngularJS, you can visit my post here.

References

  1. ReactJS – ReactJS Home
  2. Spring boot and ReactJS – Spring Boot and ReactJS


Details of Spring Boot AutoConfiguration

What is the Spring Boot? How does Spring Boot Autoconfiguration work? This post will dive into the details of Spring Boot Autoconfiguration.

What is the Spring Boot?

Spring Boot website says “We take an opinionated view of the Spring platform and third-party libraries so you can get started with minimum fuss. Most Spring Boot applications need minimal Spring configuration.

Spring Boot is a framework to build applications.

Spring Boot provides different features and if you are using it to build your application, you will need different beans. So, autoconfiguration automatically configures the Spring Boot application by creating these beans.

Why you use autoconfiguration?

Efficiency and time. With autoconfiguration, Spring will do a lot of lifting for developers and will save time from creating the beans.

Behind the scenes, it is basically a bunch of @Configuration classes. These classes don’t use the annotation @Configuration .

Some of the annotations these classes use are:

  • @ConditionalOnClass – The application uses this only if the given class is on the classpath.
  • @Conditional – Only if a condition is met
  • @ConditionalOnMissingBean – The application uses this if a bean is missing or not created.

In short, @Conditional annotation is the base of all annotations.

How do you really understand this?

You or your team are working on multiple projects and these projects share some common code.  If you want to extract this common code in its own library or shared beans, so all projects can use them.


@Configuration
public class SharedObjects
{
   @Bean
   public CommonObject commonObject()
   {
      return new CommonObject();
   }
}

Once this CommonObject is shared through a jar file, other projects can import it.

The drawback with this approach is if the other project wants to use CommonObject, but don’t want to use any other beans from that common code. Importing those beans would be unnecessary overhead in the project during startup. Therefore, you need a way to tell Spring that we only need CommonObject Bean and not other beans, don’t even create other beans. That’s when we can use @Conditional annotation.

To use this @Conditional annotation, there are a few ways. Spring Boot provides Condition interface that a class can implement.


public class IsBrowserOnCondition implements Condition
{
   @Override
   public boolean matches(ConditionContext context, AnotatedTypeMetadata metadata)
   {
      return isMozillaFirefoxEnabled(context);
   }
   
   public boolean isMozillaFirefoxEnabled(ConditionContext context)
   {
      return context.getEnvironment().containsProperty("spring.preferredbrowser");
   }
}

In this class IsBrowserOnCondition , we see the implementation of interface Condition.

  • This implementation includes the method matches .
  • This method calls another method to check if the Mozilla Firefox browser has been enabled.
  • In the process, it checks for a property spring.preferredbrowser condition.
  • Now if we want to create new beans on the condition, we will use the annotation @Conditional as @Conditional(IsBrowserOnCondition.class).

In short, Spring Boot is a shared context configuration with a number of beans created using annotation @Conditional.

AutoConfiguration with Spring Boot

To understand more about autoconfiguration, we will use a simple Spring Boot application. We want to know what happens when we start this application.

So the main class of this application will look like below:


package com.betterjavacode.abccompany

import org.springframework.boot.SpringApplication;
import org.springframework.boot.autoconfigure.SpringBootApplication;
import org.springframework.boot.autoconfigure.security.servlet.SecurityAutoConfiguration;
import org.springframework.boot.web.servlet.support.SpringBootServletInitializer;
import org.springframework.context.annotation.Bean;
import org.springframework.session.jdbc.config.annotation.web.http.EnableJdbcHttpSession;
import org.springframework.web.filter.CommonsRequestLoggingFilter;

@SpringBootApplication
@EnableJdbcHttpSession
public class HomeApplication extends SpringBootServletInitializer
{
	public static void main(String[] args)
	{
		SpringApplication.run(HomeApplication.class, args);
	}
}

When I run this main class, Spring Boot starts up the tomcat webserver.


.   ____          _            __ _ _
 /\\ / ___'_ __ _ _(_)_ __  __ _ \ \ \ \
( ( )\___ | '_ | '_| | '_ \/ _` | \ \ \ \
 \\/  ___)| |_)| | | | | || (_| |  ) ) ) )
  '  |____| .__|_| |_|_| |_\__, | / / / /
 =========|_|==============|___/=/_/_/_/
 :: Spring Boot ::        (v2.1.6.RELEASE)

2020-06-20 16:38:20.317  INFO 19632 --- [           main] c.rentersfeedback.home.HomeApplication   : Starting HomeApplication on YMALI2019 with PID 19632 (C:\projects\rentersfeedback\out\production\classes started by Yogesh Mali in C:\projects\rentersfeedback)
2020-06-20 16:38:20.320  INFO 19632 --- [           main] c.rentersfeedback.home.HomeApplication   : No active profile set, falling back to default profiles: default
2020-06-20 16:38:21.483  INFO 19632 --- [           main] .s.d.r.c.RepositoryConfigurationDelegate : Bootstrapping Spring Data repositories in DEFAULT mode.
2020-06-20 16:38:21.589  INFO 19632 --- [           main] .s.d.r.c.RepositoryConfigurationDelegate : Finished Spring Data repository scanning in 96ms. Found 5 repository interfaces.
2020-06-20 16:38:22.052  INFO 19632 --- [           main] trationDelegate$BeanPostProcessorChecker : Bean 'org.springframework.transaction.annotation.ProxyTransactionManagementConfiguration' of type [org.springframework.transaction.annotation.ProxyTransactionManagementConfiguration$$EnhancerBySpringCGLIB$$fdb646fa] is not eligible for getting processed by all BeanPostProcessors (for example: not eligible for auto-proxying)
2020-06-20 16:38:22.674  INFO 19632 --- [           main] o.s.b.w.embedded.tomcat.TomcatWebServer  : Tomcat initialized with port(s): 8443 (https)
2020-06-20 16:38:22.700  INFO 19632 --- [           main] o.apache.catalina.core.StandardService   : Starting service [Tomcat]
2020-06-20 16:38:22.700  INFO 19632 --- [           main] org.apache.catalina.core.StandardEngine  : Starting Servlet engine: [Apache Tomcat/9.0.21]
2020-06-20 16:38:22.906  INFO 19632 --- [           main] o.a.c.c.C.[Tomcat].[localhost].[/]       : Initializing Spring embedded WebApplicationContext


Behind the scene, Spring Boot is doing some work when starting the application on Tomcat. There are different 17 sources of properties that Spring Boot is using here. The official documentation Spring Boot provides the detail of these 17 sources. A developer can externalize these properties and many times we do that for application.properties. So if you have any of these properties configured, Spring Boot will read those properties instead of default sources.

Now if we expand the jar file spring-boot-autoconfigure-2.1.6.RELEASE.jar , you will see the number of directories under package org.springframework.boot.autoconfigure. All these sub packages are the beans that Spring Boot is pulling up, but only using them based on @Conditional annotation. Therefore, during startup Spring Boot will load some of these packages based on the dependencies you have configured in your Maven or Gradle build file.

From this jar, if we open the source file for ThymeleafAutoConfiguration, we will see the following:


/*
 * Copyright 2012-2019 the original author or authors.
 *
 * Licensed under the Apache License, Version 2.0 (the "License");
 * you may not use this file except in compliance with the License.
 * You may obtain a copy of the License at
 *
 *      https://www.apache.org/licenses/LICENSE-2.0
 *
 * Unless required by applicable law or agreed to in writing, software
 * distributed under the License is distributed on an "AS IS" BASIS,
 * WITHOUT WARRANTIES OR CONDITIONS OF ANY KIND, either express or implied.
 * See the License for the specific language governing permissions and
 * limitations under the License.
 */

package org.springframework.boot.autoconfigure.thymeleaf;

import java.util.Collection;
import java.util.LinkedHashMap;

import javax.annotation.PostConstruct;
import javax.servlet.DispatcherType;

import com.github.mxab.thymeleaf.extras.dataattribute.dialect.DataAttributeDialect;
import nz.net.ultraq.thymeleaf.LayoutDialect;
import org.apache.commons.logging.Log;
import org.apache.commons.logging.LogFactory;
import org.thymeleaf.dialect.IDialect;
import org.thymeleaf.extras.java8time.dialect.Java8TimeDialect;
import org.thymeleaf.extras.springsecurity5.dialect.SpringSecurityDialect;
import org.thymeleaf.spring5.ISpringWebFluxTemplateEngine;
import org.thymeleaf.spring5.SpringTemplateEngine;
import org.thymeleaf.spring5.SpringWebFluxTemplateEngine;
import org.thymeleaf.spring5.templateresolver.SpringResourceTemplateResolver;
import org.thymeleaf.spring5.view.ThymeleafViewResolver;
import org.thymeleaf.spring5.view.reactive.ThymeleafReactiveViewResolver;
import org.thymeleaf.templatemode.TemplateMode;
import org.thymeleaf.templateresolver.ITemplateResolver;

import org.springframework.beans.factory.ObjectProvider;
import org.springframework.boot.autoconfigure.AutoConfigureAfter;
import org.springframework.boot.autoconfigure.EnableAutoConfiguration;
import org.springframework.boot.autoconfigure.condition.ConditionalOnClass;
import org.springframework.boot.autoconfigure.condition.ConditionalOnMissingBean;
import org.springframework.boot.autoconfigure.condition.ConditionalOnProperty;
import org.springframework.boot.autoconfigure.condition.ConditionalOnWebApplication;
import org.springframework.boot.autoconfigure.condition.ConditionalOnWebApplication.Type;
import org.springframework.boot.autoconfigure.template.TemplateLocation;
import org.springframework.boot.autoconfigure.thymeleaf.ThymeleafProperties.Reactive;
import org.springframework.boot.autoconfigure.web.ConditionalOnEnabledResourceChain;
import org.springframework.boot.autoconfigure.web.reactive.WebFluxAutoConfiguration;
import org.springframework.boot.autoconfigure.web.servlet.ConditionalOnMissingFilterBean;
import org.springframework.boot.autoconfigure.web.servlet.WebMvcAutoConfiguration;
import org.springframework.boot.context.properties.EnableConfigurationProperties;
import org.springframework.boot.context.properties.PropertyMapper;
import org.springframework.boot.web.servlet.FilterRegistrationBean;
import org.springframework.context.ApplicationContext;
import org.springframework.context.annotation.Bean;
import org.springframework.context.annotation.Configuration;
import org.springframework.core.Ordered;
import org.springframework.util.MimeType;
import org.springframework.util.unit.DataSize;
import org.springframework.web.servlet.resource.ResourceUrlEncodingFilter;

/**
 * {@link EnableAutoConfiguration Auto-configuration} for Thymeleaf.
 *
 * @author Dave Syer
 * @author Andy Wilkinson
 * @author Stephane Nicoll
 * @author Brian Clozel
 * @author Eddú Meléndez
 * @author Daniel Fernández
 * @author Kazuki Shimizu
 * @author Artsiom Yudovin
 */
@Configuration
@EnableConfigurationProperties(ThymeleafProperties.class)
@ConditionalOnClass({ TemplateMode.class, SpringTemplateEngine.class })
@AutoConfigureAfter({ WebMvcAutoConfiguration.class, WebFluxAutoConfiguration.class })
public class ThymeleafAutoConfiguration {

	@Configuration
	@ConditionalOnMissingBean(name = "defaultTemplateResolver")
	static class DefaultTemplateResolverConfiguration {

		private static final Log logger = LogFactory.getLog(DefaultTemplateResolverConfiguration.class);

		private final ThymeleafProperties properties;

		private final ApplicationContext applicationContext;

		DefaultTemplateResolverConfiguration(ThymeleafProperties properties, ApplicationContext applicationContext) {
			this.properties = properties;
			this.applicationContext = applicationContext;
		}

		@PostConstruct
		public void checkTemplateLocationExists() {
			boolean checkTemplateLocation = this.properties.isCheckTemplateLocation();
			if (checkTemplateLocation) {
				TemplateLocation location = new TemplateLocation(this.properties.getPrefix());
				if (!location.exists(this.applicationContext)) {
					logger.warn("Cannot find template location: " + location + " (please add some templates or check "
							+ "your Thymeleaf configuration)");
				}
			}
		}

		@Bean
		public SpringResourceTemplateResolver defaultTemplateResolver() {
			SpringResourceTemplateResolver resolver = new SpringResourceTemplateResolver();
			resolver.setApplicationContext(this.applicationContext);
			resolver.setPrefix(this.properties.getPrefix());
			resolver.setSuffix(this.properties.getSuffix());
			resolver.setTemplateMode(this.properties.getMode());
			if (this.properties.getEncoding() != null) {
				resolver.setCharacterEncoding(this.properties.getEncoding().name());
			}
			resolver.setCacheable(this.properties.isCache());
			Integer order = this.properties.getTemplateResolverOrder();
			if (order != null) {
				resolver.setOrder(order);
			}
			resolver.setCheckExistence(this.properties.isCheckTemplate());
			return resolver;
		}

	}

	@Configuration
	protected static class ThymeleafDefaultConfiguration {

		private final ThymeleafProperties properties;

		private final Collection templateResolvers;

		private final ObjectProvider dialects;

		public ThymeleafDefaultConfiguration(ThymeleafProperties properties,
				Collection templateResolvers, ObjectProvider dialectsProvider) {
			this.properties = properties;
			this.templateResolvers = templateResolvers;
			this.dialects = dialectsProvider;
		}

		@Bean
		@ConditionalOnMissingBean
		public SpringTemplateEngine templateEngine() {
			SpringTemplateEngine engine = new SpringTemplateEngine();
			engine.setEnableSpringELCompiler(this.properties.isEnableSpringElCompiler());
			engine.setRenderHiddenMarkersBeforeCheckboxes(this.properties.isRenderHiddenMarkersBeforeCheckboxes());
			this.templateResolvers.forEach(engine::addTemplateResolver);
			this.dialects.orderedStream().forEach(engine::addDialect);
			return engine;
		}

	}

	@Configuration
	@ConditionalOnWebApplication(type = Type.SERVLET)
	@ConditionalOnProperty(name = "spring.thymeleaf.enabled", matchIfMissing = true)
	static class ThymeleafWebMvcConfiguration {

		@Bean
		@ConditionalOnEnabledResourceChain
		@ConditionalOnMissingFilterBean(ResourceUrlEncodingFilter.class)
		public FilterRegistrationBean resourceUrlEncodingFilter() {
			FilterRegistrationBean registration = new FilterRegistrationBean<>(
					new ResourceUrlEncodingFilter());
			registration.setDispatcherTypes(DispatcherType.REQUEST, DispatcherType.ERROR);
			return registration;
		}

		@Configuration
		static class ThymeleafViewResolverConfiguration {

			private final ThymeleafProperties properties;

			private final SpringTemplateEngine templateEngine;

			ThymeleafViewResolverConfiguration(ThymeleafProperties properties, SpringTemplateEngine templateEngine) {
				this.properties = properties;
				this.templateEngine = templateEngine;
			}

			@Bean
			@ConditionalOnMissingBean(name = "thymeleafViewResolver")
			public ThymeleafViewResolver thymeleafViewResolver() {
				ThymeleafViewResolver resolver = new ThymeleafViewResolver();
				resolver.setTemplateEngine(this.templateEngine);
				resolver.setCharacterEncoding(this.properties.getEncoding().name());
				resolver.setContentType(
						appendCharset(this.properties.getServlet().getContentType(), resolver.getCharacterEncoding()));
				resolver.setProducePartialOutputWhileProcessing(
						this.properties.getServlet().isProducePartialOutputWhileProcessing());
				resolver.setExcludedViewNames(this.properties.getExcludedViewNames());
				resolver.setViewNames(this.properties.getViewNames());
				// This resolver acts as a fallback resolver (e.g. like a
				// InternalResourceViewResolver) so it needs to have low precedence
				resolver.setOrder(Ordered.LOWEST_PRECEDENCE - 5);
				resolver.setCache(this.properties.isCache());
				return resolver;
			}

			private String appendCharset(MimeType type, String charset) {
				if (type.getCharset() != null) {
					return type.toString();
				}
				LinkedHashMap parameters = new LinkedHashMap<>();
				parameters.put("charset", charset);
				parameters.putAll(type.getParameters());
				return new MimeType(type, parameters).toString();
			}

		}

	}

	@Configuration
	@ConditionalOnWebApplication(type = Type.REACTIVE)
	@ConditionalOnProperty(name = "spring.thymeleaf.enabled", matchIfMissing = true)
	static class ThymeleafReactiveConfiguration {

		private final ThymeleafProperties properties;

		private final Collection templateResolvers;

		private final ObjectProvider dialects;

		ThymeleafReactiveConfiguration(ThymeleafProperties properties, Collection templateResolvers,
				ObjectProvider dialectsProvider) {
			this.properties = properties;
			this.templateResolvers = templateResolvers;
			this.dialects = dialectsProvider;
		}

		@Bean
		@ConditionalOnMissingBean(ISpringWebFluxTemplateEngine.class)
		public SpringWebFluxTemplateEngine templateEngine() {
			SpringWebFluxTemplateEngine engine = new SpringWebFluxTemplateEngine();
			engine.setEnableSpringELCompiler(this.properties.isEnableSpringElCompiler());
			engine.setRenderHiddenMarkersBeforeCheckboxes(this.properties.isRenderHiddenMarkersBeforeCheckboxes());
			this.templateResolvers.forEach(engine::addTemplateResolver);
			this.dialects.orderedStream().forEach(engine::addDialect);
			return engine;
		}

	}

	@Configuration
	@ConditionalOnWebApplication(type = Type.REACTIVE)
	@ConditionalOnProperty(name = "spring.thymeleaf.enabled", matchIfMissing = true)
	static class ThymeleafWebFluxConfiguration {

		private final ThymeleafProperties properties;

		ThymeleafWebFluxConfiguration(ThymeleafProperties properties) {
			this.properties = properties;
		}

		@Bean
		@ConditionalOnMissingBean(name = "thymeleafReactiveViewResolver")
		public ThymeleafReactiveViewResolver thymeleafViewResolver(ISpringWebFluxTemplateEngine templateEngine) {
			ThymeleafReactiveViewResolver resolver = new ThymeleafReactiveViewResolver();
			resolver.setTemplateEngine(templateEngine);
			mapProperties(this.properties, resolver);
			mapReactiveProperties(this.properties.getReactive(), resolver);
			// This resolver acts as a fallback resolver (e.g. like a
			// InternalResourceViewResolver) so it needs to have low precedence
			resolver.setOrder(Ordered.LOWEST_PRECEDENCE - 5);
			return resolver;
		}

		private void mapProperties(ThymeleafProperties properties, ThymeleafReactiveViewResolver resolver) {
			PropertyMapper map = PropertyMapper.get();
			map.from(properties::getEncoding).to(resolver::setDefaultCharset);
			resolver.setExcludedViewNames(properties.getExcludedViewNames());
			resolver.setViewNames(properties.getViewNames());
		}

		private void mapReactiveProperties(Reactive properties, ThymeleafReactiveViewResolver resolver) {
			PropertyMapper map = PropertyMapper.get();
			map.from(properties::getMediaTypes).whenNonNull().to(resolver::setSupportedMediaTypes);
			map.from(properties::getMaxChunkSize).asInt(DataSize::toBytes).when((size) -> size > 0)
					.to(resolver::setResponseMaxChunkSizeBytes);
			map.from(properties::getFullModeViewNames).to(resolver::setFullModeViewNames);
			map.from(properties::getChunkedModeViewNames).to(resolver::setChunkedModeViewNames);
		}

	}

	@Configuration
	@ConditionalOnClass(LayoutDialect.class)
	protected static class ThymeleafWebLayoutConfiguration {

		@Bean
		@ConditionalOnMissingBean
		public LayoutDialect layoutDialect() {
			return new LayoutDialect();
		}

	}

	@Configuration
	@ConditionalOnClass(DataAttributeDialect.class)
	protected static class DataAttributeDialectConfiguration {

		@Bean
		@ConditionalOnMissingBean
		public DataAttributeDialect dialect() {
			return new DataAttributeDialect();
		}

	}

	@Configuration
	@ConditionalOnClass({ SpringSecurityDialect.class })
	protected static class ThymeleafSecurityDialectConfiguration {

		@Bean
		@ConditionalOnMissingBean
		public SpringSecurityDialect securityDialect() {
			return new SpringSecurityDialect();
		}

	}

	@Configuration
	@ConditionalOnClass(Java8TimeDialect.class)
	protected static class ThymeleafJava8TimeDialect {

		@Bean
		@ConditionalOnMissingBean
		public Java8TimeDialect java8TimeDialect() {
			return new Java8TimeDialect();
		}

	}

}

If you are building a web application, thymeleaf template will be your default template engine.  Spring boot will load this class if TemplateMode and SpringBootEngine are loaded. We can see the use of @Conditional annotation.

How to exclude Spring Boot AutoConfiguration?

Spring Boot does offer an option to exclude any of the autoconfiguration you don’t want to include in your project.


@SpringBootApplication(exclude = {BatchAutoConfiguration.class)
public class HomeApplication 
{
    public static void main(String[] args) {
        SpringApplication.run(HomeApplication.class, args);
    }
}

One thing to remember here is that you must know why you are excluding a certain bean and if you are ok that it might exclude some dependent configurations.

Conclusion

In this post, I showed

  • How Spring Boot works and how you can build the Spring Boot application with some of the dependencies.
  • What Auto Configuration is and what it includes.

If you enjoyed this post or have any other questions, subscribe to my blog.

References

  1. Spring Boot Guide
  2. Spring Boot Official Documentation
  3. What is Spring Boot?