Category Archives: Spring-boot

The Definitive Guide to Use Keycloak With a Spring Boot Application

In this post, I will show how to use Keycloak in a Spring Boot application. Before we use Keycloak, we will cover some basics about what Keycloak is and why we use it.

To get started with this demo, you will need the following things:

  • A Code Editor – IntelliJ
  • Database – MySQL
  • Keycloak
  • Java 8

What is Keycloak?

Keycloak is an open-source identity and access management solution for modern applications and services. Keycloak provides both SAML and OpenID protocol solutions.

Why do we use Keycloak?

As mentioned, Keycloak provides identity and access management, it is also open source. SAML and OpenID protocols are industry standards. Building an application that is integrated with Keycloak will only provide you a more secure and stable solution. There are definitely other solutions available like Gluu, Shibboleth, WSO2, and Okta.

For this post, we will be using Keycloak.

Securing Spring Boot Application with Keycloak

There are two parts to this demo. One is about Keycloak. The second is about securing the Spring Boot Application with Keycloak.

Install Keycloak

Download the keycloak on your machine.  Unzip the downloaded file and run the server with the following command from bin directory on your command prompt (Note – I’m on a windows machine):

standalone.bat -Djboss.socket.binding.port-offset=100

This will start the Wildfly server for your Keycloak on your local machine. We can access the server by executing the URL http://localhost:8180. If you just use standalone.bat to execute without that parameter, the server will run on the port 8080.

Spring Boot Application with Keycloak

Once you start the server, the first thing you will have to do is to create an admin user. We will create a user admin and password d#n3q2b .

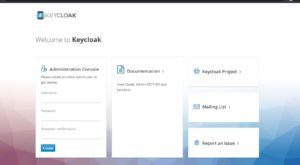
Now we will access the administration console and enter our user details. Once we login as an admin user, we will see the first screen as below:

Keycloak Home Screen

Adding application

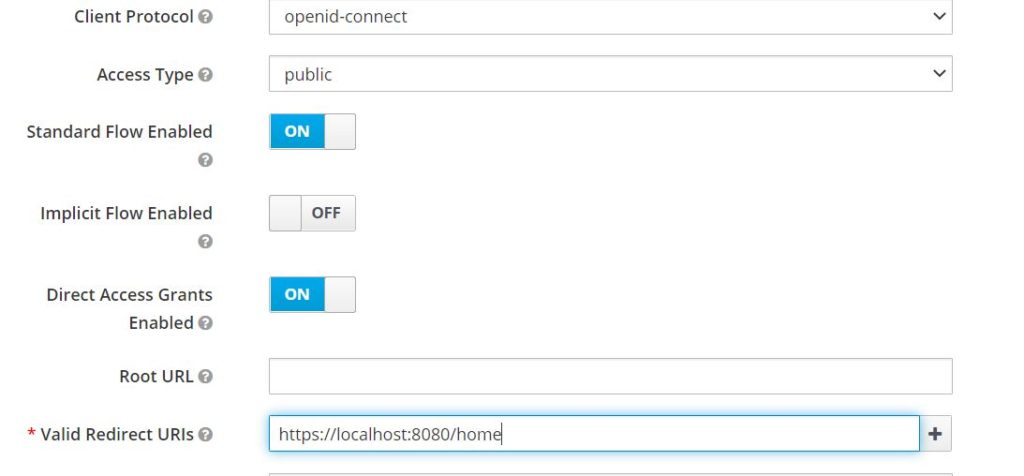
Initial screens shows the default realm. For our demo purposes, we will create a new realm SpringBootKeycloakApp . In this realm, we will add our Spring Boot application as a client. Create a new client on Clients tab. We will name our client application as SpringBootApp.

Now in settings, we will add redirect url for our Spring Boot Application. This is the URL where Keycloak will redirect to our app after authentication. Also, we are using openid connect as a protocol as part of this implementation.

Keycloak with Spring Boot App

Adding user

Now we will add a user that we will use to authenticate. We will use this user to login to our sample Spring Boot application.

Add a role that you want for this user ROLE_User on the roles tab in Keycloak. Once that is done, let’s go to the Users tab and add a new user.

Keycloak: add user

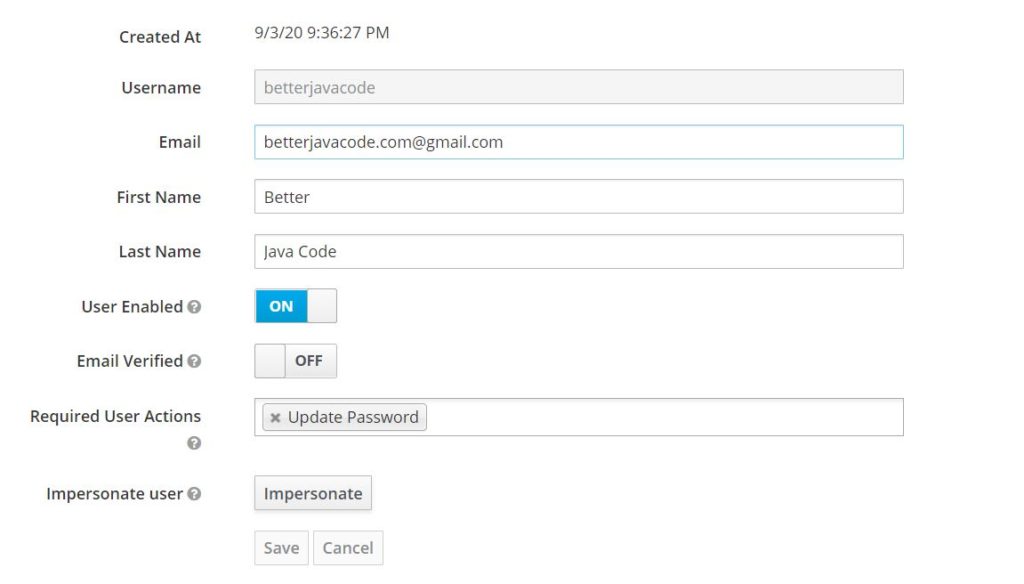
On the Role Mappings tab, make sure to add the newly created role for this user.

Create A Spring Boot Application

Now, we will create a simple Spring Boot application that will use Keycloak for security. As part of this application, we will be showing a list of to-do list tasks for the user who will authenticate with the application.

To build this app, we need the following dependencies:


dependencies {
	implementation 'org.springframework.boot:spring-boot-starter-data-jpa'
	implementation 'org.springframework.boot:spring-boot-starter-security'
	implementation 'org.springframework.boot:spring-boot-starter-thymeleaf'
	implementation 'org.springframework.boot:spring-boot-starter-web'
	implementation 'org.springframework.boot:spring-boot-starter-jdbc'
	implementation 'org.keycloak:keycloak-spring-boot-starter'
	runtimeOnly 'mysql:mysql-connector-java'
	testImplementation('org.springframework.boot:spring-boot-starter-test') {
		exclude group: 'org.junit.vintage', module: 'junit-vintage-engine'
	}
	testImplementation 'org.springframework.security:spring-security-test'
}

As you can see we are using spring-boot and spring-security along with keycloak-spring-boot-starter dependency.

The keycloak dependency includes Keycloak client adapters. We will use these adapters for authentication purposes. They will replace our standard Spring Security adapters. To make sure this keycloak-spring-boot-starter dependency works correctly, we will need one more dependency to be added in our gradle file as below:


dependencyManagement {
	imports {
		mavenBom "org.keycloak.bom:keycloak-adapter-bom:11.0.2"
	}
}

To read more about this, you can visit the official documentation of keycloak.

Our Controller class will have two important methods, one to get the home page which will be accessible for anyone, and another to get the list of tasks that will be accessible to only authenticated users with a role ROLE_User.  The code for this TaskController will look like below:


package com.betterjavacode.keycloakdemo.keycloakdemo.controllers;

import com.betterjavacode.keycloakdemo.keycloakdemo.dto.TaskDto;
import com.betterjavacode.keycloakdemo.keycloakdemo.managers.TaskManager;
import org.keycloak.KeycloakSecurityContext;
import org.springframework.beans.factory.annotation.Autowired;
import org.springframework.stereotype.Controller;
import org.springframework.ui.Model;
import org.springframework.web.bind.annotation.GetMapping;

import javax.servlet.http.HttpServletRequest;
import java.util.List;

@Controller
public class TaskController
{
    private final HttpServletRequest request;

    @Autowired
    public TaskController(HttpServletRequest request)
    {
        this.request = request;
    }

    @Autowired
    private TaskManager taskManager;

    @GetMapping(value="/")
    public String home()
    {
        return "index";
    }

    @GetMapping(value="/tasks")
    public String getTasks(Model model)
    {
        List tasks = taskManager.getAllTasks();
        model.addAttribute("tasks", tasks);
        model.addAttribute("name", getKeycloakSecurityContext().getIdToken().getGivenName());

        return "tasks";
    }

    private KeycloakSecurityContext getKeycloakSecurityContext()
    {
        return (KeycloakSecurityContext) request.getAttribute(KeycloakSecurityContext.class.getName());
    }

}

In this controller class, we use TaskManager to get all tasks. I will explain  KeyCloakSecurityContext when I will show about SecurityConfig.

With or without Spring-Security

We can leverage this application and use Keycloak for authentication with or without Spring-Security. As part of this demo, we are using Spring-Security. To use the same application without Spring-Security, you can just remove the Spring-Security dependency and add security configuration through application.properties file.

We will need the following properties in application.properties to use Keycloak for authentication in this app.

keycloak.auth-server-url=http://localhost:8180/auth
keycloak.realm=SpringBootKeycloakApp
keycloak.resource=SpringBootApp
keycloak.public-client=true
keycloak.principal-attribute=preferred_username

If we wanted to use this application without Spring-Security, we will need the following two properties also:

keycloak.security-constraints[0].authRoles[0]=ROLE_User
keycloak.security-constraints[0].securityCollections[0].patterns[0]=/tasks

Since we are using Spring-Security, we will configure the security configuration through a Java class SecurityConfig.

This SecurityConfig class will extend KeyCloakWebSecurityConfigurerAdapter .

Our configure method will look like below:

    @Override
    protected void configure(HttpSecurity httpSecurity) throws Exception
    {
        super.configure(httpSecurity);
        httpSecurity.authorizeRequests()
                .antMatchers("/tasks").hasRole("User")
                .anyRequest().permitAll();
    }

Basically, any requests coming to /tasks endpoint, should have user role as ROLE_User. The prefix of ROLE_ is assumed here. Other than any other request will be permitted without any authorization. In this case, we will be calling our index page.

We will be using annotation @KeyCloakConfiguration which is basically covers @Configuration and @EnableWebSecurity annotations.

Since our SecurityConfig extends KeycloakWebSecurityConfigurerAdapter, we have to implement sessionAuthenticationStrategy and httpSessionManager. We will also have to register our idp Keycloak with Spring Security Authentication Manager.

So our SecurityConfig will look like below:


package com.betterjavacode.keycloakdemo.keycloakdemo.config;

import org.keycloak.adapters.springsecurity.KeycloakConfiguration;
import org.keycloak.adapters.springsecurity.authentication.KeycloakAuthenticationProvider;
import org.keycloak.adapters.springsecurity.config.KeycloakWebSecurityConfigurerAdapter;
import org.keycloak.adapters.springsecurity.management.HttpSessionManager;
import org.springframework.beans.factory.annotation.Autowired;
import org.springframework.boot.autoconfigure.condition.ConditionalOnMissingBean;
import org.springframework.context.annotation.Bean;

import org.springframework.security.config.annotation.authentication.builders.AuthenticationManagerBuilder;
import org.springframework.security.config.annotation.web.builders.HttpSecurity;
import org.springframework.security.core.authority.mapping.SimpleAuthorityMapper;
import org.springframework.security.core.session.SessionRegistryImpl;
import org.springframework.security.web.authentication.session.RegisterSessionAuthenticationStrategy;
import org.springframework.security.web.authentication.session.SessionAuthenticationStrategy;


@KeycloakConfiguration
public class SecurityConfig extends KeycloakWebSecurityConfigurerAdapter
{
    @Autowired
    public void configureGlobal(AuthenticationManagerBuilder authenticationManagerBuilder)
    {
        SimpleAuthorityMapper simpleAuthorityMapper = new SimpleAuthorityMapper();
        simpleAuthorityMapper.setPrefix("ROLE_");

        KeycloakAuthenticationProvider keycloakAuthenticationProvider =
                keycloakAuthenticationProvider();
        keycloakAuthenticationProvider.setGrantedAuthoritiesMapper(simpleAuthorityMapper);
        authenticationManagerBuilder.authenticationProvider(keycloakAuthenticationProvider);
    }

    @Bean
    @Override
    protected SessionAuthenticationStrategy sessionAuthenticationStrategy ()
    {
        return new RegisterSessionAuthenticationStrategy(new SessionRegistryImpl());
    }

    @Bean
    @Override
    @ConditionalOnMissingBean(HttpSessionManager.class)
    protected HttpSessionManager httpSessionManager()
    {
        return new HttpSessionManager();
    }

    @Override
    protected void configure(HttpSecurity httpSecurity) throws Exception
    {
        super.configure(httpSecurity);
        httpSecurity.authorizeRequests()
                .antMatchers("/tasks").hasRole("User")
                .anyRequest().permitAll();
    }
}

So Spring Security uses roles in upper case like ROLE_USER and always use ROLE_ prefix. To handle that, I have added a user with a role ROLE_User in Keycloak, but we will only verify a prefix as our http configuration will verify the role anyhow.

Since we will be authenticating with Keycloak, we will need a session for user’s state. We are using RegisterSessionAuthenticationStrategy here. HttpSessionManager is a conditional bean because Keycloak already implements that bean.

To implement the Keycloak Spring Boot adapter, we will add a KeyCloakSpringBootConfigResolver bean as follows:


package com.betterjavacode.keycloakdemo.keycloakdemo.config;

import org.keycloak.adapters.springboot.KeycloakSpringBootConfigResolver;
import org.springframework.context.annotation.Bean;
import org.springframework.context.annotation.Configuration;

@Configuration
public class KeycloakConfig
{
    @Bean
    public KeycloakSpringBootConfigResolver keycloakSpringBootConfigResolver()
    {
        return new KeycloakSpringBootConfigResolver();
    }
}

I have not shown the rest of the application build, but the code is available on GitHub for this project.

Demo of the application

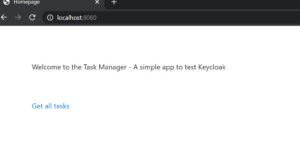
Run our keycloak application, it will be running on http://localhost:8180. Our Spring Boot application will be running at http://localhost:8080.

Our first screen of the Spring Boot application will look like below:

Spring Boot Application with Keycloak

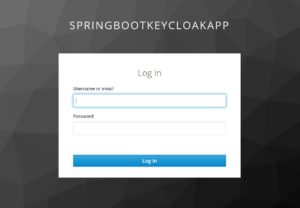
Now if a user clicks on Get all tasks, he will be redirected to Keycloak login screen as below:

Securing Spring Boot App with Keycloak

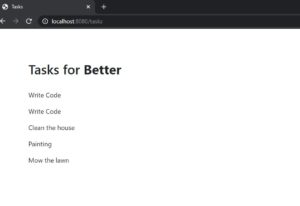
Now, I will enter my user betterjavacode username and password and it will show us our list of tasks as follows:

Spring Boot Application and Keycloak


Authentication Flow

When the user clicks on Get all tasks, the user is redirected to Spring Security‘s sso/login endpoint which KeycloakSpringBootConfigResolver handles and sends an authorization code flow request to Keycloak

http://localhost:8180/auth/realms/SpringBootKeycloakApp/protocol/openid-connect/auth?response_type=code&client_id=SpringBootApp&redirect_uri=http%3A%2F%2Flocalhost%3A8080%2Fsso%2Flogin&state=70bd4e28-89e6-43b8-8bea-94c6d057a5cf&login=true&scope=openid

Keycloak will process the request to respond with a session code and show the login screen.

Once the user enters credentials and keycloak validates those, it will respond with an authorization code, and this code is exchanged for a token, and the user is logged in.

Conclusion

In this post, I showed how to secure your Spring Boot application using Keycloak as an identity provider. If you enjoyed this post, please consider subscribing to my blog here.

References

  1. Keycloak – Keycloak
  2. Securing your application with Keycloak – Secure your application

How to Use Basic Authentication for Rest Template

In this post, I will show how to use Rest Template to consume RESTful API secured with Basic Authentication. As part of this post, I will show how to build a REST API that is secured with Basic Authentication.

Overview

Basic Authentication is one of the mechanisms that you can use to secure your REST API. In my previous post, I showed how to secure REST API with Json Web Token.

Secure a REST API with Basic Authentication

Configure a REST API

Firstly, we will show a simple REST API to create users or retrieve users from the database. Then, we will secure this REST API with a Basic Authentication mechanism. Lastly, we will show how to use Basic Authentication with Rest Template to call this REST API.

Our REST controller class for this API to create or retrieve users will look like below:


package com.betterjavacode.restdemo.controllers;

import com.betterjavacode.restdemo.dto.UserDto;
import com.betterjavacode.restdemo.managers.UserManager;
import org.springframework.beans.factory.annotation.Autowired;
import org.springframework.http.HttpStatus;
import org.springframework.http.MediaType;
import org.springframework.http.ResponseEntity;
import org.springframework.web.bind.annotation.*;

import java.util.List;

@RestController
public class UserController
{
    @Autowired
    private UserManager userManager;

    @RequestMapping(value = "/user/", method = RequestMethod.GET)
    public ResponseEntity<List> listAllUsers()
    {
        List users = userManager.getAllUsers();
        if(users.isEmpty())
        {
            return new ResponseEntity<List>(HttpStatus.NO_CONTENT);
        }

        return new ResponseEntity<>(users, HttpStatus.OK);
    }

    @RequestMapping(value = "/user/{id}", method = RequestMethod.GET, produces =
            MediaType.APPLICATION_JSON_VALUE)
    public ResponseEntity getUser(@PathVariable("id") long id)
    {
        UserDto userDto = userManager.getUser(id);
        if(userDto == null)
        {
            return new ResponseEntity<>(HttpStatus.NOT_FOUND);
        }
        return new ResponseEntity<>(userDto, HttpStatus.OK);
    }


    @RequestMapping(value = "/user/", method= RequestMethod.POST)
    public ResponseEntity createUser(@RequestBody UserDto userDto)
    {
        UserDto user = userManager.createUser(userDto);

        return new ResponseEntity<>(user, HttpStatus.OK);
    }

    @RequestMapping(value = "/user/{id}", method=RequestMethod.DELETE)
    public ResponseEntity deleteUser(@PathVariable("id") long id)
    {
        UserDto user = userManager.getUser(id);

        if(user == null)
        {
            return new ResponseEntity<>(HttpStatus.NOT_FOUND);
        }

        userManager.deleteUser(id);

        return new ResponseEntity<>(HttpStatus.NO_CONTENT);
    }
}

Our database model class for User will look like below:


package com.betterjavacode.restdemo.models;

import javax.persistence.*;
import java.io.Serializable;

@Entity(name = "User")
@Table(name = "users")
public class User implements Serializable
{
    private static final long serialVersionUID = 20200816121023L;

    public User()
    {

    }

    @Id
    @GeneratedValue(strategy = GenerationType.IDENTITY)
    @Column(name="id", nullable=false)
    private long id;

    @Column(name="firstname", length=100)
    private String firstname;

    @Column(name="lastname", length=100)
    private String lastname;

    @Column(name="email", length=100)
    private String email;

    @Column(name="role", length=45)
    private String role;

    @Column(name="enabled")
    private boolean enabled;

    public long getId ()
    {
        return id;
    }

    public void setId (long id)
    {
        this.id = id;
    }

    public String getFirstname ()
    {
        return firstname;
    }

    public void setFirstname (String firstname)
    {
        this.firstname = firstname;
    }

    public String getLastname ()
    {
        return lastname;
    }

    public void setLastname (String lastname)
    {
        this.lastname = lastname;
    }

    public String getEmail ()
    {
        return email;
    }

    public void setEmail (String email)
    {
        this.email = email;
    }

    public String getRole ()
    {
        return role;
    }

    public void setRole (String role)
    {
        this.role = role;
    }

    public boolean isEnabled ()
    {
        return enabled;
    }

    public void setEnabled (boolean enabled)
    {
        this.enabled = enabled;
    }
}

Just to make sure we understand here that, we are using a DTO object UserDto to create and retrieve the data from the database. User is our database model object.

The UserDto object will be as follows:


package com.betterjavacode.restdemo.dto;

import com.betterjavacode.restdemo.models.User;
import com.fasterxml.jackson.annotation.JsonIgnoreProperties;

@JsonIgnoreProperties(ignoreUnknown = true)
public class UserDto
{
    private String firstname;
    private String lastname;
    private String email;

    public UserDto(){}

    public UserDto(User user)
    {
        this.setEmail(user.getEmail());
        this.setFirstname(user.getFirstname());
        this.setLastname(user.getLastname());
    }

    public String getFirstname ()
    {
        return firstname;
    }

    public void setFirstname (String firstname)
    {
        this.firstname = firstname;
    }

    public String getLastname ()
    {
        return lastname;
    }

    public void setLastname (String lastname)
    {
        this.lastname = lastname;
    }

    public String getEmail ()
    {
        return email;
    }

    public void setEmail (String email)
    {
        this.email = email;
    }

}

Once we configure our application properties and create the required database table, we will start the application.

Now if we execute the API through a client like Postman, we will be able to retrieve or create the User object.

The goal is to secure this API.

So add Spring-Security in our project build.

implementation "org.springframework.boot:spring-boot-starter-security"

Now, if we add the annotation @EnableWebSecurity in our main application class like below:


package com.betterjavacode.restdemo;

import org.springframework.boot.SpringApplication;
import org.springframework.boot.autoconfigure.SpringBootApplication;
import org.springframework.security.config.annotation.web.configuration.EnableWebSecurity;

@SpringBootApplication
@EnableWebSecurity
public class RestdemoApplication
{
	public static void main(String[] args)
	{
		SpringApplication.run(RestdemoApplication.class, args);
	}
}

and if we access the API to create user, we will get 401 unauthorized error like below:

Basic Authentication with Rest Template

Basic Authentication

Traditionally, access to REST API will happen on the server-side once the user has logged in with authentication.

Basic authentication provides one of the ways to secure REST API. It’s not the most secure way compared to OAuth or JWT based security. In Basic Authentication, a client sends Base64 encoded credentials with each request using HTTP Authorization Header.

The client will send the Authorization header with each request. There is always a possibility of compromising these credentials even when they are Base64 encoded. To avoid that, we can use HTTPS.

Now from our implementation perspective, we will add a SecurityConfig class to configure security for our REST API.


package com.betterjavacode.restdemo;

import org.springframework.beans.factory.annotation.Autowired;
import org.springframework.context.annotation.Configuration;
import org.springframework.security.config.annotation.authentication.builders.AuthenticationManagerBuilder;
import org.springframework.security.config.annotation.web.builders.HttpSecurity;
import org.springframework.security.config.annotation.web.configuration.EnableWebSecurity;
import org.springframework.security.config.annotation.web.configuration.WebSecurityConfigurerAdapter;

@Configuration
@EnableWebSecurity
public class SecurityConfig extends WebSecurityConfigurerAdapter
{
    @Override
    protected void configure(HttpSecurity httpSecurity) throws Exception
    {
        httpSecurity
                .csrf().disable()
                .authorizeRequests().anyRequest().authenticated()
                .and()
                .httpBasic();
    }

    @Autowired
    public void configureGlobal(AuthenticationManagerBuilder auth)
            throws Exception
    {
        auth.inMemoryAuthentication()
                .withUser("adminuser")
                .password("{noop}adminpassword")
                .roles("USER");
    }
}

configure method in this class will configure basic authentication and every request coming to our controller will need to be authorized.

configureGlobal method will add authentication of the incoming request. The requests coming through the controller will be validated for these credentials that we have configured for in-memory authentication.

WARNING – This is not the most secure way to secure your API. Definitely not with in-memory authentication. Do not use it in production.

Now if we execute REST API through POSTMAN, we will see the successful response as below:

Securing REST API with Basic Authentication

Rest Template with Basic Authentication Example

Initially, we used POSTMAN as a client to call our REST APIs. But in a real scenario, we won’t be using POSTMAN, you will have to call these APIs programmatically.

We will create a class RestClient and that will call our APIs while building Basic Authentication.

While using RestTemplate that Spring Boot provides, you need to pass HttpHeaders with a RequestEntity.


    private static HttpHeaders getHeaders ()
    {
        String adminuserCredentials = "adminuser:adminpassword";
        String encodedCredentials =
                new String(Base64.encodeBase64(adminuserCredentials.getBytes()));

        HttpHeaders httpHeaders = new HttpHeaders();
        httpHeaders.add("Authorization", "Basic " + encodedCredentials);
        httpHeaders.setAccept(Arrays.asList(MediaType.APPLICATION_JSON));
        return httpHeaders;
    }

We use exchange method from RestTemplate to call our API and HttpHeaders that contain Basic Authentication.

The whole class  RestClient will look like below:


package com.betterjavacode.restdemo;


import com.betterjavacode.restdemo.dto.UserDto;
import org.apache.tomcat.util.codec.binary.Base64;
import org.json.JSONObject;
import org.springframework.http.*;
import org.springframework.web.client.RestTemplate;

import java.util.Arrays;
import java.util.LinkedHashMap;
import java.util.List;

public class RestClient
{
    public static final String REST_SERVICE_URL = "http://localhost:8080/user/";

    private static HttpHeaders getHeaders ()
    {
        String adminuserCredentials = "adminuser:adminpassword";
        String encodedCredentials =
                new String(Base64.encodeBase64(adminuserCredentials.getBytes()));

        HttpHeaders httpHeaders = new HttpHeaders();
        httpHeaders.add("Authorization", "Basic " + encodedCredentials);
        httpHeaders.setAccept(Arrays.asList(MediaType.APPLICATION_JSON));
        return httpHeaders;
    }

    private static void listAllUsers()
    {
        System.out.println("Getting all users");
        RestTemplate restTemplate = new RestTemplate();

        HttpHeaders httpHeaders = getHeaders();

        HttpEntity httpEntity = new HttpEntity<>(httpHeaders);

        ResponseEntity responseEntity = restTemplate.exchange(REST_SERVICE_URL,
                HttpMethod.GET, httpEntity, List.class);

        if(responseEntity.hasBody())
        {
            List<LinkedHashMap<String, Object>> users = responseEntity.getBody();

            if(users != null)
            {
                for(LinkedHashMap<String, Object> userMap: users)
                {
                    System.out.println("User is " + userMap.get("firstname") + " " + userMap.get(
                            "lastname"));
                }
            }
        }
        else
        {
            System.out.println("User not found");
        }

    }

    public static void main (String[] args)
    {
        listAllUsers();

        getUser(1);
    }


    private static void getUser(long id)
    {
        System.out.println("Getting a user ");

        String restUrl = REST_SERVICE_URL  + id;

        RestTemplate restTemplate = new RestTemplate();

        HttpHeaders httpHeaders = getHeaders();

        HttpEntity httpEntity = new HttpEntity<>(httpHeaders);

        ResponseEntity responseEntity = restTemplate.exchange(restUrl,
                HttpMethod.GET, httpEntity, String.class);

        if(responseEntity.hasBody())
        {
            JSONObject jsonObject = new JSONObject(responseEntity.getBody());

            System.out.println(jsonObject.get("firstname"));
            System.out.println(jsonObject.get("lastname"));
        }
        else
        {
            System.out.println("User not found");
        }

    }
}

Now if we execute the program, we will see the output as below:

Output of Rest Template call with Basic Authentication

In this post, we showed how to secure REST API with Basic Authentication. If you enjoyed this post, subscribe to my blog here.

Do you want to know the fundamentals of Spring Security? I’m launching my new book “Simplifying Spring Security” soon. Get on my launch list to get updates and discount codes.

References

  1. Spring Rest Template –  documentation
  2. Spring Boot Rest Template – Usage

Json Web Token: How to Secure Spring Boot REST API

In this post, I will show how to secure your spring boot based REST API. It has been more of a trend to secure REST APIs to avoid any unnecessary calls to public APIs. We will be using some Spring boot features for Spring security along with JSON WebTokens for authorization. You can learn more about basic authentication here.

User flow in this case is

  1. User logs in
  2. We validate user credentials
  3. A token is sent back to user agent.
  4. User tries to access a protected resource.
  5. User sends JWT when accessing the protected resource. We validate JWT.
  6. If JWT is valid, we allow the user to access the resource.

JSON WebTokens, known as JWTs are used for forming authorization for users. This helps us to build secure APIs and it is also easy to scale. During authentication, a JSON web token is returned. Whenever the user wants to access a protected resource, the browser must send JWTs in the Authorization header along with the request. One thing to understand here is that it is a good security practice to secure REST API.

Basically, we will show

  1. Verify JSON WebToken
  2. Validate the signature
  3. Check the client permissions

What you will need?

  1. Java 8,
  2. MySQL Database
  3. IntelliJ Editor
  4. Gradle

Note – This won’t be a full-fledged app, but REST APIs based on Spring Boot, and Spring security.

Spring Boot Based REST API

Since I have already shown this before on my blog, I won’t be creating any new APIs. I will be securing REST API for company that I created in this blog post REST API. This API also includes caching. A user will try to access /cachedemo/v1/companies/ and since APIs are protected, he will get a response like below:

Secure REST API - Forbidden

Response from protected API

Now we will implement how to protect this API and how to access it.

Adding User and User Registration

Since we want to add authorization for APIs, we will need where the user is able to log in and send credentials. These credentials will be validated and a token will be generated. This token then will be transmitted in a request to an API call. The token will be validated in the Spring security authorization filter that we will add. If a valid token, the user will be able to access the API.

Create a user model


package com.betterjavacode.models;

import javax.persistence.*;
import java.io.Serializable;

@Entity(name = "User")
@Table(name = "user")
public class User implements Serializable
{
    public User()
    {

    }

    @Id
    @GeneratedValue(strategy =  GenerationType.IDENTITY)
    private long id;

    @Column(name = "username")
    private String username;

    @Column(name = "password")
    private String password;

    public long getId()
    {
        return id;
    }

    public void setId(long id)
    {
        this.id = id;
    }

    public String getUsername()
    {
        return username;
    }

    public void setUsername(String username)
    {
        this.username = username;
    }

    public String getPassword()
    {
        return password;
    }

    public void setPassword(String password)
    {
        this.password = password;
    }
}

We will add a controller where a user can register with its details for username and password.


package com.betterjavacode.resources;

import com.betterjavacode.models.User;
import com.betterjavacode.repositories.UserRepository;
import org.springframework.security.crypto.bcrypt.BCryptPasswordEncoder;
import org.springframework.web.bind.annotation.PostMapping;
import org.springframework.web.bind.annotation.RequestBody;
import org.springframework.web.bind.annotation.RequestMapping;
import org.springframework.web.bind.annotation.RestController;

@RestController
@RequestMapping(value = "/cachedemo/v1/users")
public class UserController
{
    private UserRepository userRepository;
    private BCryptPasswordEncoder bCryptPasswordEncoder;

    public UserController(UserRepository userRepository, BCryptPasswordEncoder bCryptPasswordEncoder)
    {
        this.userRepository = userRepository;
        this.bCryptPasswordEncoder = bCryptPasswordEncoder;
    }

    @PostMapping("/signup")
    public void signUp(@RequestBody User user)
    {
        user.setPassword(bCryptPasswordEncoder.encode(user.getPassword()));
        userRepository.save(user);
    }

}

Now when we POST a request to /cachedemo/v1/users/signup , a user will be saved in the database. Password for the user will be saved in encrypted format as we are using BCryptPasswordEncoder. We will show how a user can log in to create a token.

User Login

To handle user login, we will add an AuthenticationFilter which will get added in FilterChain and Spring boot will handle the execution of it appropriately. This filter will look like below:


package com.betterjavacode.SpringAppCache;


import com.fasterxml.jackson.databind.ObjectMapper;
import io.jsonwebtoken.Jwts;
import io.jsonwebtoken.SignatureAlgorithm;
import org.springframework.security.authentication.AuthenticationManager;
import org.springframework.security.authentication.UsernamePasswordAuthenticationToken;
import org.springframework.security.core.Authentication;
import org.springframework.security.core.AuthenticationException;
import org.springframework.security.core.userdetails.User;
import org.springframework.security.web.authentication.UsernamePasswordAuthenticationFilter;

import javax.servlet.FilterChain;
import javax.servlet.http.HttpServletRequest;
import javax.servlet.http.HttpServletResponse;
import java.io.IOException;
import java.util.ArrayList;
import java.util.Date;

public class AuthenticationFilter extends UsernamePasswordAuthenticationFilter
{
    private AuthenticationManager authenticationManager;

    public AuthenticationFilter(AuthenticationManager authenticationManager)
    {
        this.authenticationManager = authenticationManager;
        setFilterProcessesUrl("/login");
    }

    @Override
    public Authentication attemptAuthentication(HttpServletRequest request, HttpServletResponse response) throws AuthenticationException
    {
        try
        {
            com.betterjavacode.models.User creds = new ObjectMapper().readValue(request.getInputStream(), com.betterjavacode .models.User.class);
            return authenticationManager.authenticate(new UsernamePasswordAuthenticationToken(creds.getUsername(), creds.getPassword(),new ArrayList<>()));
        }
        catch(IOException e)
        {
            throw new RuntimeException("Could not read request" + e);
        }
    }

    protected void successfulAuthentication(HttpServletRequest request, HttpServletResponse response, FilterChain filterChain, Authentication authentication)
    {
        String token = Jwts.builder()
                .setSubject(((User) authentication.getPrincipal()).getUsername())
                .setExpiration(new Date(System.currentTimeMillis() + 864_000_000))
                .signWith(SignatureAlgorithm.HS512, "SecretKeyToGenJWTs".getBytes())
                .compact();
        response.addHeader("Authorization","Bearer " + token);
    }
}

Basically, a user will send credentials in a request to URL ending with /login . This filter will help to authenticate the user, if there is successful authentication, a Token will be added in response header with the key Authorization.

Token Validation and Authorization

We add another filter AuthorizationFilter to validate the token that we passed through AuthenticationFilter earlier. This filter will look like below:


package com.betterjavacode.SpringAppCache;

import io.jsonwebtoken.Jwts;
import org.springframework.security.authentication.AuthenticationManager;
import org.springframework.security.authentication.UsernamePasswordAuthenticationToken;
import org.springframework.security.core.context.SecurityContextHolder;
import org.springframework.security.web.authentication.www.BasicAuthenticationFilter;

import javax.servlet.FilterChain;
import javax.servlet.ServletException;
import javax.servlet.http.HttpServletRequest;
import javax.servlet.http.HttpServletResponse;
import java.io.IOException;
import java.util.ArrayList;


public class AuthorizationFilter extends BasicAuthenticationFilter
{
    public AuthorizationFilter(AuthenticationManager authenticationManager)
    {
        super(authenticationManager);
    }

    protected void doFilterInternal(HttpServletRequest request, HttpServletResponse response, FilterChain filterChain)
            throws IOException, ServletException
    {
        String header = request.getHeader("Authorization");
        if(header == null || !header.startsWith("Bearer"))
        {
            filterChain.doFilter(request,response);
            return;
        }

        UsernamePasswordAuthenticationToken authenticationToken = getAuthentication(request);
        SecurityContextHolder.getContext().setAuthentication(authenticationToken);
        filterChain.doFilter(request,response);
    }

    private UsernamePasswordAuthenticationToken getAuthentication(HttpServletRequest request)
    {
        String token = request.getHeader("Authorization");
        if(token != null)
        {
            String user = Jwts.parser().setSigningKey("SecretKeyToGenJWTs".getBytes())
                    .parseClaimsJws(token.replace("Bearer",""))
                    .getBody()
                    .getSubject();
            if(user != null)
            {
                return new UsernamePasswordAuthenticationToken(user, null, new ArrayList<>());
            }
            return null;
        }
        return null;
    }
}

If the validation of the token is successful, the application returns a user and assigns it to a security context.

To enable Spring security, we will add a new class WebSecurityConfiguration with annotation @EnableWebSecurity. This class will extend the standard WebSecurityConfigurerAdapter . In this class, we will restrict our APIs and also add some whitelisted URLs that we will need to access without any authorization token. This will look like below:


package com.betterjavacode.SpringAppCache;

import org.springframework.context.annotation.Bean;
import org.springframework.http.HttpMethod;
import org.springframework.security.config.annotation.authentication.builders.AuthenticationManagerBuilder;
import org.springframework.security.config.annotation.web.builders.HttpSecurity;
import org.springframework.security.config.annotation.web.builders.WebSecurity;
import org.springframework.security.config.annotation.web.configuration.EnableWebSecurity;
import org.springframework.security.config.annotation.web.configuration.WebSecurityConfigurerAdapter;
import org.springframework.security.config.http.SessionCreationPolicy;
import org.springframework.security.core.userdetails.UserDetailsService;
import org.springframework.security.crypto.bcrypt.BCryptPasswordEncoder;
import org.springframework.web.cors.CorsConfiguration;
import org.springframework.web.cors.CorsConfigurationSource;
import org.springframework.web.cors.UrlBasedCorsConfigurationSource;

@EnableWebSecurity
public class WebSecurityConfiguration extends WebSecurityConfigurerAdapter
{
    private BCryptPasswordEncoder bCryptPasswordEncoder;
    private UserDetailsService userDetailsService;

    private static final String[] AUTH_WHITELIST = {
            "/v2/api-docs",
            "/swagger-resources",
            "/swagger-resources/**",
            "/configuration/ui",
            "/configuration/security",
            "/swagger-ui.html",
            "/webjars/**"
    };

    public WebSecurityConfiguration(UserDetailsService userDetailsService, BCryptPasswordEncoder bCryptPasswordEncoder)
    {
        this.bCryptPasswordEncoder = bCryptPasswordEncoder;
        this.userDetailsService = userDetailsService;
    }


    protected void configure(HttpSecurity httpSecurity) throws Exception
    {
        httpSecurity.cors().and().csrf().disable().authorizeRequests()
                .antMatchers(AUTH_WHITELIST).permitAll()
                .antMatchers(HttpMethod.POST, "/cachedemo/v1/users/signup").permitAll()
                .anyRequest().authenticated()
                .and().addFilter(new AuthenticationFilter(authenticationManager()))
                .addFilter(new AuthorizationFilter(authenticationManager()))
                .sessionManagement().sessionCreationPolicy(SessionCreationPolicy.STATELESS);
    }

    public void configure(AuthenticationManagerBuilder authenticationManagerBuilder) throws Exception
    {
        authenticationManagerBuilder.userDetailsService(userDetailsService).passwordEncoder(bCryptPasswordEncoder);
    }

    @Bean
    CorsConfigurationSource corsConfigurationSource()
    {
        final UrlBasedCorsConfigurationSource source = new UrlBasedCorsConfigurationSource();
        source.registerCorsConfiguration("/**",new CorsConfiguration().applyPermitDefaultValues());
        return source;
    }
}

In method configure we have restricted most APIs, only allowing Swagger URLs and signup URL. We also add filters to HttpSecurity. We will add our own UserDetailsServiceImpl class to validate user credentials.


package com.betterjavacode.services;

import com.betterjavacode.models.User;
import com.betterjavacode.repositories.UserRepository;
import org.springframework.security.core.userdetails.UserDetails;
import org.springframework.security.core.userdetails.UserDetailsService;
import org.springframework.security.core.userdetails.UsernameNotFoundException;
import org.springframework.stereotype.Component;

import java.util.Collections;

@Component
public class UserDetailsServiceImpl implements UserDetailsService
{
    private UserRepository userRepository;

    public UserDetailsServiceImpl(UserRepository userRepository)
    {
        this.userRepository = userRepository;
    }

    @Override
    public UserDetails loadUserByUsername(String username) throws UsernameNotFoundException
    {
        User user = userRepository.findByUsername(username);
        if(user == null)
        {
            throw new UsernameNotFoundException(username);
        }
        return new org.springframework.security.core.userdetails.User(user.getUsername(), user.getPassword(), Collections.emptyList());
    }
}

Demo

With all the code changes, now we are ready to create a user, login and access secured REST APIs. From the image above, a user gets Access Denied error for accessing secured APIs. To demo this, I have already registered a user with username `test1` and password test@123.

Secure REST API - send use credentials to login

This POST request will give us Authorization token in response as shown above. Now using this token in our GET request to retrieve companies data. This GET request will look like below:

Secure REST API - Postman call

In this way, we showed how to secure REST API using JSON web token.

I will be launching the book “Simplifying Spring Security“. Do you want to get updates on launch? Sign up

References

  1. Implementing JWTs Authentication on Spring Boot API – JWT Authentication
  2. How to secure REST APIs – Secure REST APIs

Liquibase – Handling Database in Spring Boot

If you are building an application with Spring Boot, handling the database changes becomes a nightmare over time. The more changes you add, the more changes you have to maintain for your database. Liquibase is the best solution out there. In this post, we will show how to handle database changes using liquibase.

What is Liquibase?

Liquibase is an open-source library to track, manage, and apply database changes. Liquibase tracks the changes to database through an XML configuration where a developer will usually add changesets.

Each changeset will have an id and author attributes. Liquibase uses a changelog to track the database changes. Every changeset you add, that will get added in the changelog. Changelog is a ledger of all the changes you are doing to database.

How does Liquibase work?

To track database changes, you will write an XML file that is platform-independent. This XML file will be used on the command line to translate into scripts for your database engine.

We can also use a maven or Gradle plugin to include database changes in the build configuration.

Liquibase uses its own tables to track changes. Those tables will be part of the schema you are building for consistency purposes. It records the hash of each changeset.

How to write a changeset?

Previously, I mentioned you can write a changeset using XML. But liquibase also offers the support for JSON or YAML.

As part of this post, I will show how I add a changeset and generate scripts for the database.

Create an XML changelog file db.changelog-master.xml for our database under folder src\main\resources\db. Usually, if you start using liquibase from the start of the project, you will create an initial changelog file that will generate initial scripts. You can track every change after that through a change set.

The file without any changeset will look like below:


<databaseChangeLog xmlns="http://www.liquibase.org/xml/ns/dbchangelog"
                   xmlns:xsi="http://www.w3.org/2001/XMLSchema-instance" xmlns:ext="http://www.liquibase.org/xml/ns/dbchangelog-ext"
                   xsi:schemaLocation="http://www.liquibase.org/xml/ns/dbchangelog http://www.liquibase.org/xml/ns/dbchangelog/dbchangelog-3.1.xsd
    http://www.liquibase.org/xml/ns/dbchangelog-ext http://www.liquibase.org/xml/ns/dbchangelog/dbchangelog-ext.xsd">
</databaseChangeLog>

Now I can handle this master file in two ways. For each changeset, I can create a separate file and include that file in the master file OR I can add every changeset in the same master file.

Each changeset needs an author and unique id.

Now we will add changeset to this changelog file and it will look like below:


<databaseChangeLog xmlns="http://www.liquibase.org/xml/ns/dbchangelog"
                   xmlns:xsi="http://www.w3.org/2001/XMLSchema-instance" xmlns:ext="http://www.liquibase.org/xml/ns/dbchangelog-ext"
                   xsi:schemaLocation="http://www.liquibase.org/xml/ns/dbchangelog http://www.liquibase.org/xml/ns/dbchangelog/dbchangelog-3.1.xsd
    http://www.liquibase.org/xml/ns/dbchangelog-ext http://www.liquibase.org/xml/ns/dbchangelog/dbchangelog-ext.xsd">

    <changeSet author="Yogesh Mali" id="jira-ticket-01">
        <createTable tableName="user">
            <column name="id" type="int">
                <constraints primaryKey="true" nullable="false"/>
            </column>
            <column name="guid" type="varchar(50)">
            </column>
            <column name="firstname" type="varchar(100)">
                <constraints nullable="false"/>
            </column>
            <column name="middlename" type="varchar(100)"></column>
            <column name="lastname" type="varchar(100)"></column>
            <column name="email" type="varchar(100)">
                <constraints nullable="false"/>
            </column>
            <column name="companyid" type="int"></column>
            <column name="roleid" type="int"></column>
        </createTable>
        <createTable tableName="company">
            <column name="id" type="int">
                <constraints primaryKey="true" nullable="false"/>
            </column>
            <column name="guid" type="varchar(50)">
                <constraints nullable="false"/>
            </column>
            <column name="name" type="varchar(50)">
                <constraints nullable="false"/>
            </column>
            <column name="type" type="varchar(10)"></column>
        </createTable>
        <createTable tableName="role">
            <column name="id" type="int">
                <constraints primaryKey="true" nullable="false"/>
            </column>
            <column name="role_name" type="varchar(20)">
                <constraints nullable="false"/>
            </column>
        </createTable>
        <addForeignKeyConstraint baseTableName="user" baseColumnNames="companyid"
                                  constraintName="company_fk" referencedTableName="company"
                                  referencedColumnNames="id" />
        <addForeignKeyConstraint baseTableName="user" baseColumnNames="roleid"
                                  constraintName="role_fk" referencedTableName="role"
                                  referencedColumnNames="id"/>
    </changeSet>
</databaseChangeLog>

Now we are ready to create liquibase Bean in our Spring Boot project. We will have to add the following property in our application.properties file.

spring.liquibase.changeLog=classpath:/db/db.changelog-master.xml.

Also, don’t forget to add database properties in application.properties file.


spring.datasource.url=jdbc:mysql://127.0.0.1/demo
spring.datasource.username = sa
spring.datasource.password=password
spring.datasource.driver-class-name=com.mysql.jdbc.Driver
spring.liquibase.changeLog=classpath:/db/db.changelog-master.xml

Before we run our Spring Boot Project, add liquibase dependency in our gradle project.

compile('org.liquibase:liquibase-core:4.0.0').

Now if we run our Spring Boot project, we will see the database tables created in the log messages as follows:


2020-07-26 12:22:24.362  INFO 32412 --- [           main] liquibase.lockservice                    : Successfully acquired change log lock
2020-07-26 12:22:25.314  INFO 32412 --- [           main] liquibase.changelog                      : Creating database history table with name: blogdemo.DATABASECHANGELOG
2020-07-26 12:22:25.345  INFO 32412 --- [           main] liquibase.changelog                      : Reading from blogdemo.DATABASECHANGELOG
2020-07-26 12:22:25.427  INFO 32412 --- [           main] liquibase.changelog                      : Table user created
2020-07-26 12:22:25.443  INFO 32412 --- [           main] liquibase.changelog                      : Table company created
2020-07-26 12:22:25.458  INFO 32412 --- [           main] liquibase.changelog                      : Table role created
2020-07-26 12:22:25.520  INFO 32412 --- [           main] liquibase.changelog                      : Foreign key constraint added to user (companyid)
2020-07-26 12:22:25.588  INFO 32412 --- [           main] liquibase.changelog                      : Foreign key constraint added to user (roleid)
2020-07-26 12:22:25.588  INFO 32412 --- [           main] liquibase.changelog                      : ChangeSet db/db.changelog-master.xml::jira-ticket-01::Yogesh Mali ran successfully in 186ms
2020-07-26 12:22:25.600  INFO 32412 --- [           main] liquibase.lockservice                    : Successfully released change log lock


As part of this execution, liquibase also created the tables databasechangelog and databasechangeloglock. Liquibase uses these tables to track the changes for the database. If you add another changeset in the changelog file, liquibase will identify that changeset based on previous changes and will perform appropriate action next time you run the application.

Conclusion

In this post, I showed how to use liquibase to handle database changes in a Spring Boot project.

One thing, I didn’t discuss in this post is another database migration tool Flyway. Flyway is also an open-source database migration tool.

If you enjoyed this post, subscribe to my blog here.

References

How to Create an Application with Spring Boot and ReactJS

In this post, I will show how we can create an application with Spring Boot and ReactJS.

We will use ReactJS for frontend and Spring Boot for handling business logic in the backend. We will use MySQL as a database. The application we are building is a to-do list application.

We will cover the following instructions in this post:

  • Set up Spring Boot application
  • Set up MySQL Database
  • Details of Spring Boot Application
  • Install ReactJS and set up frontend
  • Test the application on the local environment

Set up Spring Boot Application

I usually use https://start.spring.io/ to set up a boilerplate Spring Boot application with required dependencies. As part of this project, we will use spring-data-jpa, spring-data-rest, jdbc, and web dependencies. Our Gradle file will look like below:


plugins {
	id 'org.springframework.boot' version '2.3.1.RELEASE'
	id 'io.spring.dependency-management' version '1.0.9.RELEASE'
	id 'java'
}

group = 'com.betterjavacode.'
version = '0.0.1-SNAPSHOT'
sourceCompatibility = '1.8'

repositories {
	mavenCentral()
}

dependencies {
	implementation 'org.springframework.boot:spring-boot-starter-data-jpa'
	implementation 'org.springframework.boot:spring-boot-starter-data-rest'
	implementation 'org.springframework.boot:spring-boot-starter-jdbc'	
	implementation 'org.springframework.boot:spring-boot-starter-web'
	runtimeOnly 'mysql:mysql-connector-java'
	testImplementation('org.springframework.boot:spring-boot-starter-test') {
		exclude group: 'org.junit.vintage', module: 'junit-vintage-engine'
	}
}

test {
	useJUnitPlatform()
}

Once we created the project at https://start.spring.io, we can download it and import it in IntelliJ or Eclipse.

Set up MySQL Database

For the To-Do list application, we will need a database and a single table. This demo is a barebone application, so we won’t have any login or registration screen.

Since we will be connecting to the database from our Spring Boot application, we will need to set up our application.properties as follows:


spring.datasource.url=jdbc:mysql://127.0.0.1/todolist?autoReconnect=true&useSSL=false
spring.datasource.username = sa
spring.datasource.password=********
spring.datasource.driver-class-name=com.mysql.cj.jdbc.Driver
spring.jpa.show-sql=true
spring.jpa.properties.hibernate.dialect = org.hibernate.dialect.MySQL5Dialect
spring.datasource.hikari.connection-test-query=SELECT 1

You can use GUI to connect to your MySQL database, I usually prefer the command-line approach.

Once you login to your MySQL database on the command line, create a database for our application.

create database todolist

We will create a database table task.

create table task (id int(6) unsigned not null auto_increment, taskname varchar(100) not null, duedate date default null, status int(1), primary key(id));

We can either have some data inserted or have our home page of the application showing the form to insert the data.

Details of Spring Boot Application

Firstly, we will create a model class for task. This class will look like below:


package com.betterjavacode.demo.models;

import com.fasterxml.jackson.annotation.JsonFormat;

import javax.persistence.*;
import java.io.Serializable;
import java.util.Date;

@Entity(name="Task")
@Table(name="task")
public class Task implements Serializable
{
    private static final long serialVersionUID = 1L;

    public Task()
    {

    }

    @Id
    @GeneratedValue(strategy = GenerationType.IDENTITY)
    @Column(name="id", nullable = false)
    private int id;

    @Column(name = "taskname", nullable=false)
    private String taskname;

    @Column(name = "duedate")
    @JsonFormat(pattern="yyyy-MM-dd")
    private Date dueDate;

    @Column(name = "status")
    private String status;

    @Override
    public String toString()
    {
        return "Task = { id = " + id + ", taskname = " + taskname + ", duedate = " + dueDate
                + ", status = " + status + "}";
    }

    public int getId ()
    {
        return id;
    }

    public void setId (int id)
    {
        this.id = id;
    }

    public String getTaskname ()
    {
        return taskname;
    }

    public void setTaskname (String taskname)
    {
        this.taskname = taskname;
    }

    public Date getDueDate ()
    {
        return dueDate;
    }

    public void setDueDate (Date dueDate)
    {
        this.dueDate = dueDate;
    }

    public String getStatus ()
    {
        return status;
    }

    public void setStatus (String status)
    {
        this.status = status;
    }
}

In this development, we will have a Controller that will handle our rest service and a manager that will handle business layer logic.

The implementation of the manager will look like below:


package com.betterjavacode.demo.managers;

import com.betterjavacode.demo.models.Task;
import com.betterjavacode.demo.repositories.TaskRepository;
import org.springframework.beans.factory.annotation.Autowired;

import java.util.List;
import java.util.Optional;

public class TaskManagerImpl implements TaskManager
{

    @Autowired
    private TaskRepository taskRepository;

    @Override
    public Task createTask (Task task)
    {
        Task t = taskRepository.save(task);
        return t;
    }

    @Override
    public Task updateTask (Task task)
    {
        Task t = taskRepository.save(task);
        return t;
    }

    @Override
    public Task getTask (int id)
    {
        Optional task = taskRepository.findById(id);
        return task.get();
    }

    @Override
    public List getAllTasks ()
    {
        List tasks = (List) taskRepository.findAll();
        return tasks;
    }

    @Override
    public void deleteTask (int id)
    {
        taskRepository.deleteById(id);
    }
}


And our RestController will look like below:


package com.betterjavacode.demo.controllers;


import com.betterjavacode.demo.managers.TaskManager;
import com.betterjavacode.demo.models.Task;
import org.springframework.beans.factory.annotation.Autowired;
import org.springframework.web.bind.annotation.*;

import java.util.List;

@RestController
@RequestMapping("/api")
@CrossOrigin(origins = "http://localhost:8080")
public class TaskController
{
    @Autowired
    private TaskManager taskManager;

    @GetMapping("/tasks")
    public List get()
    {
        return taskManager.getAllTasks();
    }

    @PostMapping("/task")
    public Task save(@RequestBody Task task)
    {
        return taskManager.createTask(task);
    }

    @GetMapping("/task/{id}")
    public Task get(@PathVariable int id)
    {
        return taskManager.getTask(id);
    }

    @DeleteMapping("/task/{id}")
    public String delete(@PathVariable int id)
    {
        taskManager.deleteTask(id);
        return "Task with id " + id + " removed";
    }

}


Now we can test these REST APIs through POSTMAN. I will not be showing that, but if you are interested you can download postman.

Install ReactJS and Set up Frontend

For frontend UI, we will be using ReactJS. Few things, you will need to use ReactJS are npm, nodejs, and create-react-app.

Once you install these three components, we are ready to use ReactJS for our current Spring Boot application.

On command-line, go to the root directory where we have the Spring Boot application. Create a react app using the following command:

npx create-react-app frontend

If you go into frontend directory on command-line, you will be able to start the frontend and it will show you the default screen of ReactJS application.

To make sure the application works smoothly, we will need couple of libraries. We will install them as follows:

npm install react-router
npm install @material-ui/core
npm install @material-ui/icons

react-router is a standard library from React that keeps your UI in sync with the URL, provides dynamic route matching, location transitioning, and lazy code handling features.

core and icons are libraries for frontend components.

We will add a proxy in package.json so that we don’t have to write an entire URL when we make call to backend API.

proxy: http://localhost:8080

Now let’s look at component files.

  1. App.jsIn this file, we will define our app route using react router. AddTask will serve as the homepage. We will redirect a user to view page to see a list of tasks.

import React, {Component} from 'react';
import AddTask from "./Component/AddTask";
import { Route,BrowserRouter as Router} from 'react-router-dom';
import Table from "./Component/Table"

class App extends Component{
	render(){
		return(


			);
	}
}

export default App;

2. AddTask.js

This will be the entry of our application. In this file, we will have a form to add a task. Once the user enters all the required information, we will send a POST request to server-side code. This file will look like below:


import React from "react";
import Avatar from "@material-ui/core/Avatar";
import Button from "@material-ui/core/Button";
import CssBaseline from "@material-ui/core/CssBaseline";
import TextField from "@material-ui/core/TextField";
import { Link } from "react-router-dom";
import Grid from "@material-ui/core/Grid";
import GroupIcon from "@material-ui/icons/Group";
import Typography from "@material-ui/core/Typography";
import { makeStyles } from "@material-ui/core/styles";
import Container from "@material-ui/core/Container";

const useStyles = makeStyles(theme => ({
  paper: {
    marginTop: theme.spacing(7),
    display: "flex",
    flexDirection: "column",
    alignItems: "center"
  },
  avatar: {
    margin: theme.spacing(1),
    backgroundColor: theme.palette.secondary.main
  },
  form: {
    width: "100%", // Fix IE 11 issue.
    marginTop: theme.spacing(3)
  },
  submit: {
    margin: theme.spacing(3, 0, 2)
  },
  textField: {
    marginLeft: theme.spacing(1),
    marginRight: theme.spacing(1),
    width: "100%"
  }
}));

export default function AddTask(){
    const classes = useStyles();
    const[firstLoad, setLoad] = React.useState(true);

    const [selectedDate, setSelectedDate] = React.useState(
        new Date()
    );

    const [taskname, setTaskname] = React.useState("Write Code");
    const [status, setStatus] = React.useState("Active");

    const handleDateChange = event => setSelectedDate(event.target.value);
    const handleTasknameChange = event => setTaskname(event.target.value);
    const handleStatusChange = event => setStatus(event.target.value);

    const [message, setMessage] = React.useState("Nothing saved in the session");

    async function sampleFunc(toInput){
    	const response = await fetch("/api/task",{
			method : "POST",
			cache : "no-cache",
			credentials : "include",
			headers : {
				"Content-Type":"application/json"
			},
			redirect : "follow",
			referrerPolicy: "no-referrer", // no-referrer, *client
	      	body: JSON.stringify(toInput)

    	});
    	let body = await response.json();
    	//console.log(body.id);
    	setMessage(body.id ? "Data successfully updated" : "Data updation failed");
    }

    const handleSubmit = variables => {
    	const toInput = {taskname,status, dueDate:selectedDate};
    	sampleFunc(toInput);
    	setTaskname("");
    	setStatus("");
    };

    if(firstLoad){
    	setLoad(false);
    }

    return(
    	<Container component="main" maxWidth="xs">
    	   <CssBaseline />
    	   <div className={classes.paper}>
    	   	<Avatar className={classes.paper}>
    	   	   <GroupIcon />
    	   	</Avatar>
    	   	<Typography component="h1" variant="h5">
    	   	  Tasks
    	   	</Typography>
    	   	<form className={classes.form} noValidate>
    	   	   <Grid container spacing={2}>
    	   	    <Grid item xs={12}>
    	   	      <TextField
    	   	         variant = "outlined"
    	   	         required
			 	     fullWidth
			         id="taskname"
			         value={taskname.text}
			         label="Taskname"
			         name="taskname"
			         autoComplete="taskname"
			         onChange={handleTasknameChange}
              		/>
		   </Grid>
		   <Grid item xs={12} sm={6}>
		                 <TextField
		                   autoComplete="status"
		                   name="status"
		                   variant="outlined"
		                   required
		                   fullWidth
		                   value={status.text}
		                   id="status"
		                   label="Status"
		                   onChange={handleStatusChange}
		                 />
                   </Grid>
                   <Grid item xs={12}>
		                 <TextField
		                   id="date"
		                   label="Due Date"
		                   type="date"
		                   defaultValue={""}
		                   className={classes.textField}
		                   InputLabelProps={{
		                     shrink: true
		                   }}
		                   onChange={handleDateChange}
		                 />
                  </Grid>
                 </Grid>
                 <Button
		             // type="submit"
		             fullWidth
		             variant="contained"
		             color="primary"
		             preventDefault
		             className={classes.submit}
		             onClick={handleSubmit}
		           >
		             Save
                 </Button>
                 <Grid container justify="center">
		            <Grid item>
		               <Link to="/view">View Tasks</Link>
		            </Grid>
		 </Grid>
              </form>
    	      <Typography style={{ margin: 7 }} variant="body1">
	              Status: {message}
	      </Typography>
	    </div>
       </Container>    );
}

3. Table.js

This file we get the list of tasks from our database table through an API call to Spring Boot REST API. It will also show all the entries in table form.


import React from "react";
import { makeStyles } from "@material-ui/core/styles";
import Table from "@material-ui/core/Table";
import TableBody from "@material-ui/core/TableBody";
import TableCell from "@material-ui/core/TableCell";
import TableContainer from "@material-ui/core/TableContainer";
import TableHead from "@material-ui/core/TableHead";
import TableRow from "@material-ui/core/TableRow";
import Paper from "@material-ui/core/Paper";
import Avatar from "@material-ui/core/Avatar";
import GroupIcon from "@material-ui/icons/Group";
import { Link } from "react-router-dom";
import Typography from "@material-ui/core/Typography";
import CircularProgress from "@material-ui/core/CircularProgress";

const useStyles = makeStyles(theme => ({
  table: {
    minWidth: 600
  },
  avatar: {
    margin: theme.spacing(1),
    backgroundColor: theme.palette.secondary.main
  },
  paper: {
    display: "flex",
    flexDirection: "column",
    justifyContent: "center",
    alignItems: "center",
    margin: `10px`,
    height: "100%",
    width: "99%",
    marginTop: theme.spacing(7)
  },
  link: {
    color: "rgba(0,0,0,0.65)",
    textDecoration: "none",
    marginLeft: "10%",
    alignSelf: "flex-start",
    "&:hover": {
      color: "rgba(0,0,0,1)"
    }
  }
}));

export default function SimpleTable() {
  const classes = useStyles();

  const [data, upDateData] = React.useState([]);
  const [firstLoad, setLoad] = React.useState(true);
  let isLoading = true;

  async function sampleFunc() {
    let response = await fetch("/api/tasks");
    let body = await response.json();
    upDateData(body);
  }

  if (firstLoad) {
    sampleFunc();
    setLoad(false);
  }

  if (data.length > 0) isLoading = false;

  return (
    <div className={classes.paper}>
      <Avatar className={classes.avatar}>
        <GroupIcon />
      </Avatar>
      <Typography component="h1" variant="h5">
        All Tasks
      </Typography>

      {isLoading ? (
        <CircularProgress />
      ) : (
        <TableContainer
          style={{ width: "80%", margin: "0 10px" }}
          component={Paper}
        >
          <Table className={classes.table} aria-label="simple table">
            <TableHead>
              <TableRow>
              	<TableCell align="center">No.</TableCell>
                <TableCell align="center">Taskname</TableCell>
                <TableCell align="center">Status</TableCell>
                <TableCell align="center">Due Date</TableCell>
              </TableRow>
            </TableHead>
            <TableBody>
              {data?.map(row => (
                <TableRow key={row.taskname}>
                  <TableCell align="center">{row.id}</TableCell>
                  <TableCell align="center">{row.taskname}</TableCell>
                  <TableCell align="center">{row.status}</TableCell>
                  <TableCell align="center">{row.dueDate}</TableCell>
                </TableRow>
              ))}
            </TableBody>
          </Table>
        </TableContainer>
      )}
      <Link className={classes.link} to="/">
        {" "}
        <Typography align="left">
          &#x2190; Head back to save data
        </Typography>{" "}
      </Link>
    </div>
  );
}


With that change, we complete most of our code changes on the frontend and backend side.

Test the application in the local environment

Now to run the application, start Spring Boot application either on command-line or in your editor

To start the frontend, use the following command from the frontend folder:

npm start

This will start the localhost at 3000 port as below:

Create an application with Spring Boot and ReactJS

Now if I click on View Tasks, it will take me to list of tasks as follows:

Create an application with Spring Boot and ReactJS

Conclusion

In this post, we showed how to create an application with Spring Boot and ReactJS.  You can follow me on twitter if you have any questions. The code for this is available on Github repository. If you are looking for how to create a similar application with AngularJS, you can visit my post here.

References

  1. ReactJS – ReactJS Home
  2. Spring boot and ReactJS – Spring Boot and ReactJS