Category Archives: Programming

How To: AngularJS User Interface to CRUD Spring Boot REST API

In this post, we will add an user interface using AngularJS to the REST api we created here.

Controller for home page

First we will create a controller in Spring Boot rest API to call our home page. All the requests that will come to web server, will go through this controller and the controller will return a home page for the request based on path.

MainController.java will look like below:

package com.betterjavacode.benefits.controller;

import org.apache.logging.log4j.LogManager;
import org.apache.logging.log4j.Logger;
import org.springframework.stereotype.Controller;
import org.springframework.web.bind.annotation.RequestMapping;
import org.springframework.web.bind.annotation.RequestMethod;

@Controller
public class MainController 
{

     public static final Logger LOGGER = LogManager.getLogger(MainController.class);

     @RequestMapping(value = "/home", method = RequestMethod.GET)
     public String homepage() 
     {
         LOGGER.info(" Enter >> homepage() ");
         return "index";
     }
}

Any request coming to https://localhost:8443/home will return a page from index.html.

Create a Home Page

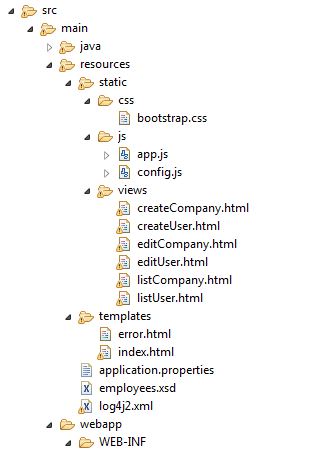
Now, we will create an index.html page. We will also be using angular JS framework as part of this home page so that we can build a single page application. If you are not aware of Angular JS or new to this framework, you can read about it AngularJS. One thing to remember while creating this page is a directory structure. Lot of issues that arise to create html pages are because of directory structure. Directory structure will look like below:

directorystructure

The home page index.html page is under main/resources/templates/ directory and it looks like below

<html ng-app="benefitApp">

<head><meta http-equiv="Content-Type" content="text/html; charset=ISO-8859-1" /><title>Benefit Application</title>

<script>document.write('<base href="' + document.location + '" />');</script>

<link rel="stylesheet" href="/css/bootstrap.css" />

<script src="https://code.angularjs.org/1.6.1/angular.js"></script>

<script src="https://cdnjs.cloudflare.com/ajax/libs/angular.js/1.6.1/angular-route.js"></script>

<script src="https://cdnjs.cloudflare.com/ajax/libs/angular.js/1.6.1/angular-resource.js"></script>

<script type="text/javascript" src="./js/app.js"></script>

</head>

<body ng-controller="MainCtrl">

Hello {{name}}!
<div>
<ul class="menu">
<li><a href="listUser">user-list</a></li>
<li><a href="listCompany">company-list</a></li>
</ul>
<div ng-view="ng-view"></div>
</div>
</body></html>

Home page shows that this is an angular app with name benefitApp. This also declares a controller MainCtrl with an angular view. Important to see we are importing angular.js, angular-route.js and angular-resource.js modules. Click on user-list or company-list, will show list of users and list of companies respectively.

Create a controller

Now to handle the controller (MainCtrl), we added in index.html, we will add app.js which will declare the controller. This javascript file also contains config data to handle all the routing of pages. That’s why we will be importing “ngRoute” and “ngResource” angular modules.

var app = angular.module('benefitApp', ['ngRoute','ngResource']);

var app = angular.module('benefitApp', ['ngRoute','ngResource']);
app.controller('MainCtrl', function($scope, $routeParams) {

$scope.name = 'World';

$scope.$routeParams = $routeParams;

})


Through out the interaction on web pages, we will be using different controllers for editing user or company information and creating user or company. The same file app.js will also handle routing of these pages which is shown below

app.config(function($routeProvider,$locationProvider) {

$locationProvider.html5Mode(true);

$routeProvider.when('/listUser',

{templateUrl: 'views/listUser.html', controller: 'userController'});

$routeProvider.when('/listCompany',

{templateUrl: 'views/listCompany.html', controller: 'companyController'});

$routeProvider .when('/editUser/:userId',

{ templateUrl : 'views/editUser.html' }) ;

$routeProvider .when('/editCompany/:companyId',

{ templateUrl : 'views/editCompany.html' }) ;

$routeProvider.when('/createUser',

{templateUrl:'views/createUser.html'});

$routeProvider.when('/createCompany',

{templateUrl:'views/createCompany.html'});

});

Rest of the code showing all controllers’ logic has been skipped for post purposes. It is available on github repository.

UserController or CompanyController are calling rest apis which we have built using Spring boot.

Demo

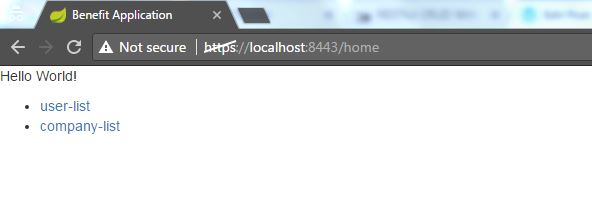
Now build the code and run our embedded tomcat webserver. Fire up the url https://localhost:8443/home – it will look like below:

Home Page created with AngularJS for CRUD REST API

Click on user-list and it will show list of users inside the same page as below:

List of User Page created with AngularJS

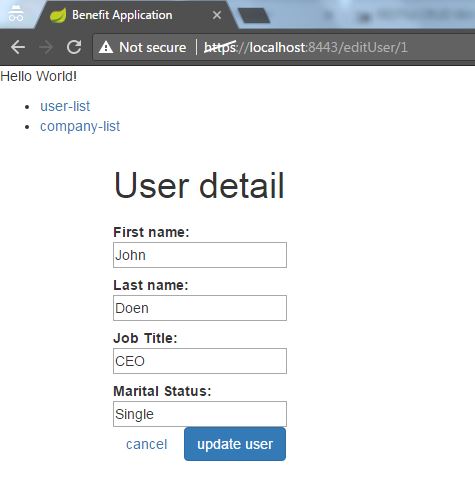
Click on edit button and we will see a form to update user information:

edituserpage

Download –

In this post, we showed how to create a simple CRUD user interface using angular JS for Spring Boot REST API. The code for this is available in repository


Design Pattern – Abstract Factory Pattern – Part IV

In the continuation of design pattern series, we have covered IntroductionSingleton Pattern and Factory Pattern. In current post, we will cover the next creational type of design pattern and that is Abstract Design Pattern.

So what is an abstract factory pattern?

It’s an interface to create families of related or dependent objects without client knowing the implementation details.

Difference between abstract factory pattern and factory pattern

Firstly, one common theme between these two patterns is that they decouple the client system from implementation details.

  • Factory pattern creates object through inheritance.
  • Abstract factory pattern creates object through composition.
  • Abstract factory provides an interface to create family of related objects.
  • Factory pattern aka factory method pattern is inherited in subclasses to create concrete objects.

In previous post, we saw an interface vehicle, implemented by different classes Car, Bus, Motorcycle, Truck and a class VehicleFactory returned different classes.

Likewise, abstract Factory pattern gives a layer of abstraction over regular factory pattern. In the process it isolates factories. The pattern returns factories of related objects. So If I want a car of Toyoto types, it can return me factories of Camry, Corolla, Avalanche etc.

Therefore, to show Abstract Factory pattern, we will create an abstract class which will return car mileage. This will look like below:

public abstract class CarMileage 
{
   protected double distance;
   protected double gas;

   public abstract void getCarMileage(double dist, double gasfilled);

   public void calculateCarMileage(double dist, double gasfilled) 
   {
     double carmileage = dist / gasfilled;
     System.out.println(" Your car mileage is " + carmileage);
   }
}


Now each related concrete class will extend this class to return us car mileage. We will have Camry, Corolla and Avalanche as different car of types Toyota. However, as part of this pattern, we will add an abstract class that will return me factories of car mileage. This is shown as below:

public abstract class AbstractFactory 
{
   public abstract CarMileage getCarMileage(String car);
}


A concrete subclass CarFactory of AbstractFactory, will return us different car mileage based on the car name we have passed.

public class CarFactory extends AbstractFactory 
{

  @Override
  public CarMileage getCarMileage(String car) 
  {

     if (car == null || car.equals("")) 
     {
       return null;
     } 
     if (car.equalsIgnoreCase("camry")) 
     {
       return new CamryCarMileage();
     } 
     else if (car.equalsIgnoreCase("corolla")) 
     {
       return new CorollaCarMileage();
     } 
     else if (car.equalsIgnoreCase("avalanche")) 
     {
       return new AvalanceCarMileage();
     }
     return null;
  }

}


To demo this by implementing a client class which will ask user input for carname, distance covered and gas filled. Based on carname, AbstractFactory will return us a factory for CarMileage. This factory of CarMileage will return us calculated car mileage for that car.

public class AbstractFactoryPatternDemo 
{
   public static void main(String[] args) throws IOException 
   {
      BufferedReader br = new BufferedReader(new InputStreamReader(System.in));
      System.out.println(" Enter the car name you want mileage for: ");
      String carname = br.readLine();
      System.out.println("\n");
      System.out.println("Enter the distance covered: ");

      String distanceStr = br.readLine();
      double distance = Double.parseDouble(distanceStr);
      System.out.println("\n");
      System.out.println("Enter the gas you had filled: ");
      System.out.println("\n");
      String gasStr = br.readLine();
      double gas = Double.parseDouble(gasStr);

      AbstractFactory af = FactoryCreator.getFactory();
      CarMileage cm = af.getCarMileage(carname);

      cm.getCarMileage(distance, gas);

   }

}


In conclusion, we showed how to use abstract factory patterns. If we want to create a family of related objects but without specifying their concrete sub-classes, this is our go-to pattern.

Download

The code for this post is available github repo.

Design Patterns – Factory Pattern – Part III

In this article, we will see how to use a factory pattern. Factory pattern is a creational type of design pattern, in short, it provides a way to create objects. Another important point to note about this design pattern is that client who uses factory pattern is not aware of the implementation of the factory pattern.

Even in our previous post Spring Boot REST CRUD API, we have used factory pattern to implement managers at the service level. As part of this post, we will show another example of the factory pattern. Factory pattern mainly used in cases when a client just needs a class/object that can handle the job of doing the work at runtime without knowing any details of how it was implemented.

To show how to implement a factory pattern, let’s assume we have different types of vehicles and we want to know what their maximum speed is.

Create an interface –

Our interface of the vehicle will have a method to return the max speed of the vehicle.

package com.betterjavacode.designpatterns.factoryexample;

public interface Vehicle 
{
    void speed();
}

Now, we will have different classes (car, truck,bus,motorcycle) that will implement this interface to return their maximum speed. For article purposes, we will only be showing one class.

package com.betterjavacode.designpatterns.factoryexample;

public class Car implements Vehicle 
{
  public void speed()
  {
     System.out.println("Max Speed of this car is 100 mph");
   }
}

To get an instance of an object, we will create a factory class. This will return an appropriate instance of vehicle object based on vehicle type.

package com.betterjavacode.designpatterns.factoryexample;

public class VehicleFactory 
{

  public Vehicle getVehicle(String vehicleType)
  {
     if (vehicleType == null)
     {
        return null;
     }
     if (vehicleType.equalsIgnoreCase("car")) 
     {
        return new Car();
     }
     if (vehicleType.equalsIgnoreCase("bus")) 
     {
        return new Bus();
     }
     if (vehicleType.equalsIgnoreCase("motorcycle"))
     {
        return new Motorcycle();
     }
     if ( vehicleType.equalsIgnoreCase("truck"))
     {
        return new Truck();
     }
     return null;
}

}

A factory pattern demo class will get any of object of type vehicle at runtime.

package com.betterjavacode.designpatterns;

import com.betterjavacode.designpatterns.factoryexample.Vehicle;
import com.betterjavacode.designpatterns.factoryexample.VehicleFactory;

public class FactoryPatternDemo
{
    public static void getSpeed(String vehicleType) 
    {
       VehicleFactory vehicleFactory = new VehicleFactory();
       Vehicle veh1 = vehicleFactory.getVehicle(vehicleType);
       veh1.speed();
     }  
}

In this example, we have shown how to implement a design pattern type factory pattern. The code for this is available design patterns.

References

  1. Factory Pattern Example
  2. Factory Pattern

Design Patterns – Singleton Pattern – Part II

In this post, we will discuss the Singleton Design Pattern which is of Creational type design pattern. You can check out the introductory post about design patterns here.

Singleton Design Pattern

Singleton design pattern is the simplest design patterns in software engineering. As Singleton is a creational type of design pattern,  you can create an object using it, but only a single object.

In this design pattern, a single class creates an object but also makes sure that only a single object is created. This class provides a way to access the object, so as to avoid the need to instantiate the object.

Implementation of Singleton Design Pattern

In this design pattern, a class will have a private constructor and a static method to provide access to static members of the class instance. Most of the time singleton pattern is used in logger and configuration classes implementation.

package com.betterjavacode.designpatterns;

public class SingletonDemo 
{
    private static SingletonDemo demo;

    private SingletonDemo()
    {

    }

    public static SingletonDemo getInstance()
    {
      if (demo == null)
         demo = new SingletonDemo();
      return demo;
    }

    public void printSingletonDemo()
    {
       System.out.println(" This is a singleton design pattern demo ");
    }
}

Now any client code who wants to use SingletonDemo class can do this with SingletonDemo.getInstance(). The major advantage of the Singleton design pattern is it allows only one instance of an object.

Conclusion

In conclusion, among all design patterns, we started this series with a Singleton design pattern.

Download

The code for this post is available to download design patterns.


Design Patterns in Java – Introduction

In the next few posts, I will write a series of posts to discuss design patterns in Java. I will give an introduction to design patterns. What design patterns are? How to use them? I will describe design patterns in Java.

What are design patterns?

Firstly, design patterns are programming and design strategies. These are independent of programming languages. Design patterns are mostly used to build a solution for common object-oriented programming problems. Secondly, one of the major benefits of design patterns is that most code is reusable and easily maintainable. However, a design pattern is a repeatable solution to a commonly occurring problem in software design.

Design patterns speed up the process of development. Nevertheless, the design patterns differ in their complexity. Hence, using them takes some practice. Overusing design patterns can complicate the design and your system. Especially, design patterns should simplify the design and not complicate it.

Example of design pattern in the real world?

Therefore, to understand what exactly design patterns are, let’s consider a real-life example. Suppose we have an animal class. The subclasses for the animal class will be Elephant, Dog, Cat. I show these classes below.

Likewise, an abstract factory is a design pattern, that can be used in this example.

abstract class AbstractAnimalFactory
{

   public Elephant makeElephant() 
   {
     return new Elephant();
   }

   public Dog makeDog(){
     return new Dog();
   }
}


abstract class Animal
{


}

class Elephant extends Animal
{


}

class Dog extends Animal
{


}

Types of design patterns

Consequently, based on their purpose, design patterns are divided into three types of patterns creational, structural, and behavioral. Moreover, each of these design patterns has sub-types.

Creational Design Pattern

  • Singleton Design Pattern
  • Factory Pattern
  • Absolute factory Pattern
  • Builder Pattern
  • Prototype Pattern

Structural Design Pattern

  • Adapter Pattern
  • Composite Pattern
  • Proxy Pattern
  • Flyweight Pattern
  • Facade Pattern
  • Bridge Pattern
  • Decorator Pattern

Behavioral Design Pattern

  • Template Method Pattern
  • Mediator Pattern
  • Chain of responsibility Pattern
  • Observer Pattern
  • Strategy Pattern
  • Command Pattern
  • State Pattern
  • Visitor Pattern
  • Interpreter Pattern
  • Iterator Pattern
  • Memento Pattern

So, we will discuss each design pattern with a production-ready example.

Advantages of design patterns

  1. Reusable in multiple projects
  2. Capture the complete experience of software engineering
  3. Provide clarity to system architecture

Conclusion

In conclusion, we discussed an introduction to design patterns. Besides, there is some criticism about design patterns that I have not talked about.  Furthermore, I will build actual design patterns to show how design patterns work. If you enjoyed this post, subscribe to my blog here.

References

  1. Design patterns in Java
  2. Design Patterns Brief Introduction