Category Archives: Programming

Example of Spring Boot Application Authentication with AWS Cognito

In this post, I plan to show an example of Spring Boot Application authentication with AWS Cognito. I will show two flows –

  1. OIDC Authentication
  2. SAML Authentication

AWS Cognito

AWS Cognito is a web service from AWS. Cognito is a user directory as well as an authentication mechanism service. In the enterprise industry, every application has two requirements from a user perspective.

  1. User Directory and Synchronization
  2. User Authentication

Cognito makes this easier by allowing the creation of a user pool or an identity pool. Once you have a pool, you can configure an application with the various settings for authentication. Another major advantage of Cognito is that it offers industry-standard security authentication protocols like OAuth 2.0, OpenID Connect, SAML.

There are equally other features like user access handling, but we won’t go into detail about that as part of this post. In this post, I will further show how we can create a user pool and configure an application to use that user pool.

Spring Boot Application

We will use a simple Spring Boot Application. We will integrate this application with AWS Cognito for authentication.

Spring Boot Setup

Add the following dependencies in the Gradle file


 implementation 'org.springframework.boot:spring-boot-starter-security'
 implementation 'org.springframework.boot:spring-boot-starter-thymeleaf'
 implementation 'org.springframework.boot:spring-boot-starter-web'
 implementation 'org.springframework.security:spring-security-oauth2-client'
 implementation 'org.springframework.security:spring-security-oauth2-jose'

And the application.properties will need oauth2 configuration properties:


# ====================================================================================
## SSL Keystore for HTTPS
# ====================================================================================
#security.require-ssl=true
server.port=8743
server.ssl.key-store-password=******
server.ssl.key-store=classpath:sssstore.p12
server.ssl.key-store-type=PKCS12
server.ssl.key-alias=selfsigned_localhost
# =====================================================================================
spring.security.oauth2.client.registration.cognito.clientId=7mtivo8jobdtd6dvocldkmu6qk
spring.security.oauth2.client.registration.cognito.clientSecret=*********
spring.security.oauth2.client.registration.cognito.scope=openid
spring.security.oauth2.client.registration.cognito.redirect-uri=https://localhost:8743/login/oauth2/code/cognito
spring.security.oauth2.client.registration.cognito.clientName=SpringBootCognitoDemo
spring.security.oauth2.client.registration.cognito.authorization-grant-type=authorization_code
spring.security.oauth2.client.provider.cognito.issueUri=https://cognito-idp.{awszone}.amazonaws.com/{userPoolId}
spring.security.oauth2.client.provider.cognito.authorization-uri=https://{customDomain}.auth.{awszone}.amazoncognito.com/oauth2/authorize
spring.security.oauth2.client.provider.cognito.token-uri=https://{customDomain}.auth.{awszone}.amazoncognito.com/oauth2/token
spring.security.oauth2.client.provider.cognito.jwk-set-uri=https://cognito-idp.{awszone}.amazonaws.com/{userPoolId}/.well-known/jwks.json
spring.security.oauth2.client.provider.cognito.user-name-attribute= cognito:username

Security Configuration

Our Main Controller class will look like below:


@Controller
public class MainController
{
    @GetMapping("/")
    public String home(Model model, Principal principal)
    {
        model.addAttribute("username", principal.getName());
        return "index";
    }
}

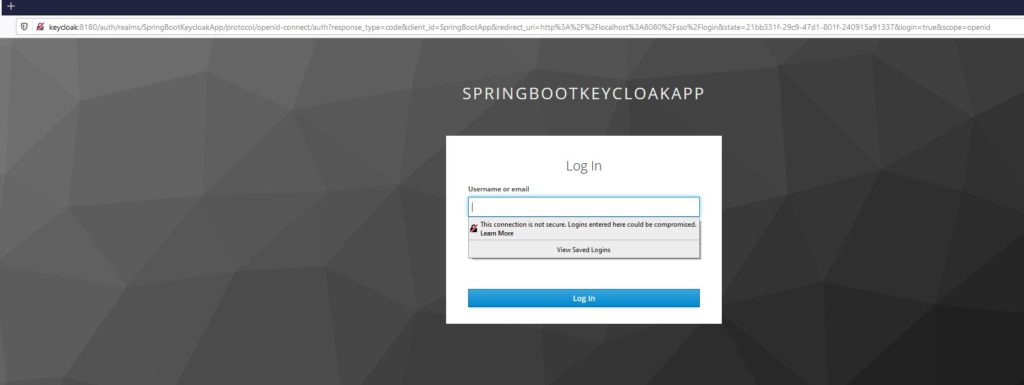
So when we will access our application, it will redirect to AWS Cognito UI for authentication. Based on the selected flow OIDC or SAML, the authentication will happen.

SecurityConfig will be as below:


@Configuration
public class SecurityConfig extends WebSecurityConfigurerAdapter
{
    @Autowired
    public CustomLogoutSuccessHandler customLogoutSuccessHandler;

    @Override
    protected void configure(HttpSecurity httpSecurity) throws Exception
    {
        httpSecurity.csrf()
                .and()
                .authorizeRequests()
                .anyRequest()
                .authenticated()
                .and()
                .oauth2Login()
                .and()
                .logout()
                .logoutUrl("/logout")
                .logoutSuccessHandler(customLogoutSuccessHandler)
                ;

    }
}

Our simple index template will look like below:


<!DOCTYPE html>
<html xmlns="http://www.w3.org/1999/xhtml"
      xmlns:th="http://www.thymeleaf.org">
<head>
    <meta charset="utf-8">
    <meta content="width=device-width, initial-scale=1" name="viewport">
    <title>Cognito Demo</title>
</head>
<body>
<div class="container">
    <h1 class="title">OAuth 2.0 Spring Security Cognito Demo</h1>
    <div>
        <div class="box">
            Hello, <strong th:text="${username}"></strong>!
        </div>
        <a th:href="@{/logout}" class="btn btn-primary">Logout</a>
    </div>
</div>
</body>
</html>


Create a User Pool

Once you log in to AWS Console, select Cognito as AWS Service. The first screen will show you two options – Create a user pool and Create an identity pool.

We will select Create a user pool.

Authentication with AWS Cognito - Create User Pool

Enter a suitable name for your user pool and select Step through settings. This will allow us to modify any settings that we don’t want to use for our use case.

Now select user pool attributes for users. These attributes allow us to identify the user and what a user can enter during authentication.

Authentication with AWS Cognito - User Attributes

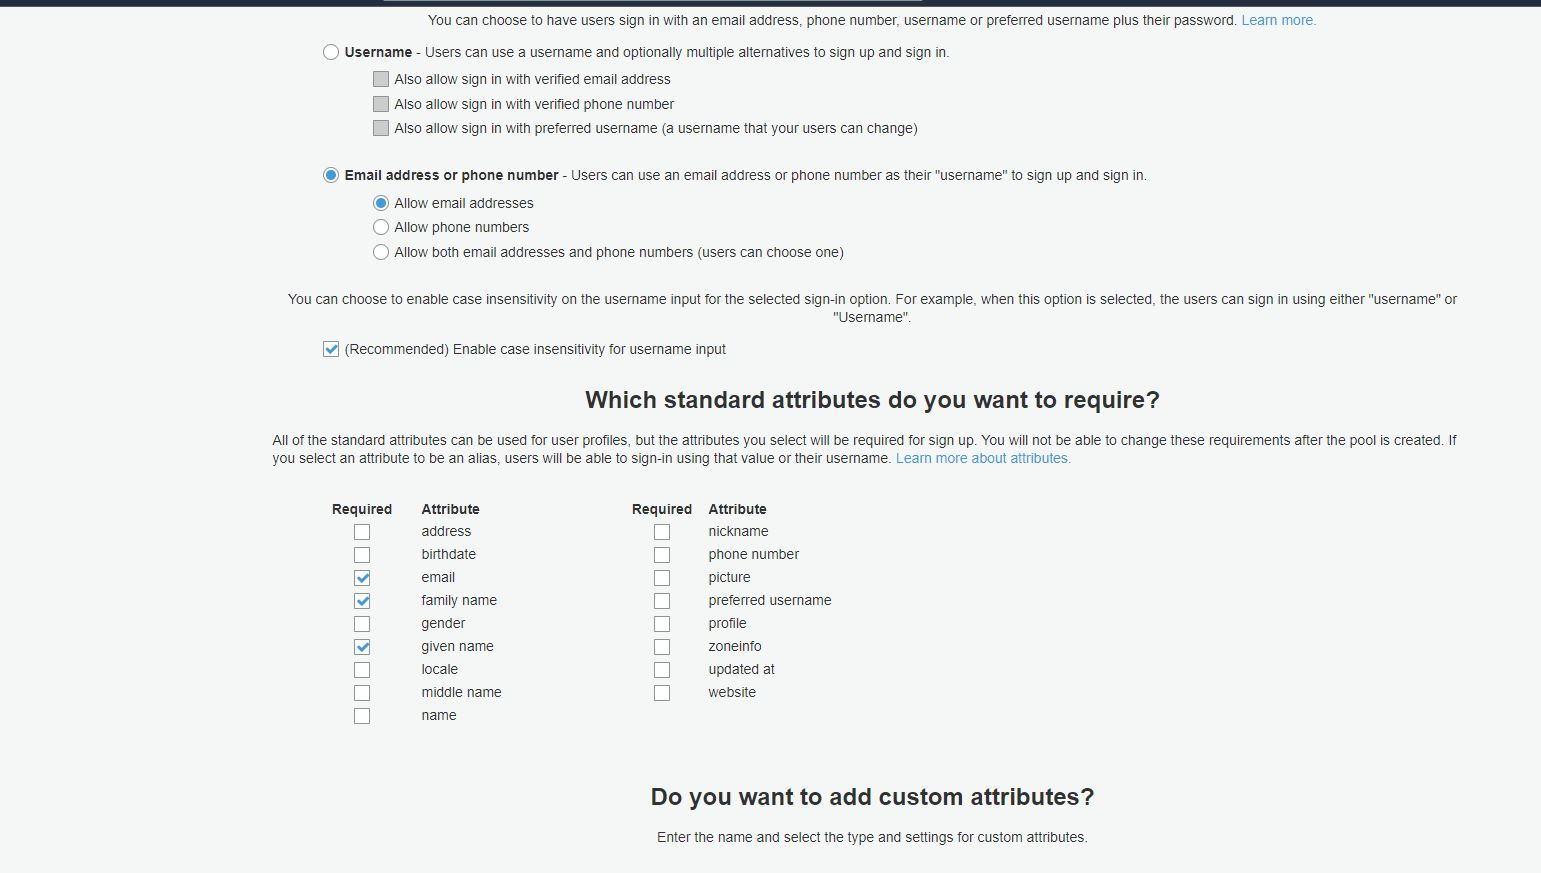
For our demo, we have selected Email address, family name, and given name as attributes. So the user will log in to the application using an email address.

For password policy, we have set that password should be of minimum length 8, should be alphanumeric with upper case and lower case characters.

Authentication with AWS Cognito - Password Policy

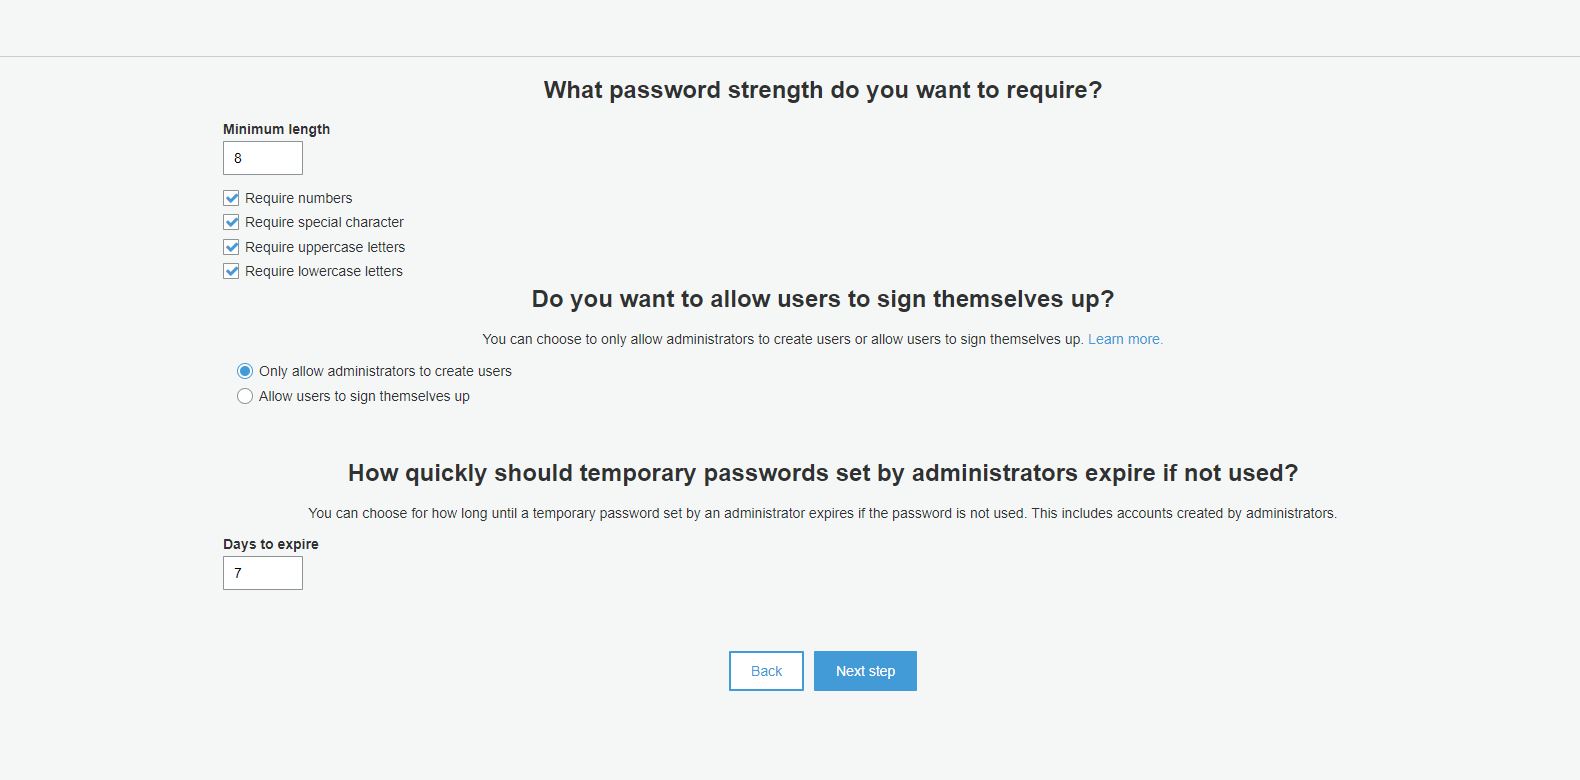
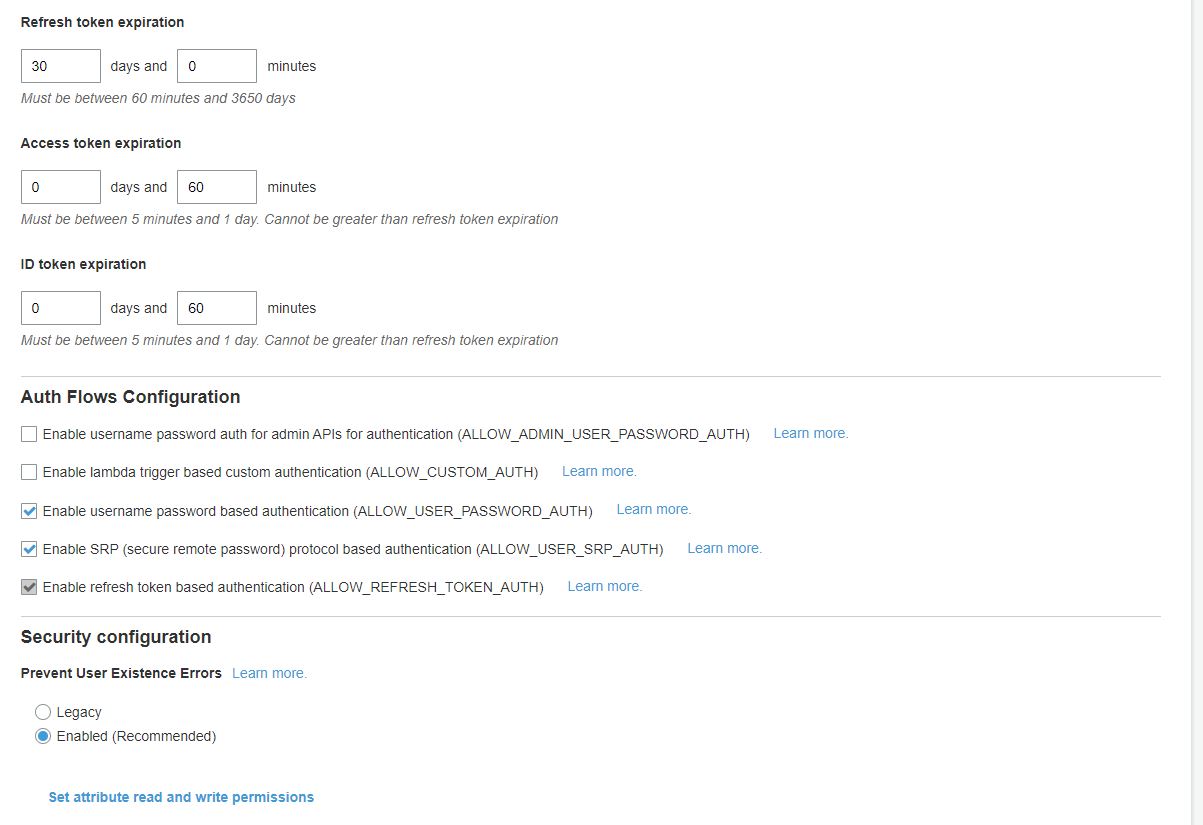
Most of the other settings we will choose as default. For App Clients Step, we will choose username and password-based authentication for Auth Flow.

Authentication with AWS Cognito - App Clients

Application Client Configuration

Once we create a user pool, we will continue to step through the next set of configurations and that includes the Application Client. In this configuration, we configure our application that will be using the user pool.

We need to enable identity provider and Cognito User Pool.

Authentication with AWS Cognito - App Client Settings

Configuring Federation Identity Provider

As mentioned previously, we will also configure a SAML Identity Provider for authentication. In this case, the flow will be application -> AWS Cognito -> SAML Identity Provider.

Configure Application in Okta

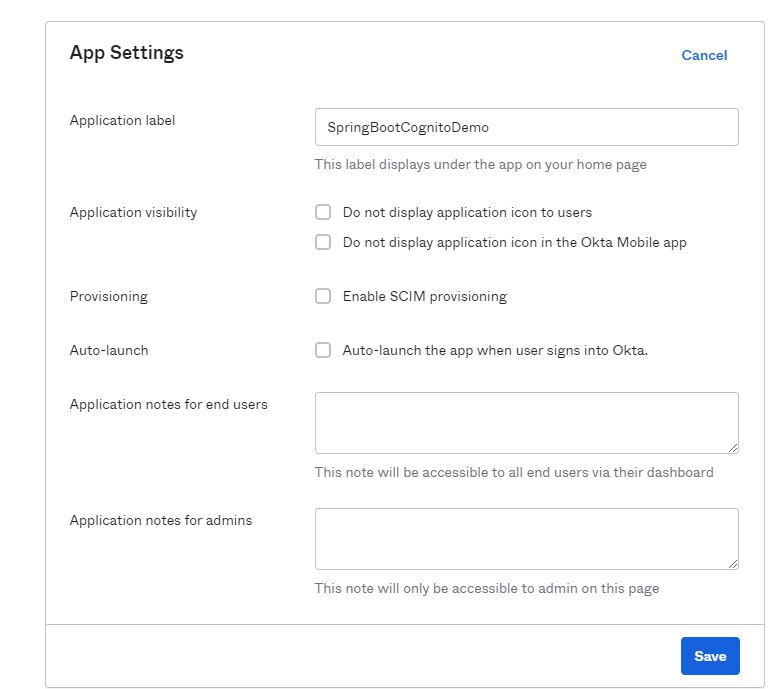
For this demo, we will use Okta as SAML Identity Provider. Log in to Okta Administrator console , configure a new application for SAML Integration as below:

Configure SAML Okta

On the next step, provide Single Sign On URL and this will be https://{yourcustomdomainfromcognito}.auth.{awszone}.amazoncognito.com. We also need to provide Audience URI (SP Entity ID). In this case, Cognito will act as Service Provider to Okta.

 Okta SAML Settings

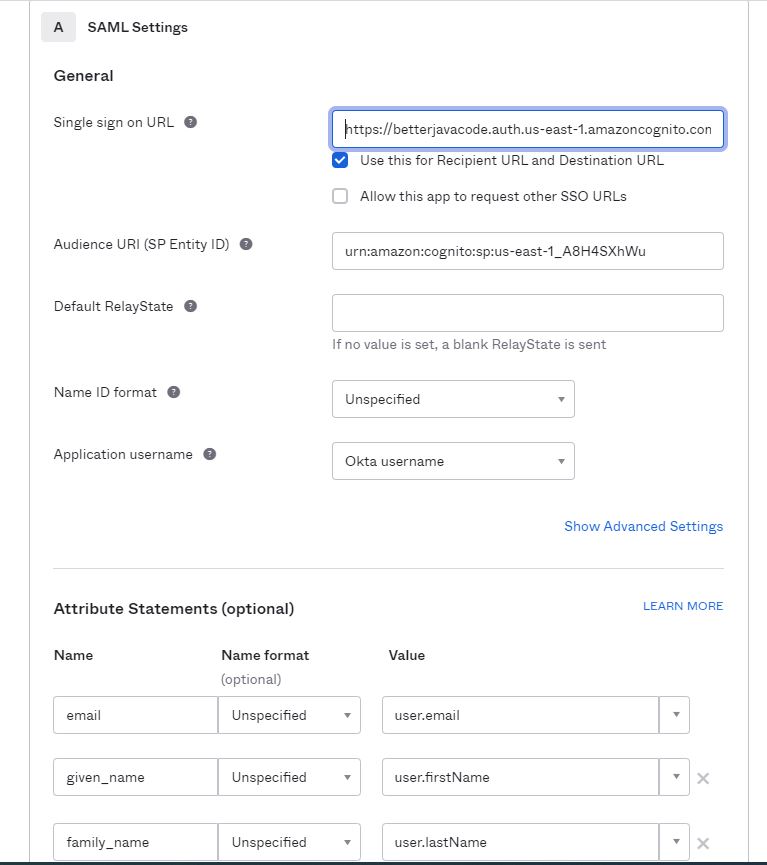
We also need to configure Attribute Statements as shown above. Those are the attributes we have configured in our Cognito User Attributes – email, given_name, family_name.

Basically, make sure that the user you plan to use is in Okta Users Directory. It will be the same user that we will need to be either configured in Cognito User Pool or created through sign-up.

Configure Federated Identity Provider in Cognito

  • In our user pool configuration, select Federated Identity Provider.
  • Choose the option of SAML and Cognito will show you to upload a metadata file or metadata URL for Identity Provider. In our case, it will be https://dev-19753289.okta.com/app/exkmt322q1Kl15Rsk5d6/sso/saml/metadata.
  • Type a name for Federated Identity Provider and Save the changes.

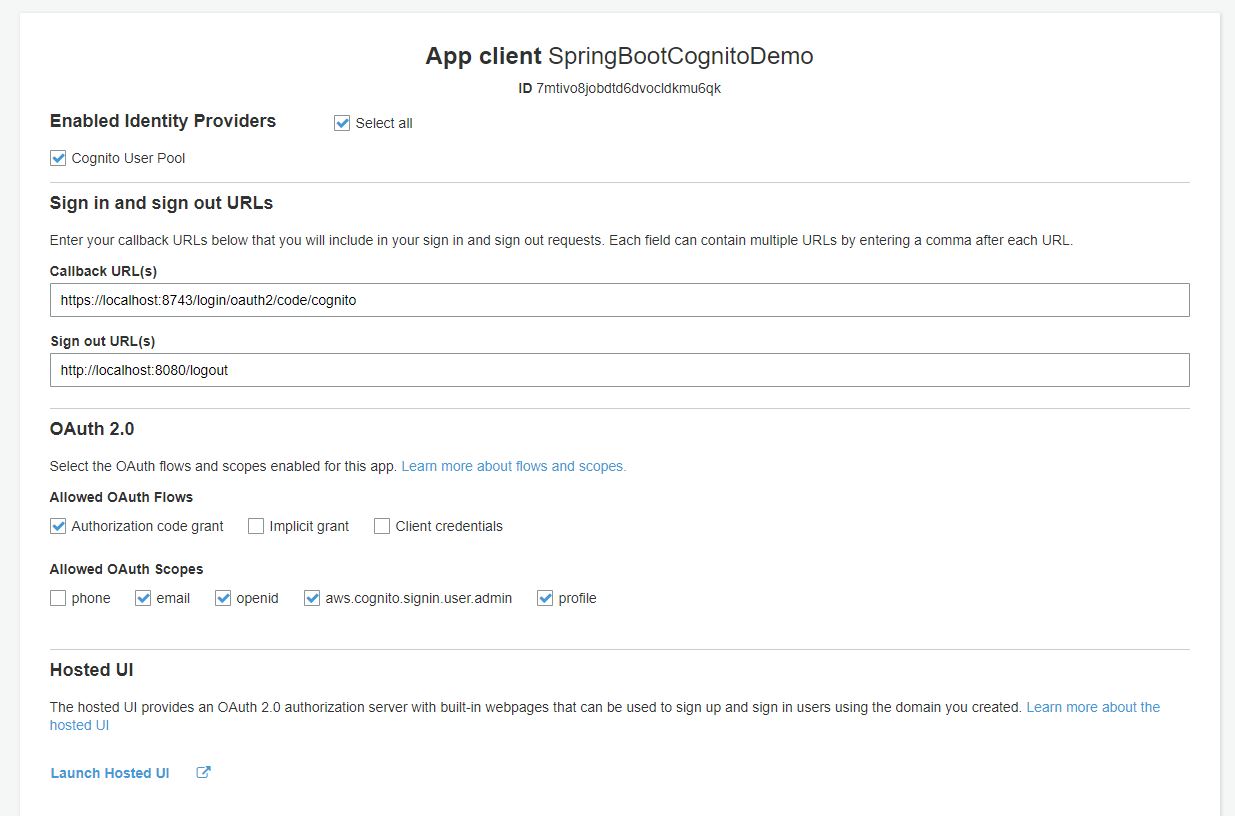
Therefore, if we go back to App Client Settings, we should see an option to select Federated Identity Provider. With the new configuration, our settings will look like below:

Cognito Federated Identity Provider

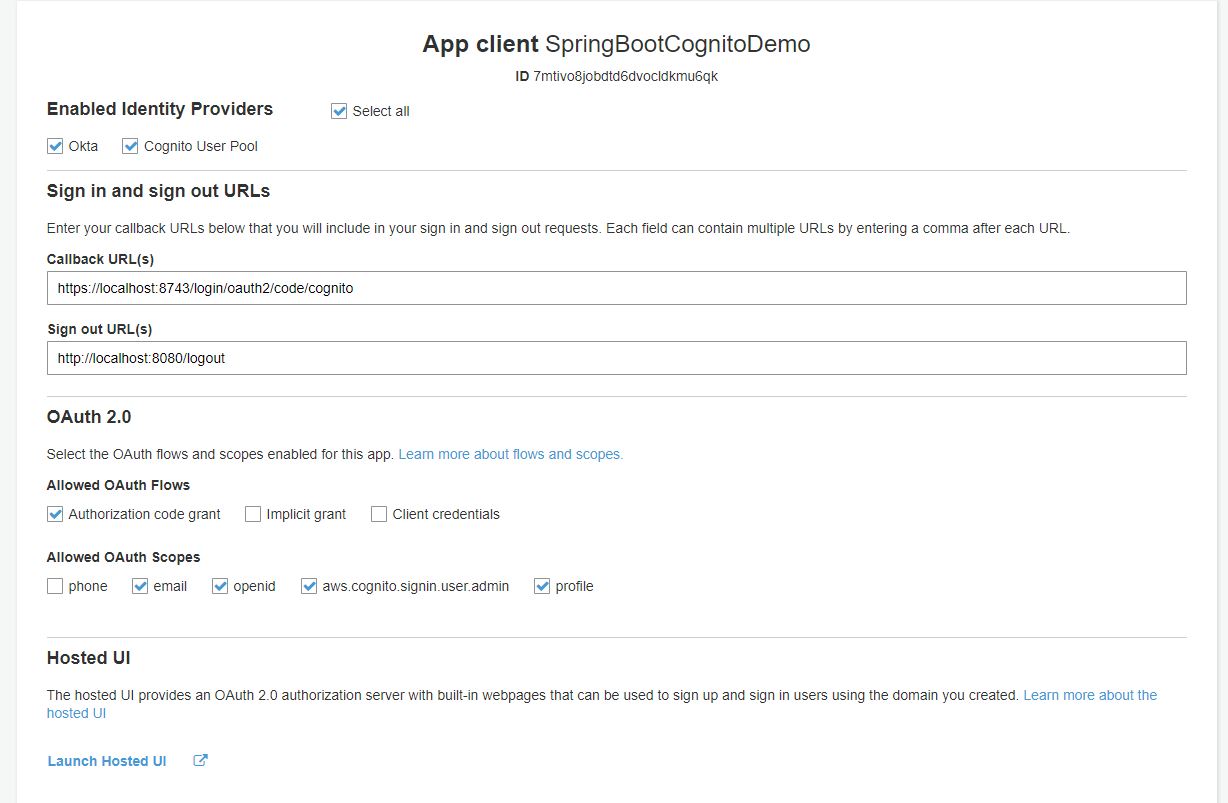
Anyhow, make sure the user attributes(given_name, family_name, and email) in Cognito are editable.

However, we have completed our configuration. Now we can show the demo.

Demo of Spring Boot Application Authentication with AWS Cognito

Now if I run my application and access it at https://localhost:8743/, I will see the following screen to select an identity provider to authenticate with:

Home Realm Discovery Cognito

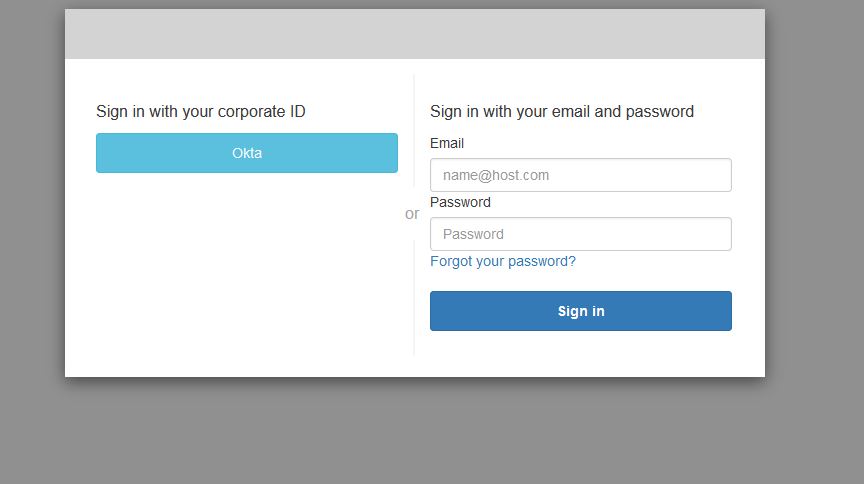
Nevertheless, we can use Okta or Cognito User Pool to log in.

SAML Flow

  1. User accesses the application that sends Authorization Code Flow OAuth request to Cognito
  2. Cognito sends SAML Request to Okta.
  3. The user enters credentials on the okta login screen.
  4. Okta sends the SAML response back to Cognito at endpoint https://{customdomain}.auth.{awszone}.amazoncognito.com/saml2/idpresponse
  5. Cognito processes the saml response and generates auth code and response back to the application.
  6. The application uses auth code to get token from Cognito and authenticates the user on verification of token.

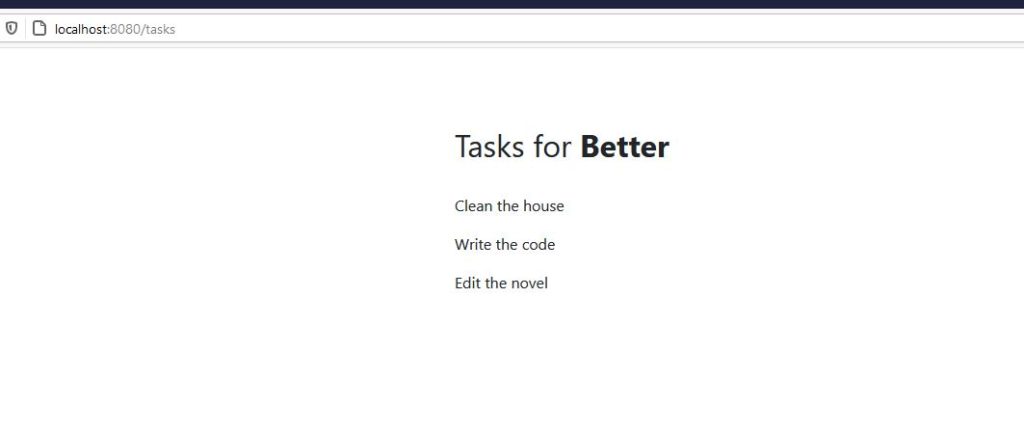
Above all, after successful authentication, the user will see

Okta SAML Authentication

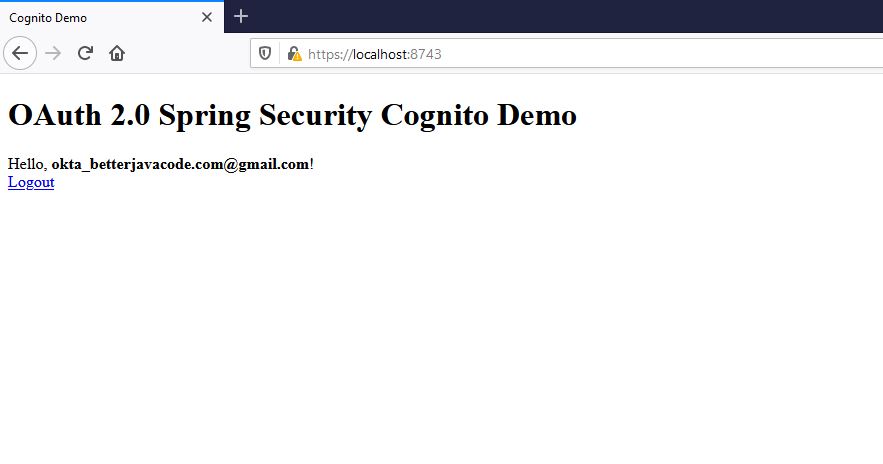
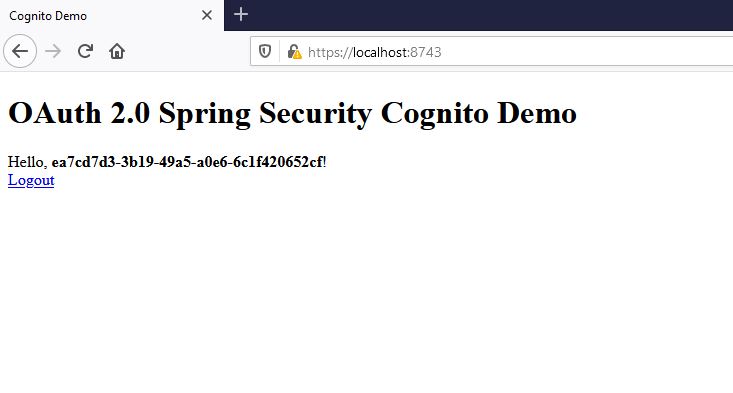
Instead of Okta, we had chosen Cognito login on the same Home Realm Discovery screen, we will see the following after successful authentication:

Cognito Successful Authentication

Conclusion

In this post, I showed how we can use AWS Cognito for authentication with Spring Boot application. Moreover, Cognito helps in configuring users as well as removing boilerplate code of security flows.

In conclusion, if you have not bought my ebook Simplifying Spring Security, it is available here.

Spring Retry vs Resilience4j Retry

In this post, I will show the comparison of the two retries – Spring Retry vs Resilience4j Retry. Usually, you can combine retry with a circuit breaker when implementing to make your application more robust. I already covered the circuit breaker demo. Also, I have updated my book Simplifying Spring Security with Okta Demo if you are interested to learn more about Spring Security.

Spring Retry vs Resilience4j Retry

Spring Retry allows applications to retry a failed operation automatically. In most cases, if your service is calling another service and another service is not responding for some reason, you can use Spring Retry to retry the same operation. This provides another way to make your service more available.

Retry makes your application more robust and less prone to failures. You can either configure Spring Retry on a method that you think can fail or you can configure a RetryTemplate. The ease of configuration makes Spring Retry an easier choice when writing code.

On other hand, the Resilience4j Retry module offers an equally easier configuration – either through code or through properties.

In this post, I will show how to use Spring Retry and Resilience4j Retry modules when calling any methods or services.

When to use Retry?

Usually, you should consider Retry operation in certain scenarios.

  1. HTTP call to a REST Endpoint
  2. Sending or retrieving messages from SQS
  3. Remote Procedure call or a web service
  4. Fetching or storing data from databases

In such cases, we can either throw an error if we fail to do the operation successfully. But with the availability of applications becoming more important, most of the time, these errors are trivial and most services come back online within a few milliseconds to seconds.

Therefore, it makes sense to apply retry. You must be careful that the operation that you are applying retry with must be idempotent. Suppose, your application sent a request and the target service received the request, but in between something happened and your target service couldn’t respond in time. Then, with retry, the target service should not treat the retry attempt as a separate or new request. This makes your system more resilient.

Spring Retry

In this section, I will show various ways to use Spring Retry. To start with, we will have a simple Spring Boot REST application to retrieve a list of companies from the database. As usual, I will not show how to build a Spring Boot application.

Gradle Dependencies

To use Spring Retry, we need two dependencies in our configuration.

        implementation 'org.springframework.retry:spring-retry:1.3.1'
 implementation 'org.springframework:spring-aspects:5.3.5'

EnableRetry Annotation

Once, we have spring-retry dependency, we will be able to annotate our main class with annotation @EnableRetry as follows:


package com.betterjavacode.retrydemo;

import org.springframework.boot.SpringApplication;
import org.springframework.boot.autoconfigure.SpringBootApplication;
import org.springframework.context.annotation.Bean;
import org.springframework.data.jpa.repository.config.EnableJpaRepositories;
import org.springframework.retry.annotation.EnableRetry;
import org.springframework.retry.backoff.FixedBackOffPolicy;
import org.springframework.retry.policy.SimpleRetryPolicy;
import org.springframework.retry.support.RetryTemplate;


@SpringBootApplication
@EnableRetry
@EnableJpaRepositories(basePackages = "com.betterjavacode.retrydemo.daos")
public class RetrydemoApplication {

 public static void main(String[] args) {
  SpringApplication.run(RetrydemoApplication.class, args);
 }

 @Bean
 public RetryTemplate retryTemplate()
 {
  RetryTemplate retryTemplate = new RetryTemplate();

  FixedBackOffPolicy backOffPolicy = new FixedBackOffPolicy();
  backOffPolicy.setBackOffPeriod(100);

  SimpleRetryPolicy simpleRetryPolicy = new SimpleRetryPolicy();
  simpleRetryPolicy.setMaxAttempts(2);

  retryTemplate.setRetryPolicy(simpleRetryPolicy);
  retryTemplate.setBackOffPolicy(backOffPolicy);
  return retryTemplate;
 }


}

I will explain the rest of the code as we go along, but just note here the annotation @EnableRetry. This will enable the retry in our application.

REST Controller

We will show Spring Retry in two different ways.

  1. Using @Retryable annotation
  2. Using RetryTemplate

Our REST Controller will fetch us a list of companies, a company by id, or a list of companies by name. It will look like below:


package com.betterjavacode.retrydemo.controllers;

import com.betterjavacode.retrydemo.dtos.CompanyDto;
import com.betterjavacode.retrydemo.service.CompanyService;
import org.springframework.beans.factory.annotation.Autowired;
import org.springframework.http.HttpStatus;
import org.springframework.http.ResponseEntity;
import org.springframework.web.bind.annotation.*;

import java.util.List;

@RestController
@RequestMapping("/v1/betterjavacode/companies")
public class CompanyController
{
    @Autowired
    CompanyService companyService;

    @GetMapping
    public ResponseEntity<List> getAllCompanies()
    {
        List companyDtos = companyService.getAllCompanies();

        if(companyDtos.isEmpty())
        {
            return new ResponseEntity<>(HttpStatus.NO_CONTENT);
        }

        return new ResponseEntity<>(companyDtos, HttpStatus.OK);
    }

    @GetMapping("/{id}")
    public ResponseEntity getCompanyById(@PathVariable("id") long id)
    {
        CompanyDto companyDto = companyService.getCompany(id);
        if(companyDto == null)
        {
            return new ResponseEntity<>(HttpStatus.NO_CONTENT);
        }
        return new ResponseEntity<>(companyDto, HttpStatus.OK);
    }

    @GetMapping("/")
    public ResponseEntity<List> searchCompanies(@RequestParam("name") String companyName)
    {
        List companyDtos = companyService.searchCompanyByName(companyName);
        if(companyDtos.isEmpty())
        {
            return new ResponseEntity<>(HttpStatus.NO_CONTENT);
        }

        return new ResponseEntity<>(companyDtos, HttpStatus.OK);
    }
}

In our controller, we are using a @Service object called CompanyService. This service object provides us with a way to implement our methods to fetch company data.

Service with various Retry Configuration

So, we will see how we can use annotation @Retryable:


    @Retryable(value = SQLException.class, maxAttempts = 2, backoff = @Backoff(delay = 100))
    public List getAllCompanies()
    {
        List companies =  companyRepository.findAll();
        List companyDtos = new ArrayList<>();
        for(Company company : companies)
        {
            CompanyDto companyDto = new CompanyDto(company.getName(), company.getType(),
                    company.getCity(), company.getState(), company.getDescription());
            companyDtos.add(companyDto);
        }

        return companyDtos;
    }

In the above code, we are fetching a list of companies. If this method fails to fetch the result with any exception related to SQLException, we will retry the fetching. We will retry this twice as configured with maxAttempts. Between each attempt, there will be a delay of 100 milliseconds. Now if we run our application and call this method, we will see how this retry works.

To simulate the error, I will stop SQL Service from Windows Services. I will show a successful response and a retried response below:

Spring Retry vs Resilience4j Retry - RetryableSpring Retry - JDBC Exception
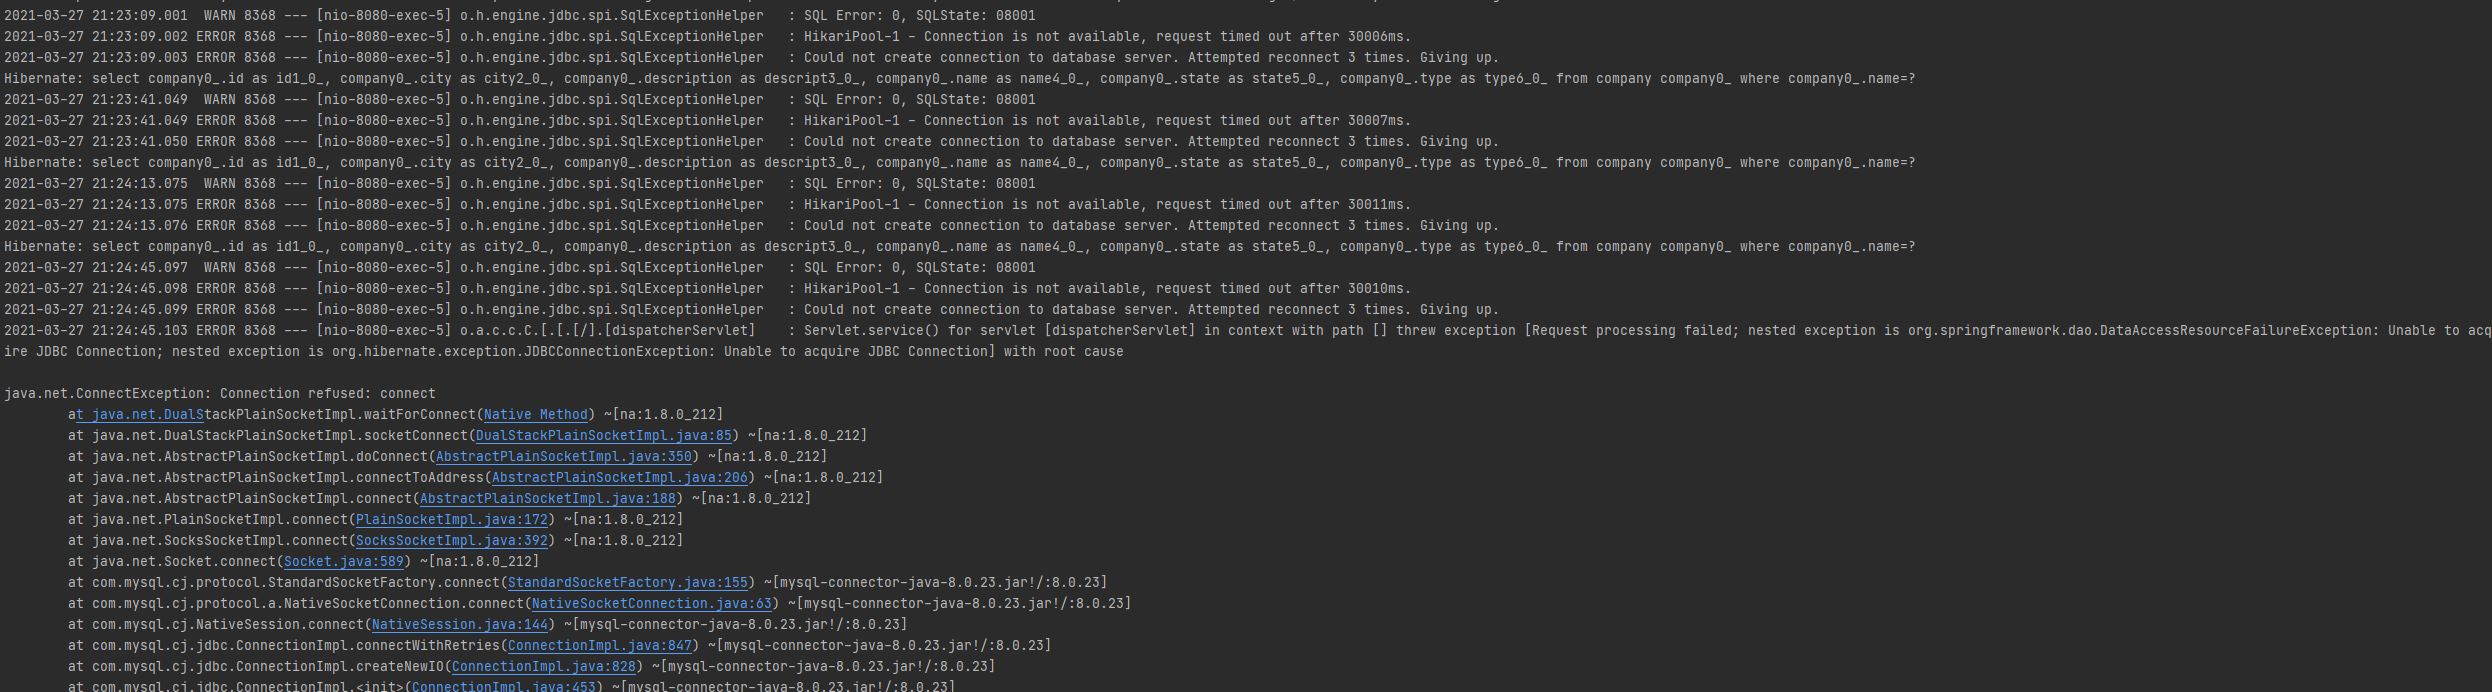
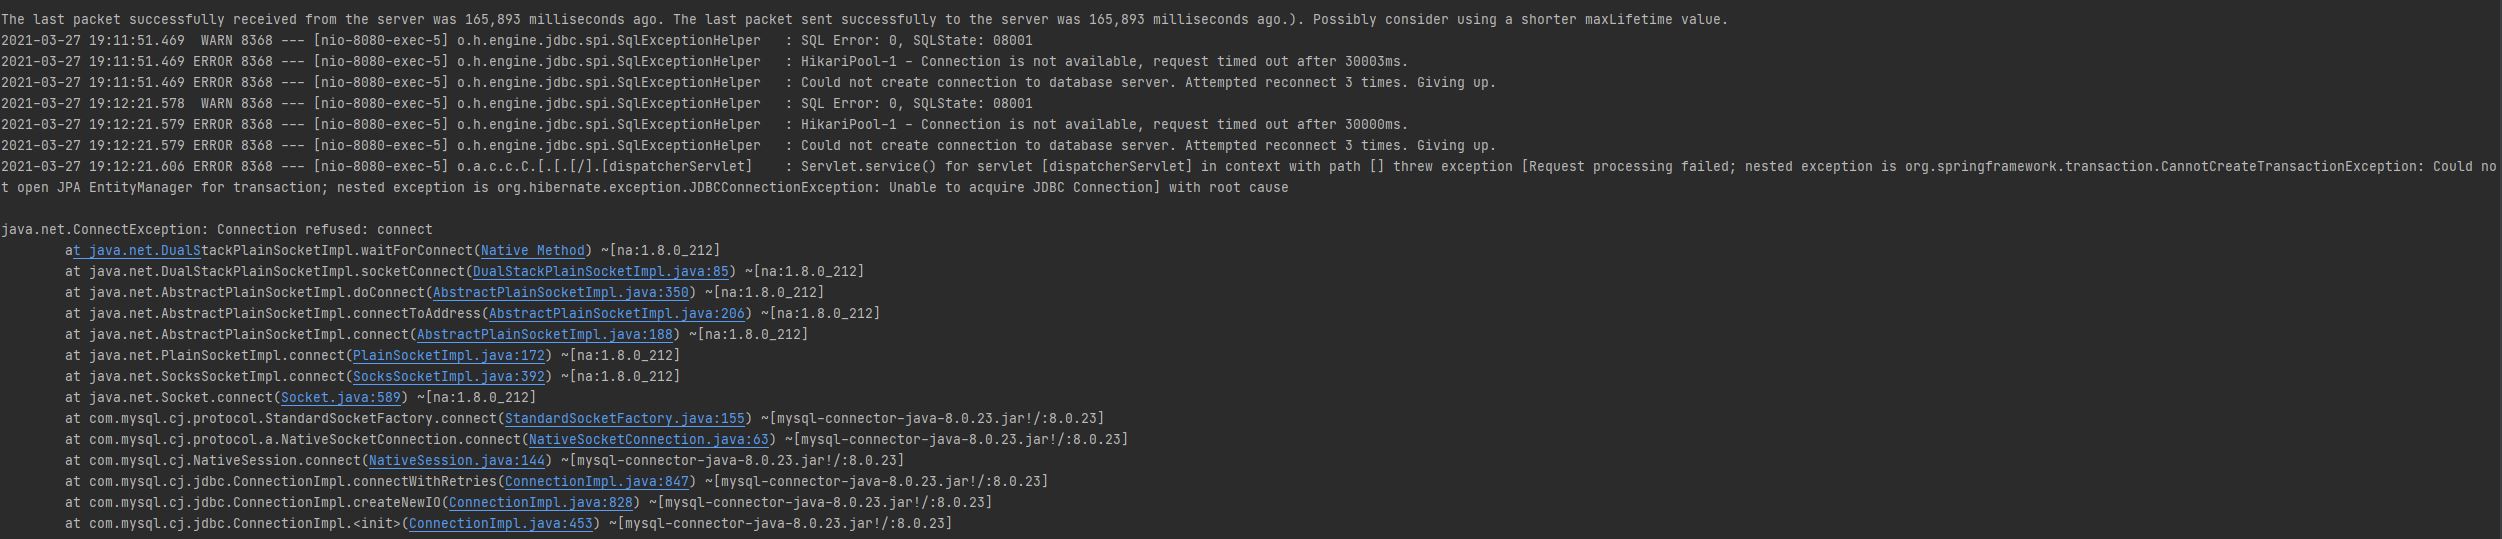
As you can see in the above screenshot, there were two attempts to retry. In each retry, it tried to connect to MySQL server thrice.

What is Spring Boot Retry Template?

Similarly, we can also use retry template that Spring-Retry offers. In the following code, I show a method that I have added in CompanyService to get company data for an id.


    public CompanyDto getCompany(long id)
    {
        CompanyDto companyDto = retryTemplate.execute(rt -> {
           Company company = companyRepository.findById(id).get();
           CompanyDto localCompanyDto = new CompanyDto(company.getName(), company.getType(),
                   company.getCity(),
                   company.getState(), company.getDescription());
           return localCompanyDto;
        });

        return companyDto;
    }

This retryTemplate bean is configured with simpleRetryPolicy with 2 attempts and 100 milliseconds delay between each attempt. Nevertheless, if I try to execute this method the same way I did for @Retryable, we will see the below output:

RetryTemplate - Successful Response

Retry Template - JDBC Exception

As mentioned above, all I am doing is stopping my MySQL service from windows services and it allows my method to get executed to retry.

Is Retry Template Thread Safe?

Retry Template class is thread-safe. It allows concurrent access. In return, one can execute multiple operations.

Resilience4j Retry

While using resilience4j-retry library, you can register a custom global RetryConfig with a RetryRegistry builder. Use this registry to build a Retry. In our demo to fetch company data, we added a new method to retrieve companies by name.

This method will look like below:


    public List searchCompanyByName(String name)
    {
        LOGGER.info("Search for company = {}", name);

        RetryConfig retryConfig =
                RetryConfig.custom().maxAttempts(4).waitDuration(Duration.of(2, SECONDS)).build();         

        RetryRegistry retryRegistry = RetryRegistry.of(retryConfig);

        Retry retryConfiguration = retryRegistry.retry("companySearchService", retryConfig);

        Supplier<List> companiesSupplier = () -> companyRepository.findAllByName(name);

        Supplier<List> retryingCompaniesSearch =
                Retry.decorateSupplier(retryConfiguration, companiesSupplier);

        List companyDtos = new ArrayList<>();
        List companies = retryingCompaniesSearch.get();
        LOGGER.info("Retrying..");
        for(Company company : companies)
        {
            CompanyDto companyDto = new CompanyDto(company.getName(), company.getType(),
                    company.getCity(), company.getState(), company.getDescription());
            companyDtos.add(companyDto);
        }

        return companyDtos;
    }

In the above method, we first create RetryConfig. We create a RetryRegistry and add RetryConfig in this registry. Then when we create our call to fetch a list of companies. We decorate this call with retryConfiguration.

Customizations with Resilience4j-Retry

RetryConfig offers different customization:

  1. maxAttempts – 3 is the default number of attempts for retries.
  2. waitDuration – a fixed wait duration between each retry attempt.
  3. intervalFunction – a function to modify the waiting interval after a failure.
  4. retryOnResultPredicate – configures a predicate that evaluates if a result should be retried.
  5. retryExceptions – Configures a list of throwable classes that are used for retrying
  6. ignoreExceptions – Configures a list of throwable classes that are ignored
  7. failAfterMaxRetries – A boolean to enable or disable throwing of MaxRetriesExceededException when the Retry has reached the configured maxAttempts

Demo

Now, let’s look at what happens when we execute this method with resilience4j-retry. The following screenshot shows the successful response when SQL service is still running.

Resilience4j-Retry Success response

If I stop SQL service, we will see the retry attempts 4 times as we have configured it for 4.

JDBCException - Resilience4jRetry

Code

The code for this demo can be found in my github repository.

Conclusion

In this post, I showed the comparison between Spring Retry vs Resilience4j Retry. When to use either of these libraries depends on your scenario. Usually, Resilience4j Retry goes well if you also plan to resilience4j circuit breaker module. Spring Retry can be handy with various configurations as well using RetryTemplate.

If you enjoyed this post, please subscribe to my blog here.

Simplifying Spring Security

Finally, the book is here. Simplifying Spring Security.

Why I wrote this book?

As part of writing this blog, I also follow few communities on Facebook. Most of these communities are related to Spring Framework and Spring Boot. The number of users asks questions related to Spring Security. Hence, I wondered why not write a book about it.

Also as a developer, when I’m writing a Spring Boot application, I often use Spring Security. Accordingly, I always felt like I was using this mysterious library that solves my authentication problems.  I wanted to understand the fundamentals and how Spring Security dealt with authentication and authorization.


What do I cover?

In the book, I cover from fundamentals of authentication, authorization, and how to use Spring Security for different authentication flows. Also, I show these flows with examples. As part of the book, you will also get access to a source code repository that you can play with.

In short, I cover the following topics in the book:

  • Introduction
    • What is Spring Security?
    • How Spring Security fits in with Spring Boot Application?
    • Why you need Spring Security?
  • Authentication
    • What is authentication?
    • Authentication Architecture
    • Types of Authentication
    • Implementation of Different Flows
  • Authorization
    • What is authorization?
    • How does Spring Security handle authorization?
    • What are GrantedAuthorities?
    • Implementation of Authorization in an application
  • Protection against common exploits
    • Introduction
    • Transport Layer Security
    • Security HTTP Response Headers
    • Clickjacking Attack
    • Cross-site Request Forgery Attack (CSRF)
  • Miscellaneous

Why should you buy this book?

First, it is a technical book and if you are a developer, it will easily help you improve your career. You’ll learn a lot about authentication and can solve some crucial security problems that many applications face.

Most importantly, you can also build your own application and use any of these authentication mechanisms for the application.

Subsequently, if you are getting started for a job in Spring Boot or Spring Framework, the book will also help you in preparing for Spring Security interviews.

Finally, the book is currently in Pre-Launch, it will be available on 7th February 2021. Why don’t you take advantage of Pre-launch?

Spring WebClient vs RestTemplate – Comparison and Features

Introduction

Spring 5 introduced a new reactive web client called WebClient. In this post, I will show when and how we can use Spring WebClient vs RestTemplate. I will also describe what features WebClient offers.

What is RestTemplate?

RestTemplate is a central Spring class that allows HTTP access from the client-side. RestTemplate offers POST, GET, PUT, DELETE, HEAD, and OPTIONS HTTP methods. The simple use case of RestTemplate is to consume Restful web services.

You can create a bean that provides the instance of RestTemplate. You can then @autowire this bean in any class where you plan to call REST services. RestTemplate is the class that implements the interface RestOperations.

The following code shows the declaration of the bean:

    @Bean
    public RestOperations restOperations()
    {
        return new RestTemplate();
    }

The following code shows a REST client `YelpClient` calling Yelp’s REST API to get rental property reviews.

   @Autowired
   private final RestOperations restOperations;

   public List getRentalPropertyReviews(String address)
   {
        String url = buildRestUrl(businessId);
        HttpHeaders httpHeaders = new HttpHeaders();
        String apiKey = getApiKey(YELP);
        httpHeaders.add("Authorization","Bearer " + apiKey);
        httpHeaders.setContentType(MediaType.APPLICATION_JSON);

        HttpEntity entity = new HttpEntity("parameters", httpHeaders);
        ResponseEntity response;

        try
        {
            response = restOperations.exchange(url, HttpMethod.GET,entity, String.class);
        }
        catch(RestClientException e)
        {
            throw new RuntimeException("Unable to retrieve reviews", e);
        }

    }

In the above code, we are building HTTP Headers by adding Yelp’s REST API key as part of the authorization. We call the GET method to get review data.

Basically, one has to do

  • Autowire the RestTemplate object
  • Build HTTP Headers with authorization and Content Type
  • Use HttpEntity to wrap the request object
  • Provide URL, Http Method, and the Return type for exchange method.

What is WebClient?

Spring 5 introduced a reactive web client called WebClient. It’s an interface to perform web requests. It is part of the Spring web reactive module. WebClient will be replacing RestTemplate eventually.

Most importantly, WebClient is reactive, nonblocking, asynchronous, and works over HTTP protocol Http/1.1.

To use WebClient, one has to do

  • Create an instance of WebClient
  • Make a request to the REST endpoint
  • handle the response


   WebClient webClient = WebClient
       .builder()
       .baseUrl("https://localhost:8443")
       .defaultCookie("cookieKey", "cookieValue")
       .defaultHeader(HttpHeaders.CONTENT_TYPE, MediaType.APPLICATION_JSON_VALUE) 
       .defaultUriVariables(Collections.singletonMap("url", "https://localhost:8443"))
       .build();

The above code shows one way to instantiate WebClient. You can also create an instance by simply using WebClient webClient = WebClient.create();

WebClient provides two methods exchange and retrieve . exchange method usually fetches the response along with status and headers. retrieve method gets the response body directly. It’s easier to use.

Also depending on if you are trying to fetch a single object in response or a list of objects, you can use mono or flux.

this.webClient =
                webClientBuilder.baseUrl("http://localhost:8080/v1/betterjavacode/").build();

this.webClient.get()
                .uri("users")
                .accept(MediaType.APPLICATION_JSON)
                .retrieve().bodyToFlux(UserDto.class).collectList();

The above code basically uses webClient to fetch a list of users from the REST API.

Spring WebClient vs RestTemplate

We already know the one key difference between these two features. WebClient is a non-blocking client and RestTemplate is a blocking client.

RestTemplate uses Java Servlet API under the hood. Servlet API is a synchronous caller. Because it is synchronous, the thread will block until webclient responds to the request.

Consequently, Requests waiting for results will increase. This will result in an increase in memory.

On the other hand, WebClient is an asynchronous non-blocking client. It uses Spring’s reactive framework under the hood. WebClient is a part of the Spring-WebFlux module.

Spring WebFlux uses reactor library. It provides Mono and Flux API to work data sequences. Reactor is a reactive streams library. And, all of its operators support non-blocking back pressure.

Example of how to use WebClient in a Spring Boot Application

We can combine the capabilities of Spring Web MVC and Spring WebFlux. In this section, I will create a sample application. This application will call a REST API using WebFlux and we will build a response to show a web page with a list of users.

RestController for this example is an API to get a list of users:

package com.betterjavacode.webclientdemo.controllers;

import com.betterjavacode.webclientdemo.dto.UserDto;
import com.betterjavacode.webclientdemo.managers.UserManager;
import org.springframework.beans.factory.annotation.Autowired;
import org.springframework.web.bind.annotation.GetMapping;
import org.springframework.web.bind.annotation.RequestMapping;
import org.springframework.web.bind.annotation.RestController;

import java.util.List;

@RestController
@RequestMapping("v1/betterjavacode")
public class UserController
{
    @Autowired
    public UserManager userManager;

    @GetMapping(value = "/users")
    public List getUsers()
    {
        return userManager.getAllUsers();
    }
}

Controller class that uses a WebClient to call REST API looks like below:

package com.betterjavacode.webclientdemo.controllers;

import com.betterjavacode.webclientdemo.clients.UserClient;
import com.betterjavacode.webclientdemo.dto.UserDto;
import com.betterjavacode.webclientdemo.managers.UserManager;
import org.springframework.beans.factory.annotation.Autowired;
import org.springframework.stereotype.Controller;
import org.springframework.ui.Model;
import org.springframework.web.bind.annotation.GetMapping;

import java.util.List;

@Controller
public class MainController
{
    @Autowired
    UserClient userClient;

    @GetMapping(value = "/")
    public String home()
    {
        return "home";
    }

    @GetMapping(value = "/users")
    public String getUsers(Model model)
    {
        List users = userClient.getUsers().block();

        model.addAttribute("userslist", users);
        return "users";
    }
}

Now, the important piece of code of UserClient is where we will be using WebClient to call REST API.

package com.betterjavacode.webclientdemo.clients;

import com.betterjavacode.webclientdemo.dto.UserDto;
import org.springframework.http.MediaType;
import org.springframework.stereotype.Service;
import org.springframework.web.reactive.function.client.WebClient;
import reactor.core.publisher.Flux;
import reactor.core.publisher.Mono;

import java.util.List;

@Service
public class UserClient
{

    private WebClient webClient;

    public UserClient(WebClient.Builder webClientBuilder)
    {
        this.webClient =
                webClientBuilder.baseUrl("http://localhost:8080/v1/betterjavacode/").build();
    }

    public Mono<List> getUsers()
    {
        return this.webClient.get()
                .uri("users")
                .accept(MediaType.APPLICATION_JSON)
                .retrieve().bodyToFlux(UserDto.class).collectList();
    }
}

Above code shows first building the WebClient and then using it to retrieve response from REST API. retrieve method offers two options of mono or flux. Since we have more than one user to get, we are using flux.

This shows we can use reactive, non-blocking WebClient which is part of WebFlux in Spring Web MVC framework.

What Else Is There in Spring WebClient?

Spring WebClient is part of Spring WebFlux framework. The major advantage of this API is that the developer doesn’t have to worry about concurrency or threads. WebClient takes care of that.

WebClient has a built-in HTTP Client library support to perform requests with. That includes Apache HttpComponents, Jetty Reactive HttpClient, or Reactor Netty.

WebClient.builder() offers following options:

  • uriBuilderFactory – customized uriBuilderFactory to use base URL
  • defaultHeader – Headers for every request
  • defaultCookie – Cookies for every request
  • defaultRequest – To customize every request
  • filter – Client filter for every request
  • exchangeStrategies – HTTP Message reader/writer customizations

I already showed retrieve method in the above code demo.

WebClient also offers a method exchange with varients like exchangeToMono and exchangeToFlux.

With attribute(), we can also add attributes to the request.

Alternatively, one can use WebClient for synchronous use also. In my example above MainController, I use block to get the final result. This basically blocks parallel calls till we get the result.

One key feature that WebClient offers is retryWhen(). For more resilient system, it is a great feature that you can add while using WebClient.

        webClient
            .get()
            .uri(String.join("", "/users", id))
            .retrieve()
            .bodyToMono(UserDto.class)
            .retryWhen(Retry.fixedDelay(5, Duration.ofMillis(100)))
            .block();

retryWhen takes Retry class as a parameter.

WebClient also offers a feature for error handling. doOnError() allows you to handle the error. It is triggered when mono ends with an error. onErrorResume() is a fallback based on the error.

Conclusion

In this post, I showed what is Spring WebClient is, how we can use Spring WebClient vs RestTemplate, and what different features it offers.

If you enjoyed this post, you can subscribe to my blog here.

References

  1. Spring WebClient – Spring Documentation
  2. WebClient Cheatsheet – Spring WebClient

The Complete Guide to Use Docker Compose

In this post, I will cover the complete guide to using docker compose. You can use it to build a multi-container application. But what is a docker compose and why one should use it?

What is Docker Compose?

If you don’t know what a docker is, you can read about that here. If you have an application that is running on a docker and if that application is using multiple other services like database, web-server, and load balancer, then you can write multiple docker files and run multiple containers. It can be cumbersome to manage these files. And if you have to change something, you might have to change all files.

Docker compose solves this problem by allowing you to write a YAML file to define multiple containers in a single file. You write one docker file and build and run that file for all the containers.

Installing Docker Compose

Based on the definition from docker.com, docker compose is a tool for defining and running multiple Docker containers.

Depending on your environment, you will have to use the instructions to install docker compose. You will also need docker engine before you can install docker compose. I use the Windows environment, so I will show those instructions here.

  • Launch Power shell in administrator mode
  • Run this command – [Net.ServicePointManager]::SecurityProtocol = [Net.SecurityProtocolType]::Tls12
  • Then run the following command – Invoke-WebRequest “https://github.com/docker/compose/releases/download/1.27.4/docker-compose-Windows-x86_64.exe” -UseBasicParsing -OutFile $Env:ProgramFiles\Docker\docker-compose.exe

This will install docker compose. Open a new command prompt and type the first command

docker-compose -v

This should provide the docker-compose version if your installation has run without any issues.

Setting up a Spring Boot application with Docker

To show the power of docker-compose, we will be using a simple To-Do list spring boot app. I will share this app in a GitHub repository along with docker compose file. But this app includes the following applications that we will be using in docker compose:

  1. Spring Boot application
  2. Java version 8
  3. MySQL for database
  4. Keycloak for Authentication

So I won’t show implementing the Spring Boot application. If you want to download this application, you can visit the github repository or you can read my previous post here.

We will create a docker file for this Spring Boot application and this will run in its own container. Now this application connects to Keycloak and MySQL database for authentication. Keycloak will use Postgres database instead of using the same MySQL database.

The docker file for the Spring Boot application will look like below:

FROM openjdk:8-jdk-alpine
VOLUME /tmp
COPY ./build/libs/*.jar app.jar
ENTRYPOINT ["java", "-jar", "/app.jar"]

This docker file basically downloads Open JDK 8. It mounts the disk at /tmp. It copies an application jar file as app.jar. And of course, it will start the application by running java -jar .

How to write Docker Compose file

Now comes the docker-compose.yml file. This will look like below:

version: "3.8"

services:
  web:
    build: .
    ports:
      - "8080:8080"
    depends_on:
      - db
      - keycloak
    environment:
      SPRING_DATASOURCE_URL: jdbc:mysql://db:3306/todolist?autoReconnect=true&useSSL=false
      SPRING_DATASOURCE_USERNAME: betterjavacode
      SPRING_DATASOURCE_PASSWORD: betterjavacode
      KEYCLOAK_URI: http://keycloak:8180/auth
      REALM: SpringBootKeycloakApp
    networks:
      - common-network
  db:
    image: mysql:5.7
    ports:
      - "3307:3306"
    restart: always
    environment:
      MYSQL_DATABASE: todolist
      MYSQL_USER: betterjavacode
      MYSQL_PASSWORD: betterjavacode
      MYSQL_ROOT_PASSWORD: root
    volumes:
      - db-data:/var/lib/mysql
    networks:
      - common-network
  postgres:
    image: postgres
    volumes:
      - postgres_data:/var/lib/postgresql/data
    environment:
      POSTGRES_DB: keycloak
      POSTGRES_USER: keycloak
      POSTGRES_PASSWORD: password
    networks:
      - common-network
  keycloak:
    image: jboss/keycloak
    ports:
      - "8180:8180"
    command: ["-Djboss.socket.binding.port-offset=100"]
    environment:
      DB_VENDOR: POSTGRES
      DB_ADDR: postgres
      DB_DATABASE: keycloak
      DB_USER: keycloak
      DB_PASSWORD: password
      DB_SCHEMA: public
      KEYCLOAK_USER: admin
      KEYCLOAK_PASSWORD: Pa55w0rd
    depends_on:
      - postgres
    networks:
      - common-network
networks:
  common-network:
    driver: bridge
volumes:
  db-data:
    driver: local
  postgres_data:
    driver: local

The first line in this docker-compose file is the version of your docker-compose.

services define different types of services that we will use to build our docker container. web service uses an image that builds from a docker file. In our case, we are building a docker image of our Spring Boot application. This application will run on port 8080. We also have to make sure to pass the required environment variables. As you see in the file, we are using our database as db and the variable SPRING_DATASOURCE_URL shows that. db is the name of our database service that our application will connect to.

Our database service db runs on host port of 3307, but uses port 3306 (default port) on the container. This is because I have MySQL running on my host machine at port 3306, so to avoid port conflict, I am using 3307.

We have another database service postgres in our docker compose file. That uses default ports of 5432 and that’s why not specified here. Keycloak uses postgres as part of this entire application. If you don’t specify postgres, Keycloak will use an in-memory H2 database by default. The problem with an in-memory database is once you stop your container, it will lose all the data. To avoid that, I am using a real database that will save our realm and users’ data.

Another service, that we are using is keycloak. This is our IDP for authentication. The service is running on port 8180. It uses the Postgres database to connect. The command part of keycloak service instructs to run the service on port 8180 in the container instead of default 8080.

networks service defines that all these containers are part of the same network common-network with a driver of type bridge.
To make sure we can use the database, we need to mount the disk volume for both MySQL and Postgres databases. We mount these volumes locally.

Running the containers

Now to execute the containers with the application, execute the following command (make sure you build your application)

docker-compose up

This will build Docker containers for all our services and start them. Now if we access our application at http://localhost:8080

Fundamentals of Docker Compose

If a user clicks on Get all tasks, user will see keycloak login screen as below:

Fundamentals of Docker Compose

Enter the username and password, and the user will see the tasks for the logged-in user.

Docker Compose Guide

Useful commands

docker-compose up – This command will build the docker containers and start them.

docker-compose up -d – This is a similar command as above, except it will run all the processes in the background.

docker-compose stop – Stop the docker services. This will retain the previous state of containers even after you have stopped the containers.

docker-compose start – Start the docker services

docker-compose logs – Show the logs from docker containers

docker-compose ps – List the Docker containers

docker-compose run – Run one-off command. Example – docker-compose run web env – List the environment variables of web service.

Advantages of Docker Compose

  • By running most of the services in docker, you don’t have to install those services in your environment.
  • It’s easier to collaborate on the development environment with other developers by checking in the source in version control with docker-compose.
  • Quick and easy configuration. You can run your services across platforms.

Advance use of docker compose

Something I have not covered in this post is using network as  a service that you can really extend with docker compose. It also allows you to run a load balancer (or reverse proxy-like nginx) and manage the load with multiple hosts.

Instead of using environment variables, you can also use .env file for environment variables and load it while starting the containers.

Conclusion

In this post, I showed how you can use docker compose to run multiple containers with a single docker compose file. It also allows you to easily manage your environment. Similarly, you can learn about Kubernetes.

References

  1. Docker Compose – docker compose
  2. Keycloak – Keycloak containers