Category Archives: Programming

What Makes a Good Junior Developer

What makes a good Junior Developer? Yes, I will talk about some qualities every junior developer should develop to do better in this role. Now Junior Developer is a broad term, it can include Associate Software Engineers, Software Engineers, or Developers.

Once I was a Junior Developer too. Now I am in a senior role, but that doesn’t take away from me to still be a junior to other Seniors. So, I wish there was some kind of a guide to help junior developers to succeed in their roles.

Qualities that will help you succeed as a Junior Developer

  1. Be open-minded to take up a challenge – One quality I really appreciate about the junior developers that I have worked with so far is to take up a challenge. In the initial days, you want to learn as much as you can. Sometimes, it can be overwhelming, other times, it can be boring. But learn and read.
  2. Take ownership of the task you work on – If you get a task to work on, take ownership of that task till its completion. You can create trust with your peers by taking ownership of the task. If you get stuck with the task, ask questions about it to your seniors. Senior Developers are meant to help you.
  3. Ask questions – As a senior developer, I really appreciate developers who ask questions. Even if those questions can be easy to answer. If you are stuck or don’t know, ask the question. Even in meetings, if you ask a question, everybody should appreciate it. A question brings a different perspective. And every perspective matters.
  4. Help others – One way to build your career at any organization is by helping others as much as you can. So, help others. You solved a problem that many other developers are facing, share that knowledge. If you built an automation tool, share the tool. Other junior developers come to you, help them. Be so good that everyone comes to you.

How to understand the system as a Junior Developer

Everyone has their own way to learn any skill or a complex system. But there are a few tried and tested ideas that can help you understand the system. This is definitely helpful in your initial days at any organization as a junior developer.

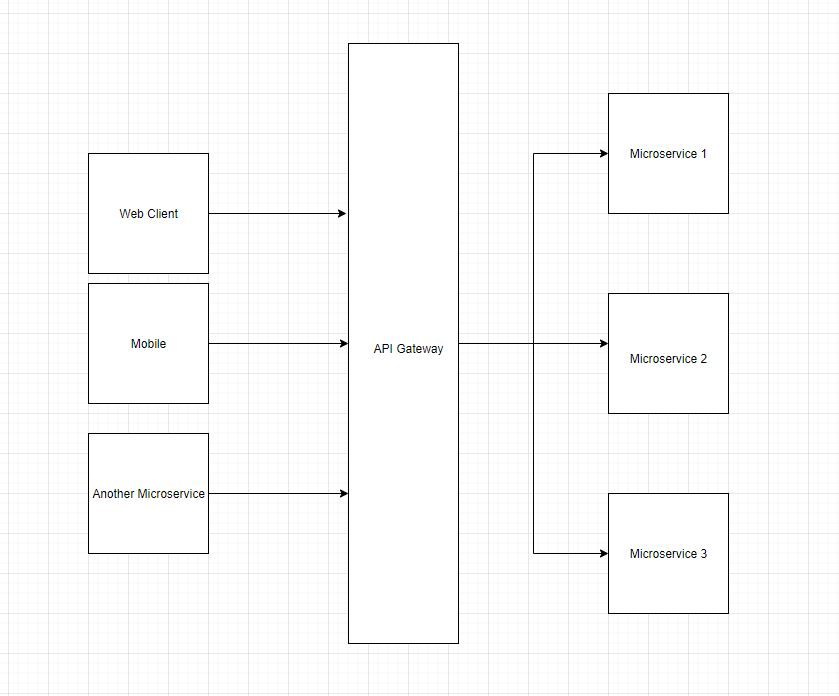
  1. Read and take notes. If there is documentation for the system architecture, read as much as you can. This will help you get the bigger picture of the system. If there is no documentation, then you are up against a challenge. Try to identify the components of the system that communicate with each other. Start creating documentation yourself so the future junior developers can thank you.
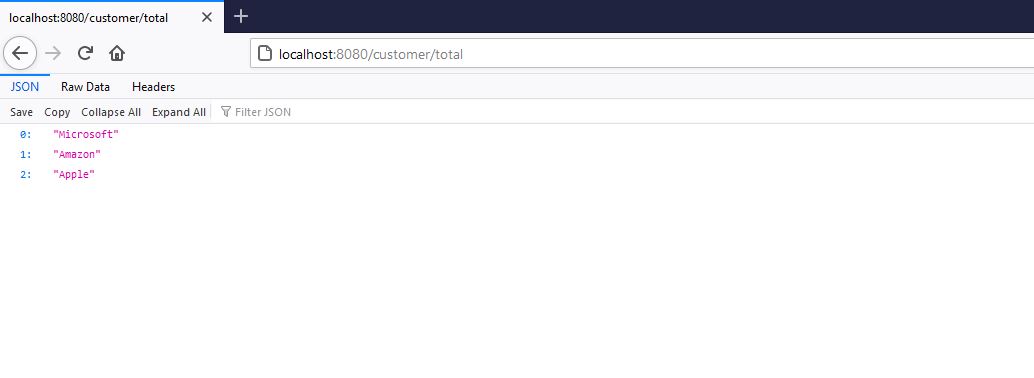
  2. Take up a task. Once you get a bigger picture, take up a task and work on it. Do a microanalysis of part of the system that you work on. Now this will provide you both a short distance view as well as a long-distance view of your system. Also, remember understanding any complex system takes time, so don’t be discouraged if you do not understand everything in a month or two.
  3. Read about system design in general. One way to build up your knowledge about any complex system is by reading about system design. Another way is to read the engineering blog of your company. A lot of passionate developers write these engineering blogs to share their knowledge worldwide.

Tips to succeed as a Junior Developer

  1. Read code – Read the code of the system you are working on. This will make you comfortable with code as well. Create your questions based on reading the code that you can ask senior developers.
  2. Participate in Code Review – One thing you will learn from code review to see how senior developers help in improving the code quality, so you can adapt to that quality. You will also learn to review others’ code.
  3. Write unit test cases – For whatever code you write, write unit test cases. This will set you apart from other developers.
  4. Start understanding where your team is struggling – Become a person who can identify a problem and find a solution. It’s very rare to find high-agency developers, but you can build up that skill. See where your team is struggling and how you can help the team in not struggling. Every team struggles with something. If as a Junior Developer, you have time, then help your team by building a tool or creating documentation of the system that has been ignored.
  5. Do not compare – Do not compare yourself with fellow junior or senior developers. Everyone’s path is different. So focus on what you can and can not do. Improve your skills.
  6. Ask for feedback – If there is no way to get feedback from a manager or senior developers, check in with your seniors once a month to get feedback. Feedback helps to improve. Find your own weaknesses and work on them.

Conclusion

In this post, I shared some tips and skills that a Junior Developer can use to be successful. If you enjoyed this post, comment on this post telling me what skill you think can make a Junior Developer stand out.

If you are still looking for my book Simplifying Spring Security, it is here to buy.

Integration Testing in Spring Boot Application

In this post, I will show how we can add integration testing to a Spring Boot application.

Integration tests play a key role in ensuring the quality of the application. With a framework like Spring Boot, it is even easier to integrate such tests. Nevertheless, it is important to test applications with integration tests without deploying them to the application server.

Integration tests can help to test the data access layer of your application. Integration tests also help to test multiple units. For the Spring Boot application, we need to run an application in ApplicationContext to be able to run tests. Integration tests can help in testing exception handling.

Spring Boot Application

For this demo, we will build a simple Spring Boot application with REST APIs. We will be using the H2 In-Memory database for storing the data. Eventually, I will show how to write an integration test. This application reads a JSON file of vulnerabilities from the National Vulnerability Database and stores it in the H2 database. REST APIs allow a user to fetch that data in a more readable format.

Dependencies

First, we want to build integration tests in this application, so we will need to include the dependency spring-boot-starter-test .


dependencies {
 implementation 'org.springframework.boot:spring-boot-starter-data-jpa'
 implementation 'org.springframework.boot:spring-boot-starter-web'
 implementation 'junit:junit:4.13.1'
 runtimeOnly 'com.h2database:h2:1.4.200'
 testImplementation 'org.springframework.boot:spring-boot-starter-test'
}

This dependency of spring-boot-starter-test allow us to add testing-related annotations that we will see soon.

REST API

Now as I said previously, we will have a REST API to fetch national vulnerability database data. We will create a REST controller with two APIs one to fetch a list of vulnerabilities and one to fetch a vulnerability by CVE id.


@RestController
@RequestMapping("/v1/beacon23/vulnerabilities")
public class CveController
{

    @Autowired
    private CveService cveService;

    @GetMapping("/list")
    public List getAllCveItems(@RequestParam(required = false, name="fromDate") String fromDate, @RequestParam(required = false, name=
            "toDate") String toDate)
    {
        List cveDTOList = cveService.getCveItems(fromDate, toDate);

        if(cveDTOList == null || cveDTOList.isEmpty())
        {
            return new ArrayList<>();
        }
        else
        {
            return cveDTOList;
        }
    }

    @GetMapping
    public ResponseEntity getCveItemById(@RequestParam("cveId") String cveId)
    {
        CveDTO cveDTO = cveService.getCveItemByCveId(cveId);

        if(cveDTO != null)
        {
            return new ResponseEntity<>(cveDTO, HttpStatus.OK);
        }
        else
        {
            return new ResponseEntity<>(HttpStatus.NO_CONTENT);
        }
    }

}

So we have

  • /v1/beacon23/vulnerabilities/list – to fetch a list of vulnerabilities
  • /v1/beacon23/vulnerabilities?cveId=value – to fetch vulnerability by CVE id.

Service

Now, most of the business logic and validation happen in Service class. As we saw in our API, we use CVEService to fetch the required data.

    @Autowired
    public CveDataDao cveDataDao;

    public List getCveItems(String from, String to)
    {
        LOGGER.debug("The date range values are from = {} and to = {}", from, to);
        List cveDataList = cveDataDao.findAll();
        List cveDTOList = new ArrayList<>();

        for(CveData cveData : cveDataList)
        {
            List cveList = cveData.getCveItems();
            for(CveItem cveItem: cveList)
            {
                Date fromDate;
                Date toDate;

                if(!isNullOrEmpty(from) && !isNullOrEmpty(to))
                {
                    fromDate = DateUtil.formatDate(from);
                    toDate = DateUtil.formatDate(to);

                    Date publishedDate = DateUtil.formatDate(cveItem.getPublishedDate());

                    if(publishedDate.after(toDate) || publishedDate.before(fromDate))
                    {
                        continue;
                    }
                }
                CveDTO cveDTO = convertCveItemToCveDTO(cveItem);
                cveDTOList.add(cveDTO);
            }
        }
        return cveDTOList;
    }

    private boolean isNullOrEmpty (String str)
    {
        return (str == null || str.isEmpty());
    }

    private String buildDescription (List descriptionDataList)
    {
        if(descriptionDataList == null || descriptionDataList.isEmpty())
        {
            return EMPTY_STRING;
        }
        else
        {
            return descriptionDataList.get(0).getValue();
        }
    }

    private List buildReferenceUrls (List referenceDataList)
    {
        return referenceDataList.stream().map(it -> it.getUrl()).collect(Collectors.toList());
    }

    public CveDTO getCveItemByCveId(String cveId)
    {
        List cveDataList = cveDataDao.findAll();
        CveDTO cveDTO = null;

        for(CveData cveData : cveDataList)
        {
            List cveItems = cveData.getCveItems();

            Optional optionalCveItem =
                    cveItems.stream().filter(ci -> ci.getCve().getCveMetadata().getCveId().equals(cveId)).findAny();
            CveItem cveItem = null;
            if(optionalCveItem.isPresent())
            {
                cveItem = optionalCveItem.get();
            }
            else
            {
                return cveDTO;
            }
            cveDTO = convertCveItemToCveDTO(cveItem);
        }

        return cveDTO;
    }

Usage of @SpringBootTest

Spring Boot provides an annotation @SpringBootTest that we can use in integration tests. With this annotation, the tests can start the application context that can contain all the objects we need for the application to run.

Integration tests provide an almost production-like scenario to test our code. The tests annotated with @SpringBootTest create the application context used in our tests through application class annotated with @SpringBootConfiguration.

These tests start an embedded server, create a web environment, and then run @Test methods to do integration testing. We need to add few attributes to make sure we can start web environment while using @SpringBootTest.

  • Attribute webEnvironment – To create a web environment with a default port or a random port.

We can also pass properties to use for tests using an active profile. Usually, we use these profiles for different environments, but we can also use a special profile for tests only. We create application-dev.yml, application-prod.yml profiles. Similarly, we can create application-test.yml and use the annotation @ActiveProfiles('test') in our tests.

Example of Integration Test

For our REST API, we will create an integration test that will test our controller. We will also use TestRestTemplate to fetch data. This integration test will look like below:


package com.betterjavacode.beacon23.tests;

import org.junit.Test;
import org.junit.runner.RunWith;
import org.springframework.boot.test.context.SpringBootTest;
import org.springframework.boot.test.web.client.TestRestTemplate;
import org.springframework.boot.web.server.LocalServerPort;
import org.springframework.http.HttpEntity;
import org.springframework.http.HttpHeaders;
import org.springframework.http.HttpMethod;
import org.springframework.http.ResponseEntity;
import org.springframework.test.context.junit4.SpringRunner;

import static org.junit.Assert.assertNotNull;

@RunWith(SpringRunner.class)
@SpringBootTest(webEnvironment = SpringBootTest.WebEnvironment.RANDOM_PORT)
public class CveControllerTest
{
    @LocalServerPort
    private int port;

    TestRestTemplate testRestTemplate = new TestRestTemplate();

    HttpHeaders headers = new HttpHeaders();

    @Test
    public void testGetAllCveItems()
    {
        HttpEntity entity = new HttpEntity<>(null, headers);

        ResponseEntity responseEntity = testRestTemplate.exchange(createURLWithPort(
                "/v1/beacon23/vulnerabilities/list"),HttpMethod.GET, entity, String.class);

        assertNotNull(responseEntity);

    }


    private String createURLWithPort(String uri)
    {
        return "http://localhost:" + port + uri;
    }
}

We use @SpringBootTest annotation for our test class and set up the application context by using webEnvironment with a RANDOM_PORT. We also mock the local web server by setting up a mock port with @LocalServerPort.

TestRestTemplate allows us to simulate a client that will call our API. Once we run this test (either through gradle build OR through IntelliJ), we will see the Spring Boot Application Context setup running and the application running at a random port.

One disadvantage of creating integration tests with @SpringBootTest is that it will slow down building your application. In most enterprise environments, you will have this set up through continuous integration and continuous deployment. In such scenarios, it slows down the process of integration and deployment if you have a lot of integration tests.

Conclusion

Finally, you should use integration testing in the Spring Boot application or not, it depends on your application. But despite the drawback, it is always useful to have integration tests that allow testing multiple units at a time. @SpringBootTest is a handy annotation that can be used to set up an application context, allowing us to run tests close to a production environment.

References

  1. integration Testing with Spring Boot – Integration Testing

Controller Advice – Exception Handler in Spring Boot

In this post, I will show how we can use the annotation @ControllerAdvice – Controller Advice – an exception handler in the Spring Boot application. If you want to read how to handle uncaught exceptions in Spring Boot, you can check my old post.

What is @ControllerAdvice ?

Spring 3.2 introduced an annotation @ControllerAdvice. The annotation allows the handling of exceptions across the application. Before this, Spring offered another annotation @ExceptionHandler for exception handling. But, you have to add this annotation in each controller class of your application. It doesn’t help on the application level.

@ControllerAdvice is an annotation-driven interceptor. It intercepts most of those classes that include @RequestMapping.

Comparison with @ExceptionHandler

In most controller classes, you can add @ExceptionHandler annotation to handle exceptions for that class. Nevertheless, in such classes, one can add an extra method to handle exceptions thrown by @RequestMapping methods in the same controller. These exception handling methods can redirect the user to the error page OR build a custom error response.

This will look like below:

@RestController
@RequestMapping("/companies")
public class CompanyController
{
  
  @GetMapping
  public List<Company> getAllCompanies(HttpServletRequest req) throws Exception {
    
  } 
  @ExceptionHandler(Exception.class)
  public ModelAndView handleError(HttpServletRequest req, Exception ex) {
    logger.error("Request: " + req.getRequestURL() + " raised " + ex);

    ModelAndView mav = new ModelAndView();
    mav.addObject("exception", ex);
    mav.addObject("url", req.getRequestURL());
    mav.setViewName("error");
    return mav;
  }

}

Additionally, you can see the method getAllCompanies throw an Exception. The method handleError will handle the exception thrown by getAllCompanies.

Furthermore, if I have another controller like UserController, I will end up writing like below if it has to handle exceptions.

@RestController
@RequestMapping("/users")
public class UserController
{
  
  @GetMapping
  public List<User> getAllUsers(HttpServletRequest req) throws Exception {
    
  } 
  @ExceptionHandler(Exception.class)
  public ModelAndView handleError(HttpServletRequest req, Exception ex) {
    logger.error("Request: " + req.getRequestURL() + " raised " + ex);

    ModelAndView mav = new ModelAndView();
    mav.addObject("exception", ex);
    mav.addObject("url", req.getRequestURL());
    mav.setViewName("error");
    return mav;
  }

}

Henceforth, this makes a lot of duplicate code. This is where Controller Advice comes into the picture with an advantage.

Example of Controller Advice

A Controller Advice allows you to use the same exception handling technique across applications, without repeating any code.

Consequently, a class annotated with @ControllerAdvice implements three types of methods:

  • Exception handling method annotated with @ExceptionHandler
  • Model enhancement methods annotated with @ModelAttribute
  • Binder initialization methods annotated with @InitBinder


@ControllerAdvice
public class GlobalExceptionHandler
{
   
    @ExceptionHandler(CompanyNotFoundException.class)
    public ModelAndView handleError(HttpServletRequest req, CompanyNotFoundException ex) 
    {
       logger.error("Request: " + req.getRequestURL() + " raised " + ex);

       ModelAndView mav = new ModelAndView();
       mav.addObject("exception", ex);
       mav.addObject("url", req.getRequestURL());
       mav.setViewName("error");
       return mav;
     }

    @ExceptionHandler(UserNotFoundException.class)
    public ResponseEntity handleUserExceptionError(HttpServletRequest req, HttpServletResponse res, UserNotFoundException ex)
    {
       List errors = Collections.singletonList(ex.getMessage());
       // Get headers
       if(HttpStatus.INTERNAL_SERVER_ERROR.equals(res.getStatus()))
       {
         // do something
       } 

       return new ResponseEntity<>(new ApiError(errors), headers, status);
    }

}

This will allow now to intercept any exception thrown from controllers. This makes implementing exception handling easier.

Conclusion

In this post, I showed how we can implement Controller Advice – exception handler in Spring Boot. This is a very effective way to handle exceptions in the current applications built with Spring Boot.

How To Use AWS Sagemaker

In this post, I will explain how to use AWS Sagemaker. Even if you do not have experience with this AWS service, this guide will help understand AWS Sagemaker step by step.

What is AWS Sagemaker?

AWS Sagemaker is a new web service that AWS offers. It helps to build, train and deploy machine learning models at any scale.  Basically, Sagemaker does the heavy lifting of machine learning and as a developer or data scientist, you can focus on building and training your model.

Major Benefits of AWS Sagemaker

  • You can easily fetch or store data from other AWS Services
  • Highly Scalable. This again relates to my earlier point by being able to connect to other AWS Services.
  • Does heavy lifting of ML algorithms – Fast training

Details Of Machine Learning and Sagemaker

Machine learning is literally machine learning about something. Nevertheless, that something can be anything that humans are usually good at or bad at. Machine Learning provides an ability for systems to learn and improve from experience.

In another way, you can say a system with a feedback loop. A system performs functions, gathers data along the way, uses that data to improve the functions it is performing.

Building a model

Sagemaker makes it easy to connect with AWS Services like S3, Database. Sagemaker also includes Juypter notebooks. These notebooks make it easier to visualize data.

Sagemaker also offers a set of algorithms pre-installed. Sagemaker also comes in with preconfigured TensorFlow or Apache MXNet.

Training and Deploying a model

I will show later in this post how we can train a model in Sagemaker with a single click. The important thing to note here is that you can easily train a model for petabyte-scale in Sagemaker. With continuous improvement, Sagemaker can also improve the performance of the model.

Once you train and tune the model in Sagemaker, it is easy to deploy the model in production. Sagemaker deploys the model on an auto-scaling cluster of EC2 instances.

A simple example of using AWS Sagemaker

  1. Once, you log in to the AWS console, access Sagemaker service. Select Notebook Instances and create a Jupyter Notebook instance as shown below:

How to Use AWS Sagemaker - Notebook Instance

2. On the next page, keep the most default settings as shown. You will need to create an IAM role for S3 bucket creation. If you don’t have that role, you can create it while selecting the role.

3.  Once you select the role, click “create a notebook instance” and it will create a notebook instance. It will take few minutes before it will show it is running. Once the notebook instance is running, click “open” and it will open Jupyter notebook in another tab.

4. Select notebook environment as conda_python3 or anything that you want to use.

Once you have the notebook opened, you can use python or the language of your choice to build a model. For the model, you can easily fetch data from S3 or relational databases from AWS service.

I will not be showing that part in this post. But if you want to refer to a good example, you can visit this post here.

Conclusion

In this post, I showed how one can use AWS Sagemaker to build and train the model for machine learning.

You can subscribe to my blog here.

How to Use API Gateway with Spring Cloud

In this post, I will show how we can use the API Gateway pattern with Spring Cloud. With microservice architecture becoming more and more useful, it has become equally complex how to handle calls to the microservices.

The purpose of microservices is to decouple the application into loosely coupled microservices that can interact with clients and with each other easily.

Importantly, the ease of development and deployment make microservices easier to design based on specific needs.

API Gateway Design Pattern

When the enterprise architecture scales, it becomes complicated with the number of microservices. Clients can directly call these microservices, but there are a few challenges

  1. Each client has to make a request to the exposed microservice API. In many cases, it might have to make multiple server round trips. As a result of this, it increases network latency.
  2. Every microservice has to implement common functionalities like authentication, logging, and authorization.
  3. It becomes harder to change microservice without affecting the client. In reality, the client doesn’t need to know microservice and its implementation behind.

To address these issues, the architecture now contains another layer between the client and the microservices. This is API Gateway.

API Gateway acts like a proxy that routes the request to the appropriate microservices and returns a response to the client. Microservices can also interact with each other through this Gateway.

API Gateway with Spring Cloud

Usage of API Gateway

There are a few functionalities that API Gateway provides.

Routing

The major usage of API Gateway is routing the request from the client to the appropriate server or microservice. Particularly, API Gateway hides the implementation of API from the client.

Common Functionalities

API Gateway can also implement extra common functionalities and in-process reducing the load from microservices.  These common functionalities include logging, authentication, authorization, load balancing, response caching, retry policies, circuit breakers, rate limiter.

Different API Gateways

There are a number of API Gateways available and one can use any of these based on the needs.

  • Netflix API Gateway (Zuul)
  • Amazon API Gateway
  • Mulesoft
  • Kong API Gateway
  • Azure API Gateway

Overall, which API Gateway to use will depend on your use case. But the most of these gateways provide options to scale, flexibility and support.

In this demo, I will be showing how to use spring-cloud-starter-netflix-zuul library for Netflix API Gateway.

Example of API Gateway with Spring Cloud

However, we will develop two microservices. We will also build an API Gateway using Spring Cloud. This API Gateway will act as a reverse proxy to route to either of the microservices.

So let’s create the first microservice. This will contain a CustomerController like below:


@RestController
@RequestMapping("/customer")
public class CustomerController
{
    @GetMapping("/total")
    public List customers()
    {
        List list = new ArrayList<>();
        list.add("Microsoft");
        list.add("Amazon");
        list.add("Apple");
        return list;
    }
}

This microservice will be running on port 8081. server.port=8081.

Now, let’s create another microservice. This will contain VendorController like below:


@RestController
@RequestMapping("/vendor")
public class VendorController
{
    @GetMapping("/total")
    public List vendors()
    {
        List list = new ArrayList<>();
        list.add("CJI Consultants");
        list.add("Signature Consultants");
        list.add("Deloitte");
        return list;
    }
}

This microservice will be running on port 8082. server.port=8082

API Gateway with Spring Cloud

After all, we will create an API Gateway using Spring Cloud. We need to include the following dependencies:

dependencies {
 implementation 'org.springframework.boot:spring-boot-starter-thymeleaf'
 implementation 'org.springframework.boot:spring-boot-starter-webflux'
 implementation 'org.springframework.cloud:spring-cloud-starter-gateway'
 testImplementation 'org.springframework.boot:spring-boot-starter-test'
 testImplementation 'io.projectreactor:reactor-test'
}

Note the dependency of spring-cloud-starter-gateway. Nevertheless, we will need a RouteLocator type bean to route our requests. This is where we add the configuration in our Api Gateway.

package com.betterjavacode.apigatewaydemo.config;


import org.springframework.cloud.gateway.route.RouteLocator;
import org.springframework.cloud.gateway.route.builder.RouteLocatorBuilder;
import org.springframework.context.annotation.Bean;
import org.springframework.context.annotation.Configuration;

@Configuration
public class SpringCloudConfig
{
    @Bean
    public RouteLocator gatewayRoutes(RouteLocatorBuilder routeLocatorBuilder)
    {
        return routeLocatorBuilder.routes()
                .route("customerModule", rt -> rt.path("/customer/**")
                        .uri("http://localhost:8081/"))
                .route("vendorModule", rt -> rt.path("/vendor/**")
                        .uri("http://localhost:8082/"))
                .build();

    }
}

As shown above, this configuration bean builds a RouteLocator to route requests related to two modules. Also, note that our gateway service is running at port 8080. If a request is initiated with a gateway address, the API gateway will route it to the appropriate service.

Demo

Let’s start out our microservices and API Gateway service. Two microservices are running on ports 8081 and 8082. The API gateway service is running on port 8080.

Now if I access http://localhost:8080/vendor/total, I will get the list of vendors as follows:

API Gateway with Spring Cloud - List of Vendors

If I access http://localhost:8080/customer/total, I will get the list of customers as follows:

API Gateway with Spring Cloud - List of Customers


Conclusion

Conclusively, I showed how to use API Gateway with Spring Cloud. API Gateway is an important design concept. With an increasing number of microservices, it becomes important to have a common pattern that can handle a lot of the common workload of these services, and API Gateway helps with that.

My book Simplifying Spring Security is currently on discount sale if you are interested.