Category Archives: Core Java

Redis Caching with RedisCacheManager

Introduction

In the previous post Redis Caching, we saw how to use Redis caching with all default settings. We didn’t have any Cache Manager or anything, but we were able to cache data. In this post, we will show how to use RedisCacheManager to cache the data. This manager can further be extended to customize the caching configuration even more. But we will not be looking into customization in this post particularly.

RedisCacheManager with Redis

Implement CacheManager for RedisCacheManager

Most of the code for this post will be similar to what we implemented in the previous post. We will just show how to use CacheManager.

To implement CacheManager first we remove @EnableCaching annotation from the main class SpringAppCacheApplication. Now we add a new CacheConfig class to configure our cache manager.

Basically, this CacheConfig will define CacheManager which build a redisTemplate to get JedisConnectionFactory which will be our java client to connect to our Redis server. This JedisConnectionFactory will get server host and port properties from application.properties file. The source code will look like below:

package com.betterjavacode.config;


import org.slf4j.Logger;
import org.slf4j.LoggerFactory;
import org.springframework.beans.factory.annotation.Value;
import org.springframework.cache.CacheManager;
import org.springframework.cache.annotation.CachingConfigurerSupport;
import org.springframework.cache.annotation.EnableCaching;
import org.springframework.context.annotation.Bean;
import org.springframework.context.annotation.ComponentScan;
import org.springframework.context.annotation.Configuration;
import org.springframework.context.annotation.PropertySource;
import org.springframework.context.support.PropertySourcesPlaceholderConfigurer;
import org.springframework.data.redis.cache.RedisCacheManager;
import org.springframework.data.redis.connection.RedisConnectionFactory;
import org.springframework.data.redis.connection.jedis.JedisConnectionFactory;
import org.springframework.data.redis.core.RedisTemplate;

@Configuration
@EnableCaching
@ComponentScan("com.betterjavacode.config")
@PropertySource("classpath:/application.properties")
public class CacheConfig extends CachingConfigurerSupport
{
    private static final Logger LOGGER = LoggerFactory.getLogger(CacheConfig.class);
    private @Value("${spring.redis.host}") String redisHost;
    private @Value("${spring.redis.port}") int redisPort;

    @Bean
    public static PropertySourcesPlaceholderConfigurer propertySourcesPlaceholderConfigurer() {
        return new PropertySourcesPlaceholderConfigurer();
    }

    @Bean
    public JedisConnectionFactory redisConnectionFactory()
    {
        LOGGER.info(" Inside redisConnectionFactory()...");

        JedisConnectionFactory redisConnectionFactory = new JedisConnectionFactory();

        redisConnectionFactory.setHostName(redisHost);
        redisConnectionFactory.setPort(redisPort);
        redisConnectionFactory.setUsePool(true);
        return redisConnectionFactory;
    }

    @Bean
    public RedisTemplate<String, String> redisTemplate(RedisConnectionFactory rf)
    {
        LOGGER.info(" Inside redisTemplate()...");

        RedisTemplate<String, String> redisTemplate = new RedisTemplate<>();
        redisTemplate.setConnectionFactory(redisConnectionFactory());
        return redisTemplate;
    }

    @Bean
    public CacheManager cacheManager(RedisTemplate redisTemplate)
    {
        LOGGER.info(" Inside cacheManager()...");
        RedisCacheManager cacheManager = new RedisCacheManager(redisTemplate);
        cacheManager.setDefaultExpiration(300);
        return cacheManager;
    }
}

Now if we build our application and run it, Spring boot console will show the following output

2018-02-28 20:31:41.913  INFO 9856 --- [ost-startStop-1] o.s.b.w.servlet.FilterRegistrationBean   : Mapping filter: 'requestContextFilter' to: [/*]
2018-02-28 20:31:42.034  INFO 9856 --- [           main] o.s.j.d.DriverManagerDataSource          : Loaded JDBC driver:com.mysql.jdbc.Driver
2018-02-28 20:31:42.244  INFO 9856 --- [           main] j.LocalContainerEntityManagerFactoryBean : Building JPA container EntityManagerFactory for persistence unit 'default'
2018-02-28 20:31:42.288  INFO 9856 --- [           main] o.hibernate.jpa.internal.util.LogHelper  : HHH000204: Processing PersistenceUnitInfo [ name: default        ...]
2018-02-28 20:31:42.495  INFO 9856 --- [           main] org.hibernate.Version                    : HHH000412: Hibernate
 Core {5.2.13.Final}
2018-02-28 20:31:42.499  INFO 9856 --- [           main] org.hibernate.cfg.Environment            : HHH000206: hibernate
.properties not found
2018-02-28 20:31:42.599  INFO 9856 --- [           main] o.hibernate.annotations.common.Version   : HCANN000001: Hiberna
te Commons Annotations {5.0.1.Final}
2018-02-28 20:31:43.688  INFO 9856 --- [           main] org.hibernate.dialect.Dialect            : HHH000400: Using dia
lect: org.hibernate.dialect.MySQL5Dialect
2018-02-28 20:31:43.764  INFO 9856 --- [           main] o.h.e.j.e.i.LobCreatorBuilderImpl        : HHH000423: Disabling
 contextual LOB creation as JDBC driver reported JDBC version [3] less than 4
2018-02-28 20:31:44.684  INFO 9856 --- [           main] j.LocalContainerEntityManagerFactoryBean : Initialized JPA Enti
tyManagerFactory for persistence unit 'default'
2018-02-28 20:31:45.184  INFO 9856 --- [           main] com.betterjavacode.config.CacheConfig    :  Inside redisConnectionFactory()...
2018-02-28 20:31:45.288  INFO 9856 --- [           main] com.betterjavacode.config.CacheConfig    :  Inside redisTemplate()...
2018-02-28 20:31:45.346  INFO 9856 --- [           main] com.betterjavacode.config.CacheConfig    :  Inside cacheManager()...
2018-02-28 20:31:45.985  INFO 9856 --- [           main] s.w.s.m.m.a.RequestMappingHandlerAdapter : Looking for @ControllerAdvice: org.springframework.boot.context.embedded.AnnotationConfigEmbeddedWebApplicationContext@30946e09: startup dat
e [Wed Feb 28 20:31:37 CST 2018]; root of context hierarchy
2018-02-28 20:31:46.214  INFO 9856 --- [           main] s.w.s.m.m.a.RequestMappingHandlerMapping : Mapped "{[/cachedemo/v1/companies/{id}/],methods=[GET],produces=[application/json]}" onto public com.betterjavacode.models.Company com.bette
rjavacode.resources.CompanyController.getCompany(int)
2018-02-28 20:31:46.217  INFO 9856 --- [           main] s.w.s.m.m.a.RequestMappingHandlerMapping : Mapped "{[/cachedemo/v1/companies],methods=[GET],produces=[application/json]}" onto public java.util.List<com.betterjavacode.models.Company>
 com.betterjavacode.resources.CompanyController.getAllCompanies()
2018-02-28 20:31:46.222  INFO 9856 --- [           main] s.w.s.m.m.a.RequestMappingHandlerMapping : Mapped "{[/error]}"onto public org.springframework.http.ResponseEntity<java.util.Map<java.lang.String, java.lang.Object>> org.springframewo
rk.boot.autoconfigure.web.BasicErrorController.error(javax.servlet.http.HttpServletRequest)
2018-02-28 20:31:46.223  INFO 9856 --- [           main] s.w.s.m.m.a.RequestMappingHandlerMapping : Mapped "{[/error],produces=[text/html]}" onto public org.springframework.web.servlet.ModelAndView org.springframework.boot.autoconfigure.web
.BasicErrorController.errorHtml(javax.servlet.http.HttpServletRequest,javax.servlet.http.HttpServletResponse)
2018-02-28 20:31:46.300  INFO 9856 --- [           main] o.s.w.s.handler.SimpleUrlHandlerMapping  : Mapped URL path [/webjars/**] onto handler of type [class org.springframework.web.servlet.resource.ResourceHttpRequestHandler]
2018-02-28 20:31:46.301  INFO 9856 --- [           main] o.s.w.s.handler.SimpleUrlHandlerMapping  : Mapped URL path [/**] onto handler of type [class org.springframework.web.servlet.resource.ResourceHttpRequestHandler]
2018-02-28 20:31:46.377  INFO 9856 --- [           main] o.s.w.s.handler.SimpleUrlHandlerMapping  : Mapped URL path [/**/favicon.ico] onto handler of type [class org.springframework.web.servlet.resource.ResourceHttpRequestHandler]
2018-02-28 20:31:47.071  INFO 9856 --- [           main] o.s.j.e.a.AnnotationMBeanExporter        : Registering beans for JMX exposure on startup
2018-02-28 20:31:47.184  INFO 9856 --- [           main] s.b.c.e.t.TomcatEmbeddedServletContainer : Tomcat started on port(s): 8080 (http)
2018-02-28 20:31:47.195  INFO 9856 --- [           main] c.b.S.SpringAppCacheApplication          : Started SpringAppCacheApplication in 10.626 seconds (JVM running for 11.552)

In this console output, we will see our log statements Inside redisConnectionFactory, Inside redisTemplate, Inside cacheManager.

Conclusion

In this short post, we showed how to use RedisCacheManager to configure Redis for a spring boot application.

References


Caching: How to use Redis Caching with Spring Boot

In this introductory post, we will show how to use Redis caching in a simple spring boot application. In subsequent posts, we will evaluate different factors of Redis caching. But for now, we will try to focus on the simple problem of providing caching to a rest service that provides companies-related data to the user interface. This data is in a database, but caching will help us improve the performance.


What you need

  • Java 8
  • MySQL Database
  • IntelliJ Editor
  • Gradle
  • Redis Server and Redis Desktop Manager

Spring Boot Based Rest Service

As part of this post, we will build a simple spring-boot based rest service. This rest service will provide data related to companies which will be stored in mysql database.

We will be using Gradle to build our dependencies in this project. Important dependencies for this project are spring-boot-starter, spring-boot-jpa and spring-boot-starter-data-redis With all the needed Gradle dependencies, our Gradle script will look like below:

buildscript {
  ext {
    springBootVersion = '1.5.10.RELEASE'
  }
  repositories {
    mavenCentral()
  }
  dependencies {
    classpath("org.springframework.boot:spring-boot-gradle-plugin:${springBootVersion}")
  }
}

apply plugin: 'java'
apply plugin: 'eclipse'
apply plugin: 'org.springframework.boot'

group = 'com.betterjavacode'
version = '0.0.1-SNAPSHOT'
sourceCompatibility = 1.8

repositories {
  mavenCentral()
}

jar {
    manifest {
        attributes 'Main-Class':'com.betterjavacode.SpringAppCache.SpringAppCacheApplication'
    }
    baseName= 'SpringAppCache'
    version='0.0.1-SNAPSHOT'
}

dependencies {
  compile('org.springframework.boot:spring-boot-starter')
  compile('org.springframework.data:spring-data-jpa')
  compile('org.springframework.boot:spring-boot-starter-data-redis')
  compile('org.springframework.boot:spring-boot-starter-web')
        compile('org.hibernate.javax.persistence:hibernate-jpa-2.1-api:1.0.0.Final')
        compile('mysql:mysql-connector-java:5.1.6')
        compile('org.hibernate:hibernate-core:5.2.13.Final')   
        compile('org.aspectj:aspectjweaver:1.8.13')
  testCompile('org.springframework.boot:spring-boot-starter-test')
}

Let’s build a model class for the object Company which will look like below:

package com.betterjavacode.models;

import javax.persistence.*;
import java.io.Serializable;

@Entity(name="Company")
@Table(name="company")
public class Company implements Serializable
{
    public Company()
    {

    }

    @Id
    @GeneratedValue(strategy = GenerationType.AUTO)
    private int id;
    @Column(nullable=false)
    private String name;
    @Column(nullable=false)
    private String type;

    public Company(int id, String name, String type)
    {
        this.id = id;
        this.type = type;
        this.name = name;
    }

    public int getId()
    {
        return id;
    }

    public void setId(int id)
    {
        this.id = id;
    }

    public String getName()
    {
        return name;
    }

    public void setName(String name)
    {
        this.name = name;
    }

    public String getType()
    {
        return type;
    }

    public void setType(String type)
    {
        this.type = type;
    }
}

We will not be showing any of the middle layer code which is mostly how the data is going to be built.

Our RestController will use an autowired CompanyManager to fetch company data from the database.

Before we build RestController, we will show the configuration that we have annotated in SpringAppCacheApplication main class.

package com.betterjavacode.SpringAppCache;

import org.springframework.boot.SpringApplication;
import org.springframework.boot.autoconfigure.EnableAutoConfiguration;
import org.springframework.boot.autoconfigure.SpringBootApplication;
import org.springframework.cache.annotation.EnableCaching;
import org.springframework.context.annotation.ComponentScan;
import org.springframework.data.jpa.repository.config.EnableJpaRepositories;

@SpringBootApplication
@EnableAutoConfiguration
@ComponentScan(basePackages = "com.betterjavacode")
@EnableJpaRepositories(basePackages = "com.betterjavacode.repositories")
@EnableCaching
public class SpringAppCacheApplication
{
  public static void main(String[] args) {
    SpringApplication.run(SpringAppCacheApplication.class, args);
  }
}

Here you can see, we have enabled caching with annotation @EnableCaching.

Now in our RestController class CompanyController , this will show annotation of @Cachable that helps decide when to cache data for the incoming request. This annotation caches data that has been fetched for the request based on configuration.

package com.betterjavacode.resources;

import java.util.List;

import com.betterjavacode.interfaces.CompanyManager;
import com.betterjavacode.models.Company;
import org.hibernate.annotations.Cache;
import org.springframework.beans.factory.annotation.Autowired;
import org.springframework.cache.annotation.Cacheable;
import org.springframework.http.HttpStatus;
import org.springframework.web.bind.annotation.*;


import javax.websocket.server.PathParam;

@RestController
@RequestMapping(value="/cachedemo/v1")
public class CompanyController
{


    @Autowired
    public CompanyManager companyManager;


    @RequestMapping(value = "/companies", method= RequestMethod.GET,
    produces = {"application/json"})
    @ResponseStatus(HttpStatus.OK)
    @ResponseBody
    @Cacheable("companies")
    public List<Company> getAllCompanies()
    {
        return companyManager.getAllCompanies();
    }


    @RequestMapping(value = "/companies/{id}/", method = RequestMethod.GET, produces = {"application/json"})
    @ResponseStatus(HttpStatus.OK)
    @ResponseBody
    @Cacheable(value = "company", key = "#id")
    public Company getCompany(@PathVariable("id") int id)
    {
        return companyManager.getCompany(id);
    }
}

Here is a controller, if you see we are caching the data coming from the database with annotation @Cacheable

To make sure data gets cached with Redis server, we will need certain properties where these annotations will help us to cache the data. The properties to configure Redis server are below:

#########################################################################################
## REDIS CACHE
#########################################################################################
spring.cache.type = redis
spring.redis.host = 127.0.0.1
spring.redis.port = 6379

Once you build the project and run it, we will be able to perform the REST requests to fetch data. If we perform the same requests multiple times, we will be able to see the data in redis.

Conclusion

In this post, we showed how to use redis-caching to cache the data for a spring boot based REST service. The code from this post is available to download github


Database design and discussion – Part I

Continuing the series of building a spring-based web application, in this post, we will discuss database design. Based on this database, we will eventually build our REST APIs.

Database Design

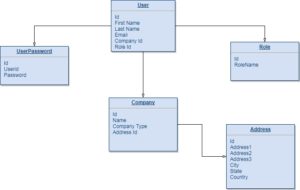
We will build database design as we go about discussing the APIs that we will be using from Twitter, Facebook, and Instagram. Since we will have users of a company logging into our application, few basic database tables that we will need

  1. User
  2. Company
  3. Role
  4. UserPassword
  5. Address

Database Model Part 1

An administrator user can add their company and can also add users. An administrator will be allowed to create reports and she can share these reports with other users. These other users will have the role of reporters.

These tables will be the foundation blocks for our application. As referred to user flow, a user with a particular role will log in to the application. He can view/change the social performance data for his company and propose new marketing strategies. Of course, this is not the complete database model for the application. We still have to look into what data we will be fetching from Facebook, Twitter, and Instagram APIs. We will study those APIs in the next post.

Follow the progress of this application here.

Building a Saas application

This is a brainstorming post where I will jot down the ideas to build a saas application. Before we start, we have to go to basics.

What is Saas?

Software as a service (Saas) is a software delivery model. In this model, the software is served through subscription service. Saas has been popular for more than a decade now. In fact, the sales of such software have skyrocketed that building simple software has become easier. From project management to ordering healthy food, we can get any of these services through software with a subscription.

Now what do we want to build and how do we start?

Of course, this is not an easy question to answer in a single post. You have to go through trial and errors to build a viable product that people will use it. But also what and who are we targeting as an audience. There are a lot of broader areas to think about to build a product. That would make the entire process to build a software way too complex. So where do we start? The eternal question still remains.

Human psychology over the years has progressed and helped technology to build a lot of cool products. With AI has been knocking on our doors, what we build today, will be obsolete in the next ten years. Based on your own experience, what I have found, is that you look into your own daily life. When you go for grocery shopping when you talk to your friends, coworkers. The moment, you feel frustrated anything that is not in your control, that’s where you have something to build on.

I know it sounds ridiculously easy to write here in the post, but not easy when you are living life. What I am trying to point is, look at problems you or other human faces and if that problem can be solved through software, you have got a viable product idea.  At every pain point, the problem is an idea to build a product. Simple example – Elon Musk was driving on LA roads, he was caught in traffic which didn’t move for a long time. How do we improve our traffic? With increasing cars and population, this is almost going to be a nightmare in the future. He realized the problem and started a company called The Boring Company that would build underground tunnels for handling traffic.

If you are like me who works in a software company, it is easy to see through this dilemma to build a solution that can help you and other developers equally. But in a larger context, you can always go through different Saas services and hear the feedback from those services’ users. Any negative feedback is your path to build a product. Assuming we got the idea to build a Saas application, so how do we proceed further?

Post-idea discussion

Once we have a solid idea, we can think about building a minimum viable product which gives customers a chance to explore the product with minimum fuss. Less complex the product for customers to use intuitively, better will be their experiences and happier they will be to recommend your product to others.

You should work to create a minimum viable design. This will be an alpha version of the product. Getting alpha version out of the door in minimum time will give you a better idea of where to focus on scaling the product in the future. This will also save time and money.

Technology and Frameworks

Once we have the initial design of the minimum product, we can think of what technology and framework to use. What kind of infrastructure to use? Considering the less expensive options, the cloud is very popular to use to build a Saas product. This reduces the management of infrastructure while giving high availability and scalability. Amazon, Google, and Microsoft all these companies offer cloud solutions to build your application. Also if you want to scale your application in the future for data-intensive, the cloud is the best option to handle all kinds of load.

For backend, there are different frameworks available based on C#, Python, or Java. Since I have worked on Java, I vouch for Spring which offers a lot of flexibility and ease to add a lot of code easily. Of course, there is a learning curve if you have never used spring before. For the database, we have two major options, one is SQL based database or NoSQL. If it is data-intensive application, NoSQL makes more sense.

On the frontend side, angularjs offers a lot of ease to build a modern user interface to interact with backend.

Conclusion

There are a lot of other factors we have not considered in this discussion especially related to the performance and health of the application. Also, we didn’t discuss any major approaches to build the application. I hope this brainstorming post will give readers an idea of a saas application that they can build.

If you have an idea of saas application and you intend to build it, let me know how it goes for you. You can subscribe to my blog.


How to implement a chatbot in Java

So we are back on our discussion about chatbots. I will not talk about the basics of chatbots that I covered here. I will directly start showing how to implement a chatbot in Java. We are going to use AIML (Artificial Intelligence Markup Language) library for this implementation. This library is opensource and provided by google.

chatbot in Java

A maven project

As a first step, let’s create a maven project in Eclipse with groupId com.betterjavacode and artifactId as chatbot. Once the project is created, we can add ab.jar to project by adding the respective dependency in maven pom.xml  like below:


<project xmlns="http://maven.apache.org/POM/4.0.0" xmlns:xsi="http://www.w3.org/2001/XMLSchema-instance" xsi:schemaLocation="http://maven.apache.org/POM/4.0.0 http://maven.apache.org/xsd/maven-4.0.0.xsd">
  <modelVersion>4.0.0</modelVersion>
  <groupId>com.betterjavacode</groupId>
  <artifactId>chatbot</artifactId>
  <version>0.0.1-SNAPSHOT</version>
  <name>JavaChatbot</name>
  
  <dependencies>
    <dependency>
        <artifactId>com.google</artifactId>
        <groupId>Ab</groupId>
        <version>0.0.4.3</version>
        <scope>system</scope>
        <systemPath>${basedir}/lib/Ab.jar</systemPath>
    </dependency>
</dependencies>
</project>

Google library for AIML provides default AI rules to use to implement chatbot. We will add these rules in resources directory of our project. Copy bots folder from program-ab directory into resources folder.

Chatbot Program

Now we will write the chatbot program which will be part of main method. In simple terms, once we invoke this program through main method, it will be in an infinite loop. An input command will wait for user input and then based on our aiml library chatbot will answer to what an user had input.


try {
            String resourcesPath = getResourcesPath();
            System.out.println(resourcesPath);
            MagicBooleans.trace_mode = TRACE_MODE;
            Bot bot = new Bot("Mr. Chatter", resourcesPath);
            Chat chatSession = new Chat(bot);
            bot.brain.nodeStats();
            String textLine = "";
            while (true) {
                System.out.println("human: ");
                textLine = IOUtils.readInputTextLine();
                if ((textLine == null) || (textLine.length() < 1))
                    textLine = MagicStrings.null_input;
                if (textLine.equals("q")) {
                    System.exit(0);
                } else if (textLine.equals("wq")) {
                    bot.writeQuit();
                    System.exit(0);
                } else {
                    String request = textLine;
                    if (MagicBooleans.trace_mode)
                        System.out.println("STATE=" + request + ":THAT=" + ((History) chatSession.thatHistory.get(0)).get(0) + ":TOPIC=" + chatSession.predicates.get("topic"));
                    String response = chatSession.multisentenceRespond(request);
                    while (response.contains("<"))
                        response = response.replace("<", "<"); while (response.contains(">")) response = response.replace(">", ">");
                    System.out.println("Robot : " + response);
                }
            }

        } catch (Exception e) {
            e.printStackTrace();
        }

Now if we run this program, it will show us input to ask a question to the chatbot Mr. Chatter.

Conclusion

In this article, we showed how to add a chatbot in Java. Similarly, we can enhance this program by adding custom patterns that the chatbot can respond to.

References

Chatbot Implementation