Author Archives: yogesh.mali@gmail.com

Spring Cloud Tutorial for Beginners

What is Spring Cloud? In this post, I will cover Spring Cloud Tutorial for beginners. If you are new to Spring Framework, I will suggest you start with Spring Boot and Microservices and Simplifying Spring Security.

As the official documentation on the Spring website says:

Spring Cloud provides tools for developers to quickly build common patterns in distributed systems – configuration management, service discovery,  circuit breakers, intelligent routing, microproxy, control bus, one-time tokens

Spring Cloud Tutorial - The Complete Guide

  • What is Spring Cloud?
  • Spring Cloud Features
  • Spring Cloud Example in action
  • Conclusion

What is Spring Cloud?

Spring Cloud provides readymade patterns to develop distributed system applications. Most of these patterns are common when building such applications.

One example is when there are multiple microservices and they interact with each other. You have to secure each service. Each service communicates with other services securely. Henceforth, how to secure these services? How do they communicate securely? And how do they get deployed seamlessly? What are the other automation tasks used for different requirements?

Using Spring Cloud, a developer can quickly build an application that implements these design patterns and deploy the application on cloud platforms( like Heroku or Cloud Foundry).

Spring Cloud Features

Spring framework is fundamental to building a Spring Cloud application. So what are the different features that Spring Cloud added?

Service Registration and Discovery

Spring Boot became popular with microservice architecture. When you have multiple services interacting with each other, you need a service to register each service, this is mostly Configuration Service. Then you need a discovery service to find other services.

Distributing Messaging

Basically, Spring cloud provides different tools to make our microservice-based architecture successful. Spring Boot helps rapid development of these applications. Spring Cloud assists in coordinating and deploying these applications. One such feature with Spring Cloud is distributed messaging.

Microservices communicate synchronously or asynchronously. Overall, Spring Cloud Bus offers a message broker that links nodes of a distributed system. Equally, Spring Cloud Stream offers a framework to build event-driven microservices. Nevertheless, this feature works well with messaging services like Kafka or ActiveMQ.

Service to Service Communication

Spring Cloud provides a feature for service-to-service communication. Usually, the flow goes like this

  • Register the service
  • Fetch the registry
  • Find the target downstream service
  • Call the REST endpoint of that service

Distributed Configuration

Particularly, the spring cloud config server allows externalized configuration on the client-side for the distributed systems.

Other than these features, Spring Cloud provides tools to build resilient and robust services. One such tool is circuit breakers.

As an illustration, we will create two microservices and one microservice will call another. We will use the feature of registry service (from Spring Cloud) to register these microservices.

Spring Cloud Example in Action

Build Eureka Server for Registry Service

First, we will create a service that will use the Eureka service and act as a registry service. As a result, add the following dependency in a new Spring Boot application:

plugins {
	id 'org.springframework.boot' version '2.5.5'
	id 'io.spring.dependency-management' version '1.0.11.RELEASE'
	id 'java'
}

group = 'com.betterjavacode'
version = '0.0.1-SNAPSHOT'
sourceCompatibility = '1.8'

repositories {
	mavenCentral()
}

ext {
	set('springCloudVersion', "2020.0.4")
}

dependencies {
	implementation 'org.springframework.cloud:spring-cloud-starter-netflix-eureka-server'
	testImplementation 'org.springframework.boot:spring-boot-starter-test'
}

dependencyManagement {
	imports {
		mavenBom "org.springframework.cloud:spring-cloud-dependencies:${springCloudVersion}"
	}
}

test {
	useJUnitPlatform()
}

Once we have that dependency, we can enable the eureka server in our main class.

package com.betterjavacode.eurekaserver;

import org.springframework.boot.SpringApplication;
import org.springframework.boot.autoconfigure.SpringBootApplication;
import org.springframework.cloud.netflix.eureka.server.EnableEurekaServer;

@SpringBootApplication
@EnableEurekaServer
public class EurekaserverApplication {

	public static void main(String[] args) {
		SpringApplication.run(EurekaserverApplication.class, args);
	}

}

Add the following properties to application.yml

server:
  port: 7000

# Discovery Server Access
eureka:
  instance:
    hostname: localhost
  client:
    registerWithEureka: false
    fetchRegistry: false
  serviceUrl:
    defaultZone: http://${eureka.instance.hostname}:${server.port}/eureka/

The properties eureka.instance.client.register-with-eureka=false and eureka.instance.client.fetch-registry=false indicates that this is a registry server and won’t use itself to register.

A microservice to return products

In order to show how we will use the registry service as part of the entire Spring Cloud integration, we will create a new microservice. This REST-based microservice will return a list of products.

plugins {
	id 'org.springframework.boot' version '2.5.5'
	id 'io.spring.dependency-management' version '1.0.11.RELEASE'
	id 'java'
}

group = 'com.betterjavacode'
version = '0.0.1-SNAPSHOT'
sourceCompatibility = '1.8'

repositories {
	mavenCentral()
}

ext {
	set('springCloudVersion', "2020.0.4")
}

dependencies {
	implementation 'org.springframework.boot:spring-boot-starter-web'
	implementation 'org.springframework.cloud:spring-cloud-starter-netflix-eureka-client'
	testImplementation 'org.springframework.boot:spring-boot-starter-test'
}

dependencyManagement {
	imports {
		mavenBom "org.springframework.cloud:spring-cloud-dependencies:${springCloudVersion}"
	}
}

test {
	useJUnitPlatform()
}

With this in mind, RESTController for this service will look like below:

package com.betterjavacode.productservice.controllers;

import org.springframework.web.bind.annotation.GetMapping;
import org.springframework.web.bind.annotation.RestController;

import java.util.ArrayList;
import java.util.List;

@RestController
public class ProductController
{
    @GetMapping("/products")
    public List getAllProducts ()
    {
        List products = new ArrayList<>();
        products.add("Shampoo");
        products.add("Soap");
        products.add("Cleaning Supplies");
        products.add("Dishes");

        return products;
    }
}

And the application.yml file for this application will be like this

spring:
  application:
    name: product-service

server:
  port: 8083

eureka:
  client:
    registerWithEureka: true
    fetchRegistry: true
    serviceUrl:
      defaultZone: http://localhost:7000/eureka/
  instance:
    hostname: localhost

Here we have eureka.client.registerWithEureka=true and eureka.client.fetchRegistry=true as we want our service to be registered with our Eureka server running registry service. Subsequently, our main class for this service will have an annotation @EnableDiscoveryClient that will allow this service to be discovered by Eureka Server.

Client Service to call Product Service

Now, let’s create another service which will be a client service to product service. It will be very similar to Product Service except it will be based on MVC, so we will use a thymeleaf template to call this service.

package com.betterjavacode.productserviceclient.controllers;

import org.springframework.beans.factory.annotation.Autowired;
import org.springframework.cloud.client.ServiceInstance;
import org.springframework.cloud.client.discovery.DiscoveryClient;
import org.springframework.stereotype.Controller;
import org.springframework.ui.Model;
import org.springframework.web.bind.annotation.GetMapping;
import org.springframework.web.client.RestTemplate;

import java.util.List;

@Controller
public class ProductController
{
    @Autowired
    private DiscoveryClient discoveryClient;

    @GetMapping("/")
    public String home(Model model)
    {
        List serviceInstances = discoveryClient.getInstances("product" +
                "-service");

        if(serviceInstances != null && !serviceInstances.isEmpty())
        {
            ServiceInstance serviceInstance = serviceInstances.get(0);
            String url = serviceInstance.getUri().toString();
            url = url + "/products";
            RestTemplate restTemplate = new RestTemplate();
            List products = restTemplate.getForObject(url, List.class);
            model.addAttribute("products", products);
        }

        return "home";
    }
}

application.yml for this service will look like below:


spring:
  application:
    name: product-service-client

server:
  port: 8084


eureka:
  client:
    registerWithEureka: true
    fetchRegistry: true
    serviceUrl:
      defaultZone: http://localhost:7000/eureka/
  instance:
    hostname: localhost

Thymeleaf template for home will basically list the products in a table form.

Run the services

Shortly, run all the services – starting with Eureka server, product service and product-service-client. Now if we access eureka server, we will see the list of services registered with it as below:

Spring Cloud Tutorial for Beginners

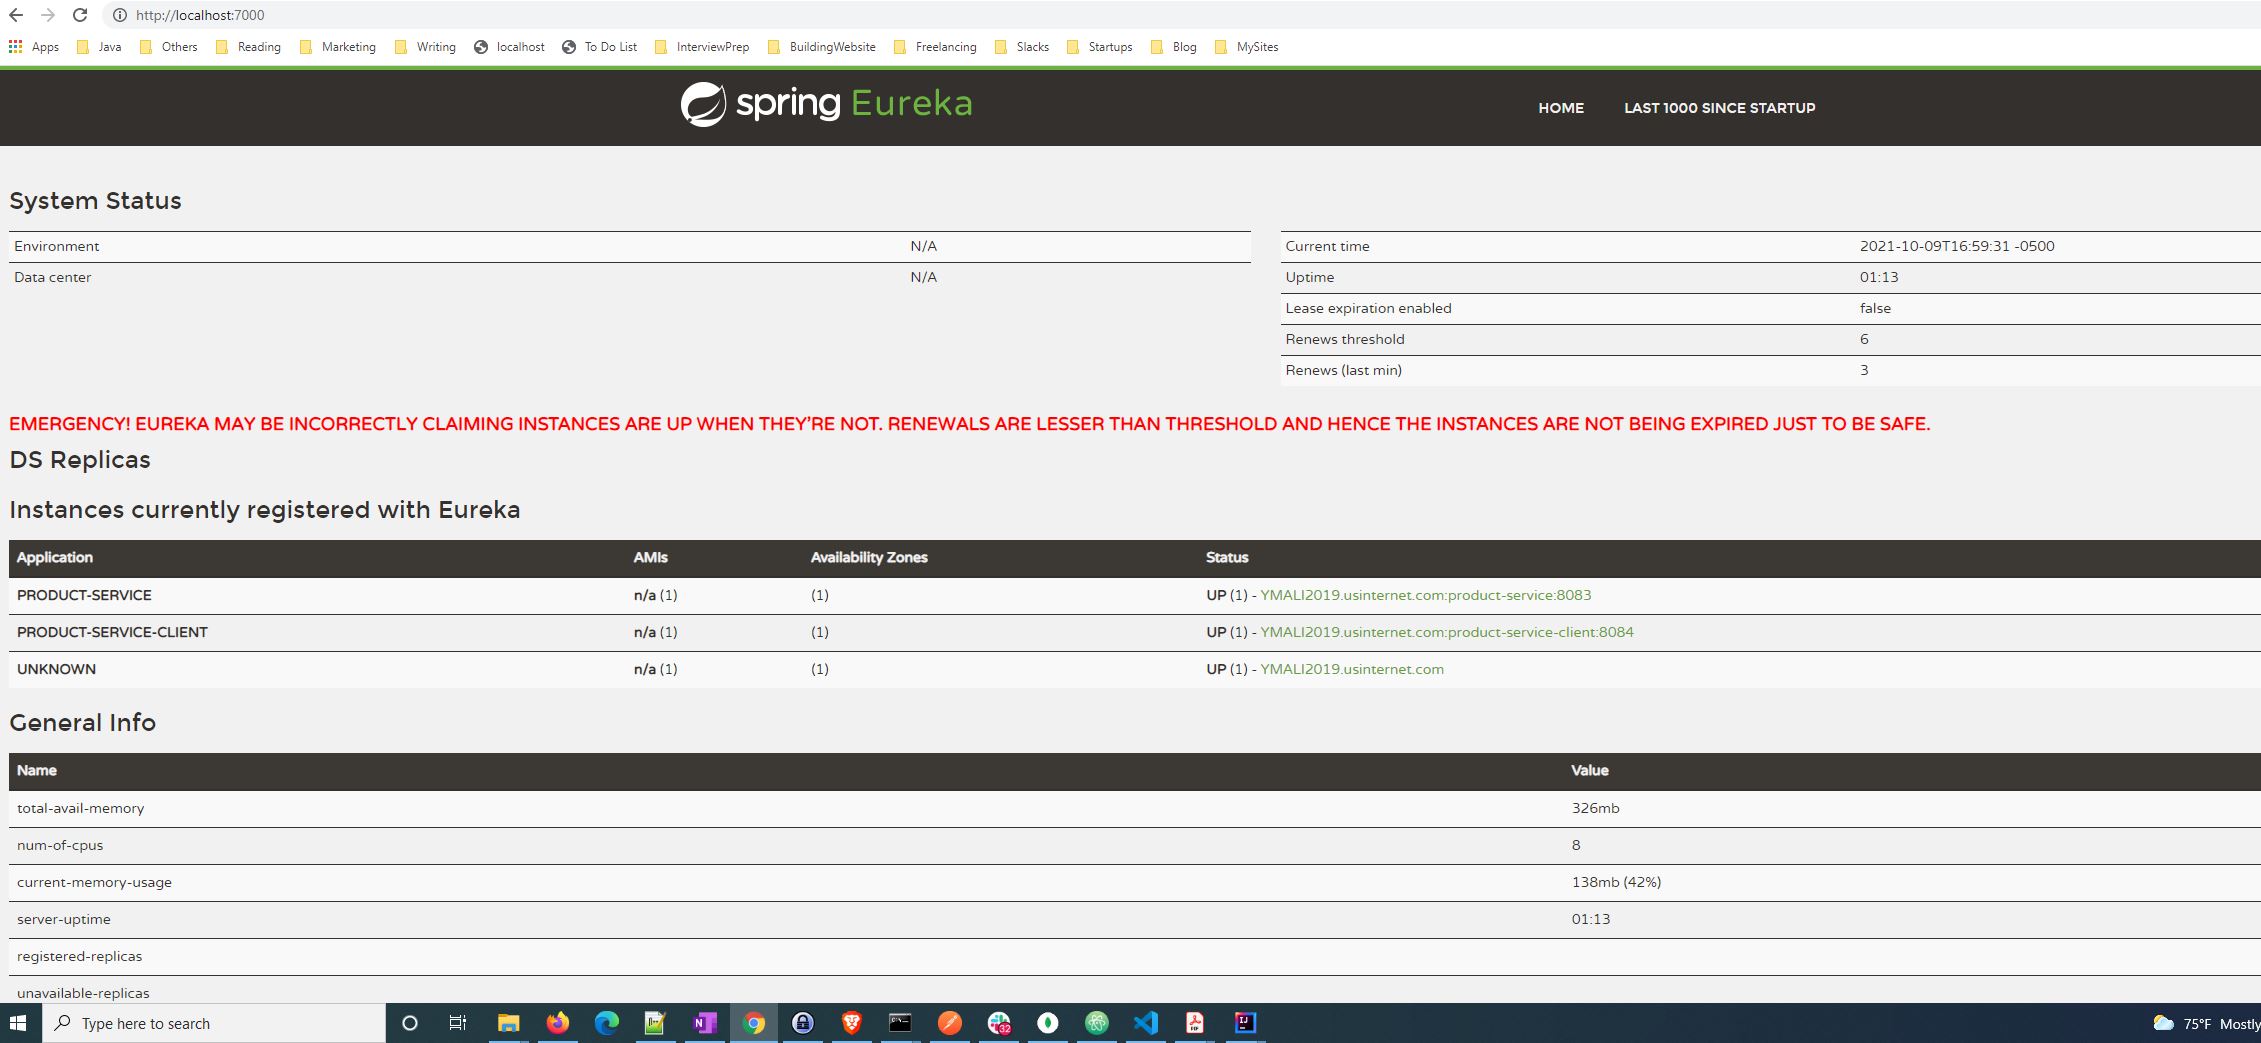
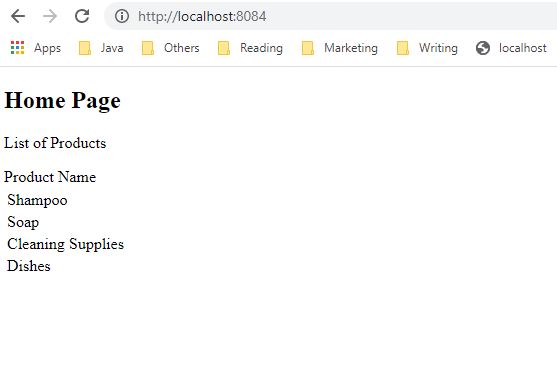
You can see both services registered. And if we access our product-service-client application at http://localhost:8084/, we will see the list of products

Spring Cloud Tutorial for Beginners - ProductServiceClient

At last, we saw a simple demo of using Eureka server as a registry service with Spring Cloud. If you want to learn more about Spring Cloud Config, I definitely recommend this course Distributed configuration with Spring Cloud Config from udemy.

Conclusion

In this post, we learned about Spring Cloud. There are a number of features to evaluate in Spring Cloud. I have covered only a feature that most developers have to use while using Spring Cloud. A developer can also combine Spring Cloud Function with AWS Lambda to learn more about Spring Cloud.

If you are still looking to learn about Spring Security, you can my book here.

Note – Links for Udemy or Educative courses are affiliate links. If you end up buying those courses, I get a percentage of the total price. I also recommend only those courses that I have taken or have learned about that topic myself.

Details of Liskov Substitution Principle Example

In this post, I will cover the details of the Liskov Substitution Principle(LSP) with an example. This is a key principle to validate the object-oriented design of your system. Hopefully, you will be able to use this in your design and find out if there are any violations. You can learn more about other object oriented design principles. Let’s start with the basics of Liskov Substitution Principle first.

Liskov Substitution Principle (LSP)

Basically, the principle states that if in an object-oriented program you substitute superclass object reference with any of its subclass objects, it should not break the program.

Wikipedia definition says – If S is a subtype of T, then the objects of type T may be replaced with objects of S without altering any of the desirable properties of the program.

LSP comes into play when you have super-sub class OR interface implementation type of inheritance. Usually, when you define a superclass or an interface, it is a contract. Any inherited object from this superclass or interface implementation class must follow the contract. Any of the objects that fail to follow the contract, will violate the Liskov Substitution Principle. If you want to learn more about Object-Oriented Design, get this course from educative.

Let’s take a simple look before we look at this in detail.


public class Bird
{
    void fly()
    {
       // Fly function for bird
    }
}

public class Parrot extends Bird
{
    @Override
    void fly()
    {

    }
}

public class Ostrich extends Bird
{
   // can't implement fly since Ostrich doesn't fly
}

If you look at the above classes, Ostrich is not a bird. Technically, we can still implement the fly method in Ostrich class, but it will be without implementation or throwing some exception. In this case, Ostrich is violating LSP.

Object-Oriented Design can violate the LSP in the following circumstances:

  1. If a subclass returns an object that is completely different from what the superclass returns.
  2. If a subclass throws an exception that is not defined in the superclass.
  3. There are any side effects in subclass methods that were not part of the superclass definition.

How do programmers break this principle?

Sometimes, if a programmer ends up extending a superclass without completely following the contract of the superclass, a programmer will have to use instanceofcheck for the new subclass. If there are more similar subclasses are added to the code, it can increase the complexity of the code and violate the LSP.

Supertype abstract intends to help programmers, but instead, it can end up hindering and add more bugs in the code. That’s why it is important for programmers to be careful when creating a new subclass of a superclass.

Liskov Substitution Principle Example

Now, let’s look at an example in detail.

Many banks offer a basic account as well as a premium account. They also charge fees for these premium accounts while basic accounts are free. So, we will have an abstract class to represent BankAccount.

public abstract class BankAccount
{
   public boolean withDraw(double amount);

   public void deposit(double amount);

}

The class BankAccount has two methods withDraw and deposit.

Consequently, let’s create a class that represents a basic account.


public class BasicAccount extends BankAccount
{
    private double balance;

    @Override
    public boolean withDraw(double amount)
    {
       if(balance > 0)
       {
           balance -= amount;
           if(balance < 0)
           {
              return false;
           }
           else 
           {
              return true;
           }
       }
       else
       {
          return false;
       } 
    }

    @Override
    public void deposit(double amount)
    {
       balance += amount;
    }
}

Now, a premium account is a little different. Of course, an account holder will still be able to deposit or withdraw from that account. But with every transaction, the account holder also earns rewards points.


public class PremiumAccount extends BankAccount
{
   private double balance;
   private double rewardPoints;

   @Override
   public boolean withDraw(double amount)
   {
      if(balance > 0)
       {
           balance -= amount;
           if(balance < 0)
           {
              return false;
           }
           else 
           {
              return true;
              updateRewardsPoints();
           }
       }
       else
       {
          return false;
       } 
   }
   
   @Override
   public void deposit(double amount)
   {
      this.balance += amount;
      updateRewardsPoints();
   }

   public void updateRewardsPoints()
   {
      this.rewardsPoints++;
   }
}

So far so good. Everything looks ok. If you want to use the same class of BankAccount to create a new investment account that an account holder can’t withdraw from, it will look like below:


public class InvestmentAccount extends BankAccount
{
   private double balance;

   @Override
   public boolean withDraw(double amount)
   {
      throw new Expcetion("Not supported");
   }
   
   @Override
   public void deposit(double amount)
   {
      this.balance += amount;
   }

}

Even though, this InvestmentAccount follows most of the contract of BankAccount, it does not implement withDraw method and throws an exception that is not in the superclass. In short, this subclass violates the LSP.

How to avoid violating LSP in the design?

So how can we avoid violating LSP in our above example? There are a few ways you can avoid violating Liskov Substitution Principle. First, the superclass should contain the most generic information. We will use some other object-oriented design principles to do design changes in our example to avoid violating LSP.

  • Use Interface instead of Program.
  • Composition over inheritance

So now, we can fix BankAccount class by creating an interface that classes can implement.


public interface IBankAccount
{
  boolean withDraw(double amount) throws InvalidTransactionException;
  void deposit(double amount) throws InvalidTransactionException;
}

Now if we create classes that implement this interface, we can also include a InvestingAccount that won’t implement withDraw method.

If you have used Object-oriented programming, you must have heard both the terms composition and inheritance. Also in object-oriented design, composition over inheritance is a common pattern. One can always make objects more generic. Using composition over inheritance can help to avoid violating LSP.

Combine Object-Oriented Design principles with fundamentals of distributed system design and you will be good at system design.

Conclusion

In this post, we talked about Liskov Substitution Principle and its example, how designers usually violate this principle, and how we can avoid violating it.


Building Microservices with Event-Driven Architecture

In this post, we will discuss how we can build microservices with event-driven architecture. As part of the post, I will also show an example of an event-driven microservice. If you don’t know what a microservice is, you can start with my primer here.

Microservices – Event-Driven Architecture

Traditionally, we would use a REST Based Microservice. In this microservice, a client would request data and then the server would respond with the data. But there were disadvantages in that client has to wait for the server to respond. A server can be down or serving other requests, in-process of delaying the response to the current client requests.

In short, when a system becomes slow because of synchronized connections, we can use event-driven architecture to make the system asynchronous.

Event-Drive microservices use an eventually consistent approach.  Each service publishes event data whenever there is an update or transaction. Other services subscribe to this service publishing events. When these subscribed services receive an event, they update their data.

A simple example of this approach: When a customer redeems a gift card, a single redemption event is created and consumed by different services.

  1. A Reward Service that can write a redemption record in the database
  2. A Customer receiving getting an item bought through a gift card
  3. A Partner Service verifying the gift card and allowing the redemption and accordingly processing of the item that the customer bought.

Event-Driven architecture is either through queues or the pub-sub model. In Pub/Sub model, a service publishes the event, and subscribed services consume that event. It is not much different from what queues and topics do.

Benefits of Event-Driven Architecture

  • Loose Coupling – Services don’t need to depend on other services. Considering the architecture is reactive, services can be independent of each other.
  • Asynchronous – A publishing service will publish the event. A subscribing service can consume the event whenever it is ready to consume. The major advantage of asynchronous architecture is that services don’t block resources.
  • Scaling – Since the services are independent, most services perform a single task. It becomes easier to scale as well to find out bottle-neck.

Drawbacks of Event-Driven Architecture

Every design is a trade-off. We do not have a perfect design in distributed systems. With event-driven architecture, one can easily over-engineer the solution by separating concerns.

Event-Driven architecture needs upfront investment. Since the data is not necessarily available immediately, it can cause some concerns with transactions. Eventual consistency can be hard to investigate if there are issues with data. There can be possibilities of duplicate events, resulting in duplicate data. Event-driven models do not support ACID transactions.

Framework for Architecture

Irrespective of those drawbacks, event-driven architecture is fast and delivers results successfully. So the next question arises what framework to choose to build this architecture. Currently, there are two choices

  • Message Processing
  • Stream Processing

Message Processing

In message processing, a service creates a message and sends it to the destination. A subscribing service picks up the message from that destination. In AWS, we use SNS (Simple Notification Service) and SQS (Simple Queue Service). A service sends a message to a topic and a queue subscribing to that topic picks up that message and processes it further.

SNS and SQS are not the only frameworks out there. Message queues use a store and forward system of brokers where events travel from broker to broker. ActiveMQ and RabbitMQ are the other two examples of message queues

Stream Processing

In stream processing, a service sends an event and subscribed service picks up that event. Nevertheless, events are not for a particular target.

Usually, a producer of events emits events and can store them in storage. A consumer of events can consume those events from the data storage. The most popular framework for stream processing is Kafka. Basically, it follows a pub-sub model.

Above all, stream processors (like Kafka) offer the durability of data. Data is not lost and if the system goes offline, it can reproduce the history of events.

Demo of Event-Driven Architecture Based Microservice

As part of this demo, we will implement a Spring Boot application along with the ActiveMQ message broker service.

ActiveMQ Messaging Service

ActiveMQ is an open-source message broker. Presently, it supports clients written in Java, Python, .Net, C++, and more.

Download the ActiveMQ from here. Once, you extract the downloaded folder on your machine, you can go to bin directory to start the ActiveMQ server with a command activemq.bat start. This will start the ActiveMQ server at http://localhost:8161.

Sender Application with Spring Boot

Now, let’s create a Message Sender application using Spring Boot. We will need the following dependencies


dependencies {
	implementation 'org.springframework.boot:spring-boot-starter-activemq'
	implementation 'org.springframework.boot:spring-boot-starter-web'
	testImplementation 'org.springframework.boot:spring-boot-starter-test'
}

We will add JMS Configuration to create an ActiveMQ Queue.


@Configuration
public class JmsConfig
{
    @Bean
    public Queue queue()
    {
        return new ActiveMQQueue("demo-queue");
    }
}

This creates a bean for our queue demo-queue. To send message to this queue through our sender application, we will create a REST API as follows:


@RestController
@RequestMapping("/v1/betterjavacode/api")
public class MessageController
{
    @Autowired
    private Queue queue;

    @Autowired
    private JmsTemplate jmsTemplate;

    @GetMapping("/message/")
    public ResponseEntity sendMessage(@RequestBody String message)
    {
        jmsTemplate.convertAndSend(queue, message);
        return new ResponseEntity(message, HttpStatus.OK);
    }

}

Subsequently, we have injected queue and jmsTemplate beans in our RestController so we can send the message.

On the other hand, we will also have a receiver application which will be a destination service or consumer service consuming the message from the sender application.

Create a message consumer class in our receiver application


@Component
@EnableJms
public class MessageConsumer
{
    private final Logger logger = LoggerFactory.getLogger(MessageConsumer.class);

    @JmsListener(destination = "demo-queue")
    public void receiveMessage(String message)
    {
        // TO-DO
        logger.info("Received a message = {}", message);
    }
}

The annotation of @JmsListener with destination makes the application to listen to that queue. @EnableJms enables the annotation @JmsListener.

We still need to add ActiveMQ properties so that both applications know where ActiveMQ server is running. So, add the following properties to application.properties


spring.activemq.broker-url=tcp://localhost:61616
spring.activemq.user=admin
spring.activemq.password=admin

Now start both of the Spring Boot applications. Sender Application is running on 8080 and Receiver Application is running on 8081.
Event-Driven Architecture Microservices - Sending Message

Now if we check the logs of receiver application, we will see that it has consumed that message from ActiveMQ queue demo-queue.

Microservices - Event-Driven Architecture - Receiving Message

We can also see the status of queue in ActiveMQ server.

Apache ActiveMQ Event-Driven Architecture

Here, you can see there have been two messages that the queue has received from the sender and delivered to the consumer.  The code for this demo is available on my github repository.

Conclusion

In this post, I discussed Event-Driven architecture for microservices. We also discussed the benefits and drawbacks of this architecture. At last, we showed how we can use ActiveMQ to set up an event-driven architecture-based microservice for asynchronous communication.

On another note, if you still haven’t bought my book for Spring Security, you can buy here OR you can read about it more here.

References

Event-Driven Microservices using ActiveMQ – ActiveMQ

On Being A Senior Software Engineer

In this post, I cover what it means to be a senior software engineer. When I say senior, it means anyone other than Junior, Associate, or Software Engineer. So it can include Senior Software Engineer, Staff Software Engineer, or Principal Software Engineer. If you are a Junior Developer, you can read my previous post on what makes a good junior developer.

Staff and Principal Engineers are usually on the same level as Engineering managers without anyone reporting to them. But this can vary in organizations. So, I am not going to on that but will focus on what all these engineers do and what they can do better.

Two Career Paths

Most Software Organizations have two career paths for all engineers.

  1. Individual Contributors
  2. Management

Individual contributors usually keep the engineering team on the engineering path while managers keep the team aligned for the overall goal of the team. Most senior engineers usually get a choice after a certain level of engineering experience if they want to be individual contributors or become managers. It can also depend on the performance.

Staff and Principal Engineers are individual contributor roles. Usually, those engineers remain on that path for the rest of their careers.

All three types of senior engineers have a certain role to play in the team, but I will not go over that much, but what they do and how they are different from Junior engineers.

Not a 10x Engineer

Most Senior engineers can be considered 10x engineers. If you don’t know what a 10x engineer is, then search for it. It’s a famous meme. Most senior engineers can definitely close a lot of tickets and code better. But that’s not their only role and they are not really 10x engineers.

A great senior engineer makes the whole team great by advocating the best practices. This is where their experience comes in handy. Senior engineers contribute in the following areas – Coding standards, coding review guidelines, system design guidelines, and understanding of the system. They become a mentor for junior engineers. A good senior engineer can distinguish between engineering language and product language. She can decipher product requirements from business to engineering and communicate engineering challenges to products. She can become a bridge between business and engineering.

One key skill a senior engineer possesses is communication. Communication to get the team to do better and focus on the goal. Communication to make sure the business understands the engineering side. Nevertheless, interpersonal skills are important for senior engineers.

Mentoring

Another important role a senior engineer does is to mentor junior engineers. A senior engineer may not hold one-on-one with juniors, but he will guide them through code review, understanding of the system, and making critical decisions in system design as well in code. He will also showcase his own leadership skills when the team needs guidance. If a team is struggling, there is a large role a senior engineer has to fill in.  If a team is doing well, a large credit goes to the senior engineer as well.

Overall, a senior engineer is a cheerleader of the team, he boosts the morale of the team. A senior engineer also guides the new developers who join the team. A senior engineer actually showcases the values the company has adapted.

Engineering Initiatives

A key skill a senior engineer possesses is to look at any system and find the pain points. A senior engineer understands that the team is the customer and she must solve the painful problem. A senior engineer can go out of her way to solve some of these problems and make the team better performing.

She also keeps herself up to date with the new challenges and changes in technology. Foresightedness is a skill, but it only comes with experience. A senior engineer finds the problem in the system and solves them. Example – How to use a circuit breaker in rest call.

Leadership

A senior engineer is a subject matter expert of the system he has worked on. If there is an issue, he doesn’t have to visit the code every time to know where the issue is. Usually, his knowledge of the system is so strong that he can fix the issue quickly. But, there can be situations where there is no solution and a senior engineer takes that as a leader to communicate to the business. Convincingly, he also leads the efforts to implement any new features. A senior engineer is a leader and he finds his way to remove obstacles to the team’s progress.

Conclusion

In conclusion, a senior engineer is the glue that holds a team. A manager usually gives a free hand to senior engineers in many aspects because of their high agency character as well as leadership qualities.

If you enjoyed this post, you can subscribe to my blog here. Also, if you are interested to learn more about Spring Security, you can buy my book Simplifying Spring Security.

A Complete Guide to Using ElasticSearch with Spring Boot

In this post, I will cover the details of how to use Elasticsearch with Spring Boot. I will also cover the fundamentals of Elasticsearch and how it is used in the industry.

What is Elasticsearch?

Elasticsearch is a distributed, free and open search and analytics engine for all types of data, including textual, numerical, geospatial, structured, and unstructured.

It is built upon Apache Lucene. Elasticsearch is often part of the ELK stack (Elastic, LogStash, and Kibana). One can use Elasticsearch to store, search, and manage data for

  • Logs
  • Metrics
  • A search backend
  • Application Monitoring

Search has become a central idea in many fields with ever-increasing data. As most applications become data-intensive, it is important to search through a large volume of data with speed and flexibility. ElasticSearch offers both.

In this post, we will look at Spring Data Elasticsearch. It provides a simple interface to do search, store, and run analytics operations. We will show how we can use Spring Data to index and search log data.

Key Concepts of Elasticsearch

Elasticsearch has indexes, documents, and fields. The idea is simple and very similar to databases. Elasticsearch stores data as documents(Rows) in indexes(Database tables). A user can search through this data using fields(Columns).

Usually, the data in elasticsearch goes through different analyzers to split that data. The default analyzer split the data on punctuation like space or comma.

We will be using spring-data-elasticsearch library to build the demo of this post. In Spring Data, a document is nothing but a POJO object. We will add different annotations from elasticsearch in the same class.

As said previously, elasticsearch can store different types of data. Nevertheless, we will be looking at the simple text data in this demo.

Creating Spring Boot Application

Let’s create a simple spring boot application. We will be using spring-data-elasticsearch dependency.


dependencies {
	implementation 'org.springframework.boot:spring-boot-starter-data-elasticsearch'
	implementation 'org.springframework.boot:spring-boot-starter-thymeleaf'
	implementation 'org.springframework.boot:spring-boot-starter-web'
	testImplementation 'org.springframework.boot:spring-boot-starter-test'
}

Subsequently, we need to create Elasticsearch client bean. Now there are two ways to create this bean.

The simple method to add this bean is by adding the properties in application.properties.

spring.elasticsearch.rest.uris=localhost:9200
spring.elasticsearch.rest.connection-timeout=1s
spring.elasticsearch.rest.read-timeout=1m
spring.elasticsearch.rest.password=
spring.elasticsearch.rest.username=

But in our application, we will be building this bean programmatically. We will be using Java High-Level Rest Client (JHLC). JHLC is a default client of elasticsearch.


@Configuration
@EnableElasticsearchRepositories
public class ElasticsearchClientConfiguration extends AbstractElasticsearchConfiguration
{

    @Override
    @Bean
    public RestHighLevelClient elasticsearchClient ()
    {
        final ClientConfiguration clientConfiguration =
                ClientConfiguration.builder().connectedTo("localhost:9200").build();

        return RestClients.create(clientConfiguration).rest();
    }
}

Henceforth, we have a client configuration that can also use properties from application.properties. We use RestClients to create elasticsearchClient.

Additionally, we will be using LogData as our model. Basically, we will be building a document for LogData to store in an index.


@Document(indexName = "logdataindex")
public class LogData
{
    @Id
    private String id;

    @Field(type = FieldType.Text, name = "host")
    private String host;

    @Field(type = FieldType.Date, name = "date")
    private Date date;

    @Field(type = FieldType.Text, name = "message")
    private String message;

    @Field(type = FieldType.Double, name = "size")
    private double size;

    @Field(type = FieldType.Text, name = "status")
    private String status;

    // Getters and Setters

}
  • @Document – specifies our index.
  • @Id – represents the field _id of our document and it is unique for each message.
  • @Field – represents a different type of field that might be in our data.

There are two ways one can search or create an index with elasticsearch  –

  1. Using Spring Data Repository
  2. Using ElasticsearchRestTemplate

Spring Data Repository with Elasticsearch

Overall, Spring Data Repository allows us to create repositories that we can use for writing simple CRUD methods for searching or indexing in elasticsearch. But if you want more control over the queries, you might want to use ElasticsearchRestTemplate. Especially, it allows you to write more efficient queries.

public interface LogDataRepository extends ElasticsearchRepository<LogData, String>
{
}

This repository provides basic CRUD methods that Spring takes care of from an implementation perspective.

Using ElasticsearchRestTemplate

If we want to use advanced queries like aggregation, suggestions, we can use ElasticsearchRestTemplate . Spring Data library provides this template.

 public List getLogDatasByHost(String host) {
    Query query = new NativeSearchQueryBuilder()
        .withQuery(QueryBuilders.matchQuery("host", host))
        .build();
    SearchHits searchHits = elasticsearchRestTemplate.search(query, LogData.class);

    return searchHits.get().map(SearchHit::getContent).collect(Collectors.toList());
  }

I will show further the usage of ElasticsearchRestTemplate when we do more complex queries.

ElasticsearchRestTemplate implements ElasticsearchOperations.  There are key queries that you can use with ElasticsearchRestTemplate that makes the use of it easier compared to Spring Data repositories.

index() OR bulkIndex() allow creating a single index or indices in bulk. One can build an index query object and use it in index() method call.


  private ElasticsearchRestTemplate elasticsearchRestTemplate;

  public List createLogData
            (final List logDataList) {

      List queries = logDataList.stream()
      .map(logData ->
        new IndexQueryBuilder()
        .withId(logData.getId().toString())
        .withObject(logData).build())
      .collect(Collectors.toList());;
    
      return elasticsearchRestTemplate.bulkIndex(queries,IndexCoordinates.of("logdataindex"));
  }

search() method helps to search documents in an index. One can perform search operations by building Query object. There are three types of Query one can build. NativeQuery, CriteriaQuery, and StringQuery.

Rest Controller to query elasticsearch instance

Let’s create a rest controller that we will use to add the bulk of data in our elasticsearch instance as well as to query the same instance.

@RestController
@RequestMapping("/v1/betterjavacode/logdata")
public class LogDataController
{
    @Autowired
    private LogDataService logDataService;

    @GetMapping
    public List searchLogDataByHost(@RequestParam("host") String host)
    {
        List logDataList = logDataService.getAllLogDataForHost(host);

        return logDataList;
    }

    @GetMapping("/search")
    public List searchLogDataByTerm(@RequestParam("term") String term)
    {
        return logDataService.findBySearchTerm(term);
    }

    @PostMapping
    public LogData addLogData(@RequestBody LogData logData)
    {

        return logDataService.createLogDataIndex(logData);
    }

    @PostMapping("/createInBulk")
    public  List addLogDataInBulk(@RequestBody List logDataList)
    {
        return (List) logDataService.createLogDataIndices(logDataList);
    }
}

Running Elasticsearch Instance

So far, we have shown how to create an index, and how to use elasticsearch client. But, we have not shown connecting this client to our elasticsearch instance.

We will be using a docker instance to run elasticsearch on our local enviornment. AWS provides its own service to run Elasticsearch.

To run your own docker instance of elasticsearch, use the following command –

docker run -p 9200:9200 -e "discovery.type=single-node" docker.elastic.co/elasticsearch/elasticsearch:7.10.0

Subsequently, this will start the node elasticsearch node that you can verify by visiting http://localhost:9200

Elastic Search and Spring Data - Docker Instance

Creating Index and Searching for Data

Altogether, if we start the application, we will be using a Postman to create an initial index and continue to add documents to it.

Elasticsearch and Spring Boot - Add Documents

This will also create an index and add the documents to that index. On elasticsearch instance, we can see the log as below:

{
	"type": "server",
	"timestamp": "2021-08-22T18:48:46,579Z",
	"level": "INFO",
	"component": "o.e.c.m.MetadataCreateIndexService",
	"cluster.name": "docker-cluster",
	"node.name": "e5f3b8096ca3",
	"message": "[logdataindex] creating index, cause [api], templates [], shards [1]/[1]",
	"cluster.uuid": "mi1O1od7Rju1dQMXDnCuNQ",
	"node.id": "PErAmAWPRiCS5tv-O7HERw"
}

The message clearly shows that it has created an index logdataindex. Now if add more documents to the same index, it will update that index.

Let’s run a search query now. I will run a simple query to search for the text term “Google”

Elasticsearch and Spring Boot - Search

This was a simple search query. As previously mentioned, we can write more complex search queries using different types of queries – String, Criteria, or Native.

Conclusion

Code for this demo is available on my GitHub repository.

In this post, we covered the following things

  • Elasticsearch and Key Concepts about Elasticsearch
  • Spring Data repository and ElasticsearchRestTemplate
  • Integration with Spring Boot Application
  • Execution of different queries against Elasticsearch

If you have not checked out my book about Spring Security, you can check here.

Do you find Gradle as a build tool confusing? Why is it so complex to understand? I am writing a new simple book about Gradle – Gradle For Humans. Follow me here for more updates.