Author Archives: yogesh.mali@gmail.com

Microservices – A Primer

In this post, I cover a primer about microservices.

What is Microservices? A Primer about Microservices

Wikipedia definition says

Microservices is a variant of the service-oriented architecture (SOA) architectural style that structures an application as a collection of loosely coupled services.

Firstly, there is no official definition of Microservices by industry standards. It’s a recent phenomenon in the software industry to architect the new software which should be lightweight, easier to deploy, and scale, easier to refactor individually, and could work independently.

However, to understand in detail, you can definitely read Martin Fowler’s Microservices or Chris Richardson’s Microservices.

Secondly, microservices are small services that can run independently but can also easily communicate with other services.

Microservice Architecture vs Monolithic Architecture

In a traditional monolithic architecture style, there is a single application with a single code base. An application contains a number of modules that are interrelated and can have external dependencies. It’s a multi-tier enterprise application and has been used to build software for long.

Above all, the microservice architecture style was born out of a need to build an application that could easily be supported for mobile applications. The older style was not easy to support for mobile and new generation way to the handling of data. Any large enterprise application can be easily built using the microservices architecture style. A famous example is NETFLIX.

How to identify the Microservice Architecture Pattern?

A simple ground rule of the microservice architecture pattern is to build a standalone service that can be run without depending on any other service. In other words, a large application can have more than one service talking to each other, communicating with their own databases, but still performing the business logic. Databases are used to ensure loose coupling of services.

For instance, a large enterprise e-commerce application can consist of the following services

  1. Backend service REST API to manage data
    1. Account Service
    2. Shipment Service
    3. Inventory Service
  2. Runtime service to handle runtime and backend data to process business logic
  3. Logging service
  4. Error Handling service
  5. Session service

Additionally, UI for the e-commerce application can be built independently to use backend services to show/edit data.

By standards, there are few rules to identify microservices patterns

  1. Decomposition by business capability
  2. Database per service pattern
  3. API gateway pattern
  4. Client-side discovery and Server-side discovery

Pros and Cons of Microservices

Pros

  1. Deployability – Easier to deploy and one can deploy them independently, without affecting other services.
  2. Reliability – A fault in the service can only bring down that service. Depending on the handling of the fault in the application, the rest of the application can still continue to work.
  3. Scalability – Similarly, the scaling of each microservice will depend on requirements using clusters and grids.
  4. Availability – Dispatching the patch or newer version of service requires less downtime compared to regular monolithic applications.
  5. Management – Easier to manage
  6. Design and Development – Each service helps the developer to manage the service easily without worrying about other services.

Cons

  1. Performance – All services involved in the application have to communicate with each other over the network and that could hamper the performance.
  2. Testability – Automated tests are harder to manage and run.
  3. Memory usage – Possible duplicate data across services and a lot of duplication in the cache.

References

In conclusion, I covered a primer about microservices. If you want to read more about Microservices at following links:

  1. Microservices by Chris Richardson
  2. Microservices by Martin Fowler
  3. Stackoverflow post about microservices

Lastly, if you enjoyed this post, subscribe to my blog.


How To: AngularJS User Interface to CRUD Spring Boot REST API

In this post, we will add an user interface using AngularJS to the REST api we created here.

Controller for home page

First we will create a controller in Spring Boot rest API to call our home page. All the requests that will come to web server, will go through this controller and the controller will return a home page for the request based on path.

MainController.java will look like below:

package com.betterjavacode.benefits.controller;

import org.apache.logging.log4j.LogManager;
import org.apache.logging.log4j.Logger;
import org.springframework.stereotype.Controller;
import org.springframework.web.bind.annotation.RequestMapping;
import org.springframework.web.bind.annotation.RequestMethod;

@Controller
public class MainController 
{

     public static final Logger LOGGER = LogManager.getLogger(MainController.class);

     @RequestMapping(value = "/home", method = RequestMethod.GET)
     public String homepage() 
     {
         LOGGER.info(" Enter >> homepage() ");
         return "index";
     }
}

Any request coming to https://localhost:8443/home will return a page from index.html.

Create a Home Page

Now, we will create an index.html page. We will also be using angular JS framework as part of this home page so that we can build a single page application. If you are not aware of Angular JS or new to this framework, you can read about it AngularJS. One thing to remember while creating this page is a directory structure. Lot of issues that arise to create html pages are because of directory structure. Directory structure will look like below:

directorystructure

The home page index.html page is under main/resources/templates/ directory and it looks like below

<html ng-app="benefitApp">

<head><meta http-equiv="Content-Type" content="text/html; charset=ISO-8859-1" /><title>Benefit Application</title>

<script>document.write('<base href="' + document.location + '" />');</script>

<link rel="stylesheet" href="/css/bootstrap.css" />

<script src="https://code.angularjs.org/1.6.1/angular.js"></script>

<script src="https://cdnjs.cloudflare.com/ajax/libs/angular.js/1.6.1/angular-route.js"></script>

<script src="https://cdnjs.cloudflare.com/ajax/libs/angular.js/1.6.1/angular-resource.js"></script>

<script type="text/javascript" src="./js/app.js"></script>

</head>

<body ng-controller="MainCtrl">

Hello {{name}}!
<div>
<ul class="menu">
<li><a href="listUser">user-list</a></li>
<li><a href="listCompany">company-list</a></li>
</ul>
<div ng-view="ng-view"></div>
</div>
</body></html>

Home page shows that this is an angular app with name benefitApp. This also declares a controller MainCtrl with an angular view. Important to see we are importing angular.js, angular-route.js and angular-resource.js modules. Click on user-list or company-list, will show list of users and list of companies respectively.

Create a controller

Now to handle the controller (MainCtrl), we added in index.html, we will add app.js which will declare the controller. This javascript file also contains config data to handle all the routing of pages. That’s why we will be importing “ngRoute” and “ngResource” angular modules.

var app = angular.module('benefitApp', ['ngRoute','ngResource']);

var app = angular.module('benefitApp', ['ngRoute','ngResource']);
app.controller('MainCtrl', function($scope, $routeParams) {

$scope.name = 'World';

$scope.$routeParams = $routeParams;

})


Through out the interaction on web pages, we will be using different controllers for editing user or company information and creating user or company. The same file app.js will also handle routing of these pages which is shown below

app.config(function($routeProvider,$locationProvider) {

$locationProvider.html5Mode(true);

$routeProvider.when('/listUser',

{templateUrl: 'views/listUser.html', controller: 'userController'});

$routeProvider.when('/listCompany',

{templateUrl: 'views/listCompany.html', controller: 'companyController'});

$routeProvider .when('/editUser/:userId',

{ templateUrl : 'views/editUser.html' }) ;

$routeProvider .when('/editCompany/:companyId',

{ templateUrl : 'views/editCompany.html' }) ;

$routeProvider.when('/createUser',

{templateUrl:'views/createUser.html'});

$routeProvider.when('/createCompany',

{templateUrl:'views/createCompany.html'});

});

Rest of the code showing all controllers’ logic has been skipped for post purposes. It is available on github repository.

UserController or CompanyController are calling rest apis which we have built using Spring boot.

Demo

Now build the code and run our embedded tomcat webserver. Fire up the url https://localhost:8443/home – it will look like below:

Home Page created with AngularJS for CRUD REST API

Click on user-list and it will show list of users inside the same page as below:

List of User Page created with AngularJS

Click on edit button and we will see a form to update user information:

edituserpage

Download –

In this post, we showed how to create a simple CRUD user interface using angular JS for Spring Boot REST API. The code for this is available in repository


Handle uncaught exceptions in a Spring-Boot REST API – Part VI

Many times, we have seen exception thrown on your web page and all the stack trace of the exception. A non-technical user will not be able to understand most of the time. Also stack trace is not the best option when we can show the same exception error in nice JSON format with the root cause. In this post, we will show how to handle uncaught exceptions from our previous Spring REST API we built here.

This particular feature will show how to handle most HTTP 500 errors which happen because of server side issues. Any errors with request or client side, those are HTTP 400 errors and they have been handled in previous post Error Handling in Spring Boot Rest API.

Problem of uncaught exceptions

Firstly, what happens when there is a database connection issue? OR Columns in your REST API are different from specified in database tables? Your API will throw a 500 error and if you don’t have any mechanism, this will display error in an html format which will not give much information to user or developer to resolve the issue. Showing such stack trace on web page to end user is a bad example from programming perspective.

Solution

JAX-RS provides a way to handle uncaught exceptions. This can be done by my implementing an interface for ExtendedExceptionMapper. Basically this is a contract for a provider that takes java exceptions and maps them to a response object which can be transformed into a JSON. This can be implemented as below:

package com.betterjavacode.benefits.utilities;

import javax.ws.rs.WebApplicationException;
import javax.ws.rs.core.Response;
import javax.ws.rs.core.Response.Status;

import org.apache.logging.log4j.LogManager;
import org.apache.logging.log4j.Logger;
import org.glassfish.jersey.spi.ExtendedExceptionMapper;

@Provider
public class UncaughtExceptionMapper implements ExtendedExceptionMapper<Throwable> 
{

   private static final Logger LOGGER = LogManager.getLogger(UncaughtExceptionMapper.class);

   @Override
   public Response toResponse(Throwable exception) 
   {
     LOGGER.info("Enter >> toResponse ");
     LOGGER.debug("Exception Caught: " + exception.getMessage());
     LOGGER.info("Exit << toResponse");
     return Response.status(Status.BAD_REQUEST)
       .entity(exception.getMessage())
       .build();
   }

   @Override
   public boolean isMappable(Throwable arg0) 
   {
     return !(arg0 instanceof WebApplicationException);
   }

}

Basically this implementation shows a class `UncaughtExceptionMapper` implementing an interface `ExtendedExceptionMapper` which provides a way to map all exceptions which are not of type WebApplicationException (Most HTTP 400 errors are WebApplicationExceptions). toResponse method will help to log all the exceptions and convert exceptions into a Response object.

Conclusion

In conclusion, we showed how to map all unhandled exceptions into JSON format for a nice response. The code for this post is available at github repository.

How to consume OAuth secured SOAP Webservice

I faced this issue where I had to consume a SOAP service which was secured by OAuth1.0a. And Spring doesn’t provide any direct solution for consuming OAuth secured SOAP webservice.

In Producing and Consuming SOAP web service and Consuming SOAP web service over HTTPS, we saw how to consume a SOAP web service. In this post, we will go little beyond this and implement a solution to consume OAuth secured SOAP web service. Securing a web service is a general trend and you must secure a web service if you are letting others consume it. This is a secure way to transfer data between producer and consumer without compromising customer data.

Pre-requisites

  1. Spring web services
  2. OAuth library and knowledge

How to implement it?

Firstly, below is a code that shows how to send a SOAP request call to a web service if it is not OAuth secured.


public class UserClient extends WebServiceGatewaySupport
{
   public GetUserResponse getUserById (int userid)
   {
      GetUserRequest userrequest = new GetUserRequest();
      userrequest.setId(userid);
      GetUserResponse response = (GetUserResponse)getWebServiceTemplate().marshalSendAndReceive(userrequest, new 
       SoapActionCallback("https://localhost:8443/benefits/endpoints/getUserResponse"));
      return response;
   }
}

We are using a WebServiceTemplate to marshal a request and send it to a SOAP endpoint. SoapActionCallback is a callback which allows changing the marshalled message and sends to an endpoint and then it will retrieve a response.

Secondly, as part of this solution, we will implement a class SignedMessageSender that will sign the request with OAuth consumer key and secret.


public class SignedMessageSender extends HttpComponentsMessageSender
{
   private final CommonsHttpOAuthConsumer consumer;

   public SignedMessageSender(CommonsHttpOAuthConsumer consumer)
   {
     this.consumer = consumer;
   }

   public WebServiceConnection createConnection(URI uri)
   {
     HttpComponentsConnection conn = null;
     try
     {
       conn = (HttpComponentsConnection)super.createConnection(uri);
       consumer.sign(connection.getHttpPost());
     }
     catch (IOException e | OAuthException e)
     {
      throw new RuntimeException("I/O Error", e);
     }
    return conn;
  }
}

Now we build our bean for the client to use this message sender. Then we will assign a consumer key and consumer secret. This also uses JAXB marshaller. The code for this will look like below


@Bean
public UserClient getUserClient(Jaxb2Marshaller marshaller)
{
   UserClient us = new UserClient();
   us.setDefaultUri("https://localhost:8443/benefits/endpoints/users.wsdl");
   us.setMarshaller(marshaller);
   us.setUnmarshaller(marshaller);
   String consumerkey = "";
   String secretkey = "";
   CommonsHttpOAuthConsumer consumer = new CommonsHttpOAuthConsumer(consumerkey,secretkey);
   SignedMessageSender signedMessageSender = new SignedMessageSender(consumer);
   signedMessageSender.createConnection(new URL("https://localhost:8443/benefits/endpoints/users.wsdl").toURI());
   us.setMessageSender(signedMessageSender);
   return us;
}

This shows how we can implement a solution to consume a SOAP web service secured with OAuth 1.0a. I am sure we can add a similar solution if the service producer secures it with OAuth 2.0, but that will be another post.

Conclusion

In conclusion, I showed how to send OAuth signed SOAP message to SOAP webservice.

References

  1. Add Header to SOAP message
  2. SOAP WS-addressing
  3. https://www.avisi.nl/blog/2012/11/22/consuming-oauth-secured-soap-webservices-using-spring-ws-axiom-signpost/

Producing and Consuming SOAP Webservice with Spring Boot – Part V

In this post, we will describe how to create a SOAP webservice from our existing Spring Boot REST API. In the last few posts, we have covered the following

  1. Spring Boot REST CRUD API – Part I
  2. Swagger Documentation for Spring Boot REST API – Part II
  3. Error Handling and logging in Spring Boot REST API – Part III
  4. Consuming RESTful Webservice – Part IV

This SOAP webservice will provide us user data from the database which is we have connected through Spring-data in Spring REST API.

1. Requirements

  1. Eclipse Mars2
  2. Maven 3.1 and above
  3. Spring 1.4 and above
  4. Java 7
  5. Tomcat 8

2. SOAP Web Service

We will use our existing Spring Boot REST API to build an application that will act as a SOAP web service to provide users data. For a given user id, web service will return user data.

Let’s create a schema file in src/main/resources directory and maven will create java classes based on this schema file.


<xs:schema xmlns:xs="http://www.w3.org/2001/XMLSchema" xmlns:tns="https://betterjavacode.com/benefits/soap" targetNamespace="https://betterjavacode.com/benefits/soap" elementFormDefault="qualified">
	<xs:element name="getUserRequest">
		<xs:complexType>
			<xs:sequence>
				<xs:element name="id" type="xs:int"/>
			</xs:sequence>
		</xs:complexType>
	</xs:element>
	<xs:element name="getUserResponse">
		<xs:complexType>
			<xs:sequence>
				<xs:element name="user" type="tns:user"/>
			</xs:sequence>
		</xs:complexType>
	</xs:element>
	<xs:complexType name="user">
		<xs:sequence>
			<xs:element name="id" type="xs:int"/>
			<xs:element name="firstname" type="xs:string"/>
			<xs:element name="middlename" type="xs:string"/>
			<xs:element name="lastname" type="xs:string"/>
			<xs:element name="username" type="xs:string"/>
			<xs:element name="createdate" type="xs:date"/>
			<xs:element name="jobtitle" type="xs:string"/>
			<xs:element name="email" type="xs:string"/>
		</xs:sequence>
	</xs:complexType>
</xs:schema>


3. Update Maven dependencies

Now to generate classes from schema, we have to make sure we have all the right dependencies in our pom.xml. We will also add spring boot service dependency to create a SOAP web service.


<project xmlns="http://maven.apache.org/POM/4.0.0" xmlns:xsi="http://www.w3.org/2001/XMLSchema-instance"
 xsi:schemaLocation="http://maven.apache.org/POM/4.0.0 http://maven.apache.org/maven-v4_0_0.xsd">
 <modelVersion>4.0.0</modelVersion>
 <groupId>com.betterjavacode</groupId>
 <artifactId>Benefits</artifactId>
 <packaging>war</packaging>
 <version>0.0.1-SNAPSHOT</version>
 <name>Benefits Maven Webapp</name>
 <url>http://maven.apache.org</url>
 <parent>
 <groupId>org.springframework.boot</groupId>
 <artifactId>spring-boot-starter-parent</artifactId>
 <version>1.4.2.RELEASE</version>
 </parent>
 <dependencies>
 <dependency>
 <groupId>org.springframework.boot</groupId>
 <artifactId>spring-boot-starter-web</artifactId>
 </dependency>
<dependency>
 <groupId>org.springframework.boot</groupId>
 <artifactId>spring-boot-starter-data-jpa</artifactId>
 </dependency>
 <dependency>
 <groupId>mysql</groupId>
 <artifactId>mysql-connector-java</artifactId>
 <scope>runtime</scope>
 </dependency>
 <dependency>
 <groupId>org.springframework.boot</groupId>
 <artifactId>spring-boot-starter-jdbc</artifactId>
 </dependency>
 <dependency>
 <groupId>org.springframework.boot</groupId>
 <artifactId>spring-boot-starter-test</artifactId>
 </dependency>
 <dependency>
 <groupId>org.slf4j</groupId>
 <artifactId>slf4j-api</artifactId>
 </dependency>
 <dependency>
 <groupId>io.swagger</groupId>
 <artifactId>swagger-jersey2-jaxrs</artifactId>
 <version>1.5.12</version>
 </dependency>
 <dependency>
 <groupId>io.springfox</groupId>
 <artifactId>springfox-swagger2</artifactId>
 <version>2.6.1</version>
 <scope>compile</scope>
 </dependency>
 <dependency>
 <groupId>io.springfox</groupId>
 <artifactId>springfox-swagger-ui</artifactId>
 <version>2.6.1</version>
 <scope>compile</scope>
 </dependency>
 <dependency>
 <groupId>org.apache.logging.log4j</groupId>
 <artifactId>log4j-api</artifactId>
 </dependency>
 <dependency>
 <groupId>org.apache.logging.log4j</groupId>
 <artifactId>log4j-core</artifactId>
 </dependency>
 <dependency>
 <groupId>org.springframework.boot</groupId>
 <artifactId>spring-boot-starter-web-services</artifactId>
 </dependency>
 <dependency>
 <groupId>wsdl4j</groupId>
 <artifactId>wsdl4j</artifactId>
 </dependency>
 <dependency>
 <groupId>javax.xml.bind</groupId>
 <artifactId>jaxb-api</artifactId>
 <version>2.1</version>
 </dependency>
 <dependency>
 <groupId>junit</groupId>
 <artifactId>junit</artifactId>
 <scope>test</scope>
 </dependency>
 </dependencies>
 <build>
 <plugins>
 <plugin>
 <artifactId>maven-compiler-plugin</artifactId>
 <version>3.3</version>
 <configuration>
 <source>1.8</source>
 <target>1.8</target>
 </configuration>
 </plugin>
 <plugin>
 <artifactId>maven-war-plugin</artifactId>
 <version>2.6</version>
 <configuration>
 <warSourceDirectory>WebContent</warSourceDirectory>
 <failOnMissingWebXml>false</failOnMissingWebXml>
 </configuration>
 </plugin>
 <plugin>
 <groupId>org.codehaus.mojo</groupId>
 <artifactId>jaxb2-maven-plugin</artifactId>
 <version>1.6</version>
 <executions>
 <execution>
 <id>xjc</id>
 <goals>
 <goal>xjc</goal>
 </goals>
 </execution>
 </executions>
 <configuration>
 <schemaDirectory>${project.basedir}/src/main/resources/</schemaDirectory>
 <outputDirectory>${project.basedir}/src/main/java</outputDirectory>
 <clearOutputDir>false</clearOutputDir>
 <schemaLanguage>WSDL</schemaLanguage>
 <generatePackage>com.betterjavacode.benefits.soap</generatePackage>
 <forceRegenerate>true</forceRegenerate>
 <scehmas>
 <schema>
 <url>http://localhost:8080/benefits/endpoints/users.wsdl</url>
 </schema>
 </scehmas>
 </configuration>
 </plugin>
 </plugins>
 <finalName>Benefits</finalName>
 </build>
 </project>


If we run the project with maven build now, the plugin jaxb2-maven-plugin will generate classes under com.betterjavacode.benefits.soap directory. It will also enable our wsdl SOAP url for users. This will generate following java objects

  • GetUserRequest
  • GetUserResponse
  • ObjectFactory
  • package-info
  • User

4. Defining the service

Next, we will define an interface for our service. This will look like below


package com.betterjavacode.benefits.services;

public interface UserAccountService
{
    public com.betterjavacode.benefits.soap.user.getUserDetails(int id);
}

Implementation of this service will be mapping out entity class User to generated class for soap service User. Using the id as a key to get user data from repository, we will map to soap service user. For post purposes, we will not show the implementation of this interface.

5. Creating the Service Endpoint

What is a service endpoint? When a SOAP request for defined URL is handled by Spring servlet, Spring servlet redirects that request to service endpoint. Service endpoint then processes that request to create a response. Our spring-boot-starter-web-services dependency will bring all the necessary classes for annotation purposes.


package com.betterjavacode.benefits.services.endpoints; 

import org.springframework.beans.factory.annotation.Autowired; 
import org.springframework.ws.server.endpoint.annotation.Endpoint; 
import org.springframework.ws.server.endpoint.annotation.PayloadRoot; 
import org.springframework.ws.server.endpoint.annotation.RequestPayload; 
import org.springframework.ws.server.endpoint.annotation.ResponsePayload; 
import com.betterjavacode.benefits.services.UserAccountService; 
import com.betterjavacode.benefits.soap.GetUserRequest; 
import com.betterjavacode.benefits.soap.GetUserResponse; 
import com.betterjavacode.benefits.soap.User; 

@Endpoint 
public class UserAccountServiceEndpoint 
{ 
  // private static final String TARGET_NAMESPACE ="http://com/betterjavacode/benefits/webservices/useraccountservice";  
  private static final String TARGET_NAMESPACE =   "https://betterjavacode.com/benefits/soap"; 
  @Autowired private UserAccountService userAccountService; 
  @PayloadRoot(localPart = "getUserRequest", namespace = TARGET_NAMESPACE) 

  public @ResponsePayload GetUserResponse getUserRequest(@RequestPayload    GetUserRequest request) 
  {  
     GetUserResponse response = new GetUserResponse(); 
     User user = userAccountService.getUserDetails(request.getId()); 
     response.setUser(user); 
     return response; 
   } 
}

@Endpoint annotation allows the class to be defined as service endpoint and included in @Component annotation for scanning. Make sure the namespace defined in this class matches with XSD schema definition. Otherwise, you can run into error for “No Endpoint defined for“.

6. Configuration

Next, we will configure our configuration class to generate wsdl endpoint. This configuration class will be annotated by @EnableWs to provide web service configuration.


package com.betterjavacode.benefits;

import org.springframework.boot.web.servlet.ServletRegistrationBean;
import org.springframework.context.ApplicationContext;
import org.springframework.context.annotation.Bean;
import org.springframework.context.annotation.ComponentScan;
import org.springframework.context.annotation.Configuration;
import org.springframework.core.io.ClassPathResource;
import org.springframework.ws.config.annotation.EnableWs;
import org.springframework.ws.config.annotation.WsConfigurerAdapter;
import org.springframework.ws.transport.http.MessageDispatcherServlet;
import org.springframework.ws.wsdl.wsdl11.DefaultWsdl11Definition;
import org.springframework.xml.xsd.SimpleXsdSchema;
import org.springframework.xml.xsd.XsdSchema;

@Configuration
@EnableWs
@ComponentScan("com.betterjavacode")
public class AppConfig extends WsConfigurerAdapter
{

    @Bean
	public ServletRegistrationBean messageDispatcherServlet(ApplicationContext applicationContext)
	{
		MessageDispatcherServlet servlet = new MessageDispatcherServlet();
		servlet.setApplicationContext(applicationContext);
		return new ServletRegistrationBean(servlet,"/benefits/endpoints/*");
	}

	@Bean(name="users")
	public DefaultWsdl11Definition defaultWsdl11Definition(XsdSchema usersSchema)
	{
		DefaultWsdl11Definition wsdl11definition = new DefaultWsdl11Definition();
		wsdl11definition.setPortTypeName("UserAccountService");
		wsdl11definition.setLocationUri("/endpoints");
		wsdl11definition.setTargetNamespace("http://com/betterjavacode/benefits/webservices/useraccountservice");
		wsdl11definition.setSchema(usersSchema);
		return wsdl11definition;
	}

	@Bean
	public XsdSchema usersSchema()
	{
		return new SimpleXsdSchema(new ClassPathResource("employees.xsd"));
	}
}

Few important points about this configuration class are

  • MessageDispatcherServlet is a required servlet to dispatch web service messages. We set this servlet with a bean to handle the URL from which request will be coming.
  • DefaultWsdl11Definition creates SOAP for the given XSD schema
  • XsdSchema provides an abstraction for our users XSD schema

7. Running the SOAP Webservice

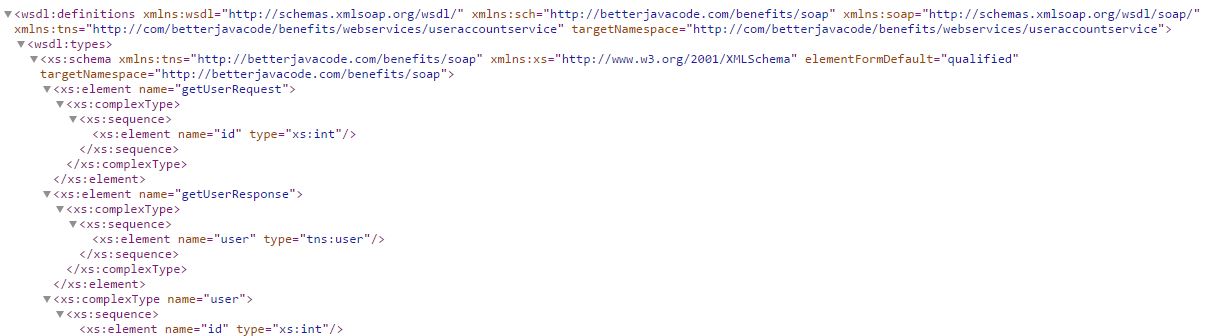
Now build our project with maven. Run the spring boot application through eclipse to start the embedded tomcat server. Once the tomcat server starts, if we access url http://localhost:8080/benefits/endpoints/users.wsdl

Output in the browser will be as below

SOAP Webservice - wsdl endpoint

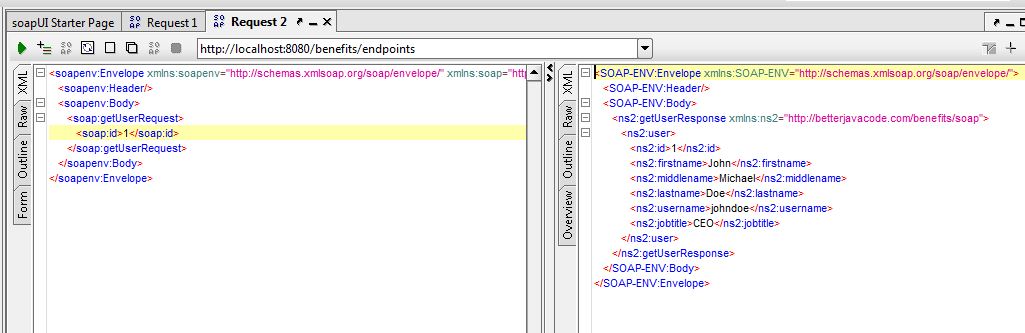
Here we showed how to create a simple SOAP webservice which we have combined with Spring Boot REST API service. We can also test this SOAP webservice using Soap UI, as shown in below screenshot

SOAP Webservice - SoapUITest

8. Consuming the SOAP web service

In previous steps, we showed how to produce a SOAP web service, now we will show how to consume this SOAP web service programmatically.

8.1 Create a client class

Under package com.betterjavacode.benefits.views, define a class UserClient which will extend a WebServiceGatewaySupport class. WebServiceGatewaySupport class provides web service methods.


package com.betterjavacode.benefits.views; 

import org.springframework.ws.client.core.support.WebServiceGatewaySupport; 
import org.springframework.ws.soap.client.core.SoapActionCallback; 
import com.betterjavacode.benefits.soap.GetUserRequest; 
import com.betterjavacode.benefits.soap.GetUserResponse; 

public class UserClient extends WebServiceGatewaySupport 
{

   public GetUserResponse getUserById(int userid) 
   { 
      GetUserRequest userrequest = new GetUserRequest(); userrequest.setId(userid); 
      GetUserResponse response = (GetUserResponse) getWebServiceTemplate().marshalSendAndReceive(userrequest, new SoapActionCallback("http://localhost:8080/benefits/endpoints/getUserResponse"));  
      return response;  
    }  
}

8.2 Configure the client for Spring Bean support

We will configure Jaxb2Marshaller to support JAXB to set context path. This will help us marshal and unmarshal our xml request and response through.


package com.betterjavacode.benefits.views; 

import org.springframework.context.annotation.Bean; 
import org.springframework.context.annotation.Configuration; 
import org.springframework.oxm.jaxb.Jaxb2Marshaller; 

@Configuration 
public class ClientAppConfig 
{ 

   @Bean 
   public Jaxb2Marshaller marshaller() 
   {  
       Jaxb2Marshaller marshaller = new Jaxb2Marshaller(); 
       marshaller.setContextPath("com.betterjavacode.benefits.soap"); 
       return marshaller;  
    } 
    
    @Bean 
    public UserClient userClient(Jaxb2Marshaller marshaller)  
    {  
        // WSDL URL - http://localhost:8080/benefits/endpoints/users.wsdl 
        UserClient uc = new UserClient(); 
        uc.setDefaultUri("http://localhost:8080/benefits/endpoints/users.wsdl"); 
        uc.setMarshaller(marshaller);  
        uc.setUnmarshaller(marshaller);
        return uc; 
     }  
}

8.3 Run the SOAP web service client

We will define a class with the main method to pass an argument of user id. Our client will call the web service with a passed argument to return the data if that user id exists in the database.

9. Conclusion

In this article, we showed how to create a SOAP web service and how to build a client to consume the same SOAP web service using Spring Boot. The code for this is available at github

10. References

  1. Spring Web services tutorial
  2. SOAP Web service producer and consumer
  3. Consuming a web service in java and SOAP UI