Author Archives: yogesh.mali@gmail.com

Fundamentals of a Distributed System Design

When you are a beginner software developer, your focus is on the micro-level. What happens in your code? What happens in your application? But if you start thinking in a System Design way, it can help you immensely in your career. System design is a big topic, but I will cover the important fundamentals of distributed system design. Understanding System Design is the key to building a good system. Therefore, a developer should definitely try to learn about system design.

Fundamentals of a Distributed System

In this post, we will learn the following fundamentals.

  1. Key characteristics of a distributed system
  2. Load balancing
  3. Caching
  4. Database
  5. Database indexes
  6. Proxies
  7. CAP Theorem
  8. Consistent Hashing

Key Characteristics of a distributed system

Scalability

  • Scalability is the system’s ability to grow and manage increased demand
  • Horizontal scaling – you scale by adding more servers into your pool of resources.
  • Vertical scaling – you scale by adding more power to an existing server.

Reliability

  • It is the probability a system will fail in a given period. Specifically, the goal is to minimize this probability as much as possible.
  • To achieve reliability, redundancy is required. Therefore, it has a cost.

Availability

  • Availability is the time a system remains operational to perform its required function in a specific period.
  • If a system is reliable, it is available. By comparison, if it is available, it is not necessarily reliable.

Efficiency

  • Latency – response time
  • Throughput – the number of items delivered in a given time unit

Load Balancing

The load balancer routes the traffic from clients to different servers. It keeps track of the status of all the resources while distributing requests. Equally, a load balancer reduces individual server load and prevents any one application server from becoming a single point of failure. So, the load balancer can be added between clients and web servers, between webservers and an internal platform layer (application server), and between internal platform and database servers.

To organize a load balancer for distributing requests to servers, one can use different algorithms like Round Robin, Weighted Round Robin, Least Connection Method, Least Response Time, Least Bandwidth, IP Hash.

As a result, the load balancer can be a single point of failure. To overcome this, a second load balancer can be connected to the first to form a cluster.

Caching

Caches take advantage of the locality of references principle. A cache is like a short term memory. That is to say, it is faster with limited space. Furthermore, caches can exist at all levels in the architecture but often found at the level nearest to the front end.

Application Server Cache

Placing a cache directly on a request layer node enables the local storage of response data.

Content Distribution Network

CDNs are a kind of cache that comes into play for sites serving large amounts of static data.

Cache Invalidation

  1. Write through cache – Write the data into the cache and the corresponding database at the same time.
  2. Write around cache – Write the data to permanent storage, bypassing the cache. Therefore, recently written data will create a cache miss.
  3. Write-back cache – Write the data to cache alone and sync with backend storage after a specified interval.

Cache Eviction Policies

  1. First In First Out
  2. Last In First Out
  3. Least Recently Used
  4. Least Frequently Used
  5. Most Recently Used
  6. Random Replacement

Database

You will need a storage system for your data. Obviously, Databases are the most common solution. Accordingly, there are two types of databases. Basically, Relational databases and Non-Relational databases.

If your data is structured, you can use a relational database. Also, relational databases offer structured query language (SQL) to query the databases.

Non-relational databases are unstructured, and distributed.

SQL

  1. Store data in rows and columns
  2. Each row contains information about one entity
  3. MySQL, MS SQL, Oracle, PostgreSQL, SQLite are some examples of relational databases.
  4. SQL databases use SQL for querying.
  5. Vertically scalable, but expensive.
  6. Horizontally scalable, but time-consuming process.
  7. SQL databases are ACID (Atomicity, Consistency, Isolation, and Durability) compliant.
  8. If you need ACID compliance and structured data, use SQL databases.

NoSQL

  1. Key-Value Stores  – Redis, Dynamo DB
  2. Document databases – Couch DB and MongoDB
  3. Wide-Column databases – Columnar databases are best suited for analyzing large datasets – Cassandra and HBase
  4. Graph databases – data stored and related to each other in graph format.  Subsequently, data is stored with nodes (entities), properties (info about entities), and lines (the connection between entities) – Neo4J and InfiniteGraph
  5. Schemas are dynamic. Columns can be added on the fly and each row doesn’t have to contain data for each column.
  6. Use UnQL (Unstructured Query Language).
  7. Horizontally scalable easily.
  8. Not ACID Compliant
  9. Allows rapid development, stores a large volume of data with no structure.

Database Indexes

If the database search performance has been bad, we create indexes to improve that performance. Henceforth, the goal of creating an index on a particular table in a database is to make it faster to search through the table.

Indexes improve read performance, but decrease write performance. Consequently, indexes also increase memory usage. If your database is read-intensive, indexes are a good strategy. Don’t add indexes if the database is write-intensive.

Proxies

Proxy server is a piece of software or hardware that acts as an intermediary for requests from clients seekings resources from other servers. Accordingly, Proxies are used to filter requests, log requests, and sometimes transform the requests. Even more, proxy server cache can serve a lot of requests.

Open Proxy

An open proxy server is accessible by any internet user. As a result, any internet user is able to use the proxy for forwarding the requests.

Reverse Proxy

A reverse proxy retrieves resources on behalf of the client from one or more servers. Consequently, these resources are then returned to the client.

CAP Theorem

In any distributed system, you can not achieve all three consistency, availability, and partition tolerance.

CAP Theorem states that you can only get two out of these three options.

Consistency – All nodes see the same data at the same time.

Availability – Every request gets a response on success/failure.

Partition Tolerance – A partition tolerant system can tolerate any amount of network failure that doesn’t result in a failure of the entire network. Particularly, data replication across nodes helps to keep the system up.

Consistent Hashing

Consistent hashing is a mechanism that allows distributing the data across a cluster in such a way that will minimize reorganization when nodes are added or removed. As a result, when you employ consistent hashing, resizing of the hash table results in the remapping of k/n keys.

Conclusion

In conclusion, knowing these fundamentals about a distributed system can immensely help a developer while writing code or designing a system. By all means, study these fundamentals, but you should also learn about domain-driven design. Nonetheless, if you enjoyed this post, you can subscribe to my blog here.

References

  1. System Design Primer – System Design Primer
  2. System Design – System Design

7 AWS Services Every Developer Should Know About

In this post, I will describe the 7 AWS Services a developer should know about. As a developer, it is important to understand when and how to use these services.

Even though moving the infrastructure to the cloud movement began in the last decade, it has picked up the speed in the last 5-6 years. As always, Amazon had been leading on this front. Now the most companies use cloud whether AWS, Google, or Microsoft Azure services for cloud infrastructure.

Amazon Web Services offer a number of services, but we will look at the 7 AWS services only. These services help users to administrator their applications smoothly. If you are building an application and using old on-premise infrastructure, you will be better off moving to the cloud. The dilemma comes what services to use, which Cloud service to choose.

Personally, Amazon is the best solution. It also offers alerts for price management. There are millions of features available with AWS.

7 AWS Services to know

  • Elastic Container Service
  • AWS Lambda
  • Simple Cloud Storage (S3)
  • DynamoDB
  • Route53
  • Elastic Load Balancer (ELB)
  • Kinesis

Elastic Container Service (ECS)

ECS is a container orchestration service. What does container orchestration mean?

  • Basically, you build your application.
  • Deploy that application on a docker container.
  • Push the docker image to ECR (Elastic Container Repository).
  • Build your elastic container service while using the docker image from ECR.

ECS does a good job of choosing what EC2 instance to use, how to identify a load balancer to use, and how many instances to run for your service.

ECS easily integrates with other cloud services that Amazon offers. These services include Amazon Route53, Secrets Manager, Identity and Access Management, and Cloudwatch.

While deploying your service on ECS, you can choose an EC2 container or AWS Fargate container. AWS Fargate is a serverless compute engine that works with both Elastic Container Service or Elastic Kubernetes Service (EKS).

EC2 is an Elastic Cloud Computing service that offers a server instance. You can choose what you want on your server instance installed.

Lambda

If you have heard the word “Serverless”, it is the AWS Lambda that has made it popular. You can write your code without provisioning or managing servers. The selling point of Lambda is that you don’t have to worry about backend infrastructure. Lambda takes care of that, you only pay for the compute time you use. So this makes writing efficient code even more important.

The alacrity with which Lambda handles running your code, it makes Lambda one of the most useful services. Lambda is definitely the most useful when you want to automate repetitive tasks.

Running an entire application on Lambda may not be the best idea. If it’s a static website, then surely you can use Lambda. But a scalable and dynamic application, you will be better off using an EC2 instance than Lambda.

One heuristic to consider to decide when to use Lambda – If you have a code that will not change, but will also perform repetitive tasks without much monitoring efforts, then use Lambda.

S3

S3 is a Simple Cloud Storage. Irrespective of what kind of application you build, you have to store static files somewhere. AWS offers a simple and effective service called S3.

To understand S3 is to understand a hash table. Usually, when you store any file on S3, the service generates a random string as a key to identify that file. The file is the blob format data.

S3 is targeted towards application builders to individual users. The advantages of S3 are scalability, high availability, performance, and security. S3 can also be used for redundancy. One thing to remember that you can not use S3 to host a static website, especially if you want to use it with HTTPS.

DynamoDB

DyanmoDB is a No-SQL database service. The advantages of DynamoDB over regular DB are:

  • High performance even at a scale
  • a simple API allowing for simple key-value access

Dynamo DB is a partitioned B-Tree Data structure. The performance in DynamoDB remains consistent irrespective of the data you are inserting in it. Key-Value pair makes it easy to access Dyanmo DB.

You can get aggregated or sorted data from a regular relational database. But with DynamoDB, your application has to do everything on its own. Once the application fetches the data from DynamoDB, it can get a single data or a contiguous range of data. This is the key point in deciding if you want to use DynamoDB or not.

Route53

Route53 as the name suggests is a DNS service that translates a domain name to IP address. When a request comes from an application to AWS infrastructure, Route53 translates that request to either load balancers or EC2 instance or S3 bucket.

Route53 may not have many advantages over any other infrastructure, but as a developer knowing about Route53 is important. Once you deploy your application in AWS, you will need to make sure it is accessible to users. From a network perspective, understanding Route53 is important.

Route53 integrates well with ELB (Elastic Load Balancer).

ELB

ELB is an elastic load balancer service. It offers a load balancer for application and for the network. So we can say application load balancer (ALB) or network load balancer (NLB).

Application load balancer basically routes the traffic from the internet to your application and vice versa. ALBs offer different features like routing rules, sticky sessions, authentications.

Network load balancers route the network packets. NLB is a network router and not an HTTP request router.

Both NLBs and ALBs support TLS/HTTPS and integrates with AWS Certificate Manager. NLBs and ALBs don’t validate certificates, but since these load balancers run in a VPC, there is a protection from spoofing and man-in-the-middle attack.

One disadvantage of ALBs is that it adds a few milliseconds to each request, increasing the latency in the process. AWS handles scaling ALB automatically based on the demand for your service.

Kinesis

Kinesis is a streaming service. It basically collects, processes, and analyzes real-time data. Once the data arrives in the streaming service, you can build an event to handle the data. Kinesis steam is a highly durable linked list.

You can have multiple applications consuming data from Kinesis. As data streaming getting more and more popular, kinesis offers a lot of flexibility.

Conclusion

There are a lot of other AWS services like SQS, Cloud Formation, Cognito, API Gateway, Step Functions, etc. Here I described 7 AWS services that you will end up using the most frequently. Also, I want to thank Daniel Vassallo and his insightful book The Good Parts of AWS.

If you enjoyed this post, please subscribe to my blog here.

The Definitive Guide to Use Keycloak With a Spring Boot Application

In this post, I will show how to use Keycloak in a Spring Boot application. Before we use Keycloak, we will cover some basics about what Keycloak is and why we use it.

To get started with this demo, you will need the following things:

  • A Code Editor – IntelliJ
  • Database – MySQL
  • Keycloak
  • Java 8

What is Keycloak?

Keycloak is an open-source identity and access management solution for modern applications and services. Keycloak provides both SAML and OpenID protocol solutions.

Why do we use Keycloak?

As mentioned, Keycloak provides identity and access management, it is also open source. SAML and OpenID protocols are industry standards. Building an application that is integrated with Keycloak will only provide you a more secure and stable solution. There are definitely other solutions available like Gluu, Shibboleth, WSO2, and Okta.

For this post, we will be using Keycloak.

Securing Spring Boot Application with Keycloak

There are two parts to this demo. One is about Keycloak. The second is about securing the Spring Boot Application with Keycloak.

Install Keycloak

Download the keycloak on your machine.  Unzip the downloaded file and run the server with the following command from bin directory on your command prompt (Note – I’m on a windows machine):

standalone.bat -Djboss.socket.binding.port-offset=100

This will start the Wildfly server for your Keycloak on your local machine. We can access the server by executing the URL http://localhost:8180. If you just use standalone.bat to execute without that parameter, the server will run on the port 8080.

Spring Boot Application with Keycloak

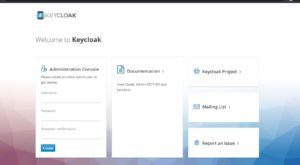
Once you start the server, the first thing you will have to do is to create an admin user. We will create a user admin and password d#n3q2b .

Now we will access the administration console and enter our user details. Once we login as an admin user, we will see the first screen as below:

Keycloak Home Screen

Adding application

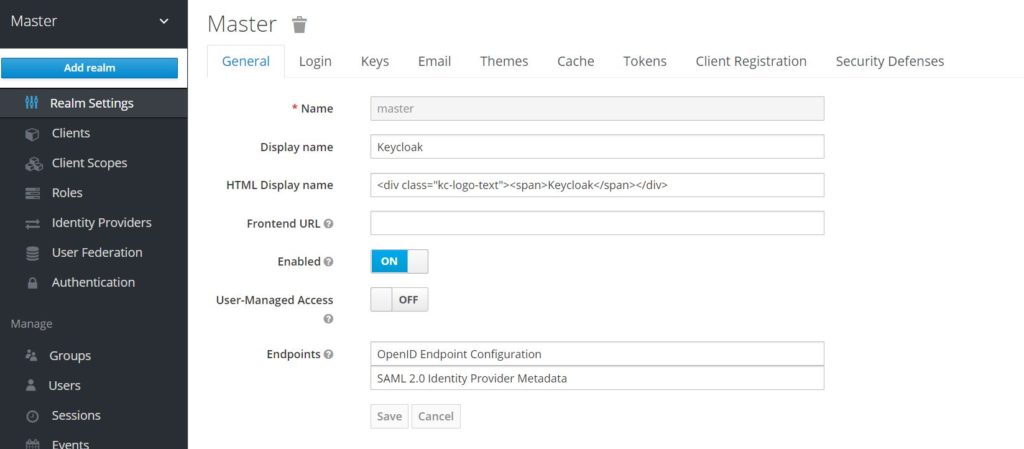
Initial screens shows the default realm. For our demo purposes, we will create a new realm SpringBootKeycloakApp . In this realm, we will add our Spring Boot application as a client. Create a new client on Clients tab. We will name our client application as SpringBootApp.

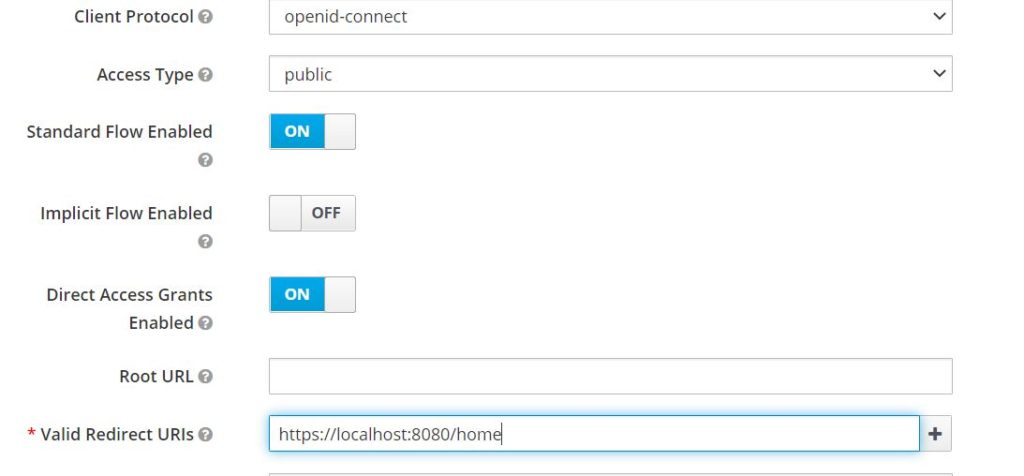
Now in settings, we will add redirect url for our Spring Boot Application. This is the URL where Keycloak will redirect to our app after authentication. Also, we are using openid connect as a protocol as part of this implementation.

Keycloak with Spring Boot App

Adding user

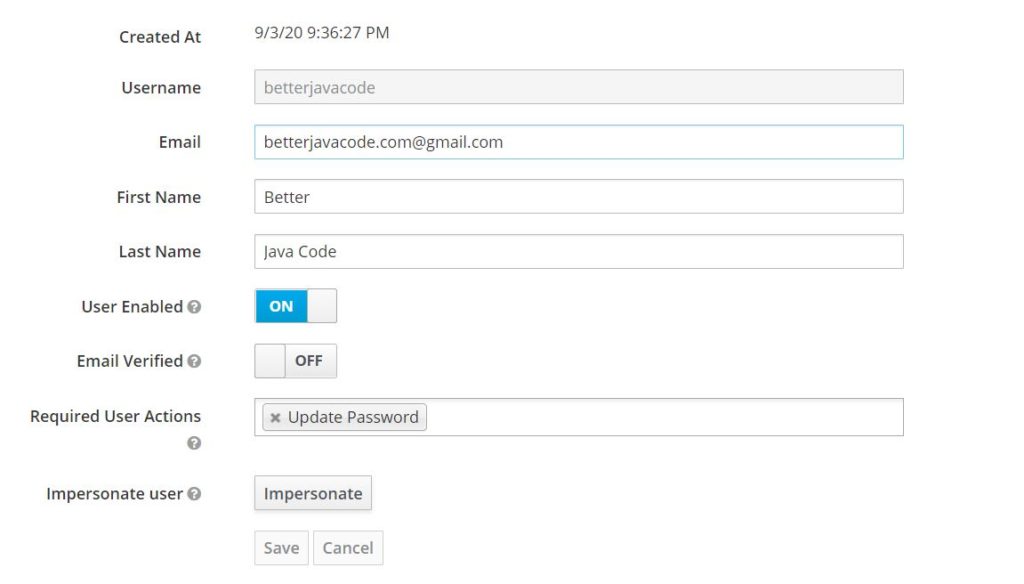
Now we will add a user that we will use to authenticate. We will use this user to login to our sample Spring Boot application.

Add a role that you want for this user ROLE_User on the roles tab in Keycloak. Once that is done, let’s go to the Users tab and add a new user.

Keycloak: add user

On the Role Mappings tab, make sure to add the newly created role for this user.

Create A Spring Boot Application

Now, we will create a simple Spring Boot application that will use Keycloak for security. As part of this application, we will be showing a list of to-do list tasks for the user who will authenticate with the application.

To build this app, we need the following dependencies:


dependencies {
	implementation 'org.springframework.boot:spring-boot-starter-data-jpa'
	implementation 'org.springframework.boot:spring-boot-starter-security'
	implementation 'org.springframework.boot:spring-boot-starter-thymeleaf'
	implementation 'org.springframework.boot:spring-boot-starter-web'
	implementation 'org.springframework.boot:spring-boot-starter-jdbc'
	implementation 'org.keycloak:keycloak-spring-boot-starter'
	runtimeOnly 'mysql:mysql-connector-java'
	testImplementation('org.springframework.boot:spring-boot-starter-test') {
		exclude group: 'org.junit.vintage', module: 'junit-vintage-engine'
	}
	testImplementation 'org.springframework.security:spring-security-test'
}

As you can see we are using spring-boot and spring-security along with keycloak-spring-boot-starter dependency.

The keycloak dependency includes Keycloak client adapters. We will use these adapters for authentication purposes. They will replace our standard Spring Security adapters. To make sure this keycloak-spring-boot-starter dependency works correctly, we will need one more dependency to be added in our gradle file as below:


dependencyManagement {
	imports {
		mavenBom "org.keycloak.bom:keycloak-adapter-bom:11.0.2"
	}
}

To read more about this, you can visit the official documentation of keycloak.

Our Controller class will have two important methods, one to get the home page which will be accessible for anyone, and another to get the list of tasks that will be accessible to only authenticated users with a role ROLE_User.  The code for this TaskController will look like below:


package com.betterjavacode.keycloakdemo.keycloakdemo.controllers;

import com.betterjavacode.keycloakdemo.keycloakdemo.dto.TaskDto;
import com.betterjavacode.keycloakdemo.keycloakdemo.managers.TaskManager;
import org.keycloak.KeycloakSecurityContext;
import org.springframework.beans.factory.annotation.Autowired;
import org.springframework.stereotype.Controller;
import org.springframework.ui.Model;
import org.springframework.web.bind.annotation.GetMapping;

import javax.servlet.http.HttpServletRequest;
import java.util.List;

@Controller
public class TaskController
{
    private final HttpServletRequest request;

    @Autowired
    public TaskController(HttpServletRequest request)
    {
        this.request = request;
    }

    @Autowired
    private TaskManager taskManager;

    @GetMapping(value="/")
    public String home()
    {
        return "index";
    }

    @GetMapping(value="/tasks")
    public String getTasks(Model model)
    {
        List tasks = taskManager.getAllTasks();
        model.addAttribute("tasks", tasks);
        model.addAttribute("name", getKeycloakSecurityContext().getIdToken().getGivenName());

        return "tasks";
    }

    private KeycloakSecurityContext getKeycloakSecurityContext()
    {
        return (KeycloakSecurityContext) request.getAttribute(KeycloakSecurityContext.class.getName());
    }

}

In this controller class, we use TaskManager to get all tasks. I will explain  KeyCloakSecurityContext when I will show about SecurityConfig.

With or without Spring-Security

We can leverage this application and use Keycloak for authentication with or without Spring-Security. As part of this demo, we are using Spring-Security. To use the same application without Spring-Security, you can just remove the Spring-Security dependency and add security configuration through application.properties file.

We will need the following properties in application.properties to use Keycloak for authentication in this app.

keycloak.auth-server-url=http://localhost:8180/auth
keycloak.realm=SpringBootKeycloakApp
keycloak.resource=SpringBootApp
keycloak.public-client=true
keycloak.principal-attribute=preferred_username

If we wanted to use this application without Spring-Security, we will need the following two properties also:

keycloak.security-constraints[0].authRoles[0]=ROLE_User
keycloak.security-constraints[0].securityCollections[0].patterns[0]=/tasks

Since we are using Spring-Security, we will configure the security configuration through a Java class SecurityConfig.

This SecurityConfig class will extend KeyCloakWebSecurityConfigurerAdapter .

Our configure method will look like below:

    @Override
    protected void configure(HttpSecurity httpSecurity) throws Exception
    {
        super.configure(httpSecurity);
        httpSecurity.authorizeRequests()
                .antMatchers("/tasks").hasRole("User")
                .anyRequest().permitAll();
    }

Basically, any requests coming to /tasks endpoint, should have user role as ROLE_User. The prefix of ROLE_ is assumed here. Other than any other request will be permitted without any authorization. In this case, we will be calling our index page.

We will be using annotation @KeyCloakConfiguration which is basically covers @Configuration and @EnableWebSecurity annotations.

Since our SecurityConfig extends KeycloakWebSecurityConfigurerAdapter, we have to implement sessionAuthenticationStrategy and httpSessionManager. We will also have to register our idp Keycloak with Spring Security Authentication Manager.

So our SecurityConfig will look like below:


package com.betterjavacode.keycloakdemo.keycloakdemo.config;

import org.keycloak.adapters.springsecurity.KeycloakConfiguration;
import org.keycloak.adapters.springsecurity.authentication.KeycloakAuthenticationProvider;
import org.keycloak.adapters.springsecurity.config.KeycloakWebSecurityConfigurerAdapter;
import org.keycloak.adapters.springsecurity.management.HttpSessionManager;
import org.springframework.beans.factory.annotation.Autowired;
import org.springframework.boot.autoconfigure.condition.ConditionalOnMissingBean;
import org.springframework.context.annotation.Bean;

import org.springframework.security.config.annotation.authentication.builders.AuthenticationManagerBuilder;
import org.springframework.security.config.annotation.web.builders.HttpSecurity;
import org.springframework.security.core.authority.mapping.SimpleAuthorityMapper;
import org.springframework.security.core.session.SessionRegistryImpl;
import org.springframework.security.web.authentication.session.RegisterSessionAuthenticationStrategy;
import org.springframework.security.web.authentication.session.SessionAuthenticationStrategy;


@KeycloakConfiguration
public class SecurityConfig extends KeycloakWebSecurityConfigurerAdapter
{
    @Autowired
    public void configureGlobal(AuthenticationManagerBuilder authenticationManagerBuilder)
    {
        SimpleAuthorityMapper simpleAuthorityMapper = new SimpleAuthorityMapper();
        simpleAuthorityMapper.setPrefix("ROLE_");

        KeycloakAuthenticationProvider keycloakAuthenticationProvider =
                keycloakAuthenticationProvider();
        keycloakAuthenticationProvider.setGrantedAuthoritiesMapper(simpleAuthorityMapper);
        authenticationManagerBuilder.authenticationProvider(keycloakAuthenticationProvider);
    }

    @Bean
    @Override
    protected SessionAuthenticationStrategy sessionAuthenticationStrategy ()
    {
        return new RegisterSessionAuthenticationStrategy(new SessionRegistryImpl());
    }

    @Bean
    @Override
    @ConditionalOnMissingBean(HttpSessionManager.class)
    protected HttpSessionManager httpSessionManager()
    {
        return new HttpSessionManager();
    }

    @Override
    protected void configure(HttpSecurity httpSecurity) throws Exception
    {
        super.configure(httpSecurity);
        httpSecurity.authorizeRequests()
                .antMatchers("/tasks").hasRole("User")
                .anyRequest().permitAll();
    }
}

So Spring Security uses roles in upper case like ROLE_USER and always use ROLE_ prefix. To handle that, I have added a user with a role ROLE_User in Keycloak, but we will only verify a prefix as our http configuration will verify the role anyhow.

Since we will be authenticating with Keycloak, we will need a session for user’s state. We are using RegisterSessionAuthenticationStrategy here. HttpSessionManager is a conditional bean because Keycloak already implements that bean.

To implement the Keycloak Spring Boot adapter, we will add a KeyCloakSpringBootConfigResolver bean as follows:


package com.betterjavacode.keycloakdemo.keycloakdemo.config;

import org.keycloak.adapters.springboot.KeycloakSpringBootConfigResolver;
import org.springframework.context.annotation.Bean;
import org.springframework.context.annotation.Configuration;

@Configuration
public class KeycloakConfig
{
    @Bean
    public KeycloakSpringBootConfigResolver keycloakSpringBootConfigResolver()
    {
        return new KeycloakSpringBootConfigResolver();
    }
}

I have not shown the rest of the application build, but the code is available on GitHub for this project.

Demo of the application

Run our keycloak application, it will be running on http://localhost:8180. Our Spring Boot application will be running at http://localhost:8080.

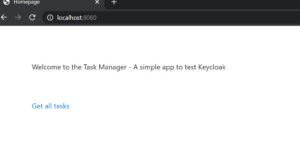
Our first screen of the Spring Boot application will look like below:

Spring Boot Application with Keycloak

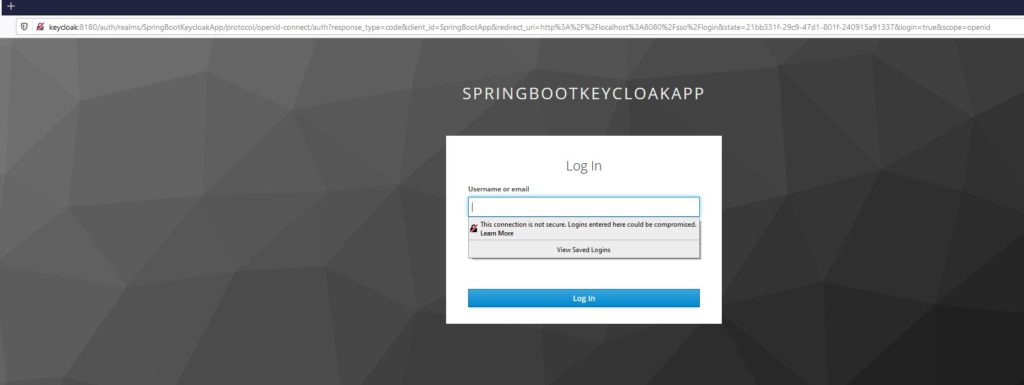
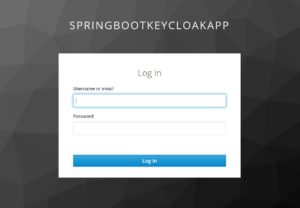
Now if a user clicks on Get all tasks, he will be redirected to Keycloak login screen as below:

Securing Spring Boot App with Keycloak

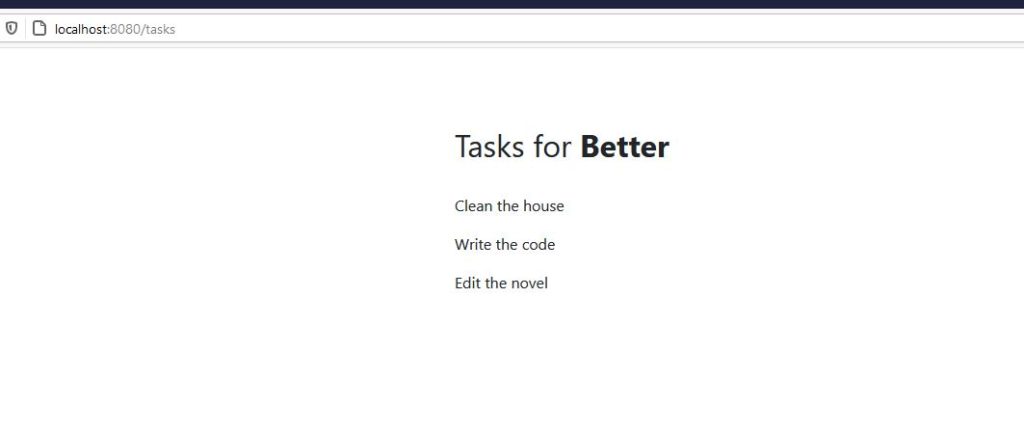
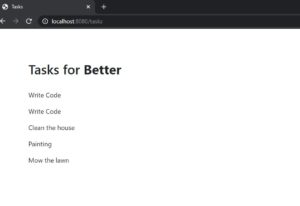
Now, I will enter my user betterjavacode username and password and it will show us our list of tasks as follows:

Spring Boot Application and Keycloak


Authentication Flow

When the user clicks on Get all tasks, the user is redirected to Spring Security‘s sso/login endpoint which KeycloakSpringBootConfigResolver handles and sends an authorization code flow request to Keycloak

http://localhost:8180/auth/realms/SpringBootKeycloakApp/protocol/openid-connect/auth?response_type=code&client_id=SpringBootApp&redirect_uri=http%3A%2F%2Flocalhost%3A8080%2Fsso%2Flogin&state=70bd4e28-89e6-43b8-8bea-94c6d057a5cf&login=true&scope=openid

Keycloak will process the request to respond with a session code and show the login screen.

Once the user enters credentials and keycloak validates those, it will respond with an authorization code, and this code is exchanged for a token, and the user is logged in.

Conclusion

In this post, I showed how to secure your Spring Boot application using Keycloak as an identity provider. If you enjoyed this post, please consider subscribing to my blog here.

References

  1. Keycloak – Keycloak
  2. Securing your application with Keycloak – Secure your application

How to Use Basic Authentication for Rest Template

In this post, I will show how to use Rest Template to consume RESTful API secured with Basic Authentication. As part of this post, I will show how to build a REST API that is secured with Basic Authentication.

Overview

Basic Authentication is one of the mechanisms that you can use to secure your REST API. In my previous post, I showed how to secure REST API with Json Web Token.

Secure a REST API with Basic Authentication

Configure a REST API

Firstly, we will show a simple REST API to create users or retrieve users from the database. Then, we will secure this REST API with a Basic Authentication mechanism. Lastly, we will show how to use Basic Authentication with Rest Template to call this REST API.

Our REST controller class for this API to create or retrieve users will look like below:


package com.betterjavacode.restdemo.controllers;

import com.betterjavacode.restdemo.dto.UserDto;
import com.betterjavacode.restdemo.managers.UserManager;
import org.springframework.beans.factory.annotation.Autowired;
import org.springframework.http.HttpStatus;
import org.springframework.http.MediaType;
import org.springframework.http.ResponseEntity;
import org.springframework.web.bind.annotation.*;

import java.util.List;

@RestController
public class UserController
{
    @Autowired
    private UserManager userManager;

    @RequestMapping(value = "/user/", method = RequestMethod.GET)
    public ResponseEntity<List> listAllUsers()
    {
        List users = userManager.getAllUsers();
        if(users.isEmpty())
        {
            return new ResponseEntity<List>(HttpStatus.NO_CONTENT);
        }

        return new ResponseEntity<>(users, HttpStatus.OK);
    }

    @RequestMapping(value = "/user/{id}", method = RequestMethod.GET, produces =
            MediaType.APPLICATION_JSON_VALUE)
    public ResponseEntity getUser(@PathVariable("id") long id)
    {
        UserDto userDto = userManager.getUser(id);
        if(userDto == null)
        {
            return new ResponseEntity<>(HttpStatus.NOT_FOUND);
        }
        return new ResponseEntity<>(userDto, HttpStatus.OK);
    }


    @RequestMapping(value = "/user/", method= RequestMethod.POST)
    public ResponseEntity createUser(@RequestBody UserDto userDto)
    {
        UserDto user = userManager.createUser(userDto);

        return new ResponseEntity<>(user, HttpStatus.OK);
    }

    @RequestMapping(value = "/user/{id}", method=RequestMethod.DELETE)
    public ResponseEntity deleteUser(@PathVariable("id") long id)
    {
        UserDto user = userManager.getUser(id);

        if(user == null)
        {
            return new ResponseEntity<>(HttpStatus.NOT_FOUND);
        }

        userManager.deleteUser(id);

        return new ResponseEntity<>(HttpStatus.NO_CONTENT);
    }
}

Our database model class for User will look like below:


package com.betterjavacode.restdemo.models;

import javax.persistence.*;
import java.io.Serializable;

@Entity(name = "User")
@Table(name = "users")
public class User implements Serializable
{
    private static final long serialVersionUID = 20200816121023L;

    public User()
    {

    }

    @Id
    @GeneratedValue(strategy = GenerationType.IDENTITY)
    @Column(name="id", nullable=false)
    private long id;

    @Column(name="firstname", length=100)
    private String firstname;

    @Column(name="lastname", length=100)
    private String lastname;

    @Column(name="email", length=100)
    private String email;

    @Column(name="role", length=45)
    private String role;

    @Column(name="enabled")
    private boolean enabled;

    public long getId ()
    {
        return id;
    }

    public void setId (long id)
    {
        this.id = id;
    }

    public String getFirstname ()
    {
        return firstname;
    }

    public void setFirstname (String firstname)
    {
        this.firstname = firstname;
    }

    public String getLastname ()
    {
        return lastname;
    }

    public void setLastname (String lastname)
    {
        this.lastname = lastname;
    }

    public String getEmail ()
    {
        return email;
    }

    public void setEmail (String email)
    {
        this.email = email;
    }

    public String getRole ()
    {
        return role;
    }

    public void setRole (String role)
    {
        this.role = role;
    }

    public boolean isEnabled ()
    {
        return enabled;
    }

    public void setEnabled (boolean enabled)
    {
        this.enabled = enabled;
    }
}

Just to make sure we understand here that, we are using a DTO object UserDto to create and retrieve the data from the database. User is our database model object.

The UserDto object will be as follows:


package com.betterjavacode.restdemo.dto;

import com.betterjavacode.restdemo.models.User;
import com.fasterxml.jackson.annotation.JsonIgnoreProperties;

@JsonIgnoreProperties(ignoreUnknown = true)
public class UserDto
{
    private String firstname;
    private String lastname;
    private String email;

    public UserDto(){}

    public UserDto(User user)
    {
        this.setEmail(user.getEmail());
        this.setFirstname(user.getFirstname());
        this.setLastname(user.getLastname());
    }

    public String getFirstname ()
    {
        return firstname;
    }

    public void setFirstname (String firstname)
    {
        this.firstname = firstname;
    }

    public String getLastname ()
    {
        return lastname;
    }

    public void setLastname (String lastname)
    {
        this.lastname = lastname;
    }

    public String getEmail ()
    {
        return email;
    }

    public void setEmail (String email)
    {
        this.email = email;
    }

}

Once we configure our application properties and create the required database table, we will start the application.

Now if we execute the API through a client like Postman, we will be able to retrieve or create the User object.

The goal is to secure this API.

So add Spring-Security in our project build.

implementation "org.springframework.boot:spring-boot-starter-security"

Now, if we add the annotation @EnableWebSecurity in our main application class like below:


package com.betterjavacode.restdemo;

import org.springframework.boot.SpringApplication;
import org.springframework.boot.autoconfigure.SpringBootApplication;
import org.springframework.security.config.annotation.web.configuration.EnableWebSecurity;

@SpringBootApplication
@EnableWebSecurity
public class RestdemoApplication
{
	public static void main(String[] args)
	{
		SpringApplication.run(RestdemoApplication.class, args);
	}
}

and if we access the API to create user, we will get 401 unauthorized error like below:

Basic Authentication with Rest Template

Basic Authentication

Traditionally, access to REST API will happen on the server-side once the user has logged in with authentication.

Basic authentication provides one of the ways to secure REST API. It’s not the most secure way compared to OAuth or JWT based security. In Basic Authentication, a client sends Base64 encoded credentials with each request using HTTP Authorization Header.

The client will send the Authorization header with each request. There is always a possibility of compromising these credentials even when they are Base64 encoded. To avoid that, we can use HTTPS.

Now from our implementation perspective, we will add a SecurityConfig class to configure security for our REST API.


package com.betterjavacode.restdemo;

import org.springframework.beans.factory.annotation.Autowired;
import org.springframework.context.annotation.Configuration;
import org.springframework.security.config.annotation.authentication.builders.AuthenticationManagerBuilder;
import org.springframework.security.config.annotation.web.builders.HttpSecurity;
import org.springframework.security.config.annotation.web.configuration.EnableWebSecurity;
import org.springframework.security.config.annotation.web.configuration.WebSecurityConfigurerAdapter;

@Configuration
@EnableWebSecurity
public class SecurityConfig extends WebSecurityConfigurerAdapter
{
    @Override
    protected void configure(HttpSecurity httpSecurity) throws Exception
    {
        httpSecurity
                .csrf().disable()
                .authorizeRequests().anyRequest().authenticated()
                .and()
                .httpBasic();
    }

    @Autowired
    public void configureGlobal(AuthenticationManagerBuilder auth)
            throws Exception
    {
        auth.inMemoryAuthentication()
                .withUser("adminuser")
                .password("{noop}adminpassword")
                .roles("USER");
    }
}

configure method in this class will configure basic authentication and every request coming to our controller will need to be authorized.

configureGlobal method will add authentication of the incoming request. The requests coming through the controller will be validated for these credentials that we have configured for in-memory authentication.

WARNING – This is not the most secure way to secure your API. Definitely not with in-memory authentication. Do not use it in production.

Now if we execute REST API through POSTMAN, we will see the successful response as below:

Securing REST API with Basic Authentication

Rest Template with Basic Authentication Example

Initially, we used POSTMAN as a client to call our REST APIs. But in a real scenario, we won’t be using POSTMAN, you will have to call these APIs programmatically.

We will create a class RestClient and that will call our APIs while building Basic Authentication.

While using RestTemplate that Spring Boot provides, you need to pass HttpHeaders with a RequestEntity.


    private static HttpHeaders getHeaders ()
    {
        String adminuserCredentials = "adminuser:adminpassword";
        String encodedCredentials =
                new String(Base64.encodeBase64(adminuserCredentials.getBytes()));

        HttpHeaders httpHeaders = new HttpHeaders();
        httpHeaders.add("Authorization", "Basic " + encodedCredentials);
        httpHeaders.setAccept(Arrays.asList(MediaType.APPLICATION_JSON));
        return httpHeaders;
    }

We use exchange method from RestTemplate to call our API and HttpHeaders that contain Basic Authentication.

The whole class  RestClient will look like below:


package com.betterjavacode.restdemo;


import com.betterjavacode.restdemo.dto.UserDto;
import org.apache.tomcat.util.codec.binary.Base64;
import org.json.JSONObject;
import org.springframework.http.*;
import org.springframework.web.client.RestTemplate;

import java.util.Arrays;
import java.util.LinkedHashMap;
import java.util.List;

public class RestClient
{
    public static final String REST_SERVICE_URL = "http://localhost:8080/user/";

    private static HttpHeaders getHeaders ()
    {
        String adminuserCredentials = "adminuser:adminpassword";
        String encodedCredentials =
                new String(Base64.encodeBase64(adminuserCredentials.getBytes()));

        HttpHeaders httpHeaders = new HttpHeaders();
        httpHeaders.add("Authorization", "Basic " + encodedCredentials);
        httpHeaders.setAccept(Arrays.asList(MediaType.APPLICATION_JSON));
        return httpHeaders;
    }

    private static void listAllUsers()
    {
        System.out.println("Getting all users");
        RestTemplate restTemplate = new RestTemplate();

        HttpHeaders httpHeaders = getHeaders();

        HttpEntity httpEntity = new HttpEntity<>(httpHeaders);

        ResponseEntity responseEntity = restTemplate.exchange(REST_SERVICE_URL,
                HttpMethod.GET, httpEntity, List.class);

        if(responseEntity.hasBody())
        {
            List<LinkedHashMap<String, Object>> users = responseEntity.getBody();

            if(users != null)
            {
                for(LinkedHashMap<String, Object> userMap: users)
                {
                    System.out.println("User is " + userMap.get("firstname") + " " + userMap.get(
                            "lastname"));
                }
            }
        }
        else
        {
            System.out.println("User not found");
        }

    }

    public static void main (String[] args)
    {
        listAllUsers();

        getUser(1);
    }


    private static void getUser(long id)
    {
        System.out.println("Getting a user ");

        String restUrl = REST_SERVICE_URL  + id;

        RestTemplate restTemplate = new RestTemplate();

        HttpHeaders httpHeaders = getHeaders();

        HttpEntity httpEntity = new HttpEntity<>(httpHeaders);

        ResponseEntity responseEntity = restTemplate.exchange(restUrl,
                HttpMethod.GET, httpEntity, String.class);

        if(responseEntity.hasBody())
        {
            JSONObject jsonObject = new JSONObject(responseEntity.getBody());

            System.out.println(jsonObject.get("firstname"));
            System.out.println(jsonObject.get("lastname"));
        }
        else
        {
            System.out.println("User not found");
        }

    }
}

Now if we execute the program, we will see the output as below:

Output of Rest Template call with Basic Authentication

In this post, we showed how to secure REST API with Basic Authentication. If you enjoyed this post, subscribe to my blog here.

Do you want to know the fundamentals of Spring Security? I’m launching my new book “Simplifying Spring Security” soon. Get on my launch list to get updates and discount codes.

References

  1. Spring Rest Template –  documentation
  2. Spring Boot Rest Template – Usage

Json Web Token: How to Secure Spring Boot REST API

In this post, I will show how to secure your spring boot based REST API. It has been more of a trend to secure REST APIs to avoid any unnecessary calls to public APIs. We will be using some Spring boot features for Spring security along with JSON WebTokens for authorization. You can learn more about basic authentication here.

User flow in this case is

  1. User logs in
  2. We validate user credentials
  3. A token is sent back to user agent.
  4. User tries to access a protected resource.
  5. User sends JWT when accessing the protected resource. We validate JWT.
  6. If JWT is valid, we allow the user to access the resource.

JSON WebTokens, known as JWTs are used for forming authorization for users. This helps us to build secure APIs and it is also easy to scale. During authentication, a JSON web token is returned. Whenever the user wants to access a protected resource, the browser must send JWTs in the Authorization header along with the request. One thing to understand here is that it is a good security practice to secure REST API.

Basically, we will show

  1. Verify JSON WebToken
  2. Validate the signature
  3. Check the client permissions

What you will need?

  1. Java 8,
  2. MySQL Database
  3. IntelliJ Editor
  4. Gradle

Note – This won’t be a full-fledged app, but REST APIs based on Spring Boot, and Spring security.

Spring Boot Based REST API

Since I have already shown this before on my blog, I won’t be creating any new APIs. I will be securing REST API for company that I created in this blog post REST API. This API also includes caching. A user will try to access /cachedemo/v1/companies/ and since APIs are protected, he will get a response like below:

Secure REST API - Forbidden

Response from protected API

Now we will implement how to protect this API and how to access it.

Adding User and User Registration

Since we want to add authorization for APIs, we will need where the user is able to log in and send credentials. These credentials will be validated and a token will be generated. This token then will be transmitted in a request to an API call. The token will be validated in the Spring security authorization filter that we will add. If a valid token, the user will be able to access the API.

Create a user model


package com.betterjavacode.models;

import javax.persistence.*;
import java.io.Serializable;

@Entity(name = "User")
@Table(name = "user")
public class User implements Serializable
{
    public User()
    {

    }

    @Id
    @GeneratedValue(strategy =  GenerationType.IDENTITY)
    private long id;

    @Column(name = "username")
    private String username;

    @Column(name = "password")
    private String password;

    public long getId()
    {
        return id;
    }

    public void setId(long id)
    {
        this.id = id;
    }

    public String getUsername()
    {
        return username;
    }

    public void setUsername(String username)
    {
        this.username = username;
    }

    public String getPassword()
    {
        return password;
    }

    public void setPassword(String password)
    {
        this.password = password;
    }
}

We will add a controller where a user can register with its details for username and password.


package com.betterjavacode.resources;

import com.betterjavacode.models.User;
import com.betterjavacode.repositories.UserRepository;
import org.springframework.security.crypto.bcrypt.BCryptPasswordEncoder;
import org.springframework.web.bind.annotation.PostMapping;
import org.springframework.web.bind.annotation.RequestBody;
import org.springframework.web.bind.annotation.RequestMapping;
import org.springframework.web.bind.annotation.RestController;

@RestController
@RequestMapping(value = "/cachedemo/v1/users")
public class UserController
{
    private UserRepository userRepository;
    private BCryptPasswordEncoder bCryptPasswordEncoder;

    public UserController(UserRepository userRepository, BCryptPasswordEncoder bCryptPasswordEncoder)
    {
        this.userRepository = userRepository;
        this.bCryptPasswordEncoder = bCryptPasswordEncoder;
    }

    @PostMapping("/signup")
    public void signUp(@RequestBody User user)
    {
        user.setPassword(bCryptPasswordEncoder.encode(user.getPassword()));
        userRepository.save(user);
    }

}

Now when we POST a request to /cachedemo/v1/users/signup , a user will be saved in the database. Password for the user will be saved in encrypted format as we are using BCryptPasswordEncoder. We will show how a user can log in to create a token.

User Login

To handle user login, we will add an AuthenticationFilter which will get added in FilterChain and Spring boot will handle the execution of it appropriately. This filter will look like below:


package com.betterjavacode.SpringAppCache;


import com.fasterxml.jackson.databind.ObjectMapper;
import io.jsonwebtoken.Jwts;
import io.jsonwebtoken.SignatureAlgorithm;
import org.springframework.security.authentication.AuthenticationManager;
import org.springframework.security.authentication.UsernamePasswordAuthenticationToken;
import org.springframework.security.core.Authentication;
import org.springframework.security.core.AuthenticationException;
import org.springframework.security.core.userdetails.User;
import org.springframework.security.web.authentication.UsernamePasswordAuthenticationFilter;

import javax.servlet.FilterChain;
import javax.servlet.http.HttpServletRequest;
import javax.servlet.http.HttpServletResponse;
import java.io.IOException;
import java.util.ArrayList;
import java.util.Date;

public class AuthenticationFilter extends UsernamePasswordAuthenticationFilter
{
    private AuthenticationManager authenticationManager;

    public AuthenticationFilter(AuthenticationManager authenticationManager)
    {
        this.authenticationManager = authenticationManager;
        setFilterProcessesUrl("/login");
    }

    @Override
    public Authentication attemptAuthentication(HttpServletRequest request, HttpServletResponse response) throws AuthenticationException
    {
        try
        {
            com.betterjavacode.models.User creds = new ObjectMapper().readValue(request.getInputStream(), com.betterjavacode .models.User.class);
            return authenticationManager.authenticate(new UsernamePasswordAuthenticationToken(creds.getUsername(), creds.getPassword(),new ArrayList<>()));
        }
        catch(IOException e)
        {
            throw new RuntimeException("Could not read request" + e);
        }
    }

    protected void successfulAuthentication(HttpServletRequest request, HttpServletResponse response, FilterChain filterChain, Authentication authentication)
    {
        String token = Jwts.builder()
                .setSubject(((User) authentication.getPrincipal()).getUsername())
                .setExpiration(new Date(System.currentTimeMillis() + 864_000_000))
                .signWith(SignatureAlgorithm.HS512, "SecretKeyToGenJWTs".getBytes())
                .compact();
        response.addHeader("Authorization","Bearer " + token);
    }
}

Basically, a user will send credentials in a request to URL ending with /login . This filter will help to authenticate the user, if there is successful authentication, a Token will be added in response header with the key Authorization.

Token Validation and Authorization

We add another filter AuthorizationFilter to validate the token that we passed through AuthenticationFilter earlier. This filter will look like below:


package com.betterjavacode.SpringAppCache;

import io.jsonwebtoken.Jwts;
import org.springframework.security.authentication.AuthenticationManager;
import org.springframework.security.authentication.UsernamePasswordAuthenticationToken;
import org.springframework.security.core.context.SecurityContextHolder;
import org.springframework.security.web.authentication.www.BasicAuthenticationFilter;

import javax.servlet.FilterChain;
import javax.servlet.ServletException;
import javax.servlet.http.HttpServletRequest;
import javax.servlet.http.HttpServletResponse;
import java.io.IOException;
import java.util.ArrayList;


public class AuthorizationFilter extends BasicAuthenticationFilter
{
    public AuthorizationFilter(AuthenticationManager authenticationManager)
    {
        super(authenticationManager);
    }

    protected void doFilterInternal(HttpServletRequest request, HttpServletResponse response, FilterChain filterChain)
            throws IOException, ServletException
    {
        String header = request.getHeader("Authorization");
        if(header == null || !header.startsWith("Bearer"))
        {
            filterChain.doFilter(request,response);
            return;
        }

        UsernamePasswordAuthenticationToken authenticationToken = getAuthentication(request);
        SecurityContextHolder.getContext().setAuthentication(authenticationToken);
        filterChain.doFilter(request,response);
    }

    private UsernamePasswordAuthenticationToken getAuthentication(HttpServletRequest request)
    {
        String token = request.getHeader("Authorization");
        if(token != null)
        {
            String user = Jwts.parser().setSigningKey("SecretKeyToGenJWTs".getBytes())
                    .parseClaimsJws(token.replace("Bearer",""))
                    .getBody()
                    .getSubject();
            if(user != null)
            {
                return new UsernamePasswordAuthenticationToken(user, null, new ArrayList<>());
            }
            return null;
        }
        return null;
    }
}

If the validation of the token is successful, the application returns a user and assigns it to a security context.

To enable Spring security, we will add a new class WebSecurityConfiguration with annotation @EnableWebSecurity. This class will extend the standard WebSecurityConfigurerAdapter . In this class, we will restrict our APIs and also add some whitelisted URLs that we will need to access without any authorization token. This will look like below:


package com.betterjavacode.SpringAppCache;

import org.springframework.context.annotation.Bean;
import org.springframework.http.HttpMethod;
import org.springframework.security.config.annotation.authentication.builders.AuthenticationManagerBuilder;
import org.springframework.security.config.annotation.web.builders.HttpSecurity;
import org.springframework.security.config.annotation.web.builders.WebSecurity;
import org.springframework.security.config.annotation.web.configuration.EnableWebSecurity;
import org.springframework.security.config.annotation.web.configuration.WebSecurityConfigurerAdapter;
import org.springframework.security.config.http.SessionCreationPolicy;
import org.springframework.security.core.userdetails.UserDetailsService;
import org.springframework.security.crypto.bcrypt.BCryptPasswordEncoder;
import org.springframework.web.cors.CorsConfiguration;
import org.springframework.web.cors.CorsConfigurationSource;
import org.springframework.web.cors.UrlBasedCorsConfigurationSource;

@EnableWebSecurity
public class WebSecurityConfiguration extends WebSecurityConfigurerAdapter
{
    private BCryptPasswordEncoder bCryptPasswordEncoder;
    private UserDetailsService userDetailsService;

    private static final String[] AUTH_WHITELIST = {
            "/v2/api-docs",
            "/swagger-resources",
            "/swagger-resources/**",
            "/configuration/ui",
            "/configuration/security",
            "/swagger-ui.html",
            "/webjars/**"
    };

    public WebSecurityConfiguration(UserDetailsService userDetailsService, BCryptPasswordEncoder bCryptPasswordEncoder)
    {
        this.bCryptPasswordEncoder = bCryptPasswordEncoder;
        this.userDetailsService = userDetailsService;
    }


    protected void configure(HttpSecurity httpSecurity) throws Exception
    {
        httpSecurity.cors().and().csrf().disable().authorizeRequests()
                .antMatchers(AUTH_WHITELIST).permitAll()
                .antMatchers(HttpMethod.POST, "/cachedemo/v1/users/signup").permitAll()
                .anyRequest().authenticated()
                .and().addFilter(new AuthenticationFilter(authenticationManager()))
                .addFilter(new AuthorizationFilter(authenticationManager()))
                .sessionManagement().sessionCreationPolicy(SessionCreationPolicy.STATELESS);
    }

    public void configure(AuthenticationManagerBuilder authenticationManagerBuilder) throws Exception
    {
        authenticationManagerBuilder.userDetailsService(userDetailsService).passwordEncoder(bCryptPasswordEncoder);
    }

    @Bean
    CorsConfigurationSource corsConfigurationSource()
    {
        final UrlBasedCorsConfigurationSource source = new UrlBasedCorsConfigurationSource();
        source.registerCorsConfiguration("/**",new CorsConfiguration().applyPermitDefaultValues());
        return source;
    }
}

In method configure we have restricted most APIs, only allowing Swagger URLs and signup URL. We also add filters to HttpSecurity. We will add our own UserDetailsServiceImpl class to validate user credentials.


package com.betterjavacode.services;

import com.betterjavacode.models.User;
import com.betterjavacode.repositories.UserRepository;
import org.springframework.security.core.userdetails.UserDetails;
import org.springframework.security.core.userdetails.UserDetailsService;
import org.springframework.security.core.userdetails.UsernameNotFoundException;
import org.springframework.stereotype.Component;

import java.util.Collections;

@Component
public class UserDetailsServiceImpl implements UserDetailsService
{
    private UserRepository userRepository;

    public UserDetailsServiceImpl(UserRepository userRepository)
    {
        this.userRepository = userRepository;
    }

    @Override
    public UserDetails loadUserByUsername(String username) throws UsernameNotFoundException
    {
        User user = userRepository.findByUsername(username);
        if(user == null)
        {
            throw new UsernameNotFoundException(username);
        }
        return new org.springframework.security.core.userdetails.User(user.getUsername(), user.getPassword(), Collections.emptyList());
    }
}

Demo

With all the code changes, now we are ready to create a user, login and access secured REST APIs. From the image above, a user gets Access Denied error for accessing secured APIs. To demo this, I have already registered a user with username `test1` and password test@123.

Secure REST API - send use credentials to login

This POST request will give us Authorization token in response as shown above. Now using this token in our GET request to retrieve companies data. This GET request will look like below:

Secure REST API - Postman call

In this way, we showed how to secure REST API using JSON web token.

I will be launching the book “Simplifying Spring Security“. Do you want to get updates on launch? Sign up

References

  1. Implementing JWTs Authentication on Spring Boot API – JWT Authentication
  2. How to secure REST APIs – Secure REST APIs