In this post, we show an example of building a scalable NestJS API with AWS Lambda.
If you are not familiar with the NestJS framework, I would recommend going through their documentation. NestJS is a popular Node.js framework for building scalable and efficient web applications. AWS Lambda is a serverless computing service that enables developers to run code without provisioning or managing servers. We will combine the two technologies to build a scalable and cost-effective API.
Setting up NestJS Project
To set up a NestJS project, we first need to install the NestJS CLI using the following command:
npm install -g @nestjs/cli
Once the CLI is installed, we can create a new project using the following command:
nest new nestjsapi-demo
This will create a new NestJS project in a directory named nestjsapi-demo. We can then navigate to this directory and start the development server using the following command:
npm run start:dev
AWS Lambda Support
To add AWS Lambda support to our NestJS project, we need to install the aws-serverless-express package using the following command:
npm install aws-serverless-express @types/aws-serverless-express @types/aws-lambda
This package allows us to run our NestJS application on AWS Lambda using the Express framework.
To eventually be able to use AWS Lambda resources, we will need an AWS account. Here I assume that you have an AWS account and be able to use your credentials to deploy AWS resources. You can configure your credentials in your local machine with aws configure command. This should store your credentials in .aws file
aws_access_key_id = YOUR_ACCESS_KEY
aws_secret_access_key = YOUR_SECRET_ACCESS_KEY
Creating an AWS Lambda Function
When you create a serverless project, it generates an API gateway by default. Each serverless needs an entry point to build a NestJS project to a lambda function.
To create an AWS Lambda function, we need to create a new file called lambda.ts in the root of our project directory. We can then add the following code to the file:
import { Handler } from 'aws-lambda';
import { createServer, proxy } from 'aws-serverless-express';
import { AppModule } from './app.module';
import * as express from 'express';
import { NestFactory } from '@nestjs/core/nest-factory';
import { ExpressAdapter } from '@nestjs/platform-express';
import { Server } from 'http';

const server = express();

async function bootstrap(): Promise {
  const app = await NestFactory.create(AppModule, new ExpressAdapter(server));
  app.enableCors();
  await app.init();
  return createServer(server);
}

let cachedServer: Server;

export const handler: Handler = async (event, context) => {
  if (!cachedServer) {
    cachedServer = await bootstrap();
  }
  return proxy(cachedServer, event, context, 'PROMISE').promise;
};
This code creates an instance of our NestJS application and creates an AWS Lambda handler function that proxies requests to our application.
We will need to update our tsconfig.lambda.json file to include where the lambda function is.
{
    "extends": "./tsconfig.json",
    "compilerOptions": {
      "module": "commonjs",
      "outDir": "./dist-lambda",
      "noEmit": false
    },
    "include": ["src/lambda.ts"]
}
Adding scripts to build and deploy
Once we create a lambda entry point, we can configure serverless to build this lambda. Let’s create a YAML file serverless.yml
service: nestjsapi-demo

plugins:
 - '@hewmen/serverless-plugin-typescript'
 - serverless-plugin-optimize
 - serverless-offline
 - serverless-plugin-warmup

provider:
 name: aws
 runtime: nodejs14.x

functions:
 main: # The name of the lambda function
   # The module 'handler' is exported in the file 'src/lambda'
   handler: src/lambda.handler
   events:
     - http:
         method: any
         path: /{any+}
We need those serverless plugins to be able to build this project and create a Lambda main function for our entry point.
@hewmen/serverless-plugin-typescript: Serverless plugin for Typescript support that works out of the box without the need to install any other compiler or plugins.
serverless-plugin-optimize: Plugin to transpile and minify your code
serverless-offline plugin: Plugin to be able to test your app offline.
serverless-warmup plugin: This plugin solves cold-start by creating a scheduled lambda.
We will need a couple of scripts to build and deploy our NestJS API app to AWS Lambda.
    "build-lambda": "tsc --project tsconfig.lambda.json",
    "deploy-lambda": "sls deploy",
build-lambda script will let us build our nestJS typescript project.
Deploying NestJS application to AWS Lambda
To deploy our NestJS API to AWS Lambda, we need to first create a new AWS Lambda function using the AWS Console. Once the function is created, we can upload our lambda.ts file as the function code.
We also need to configure the function’s handler to be lambda.handler and set the runtime to Node.js 14.x.
We will run our script npm run deploy-lambda and that should build and deploy lambda to AWS Lambda resource. (Make sure you have configured your AWS credentials to be able to deploy this).
Probably, you might come across this error when deploying the lambda –
× Stack nestjsapi-demo-dev failed to deploy (0s)
Environment: win32, node 14.19.0, framework 3.28.1, plugin 6.2.3, SDK 4.3.2
Credentials: Local, "default" profile
Docs:        docs.serverless.com
Support:     forum.serverless.com
Bugs:        github.com/serverless/serverless/issues

Error:
Error: [{"messageText":"Unknown compiler option 'incremental'.","category":1,"code":5023},{"messageText":"Unknown compiler option 'strictBindCallApply'.","category":1,"code":5023}]
One way to fix this issue is to remove – incremental: true option from tsconfig.json
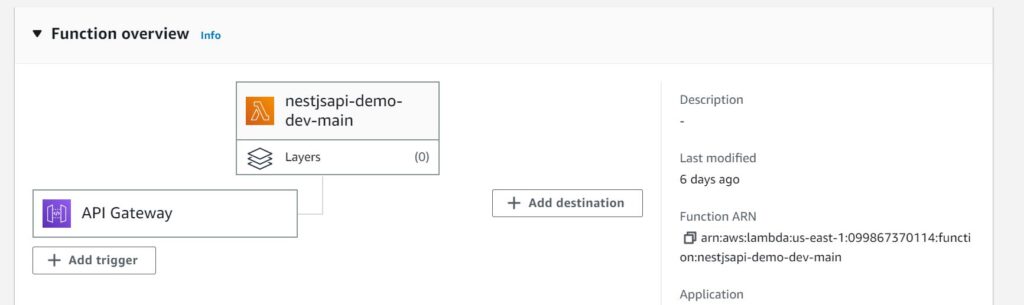
Overall, once you run npm run deploy-lambda , you will see your lambda deployed in AWS like below:
Testing our AWS Lambda Function
To test our AWS Lambda function, we can use the AWS Lambda Console or the AWS CLI. We can invoke the function using the following command:
aws lambda invoke --function-name function-name --payload {} response.json
This command will invoke our function and store the response in a file called response.json.
Conclusion
In this blog post, we discussed how to build a scalable NestJS API with AWS Lambda. By combining the power of NestJS and AWS Lambda, we can build a scalable and cost-effective API that can handle large amounts of traffic. With the steps outlined in this blog post, you should now be able to create your own NestJS API with AWS Lambda support.