Author Archives: yogesh.mali@gmail.com

Adding Health checks in NestJS Application

The health check endpoint provides the details of how our application is doing. In this post, we will show how to add health checks to your NestJS application. If you want to learn about enabling CORS in your NestJS application, you can read more about it here.

Why add Health Checks?

Once you build and deploy your application, you need to know if your application is running smoothly in an easier way without making some application business logic calls. Health checks offer a way to check if the database is running smoothly, your storage disk is fine, and your application service is executing as intended.

The most important reason you need health checks is so you can continue to monitor your application. A metrics collection service (like Micrometer) can continue to validate the application. It can verify that there are no software or hardware failures. Any moment, there is any software or hardware failure, it can trigger a notification for manual or automatic intervention to get the application back on track. This improves the reliability of the application.

Health checks in NestJS Application

In NestJS framework, Terminus library offers a way to integrate readiness/liveness health checks. A service or component of infrastructure will continuously hit a GET endpoint. Service will take action based on the response.

Let’s get started. We will add the terminus library to our NestJS application.

npm install @nestjs/terminus.

Terminus integration offers graceful shutdown as well Kubernetes readiness/liveness check for http applications. Liveness check tells if the container is up and running. A readiness check tells if the container is ready to accept incoming requests.

We will also set up a number of checks for database, memory, disk, and redis in this post to show how health checks work.

How to set up a Health check in NestJS?

Once we have added nestjs/terminus package, we can create a health check endpoint and include some predefined indicators. These indicators include HTTP check, Database connectivity check, Memory and Disk check.

Depending on what ORM, you are using, nestjs offers some inbuilt packages like TypeORM or Sequlize health check indicators.

The health check will provide us with a combination of indicators. This set of indicators provides us with information to indicate how our application is doing.

DiskHealthIndicator

Let’s start with how the server’s hard disk is doing.

DiskHealthIndicator contains the check for disk storage of the current machine.

Once we add DiskHealthIndicator in our health controller, we will check for storage as follows:

this.disk.checkStorage('diskStorage', { thresholdPercent: 0.5, path: 'C:\\'});

HttpHealthIndicator

HttpHealthIndicator will provide the details of our HTTP application and if it is up and running. Explicitly, we will add @nestjs/axios package to our project.

npm install @nestjs/axios.

Additionally. we will use pingCheck method to verify if we are able to connect to the application.

this.http.pingCheck('Basic check', 'http://localhost:3000');

MemoryHealthIndicator

Overall, MemoryHealthIndicator provides the details of the memory of the machine on which the application is running.

this.memory.checkHeap('memory_heap', 300*1024*1024);

this.memory.checkRSS('memory_rss',300*1024*1024);

Database Health Check

Assuming your application is using a database, you will need a database health check. Subsequently,  nestjs/terminus provides database health check through ORM packages like TypeORM, Sequelize, or Mongoose. As part of this demo, we will create a custom database health check since we use Prisma ORM.

NestJS Application

In any case, let’s create nestjs application with nestjs/cli.

nest new healthcheckdemo.

As previously stated, we will use Prisma ORM.

npm install prisma --save-dev.

This will install Prisma cli. Now if we run npx prisma init , it will create a barebone of schema.prisma file where we will create our database model schema.

In this application, I am using a simple schema where a user can sign up to create posts. I am also using the MySQL database. This schema will look like the below:

// This is your Prisma schema file,
// learn more about it in the docs: https://pris.ly/d/prisma-schema

generator client {
  provider = "prisma-client-js"
  engineType = "binary"
}

datasource db {
  provider = "mysql"
  url      = env("DATABASE_URL")
}

model User {
  id    Int     @default(autoincrement()) @id
  email String  @unique
  name  String?
  posts Post[]
}

model Post {
  id        Int      @default(autoincrement()) @id
  title     String
  content   String?
  published Boolean? @default(false)
  author    User?    @relation(fields: [authorId], references: [id])
  authorId  Int?
}

By default, Prisma will create .env file if it was not there before. It will also add a default variable for DATABASE_URL.

If we run npm run prisma migrate dev, it will create those database tables in our DB.

Further, let’s create an app module in our sample application for healthcheckdemo.

import { Module } from '@nestjs/common';
import { PrismaClient } from '@prisma/client';
import { AppController } from './app.controller';
import { AppService } from './app.service';
import { UserService } from './user.service';
import { HealthModule } from './health/health.module';
import { HttpModule } from '@nestjs/axios';
import { PrismaService } from './prisma.service';

@Module({
  imports: [HealthModule, HttpModule],
  controllers: [AppController],
  providers: [AppService, UserService, PrismaClient, PrismaService,],
})
export class AppModule {}

We will also create HealthModule that will serve the purpose for the HealthController.

import { Module } from '@nestjs/common';
import { TerminusModule } from '@nestjs/terminus';
import { PrismaService } from 'src/prisma.service';

import { HealthController } from './health.controller';
import { PrismaOrmHealthIndicator } from './prismaorm.health';

@Module({
  imports: [
    TerminusModule,   
  ],
  controllers: [HealthController],
  providers: [ PrismaOrmHealthIndicator, PrismaService]
})
export class HealthModule {}

In this HealthModule, you will notice there is PrismaOrmHealthIndicator. Before we dive into PrismaOrmHealthIndicator, we need to generate Prisma Client .

npm install @prisma/client will generate the Prisma client for your database model. This will expose CRUD operations for your database model, making it easier for developers to focus on business logic rather than how to access data from a database.

We will abstract away Prisma Client APIs to create database queries in a separate service PrismaService. This service will also instantiate Prisma Client.


import { INestApplication, Injectable, OnModuleInit } from '@nestjs/common';
import { PrismaClient } from '@prisma/client';

@Injectable()
export class PrismaService extends PrismaClient implements OnModuleInit {
  async onModuleInit() {
    await this.$connect();
  }

  async enableShutdownHooks(app: INestApplication) {
    this.$on('beforeExit', async () => {
      await app.close();
    });
  }
}

There is a documented issue with enableShutdownHooks. We will use enableShutdownHooks call when closing the application.

Health Controller

For a health check, we will need a health controller. We talked about the health module in the previous section, There are two important pieces left before we show how the health check will look.

Let’s create a health controller.

nest g controller health

This will generate a controller for us.

import { Controller, Get, Inject } from '@nestjs/common';
import { DiskHealthIndicator, HealthCheck, HealthCheckService, HttpHealthIndicator, MemoryHealthIndicator, MicroserviceHealthIndicator } from '@nestjs/terminus';
import { PrismaOrmHealthIndicator } from './prismaorm.health';


@Controller('health')
export class HealthController {
    constructor(
        private health: HealthCheckService,
        private http: HttpHealthIndicator,
        @Inject(PrismaOrmHealthIndicator)
        private db: PrismaOrmHealthIndicator,
        private disk: DiskHealthIndicator,
        private memory: MemoryHealthIndicator,        
    ) {}

  @Get()
  @HealthCheck()
  check() {
    return this.health.check([
      () => this.http.pingCheck('basic check', 'http://localhost:3000'),
      () => this.disk.checkStorage('diskStorage', { thresholdPercent: 0.5, path: 'C:\\'}),
      () => this.db.pingCheck('healthcheckdemo'),
      () => this.memory.checkHeap('memory_heap', 300*1024*1024),
      () => this.memory.checkRSS('memory_rss', 300*1024*1024),
      
      // Mongoose for MongoDB check
      // Redis check
    ]);
  }
}

In the health controller, we have a GET endpoint /health to provide details of how our application, memory of the machine, storage disk, and databases are doing. NestJs do not offer any ORM Health indicator for Prisma. So I am writing a custom indicator to find out database health.

By and large, this custom Prisma health indicator will be:


import { Injectable, InternalServerErrorException } from "@nestjs/common";
import { HealthIndicator, HealthIndicatorResult } from "@nestjs/terminus";
import { PrismaService } from "src/prisma.service";


@Injectable()
export class PrismaOrmHealthIndicator extends HealthIndicator {
    constructor(private readonly prismaService: PrismaService) {
        super();
    }

    async pingCheck(databaseName: string): Promise {
        try {
            await this.prismaService.$queryRaw`SELECT 1`;
            return this.getStatus(databaseName, true);
        } catch (e) {
            throw new InternalServerErrorException('Prisma check failed', e);
        }
    }
}

We are extending the abstract class HealthIndicator and implementing a method called pingCheck in this PrismaOrmHealthIndicator class. This method uses PrismaService to query the database that has been passed. We use SELECT 1 query. If the query is successful, we get the database status as true.

Also, note that this class PrismaOrmHealthIndicator is injectable and we are injecting that in our HealthController.

Now if we start the application and execute the endpoint, we will get the response as below:


{
  "status": "ok",
  "info": {
    "basic check": {
      "status": "up"
    },
    "diskStorage": {
      "status": "up"
    },
    "healthcheckdemo": {
      "status": "up"
    },
    "memory_heap": {
      "status": "up"
    },
    "memory_rss": {
      "status": "up"
    }
  },
  "error": {},
  "details": {
    "basic check": {
      "status": "up"
    },
    "diskStorage": {
      "status": "up"
    },
    "healthcheckdemo": {
      "status": "up"
    },
    "memory_heap": {
      "status": "up"
    },
    "memory_rss": {
      "status": "up"
    }
  }
}

As you can see, everything seems to be running fine. healthcheckdemo is the database name that I am using in MySQL.

Similarly, we can also add redis and mongoose as part of health checks in our NestJS application.

Conclusion

In this post, we create a simple NestJS application to demonstrate how to add health checks. The code for this post is available here.

If you have any feedback for this post OR my book Simplifying Spring Security, I would love to hear your feedback.


How To Use CORS in NestJS Application

In this post, we will talk about how to use CORS (Cross-Origin Resource Sharing) in a NestJS application. Before showing, how easy it is to enable CORS, we will cover some fundamentals in this post.

  • What is CORS?
  • What is the NestJS framework?
  • How to use CORS?

What is CORS?

In a usual REST API-based application, there is a client that calls the API served by a Server. When accessing these APIs, clients can request different resources, and this includes images, videos, iframes, or scripts. A website requesting resources can be on a different domain compared to the domain of the resource. By default, a request to fetch resources can fail. That’s when CORS comes into the picture.

As said previously, CORS stands for Cross-Origin Resource Sharing. By default, CORS makes a call from client to server more secure. In many cases, we are aware of who the client is and what domain it is going to be on. In such cases, we want to relax the security for clients calling the APIs. We do this by the client sending request headers Access-Control-Allow-Origin. These headers indicate which origins can access the API.

CORS is an HTTP-header-based mechanism that allows a server to indicate any origins (domain, scheme, or port) other than its own from which a browser should permit loading resources. – Mozilla Firefox

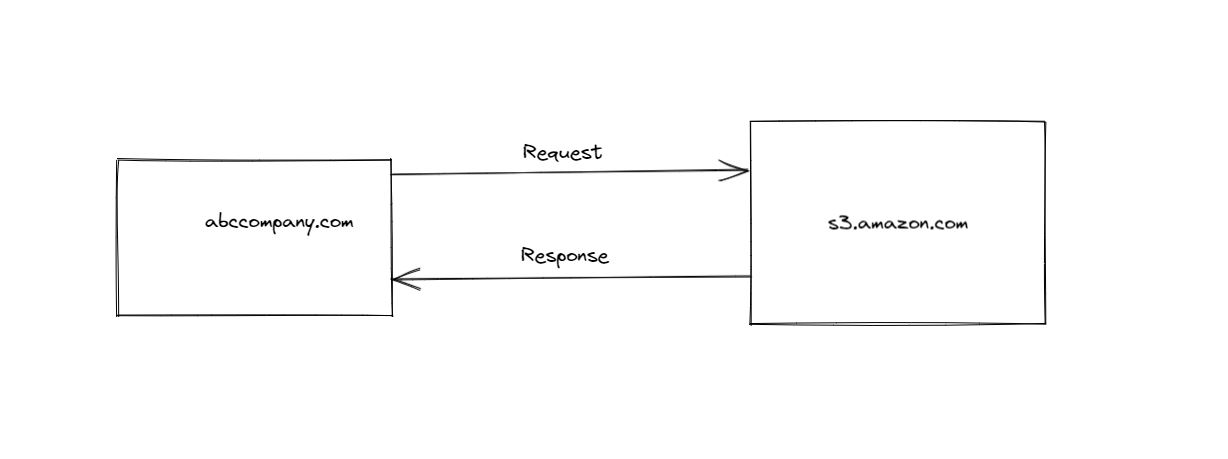
Let’s look at the following diagram

CORS in NestJS Application

A client from the abccompany.com sends a request to s3.amazon.com to access a resource from S3. In this case, the client and server have different origins. Usually, this request will fail because of cross-origins. It’s a security concern for browsers. CORS allows to access a resource from a server with a different origin compared to a request originating from. CORS will add Access-Control-Allow-Origin headers in the request.

What is NestJS Framework?

NestJS is a framework to build scalable NodeJS server-side applications. In the background, NestJS uses HTTP server frameworks like Express.

To get started,

npm i -g @nestjs/cli

Nest provides an out-of-the-box application architecture which allows developers and teams to create highly testable, scalable, loosely coupled, and easily maintainable applications – NestJS

Create a new project with Nest

nest new project-name.

How to use CORS?

To show how to use CORS, we will create a nestjs application.

nest new corsdemoapp – will create a new folder for corsdemoapp.

Now if I run npm start, it will start our default nestjs application at http://localhost:3000.

NestJs makes this really easier by providing a method enableCors().  This will look like below:

async function bootstrap() {
  const app = await NestFactory.create(AppModule);
  app.enableCors();
  await app.listen(3000);
}
bootstrap();

There is another way to enable CORS. By passing cors as an object in NestFactory.create() method.

async function bootstrap() {
  const app = await NestFactory.create(AppModule, {
    cors: true,
  });
  await app.listen(3000);
}
bootstrap();

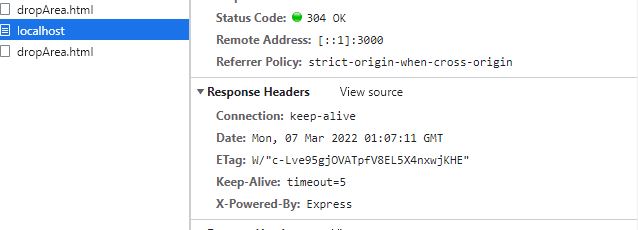
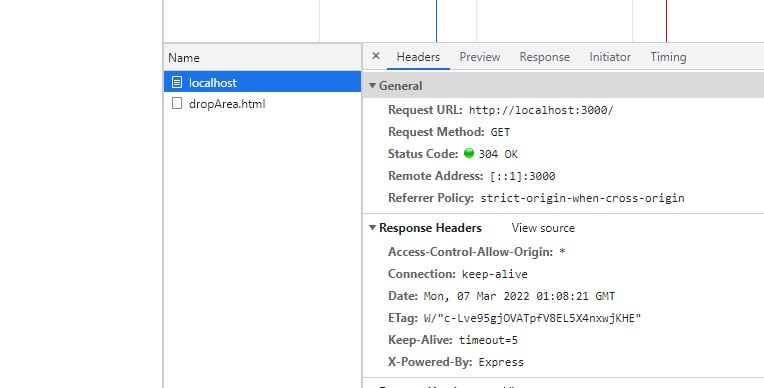
If we want to see the response headers for the request made to http://localhost:3000 , they will look like below:

CORS NestJS Application without Headers

NestJS Application CORS Headers

The second screenshot shows the header Access-Control-Allow-Origin with the value of *. That means requests from any origin source can access the server to get response from http://localhost:3000.

What are the other options we can add for CORS?

There are a few other options that we can set with CORS while enabling through enableCors(). If we know, what other domains will be accessing our API, we can set that domain. Sometimes, the API can be public. In that case, we can use the wild card * for Access-Control-Allow-Origin.

app.enableCors(
    { 
      origin: ['https://betterjavacode.com', 'https://www.google.com'],
    }
  );

Also, we can only allow a set of methods for API calls.

app.enableCors(
    { 
      origin: ['https://betterjavacode.com', 'https://www.google.com'],
      methods: ['POST', 'PUT', 'DELETE', 'GET']
    }
  );

The most common use case of CORS is when building RESTful APIS in the backend and calling them through the frontend.

Conclusion

When building and deploying applications on servers, it is important to know who is calling your APIs. CORS provides a security feature. Accepting a request from every domain can pose a security risk. NestJS provides a simple way to enable CORS and options to add domains from which the server can accept the request. CORS allows us to avoid cross-site request forgery attacks (CSRF). I cover some of the common exploits in my book Simplifying Spring Security.


Handling Large Datasets in Distributed Systems

In this post, we will talk about handling large datasets in distributed systems. This is not related to big data or machine learning where you handle large data. But in general, when you start scaling a distributed system, you will start processing various transactional and reporting data. How do you handle that kind of large datasets? If you are a beginner with distributed systems, you can read fundamentals of distributed systems or building event-driven microservices.

Why handle large datasets?

The first question arises why we need to handle the large datasets. In practicality, there can be many reasons like migrating a large set of data after upgrading the legacy system, or processing historical data, or your existing system is growing with transactional data. All these scenarios come with complexities and scale. When designing any distributed system, one can always make decisions to take into account such scenarios. But despite that, every decision in a distributed system is a trade-off. Despite how well you are prepared, you might come across a scenario that you have not taken into account. How do you handle such cases?

Ways for handling large datasets

We have a large dataset. How do we process? This dataset can be for reporting or even auditing purposes.

Chunking

Chunking is one way of processing this data. We take a large dataset and splits that into multiple data chunks. And then process each chunk. As simple as that, the terminology goes – process data in n number of chunks.

In this scenario, you need to know the characteristic of data to split it into multiple chunks. There can be other side effects with chunking. Imagine if you read a gigabyte of data into memory and then tried to split. That would create performance issues. In such scenarios, you need to think about how one can read data from a data store or database in chunks. Probably use filters. Pagination is one such example.

MapReduce

MapReduce is a programming model where you take data and pass that data through a map and reduce functions.

Map takes a key/value pair of input and produces a sequence of key/value pairs. The data is sorted this way that it groups keys together. Reduce reduces the accepted values with the same key and produce a new key/value pair.

Streaming

Streaming can be considered similar to chunking. But with streaming, you don’t need to have any custom filters. Also, many programming languages offer streaming syntax to process a large dataset. We can process a large data set from a file or a database through the stream. Streaming data is a continuous flow of data generated by various sources. Overall, there are systems that can transmit data through event streams.

Streaming allows the processing of data in real-time. Applications like Kafka allow to send data and consume it immediately. The performance measure for streaming is latency.

Batch Processing

Batch processing allows processing a set of data in batches. So if you have 100k records, you can set a limit to process only 10K records in a batch. Spring Boot also offers an option of Spring batch for batch processing. Batch processes are scheduled jobs that run a set program to process a set of data and then produce output. The performance measure of batch processing is throughput.

Conclusion

In this post, we discussed different ways to process a large set of data. Do you know any other way? Please comment on this post and I will add it to this list.

With ever-growing distributed systems, one will need to handle large data sets eventually. It’s always good to revisit these methods to understand the fundamentals of data processing.

Example of Spring Cloud Function with AWS Lambda

In this post, we will learn about Spring Cloud Function and will deploy an example of Spring Cloud Function on AWS Lambda. By end of this post, we will have more understanding of serverless functions. If you want to learn more about serverless architecture, this post will get you started.

What is Spring Cloud Function?

Spring Cloud Function is one of the features of Spring Cloud. It allows developers to write cloud-agnostic functions with Spring features. These functions can be stand-alone classes and one can easily deploy on any cloud platform to build a serverless framework. Spring Cloud offers a library spring-cloud-starter-function-web allows to build functions with Spring features and it brings all the necessary dependencies.

Why use Spring Cloud Function?

This question is more when to use Spring Cloud Function. Basically, Spring Cloud Function library allows to the creation of functional applications that can be deployed easily on AWS Lambda. These functions follow the Java 8 pattern of Supplier, Consumer, and Function.

spring-cloud-starter-function-web library provides native interaction for handling requests, streams.

Features of Spring Cloud Function

The major advantage of Spring Cloud Function is it provides all the features of Spring Boot like autoconfiguration, dependency injection. But there are more features:

  • Transparent type conversions of input and output
  • POJO Functions
  • REST Support to expose functions as HTTP endpoints
  • Streaming data to/from functions via Spring Cloud Stream framework
  • Deploying functions as isolated jar files
  • Adapter for AWS Lambda, Google Cloud Platform, Microsoft Azure

Demo

As part of this post, we will create Spring Cloud Function and deploy it in AWS Lambda. Once we create a regular spring boot application, add the following dependencies in your Gradle file:

dependencies {
	implementation 'org.springframework.boot:spring-boot-starter'
	implementation 'org.springframework.boot:spring-boot-starter-data-jpa'
	implementation 'org.springframework.cloud:spring-cloud-function-adapter-aws:3.2.1'
	implementation "com.amazonaws:aws-lambda-java-events:${awsLambdaEventsVersion}"
	implementation "com.amazonaws:aws-lambda-java-core:${awsLambdaCoreVersion}"
	runtimeOnly 'com.h2database:h2'
	testImplementation 'org.springframework.boot:spring-boot-starter-test'
}

Note the dependency spring-cloud-function-adapter-aws allows us to integrate Spring Cloud Function with AWS Lambda.

One main class for the application will look like below:

package com.betterjavacode.springcloudfunctiondemo;

import org.springframework.boot.autoconfigure.SpringBootApplication;
import org.springframework.cloud.function.context.FunctionalSpringApplication;

@SpringBootApplication
public class SpringcloudfunctiondemoApplication {

	public static void main(String[] args) {
		FunctionalSpringApplication.run(SpringcloudfunctiondemoApplication.class, args);
	}

}

Compare this to a regular Spring Boot application, there is one difference. We are using FunctionalSpringApplication as an entry point. This is a functional approach to writing beans and helps with startup time.

Now, we can write three types of functions Function, Consumer OR Supplier. We will see what each function does and how we can use as part of this demo.

Furthermore, let’s create a POJO model class Customer.

package com.betterjavacode.springcloudfunctiondemo.models;

import javax.persistence.Entity;
import javax.persistence.GeneratedValue;
import javax.persistence.Id;
import javax.persistence.Table;

@Entity
@Table(name= "customer")
public class Customer
{
    @Id
    @GeneratedValue(generator = "UUID")
    private Long id;

    private String name;

    private int customerIdentifier;

    private String email;

    private String contactPerson;

    public Customer(String name, int customerIdentifier, String email, String contactPerson)
    {
        this.name = name;
        this.customerIdentifier = customerIdentifier;
        this.email = email;
        this.contactPerson = contactPerson;
    }

    public String getName ()
    {
        return name;
    }

    public void setName (String name)
    {
        this.name = name;
    }

    public int getCustomerIdentifier ()
    {
        return customerIdentifier;
    }

    public void setCustomerIdentifier (int customerIdentifier)
    {
        this.customerIdentifier = customerIdentifier;
    }

    public String getEmail ()
    {
        return email;
    }

    public void setEmail (String email)
    {
        this.email = email;
    }

    public String getContactPerson ()
    {
        return contactPerson;
    }

    public void setContactPerson (String contactPerson)
    {
        this.contactPerson = contactPerson;
    }

    public Long getId ()
    {
        return id;
    }

    public void setId (Long id)
    {
        this.id = id;
    }
}

Certainly, our spring cloud function will perform some business logic related to this model Customer.

Consumer Function

Let’s create a Consumer function. Consumer function usually takes an input and performs some business logic that will have a side-effect on the data. It will not produce any output. So it is more like a void method.

For our demo, it will look like below:

package com.betterjavacode.springcloudfunctiondemo.functions;

import com.betterjavacode.springcloudfunctiondemo.models.Customer;
import com.betterjavacode.springcloudfunctiondemo.repositories.CustomerRepository;
import org.slf4j.Logger;
import org.slf4j.LoggerFactory;
import org.springframework.beans.factory.annotation.Autowired;
import org.springframework.stereotype.Component;
import java.util.Map;
import java.util.function.Consumer;

@Component
public class CustomerConsumer implements Consumer<Map<String, String>>
{
    public static final Logger LOGGER = LoggerFactory.getLogger(CustomerConsumer.class);

    @Autowired
    private CustomerRepository customerRepository;

    @Override
    public void accept (Map<String, String> map)
    {
        LOGGER.info("Creating the customer", map);
        Customer customer = new Customer(map.get("name"), Integer.parseInt(map.get(
                "customerIdentifier")), map.get("email"), map.get("contactPerson"));
        customerRepository.save(customer);
    }

}

This CustomerConsumer function implements Consumer function type and takes an input of type Map<String, String>. As part of the interface contract, one needs to implement the method accept. This method will take map input and perform some business logic. One thing to understand is that Spring Cloud Function will handle type conversion from raw input stream and types declared by the function. If the function is not able to infer tye information, it will convert to a generic type of map.

This function takes a map of DTO object for the customer and saves it in the database. For the database, we are using H2 in-memory database. One can always add more business logic, but for demo purposes, we are showing a simple example.

Supplier Function

The supplier function acts like a GET endpoint. This function takes no input but returns data.

package com.betterjavacode.springcloudfunctiondemo.functions;

import com.betterjavacode.springcloudfunctiondemo.models.Customer;
import com.betterjavacode.springcloudfunctiondemo.repositories.CustomerRepository;
import org.slf4j.Logger;
import org.slf4j.LoggerFactory;
import org.springframework.beans.factory.annotation.Autowired;
import org.springframework.stereotype.Component;

import java.util.List;
import java.util.function.Supplier;

@Component
public class CustomerSupplier implements Supplier
{
    public static final Logger LOGGER = LoggerFactory.getLogger(CustomerSupplier.class);

    @Autowired
    private CustomerRepository customerRepository;

    @Override
    public Customer get ()
    {
        List customers = customerRepository.findAll();
        LOGGER.info("Getting the customer of our choice - ", customers);
        return customers.get(0);
    }
}

Configuring Spring Cloud Function with AWS Lambda

One AWS Lambda will execute only one function. If there are multiple Spring Cloud Function beans, one can configure which function to execute through a lambda. Add the property in application.properties as follows:

spring.cloud.function.definition=customerConsumer

One can easily deploy a single jar file with AWS Lambda and use Spring Profiles to pass different functions in application.properties.

Building Shaded Jar

To deploy the application in AWS Lambda with Spring Cloud Function, you will need a shaded jar. To build this jar, we will use gradle shadow plugin. The build file will look like below:


buildscript {
	ext {
		springBootVersion = '2.6.2'
		wrapperVersion = '1.0.17.RELEASE'
		shadowVersion = '5.1.0'
	}
	repositories {
		mavenLocal()
		jcenter()
		mavenCentral()
		maven { url "https://repo.spring.io/snapshot" }
		maven { url "https://repo.spring.io/milestone" }
	}
	dependencies {
		classpath "com.github.jengelman.gradle.plugins:shadow:${shadowVersion}"
		classpath("org.springframework.boot.experimental:spring-boot-thin-gradle-plugin:${wrapperVersion}")
		classpath("org.springframework.boot:spring-boot-gradle-plugin:${springBootVersion}")
		classpath("io.spring.gradle:dependency-management-plugin:1.0.8.RELEASE")
	}
}
apply plugin: 'java'
apply plugin: 'maven-publish'
apply plugin: 'eclipse'
apply plugin: 'com.github.johnrengelman.shadow'
apply plugin: 'org.springframework.boot'
apply plugin: 'io.spring.dependency-management'

group = 'com.betterjavacode'
version = '0.0.1-SNAPSHOT'
sourceCompatibility = '1.8'
targetCompatibility = '1.8'

repositories {
	mavenLocal()
	mavenCentral()
	maven { url "https://repo.spring.io/snapshot" }
	maven { url "https://repo.spring.io/milestone" }
}

ext {
	springCloudFunctionVersion = "3.2.1"
	awsLambdaEventsVersion = "2.0.2"
	awsLambdaCoreVersion = "1.2.1"
}

assemble.dependsOn = [shadowJar]

jar {
	manifest {
		attributes 'Main-Class': 'com.betterjavacode.springcloudfunctiondemo.SpringcloudfunctiondemoApplication'
	}
}

import com.github.jengelman.gradle.plugins.shadow.transformers.*

shadowJar {
	classifier = 'aws'
	dependencies {
		exclude(
				dependency("org.springframework.cloud:spring-cloud-function-web:${springCloudFunctionVersion}"))
	}
	// Required for Spring
	mergeServiceFiles()
	append 'META-INF/spring.handlers'
	append 'META-INF/spring.schemas'
	append 'META-INF/spring.tooling'
	transform(PropertiesFileTransformer) {
		paths = ['META-INF/spring.factories']
		mergeStrategy = "append"
	}
}

dependencyManagement {
	imports {
		mavenBom "org.springframework.cloud:spring-cloud-function-dependencies:${springCloudFunctionVersion}"
	}
}

dependencies {
	implementation 'org.springframework.boot:spring-boot-starter'
	implementation 'org.springframework.boot:spring-boot-starter-data-jpa'
	implementation 'org.springframework.cloud:spring-cloud-function-adapter-aws:3.2.1'
	implementation "com.amazonaws:aws-lambda-java-events:${awsLambdaEventsVersion}"
	implementation "com.amazonaws:aws-lambda-java-core:${awsLambdaCoreVersion}"
	runtimeOnly 'com.h2database:h2'
	testImplementation 'org.springframework.boot:spring-boot-starter-test'
}

test {
	useJUnitPlatform()
}

Run the command ./gradlew clean build and it will build a shaded jar. An Uber Jar contains the contents of multiple jars from dependencies. A shaded jar provides a way of creating an uber jar and renaming the packages from Uber Jar. Now to deploy our jar in AWS Lambda, we have to make sure to include a dependency com.amazonaws:aws-lambda-java-core.

Creating an AWS Lambda in AWS

Regardless, let’s create an AWS Lambda in AWS.Example of Spring Cloud Function - Create Lambda

Provide a descriptive name – SpringCloudFunctionDemo.

Upload the shaded jar.

Spring Cloud Function Example - Upload Shaded Jar

Now update Runtime Settings in AWS Lambda to indicate how the lambda will invoke our function. Spring provides a classFunctionInvoker with generic method handleRequest as part of the library spring-cloud-function-aws-adapter.

Spring Cloud Function Example - Function Invocation

Now if we run the AWS Lambda, we will see the execution of our consumer function. We will test our consumer function with a JSON data load:

{
  "name": "ABC Company",
  "customerIdentifier": "1",
  "email": "support@abccompany.com",
  "contactPerson": "John Doe"
}


2022-01-23 06:45:08.987  INFO 9 --- [           main] com.zaxxer.hikari.HikariDataSource       : HikariPool-1 - Starting...
2022-01-23 06:45:09.391  INFO 9 --- [           main] com.zaxxer.hikari.HikariDataSource       : HikariPool-1 - Start completed.
2022-01-23 06:45:09.455  INFO 9 --- [           main] org.hibernate.dialect.Dialect            : HHH000400: Using dialect: org.hibernate.dialect.H2Dialect
2022-01-23 06:45:10.289  INFO 9 --- [           main] org.hibernate.tuple.PojoInstantiator     : HHH000182: No default (no-argument) constructor for class: com.betterjavacode.springcloudfunctiondemo.models.Customer (class must be instantiated by Interceptor)
2022-01-23 06:45:10.777  INFO 9 --- [           main] o.h.e.t.j.p.i.JtaPlatformInitiator       : HHH000490: Using JtaPlatform implementation: [org.hibernate.engine.transaction.jta.platform.internal.NoJtaPlatform]
2022-01-23 06:45:10.800  INFO 9 --- [           main] j.LocalContainerEntityManagerFactoryBean : Initialized JPA EntityManagerFactory for persistence unit 'default'
2022-01-23 06:45:12.832  INFO 9 --- [           main] lambdainternal.LambdaRTEntry             : Started LambdaRTEntry in 8.239 seconds (JVM running for 8.868)
2022-01-23 06:45:12.919  INFO 9 --- [           main] o.s.c.f.adapter.aws.FunctionInvoker      : Locating function: 'customerConsumer'
2022-01-23 06:45:12.931  INFO 9 --- [           main] o.s.c.f.adapter.aws.FunctionInvoker      : Located function: 'customerConsumer'
2022-01-23 06:45:12.940  INFO 9 --- [           main] o.s.c.f.adapter.aws.FunctionInvoker      : Received: {"name":"ABC Company","customerIdentifier":"1","email":"support@abccompany.com","contactPerson":"John Doe"}
2022-01-23 06:45:13.146  INFO 9 --- [           main] o.s.c.f.adapter.aws.AWSLambdaUtils       : Incoming JSON Event: {"name":"ABC Company","customerIdentifier":"1","email":"support@abccompany.com","contactPerson":"John Doe"}
2022-01-23 06:45:13.146  INFO 9 --- [           main] o.s.c.f.adapter.aws.AWSLambdaUtils       : Incoming MAP: {name=ABC Company, customerIdentifier=1, email=support@abccompany.com, contactPerson=John Doe}
2022-01-23 06:45:13.166  INFO 9 --- [           main] o.s.c.f.adapter.aws.AWSLambdaUtils       : Incoming request headers: {id=042ab9bc-211d-fa47-839c-888720ec35d4, timestamp=1642920313144}
2022-01-23 06:45:13.184  INFO 9 --- [           main] c.b.s.functions.CustomerConsumer         : Creating the customer
END RequestId: b8352114-77f6-414c-a2dc-63d522a9eef4
REPORT RequestId: b8352114-77f6-414c-a2dc-63d522a9eef4	Duration: 710.53 ms	Billed Duration: 711 ms	Memory Size: 512 MB	Max Memory Used: 251 MB	Init Duration: 8986.65 ms	

As you can see in the above log, there is a log Creating the customer from our code. Also, you will see the response as Ok from Lambda execution.

The code for this demo is available here.

Conclusion

AWS Lambda is a very powerful service to build a serverless framework. With the combination of Spring Cloud and AWS, one can leverage multiple features to build simpler services for handling complex business requirements. Here is another post about connecting Spring Boot application with AWS Dynamo DB.

How to Use Pub/Sub with NodeJS

In this post, I show how to use pub/sub pattern with the NodeJS application. We will use the Google Cloud Pub/Sub module for building this sample application.

What is Pub/Sub?

Most architectures used to be synchronous previously. But with the advent of microservices, asynchronous communication is an equal part of the design. Pub/Sub is one such model that allows asynchronous communication. Usually, in event-driven architecture, one service publishes an event and another service consumes that event.

A message broker plays a relay role when it comes to publishing and consuming the messages. Both Google Cloud(Pub-Sub) and AWS offer a service (SNS & SQS) that allows applications to use the Pub-Sub model. Another advantage of Pub/Sub is that it allows to set up a retry policy, covers idempotency. You can learn more about event-driven architecture here.

Push-Pull

In any pub-sub model, there are two patterns of implementation. One is Push and the other is Pull.

In Pull Model

  • The consumer sends a request to pull any messages.
  • Pub/Sub server responds with a message if there are any messages available and not previously consumed.
  • The consumer sends an acknowledgment.

In Push Model

  • The publisher publishes a message to Pub/Sub Server
  • The Pub/Sub server sends the message to the specified endpoint on the consumer side.
  • Once the consumer receives the messages, it sends an acknowledgment.

NodeJS Application

As part of the post, we will create a nodejs application that will use the pub-sub model. This application will send simple messages to Google Cloud pub/sub. We will have another consumer application that will consume this message.

Accordingly, before we write our application, let’s make sure you have installed gcloud emulator on your environment. First, install gcloud sdk depending on what OS you have.

Now initialize the gcloud on your environment and you will have to log in for this

gcloud init

Gcloud will ask a bunch of questions to choose a project and configure a cloud environment.

Now, we will install a pub-sub component emulator for gcloud on our local environment.

gcloud components install pubsub-emulator

Now to get started with pub-sub service, use the following command

gcloud beta emulators pubsub start --project=pubsubdemo --host-port=localhost:8085

This command will start the pubsub service on your machine at localhost:8085. Since we will have to use this service in our application, we will need to know where the service is located. So set two environment variables

PUBSUB_EMULATOR_HOST=localhost:8085

PUBSUB_PROJECT_ID=pubsubdemo

Publisher Application

In general, we have a Publisher application. This application checks if the topic exists in Pub-Sub service and if not, then creates that topic. Once it creates the topic, it sends the data through a message to Pub-Sub service topic.

The code for this application will look like below:


const { PubSub } = require('@google-cloud/pubsub');
require('dotenv').config();

const pubsubClient = new PubSub();

const data = JSON.stringify({
  "userId": "50001",
  "companyId": "acme",
  "companyName": "Acme Company",
  "firstName": "John",
  "lastName": "Doe",
  "email": "john.doe@acme.com",
  "country": "US",
  "city": "Austin",
  "status": "Active",
  "effectiveDate": "11/11/2021",
  "department": "sales",
  "title": "Sales Lead"
});
const topicName = "PubSubExample";

async function createTopic() {
  // Creates a new topic
  await pubsubClient.createTopic(topicName);
  console.log(`Topic ${topicName} created.`);
}

async function doesTopicExist() {
  const topics = await pubsubClient.getTopics();
  const topicExists = topics.find((topic) => topic.name === topicName);
  return (topics && topicExists);
}

if(!doesTopicExist()) {
  createTopic();
}

async function publishMessage() {
    const dataBuffer = Buffer.from(data);

    try {
      const messageId = await pubsubClient.topic(topicName).publish(dataBuffer);
      console.log(`Message ${messageId} published`);
    } catch(error) {
      console.error(`Received error while publishing: ${error.message}`);
      process.exitCode = 1;
    }
}

publishMessage();

Conversely, let’s look at the consumer application.


require('dotenv').config();

const { PubSub } = require(`@google-cloud/pubsub`);

const pubsubClient = new PubSub();
const subscriptionName = 'consumeUserData';
const timeout = 60;
const topicName = 'PubSubExample';

async function createSubscription() {
  // Creates a new subscription
  await pubsubClient.topic(topicName).createSubscription(subscriptionName);
  console.log(`Subscription ${subscriptionName} created.`);
}

async function doesSubscriptionExist() {
  const subscriptions = await pubsubClient.getSubscriptions();
  const subscriptionExist = subscriptions.find((sub) => sub.name === subscriptionName);
  return (subscriptions && subscriptionExist);
}

if(!doesSubscriptionExist()) {
    createSubscription().catch(console.error);
}

const subscription = pubsubClient.subscription(subscriptionName);

let messageCount = 0;

const messageHandler = message => {
  console.log(`message received ${message.id}`);
  console.log(`Data: ${message.data}`);
  messageCount += 1;

  message.ack();
};

subscription.on(`message`, messageHandler);
setTimeout(() => {
  subscription.removeListener('message', messageHandler);
  console.log(`${messageCount} message(s) received`);
}, timeout * 1000);

Basically, this consumer application verifies if the subscription exists, if not it creates a subscription against the topic where our publisher application is sending messages. Once the message arrives in pub-sub topic, the consumer application pulls that message. This application implements the PULL model of pub-sub.

Demo

On starting pubsub service emulator, we will see the log like below:

How to use Pub Sub with NodeJS - PubSub Emulator

Now, let’s execute the publisher application and we will see a console log of message publishing

How to Publish a message to Pub Sub with NodeJS

If you execute the same application, you will not see the message Topic PubSubExample created.

Now if execute the consumer application, we will pull the message that publisher sent to topic.

How to consume message from Pub Sub

Same demo with a simple loom video here.

Conclusion

In this post, I showed how to use Pub Sub with NodeJS application. Pub-Sub is a powerful model to use in enterprise applications. It allows us to build services that can communicate asynchronously. If you have more questions about this topic, feel free to reach out to me.