Category Archives: Programming

Logging in Spring Boot Microservices

Logging is a key part of enterprise applications. Logging not only helps to investigate a problem but also helps to build relevant metrics. These metrics are important from a business perspective. In fact, businesses write service level agreements (SLA) using these metrics. In this post, we will talk about logging in Spring Boot-based Microservices.

If you are new to Spring Boot and Microservices, I will recommend reading about Spring Boot and Microservices.

Why do we log and what do we log?

The Production Level applications can fail anytime for various reasons. For a developer to investigate such issues in a timely manner, it becomes critical to have logs available. Logs are a key for applications to recover.

The question comes what do we log? Developers, software architects invest enough time to decide what to log. It’s equally important to not log a lot of information. You do not want to lose critical information. Evidently, one should not log any of PII (Personal Identifiable Information). A paradigm that developers can use is “What will help me to investigate issues in the code if the application fails?”. Especially,  if a critical business decision needs comment in the code, it is an equally viable option to log that decision.

Concurrently, one can use a randomly generated trace id in the logs to trace the request-response. The harder part is to maintain this idea throughout the application’s life.

Logging and Observability

Microservices communicate with external APIs, other microservices. Henceforth, it is important to log the details of such communication. In event-driven microservices, one can log details of events. With cloud infrastructure, it has become easier to log details from microservices. Cloud infrastructure like AWS offers CloudWatch to collect these logs and then use the ELK stack to monitor the logs. However, observability tools like New Relic, Sumo Logic connect with different cloud infrastructures. They collect logs and offer flexibility to display, query, and build metrics based on logs.

Accordingly, developers have enough tools to log the data from applications to improve traceability and debugging.

Logging In Spring Boot Based Microservices

Let’s look at the logging in a Spring Boot-based Microservice. We will create a simple microservice and show what kind of logging configuration we can use.

Our main class looks like below:

package com.betterjavacode.loggingdemo;

import org.springframework.boot.SpringApplication;
import org.springframework.boot.autoconfigure.SpringBootApplication;

@SpringBootApplication
public class LoggingdemoApplication {

 public static void main(String[] args) {
  SpringApplication.run(LoggingdemoApplication.class, args);
 }

}

Basically, the microservice does not have anything at the moment. Regardless, we have a main class and we will see how the logging comes into the picture.

As part of the application, I have included a single dependency

implementation 'org.springframework.boot:spring-boot-starter-web'

This dependency also includes spring-boot-starter-logging . spring-boot-starter-logging is a default logging configuration that Spring Boot offers. We will look into more details.

Default Logging Configuration

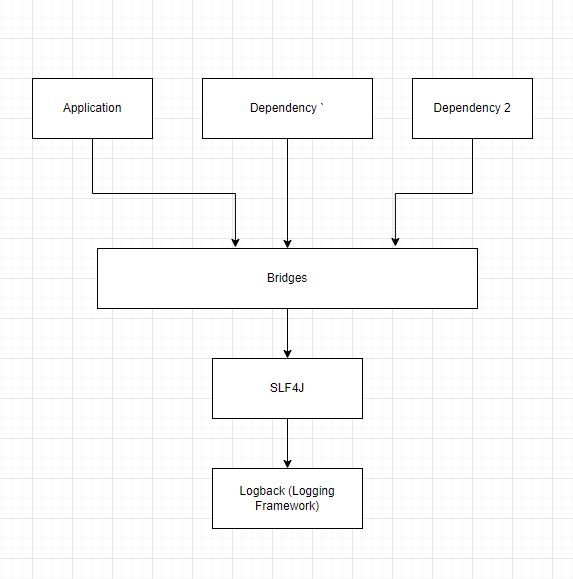
spring-boot-stater-logging dependency includes slf4j as a logging facade with logback as logging framework.

SLF4J is a logging facade that a number of frameworks support. The advantage of using this facade is that we can switch from one framework to another easily. Logback is the default framework in any spring boot application, but we can switch to Log4j, Log4J2, or Java Util Logging easily.

spring-boot-starter-logging includes the required bridges that take logs from other dependencies and delegate them to the logging framework.

Logging in Spring Boot Microservices

Logback Logging Configuration

Analogous to what we added as a microservice and the default logging, we will see how we can use logback logging configuration. If we do not provide any configuration, spring boot will use the default configuration for logback. It will append the logs to console with the log level as info. Logging frameworks help us to propagate the logs to different targets like consoles, files, databases, or even Kafka.

With the configuration file (logback-spring.xml), we can also set the pattern of messages. If you want to use log4j2 instead logback, you can read this post about logging and error handling.

The following configuration file shows how we will be logging:

<configuration>
    <property name="LOGDIRECTORY" value="./logs" />
    <appender name="Console" class="ch.qos.logback.core.ConsoleAppender">
        <layout class="ch.qos.logback.classic.PatternLayout">
            <Pattern>
                %black(%d{ISO8601}) %highlight(%-5level) [%blue(%t)] %yellow(%C{1.}): %msg%n%throwable
            </Pattern>
        </layout>
    </appender>
    <appender name="RollingFile" class="ch.qos.logback.core.rolling.RollingFileAppender">
        <file>${LOGDIRECTORY}/microservice.log</file>
        <encoder
                class="ch.qos.logback.classic.encoder.PatternLayoutEncoder">
            <Pattern>%d %p %C{1.} [%t] %m%n</Pattern>
        </encoder>

        <rollingPolicy
                class="ch.qos.logback.core.rolling.TimeBasedRollingPolicy">
            <fileNamePattern>${LOGDIRECTORY}/archived/microservice-%d{yyyy-MM-dd}.%i.log
            </fileNamePattern>
            <timeBasedFileNamingAndTriggeringPolicy
                    class="ch.qos.logback.core.rolling.SizeAndTimeBasedFNATP">
                <maxFileSize>5MB</maxFileSize>
            </timeBasedFileNamingAndTriggeringPolicy>
        </rollingPolicy>
    </appender>
    <root level="info">
        <appender-ref ref="RollingFile" />
        <appender-ref ref="Console" />
    </root>

    <logger name="com.betterjavacode" level="debug" additivity="false">
        <appender-ref ref="RollingFile" />
        <appender-ref ref="Console" />
    </logger>
</configuration>

We will dissect this file to understand what each line in the configuration does.

At first, we configured a property LOGDIRECTORY pointing to a physical directory on the machine where log files will be saved. We use this property in appender and rollingPolicy.

Different options for logging

Subsequently, we are using appender from Logback configuration to configure where we want to append our logs. In this case, we have configured for Console and File.

For ConsoleAppnder, we are using a pattern of messages that includes a date and time in black color, log level in blue, package in yellow color. The log message will be of the default color.

For RollingFileAppender, we have a line indicating what will be the file name and where it will be stored. In this case, we are logging in microservice.log in LOGDIRECTORY. The next line indicates the pattern for the log message.

  • %d – DateTime
  • %p – log-level pattern
  • %C – ClassName
  • %t – thread
  • %m – message
  • %n – line separator

Thereafter, we define RollingPolicy. We want to make sure that we do not log the information in a single file and that keeps growing in size. We trigger the rolling out of the log file after it reaches a file size of 5 MB and save the old file in the archive directory with a name microservice-date-number.log.

Moving on, we will discuss the log level in the next section.

Configuring Log Level

The last part of the configuration file indicates log level. At the root level, we are logging everything at INFO level. Basically, our application will log all those messages that are written with INFO log level in the code.

But the next configuration allows us to set the log level at the package. In the package starting with com.betterjavacode, log all those messages that are on DEBUG level.

Executing the Spring Boot Application

Now, we will look at how this will be in our demo microservice.

I have a simple RestController in my application that retrieves company information as below:

 package com.betterjavacode.loggingdemo.controller;

import org.slf4j.Logger;
import org.slf4j.LoggerFactory;
import org.springframework.web.bind.annotation.GetMapping;
import org.springframework.web.bind.annotation.RequestMapping;
import org.springframework.web.bind.annotation.RestController;

import java.util.ArrayList;
import java.util.List;

@RestController
@RequestMapping("/v1/companies")
public class CompanyController
{
    private static final Logger LOGGER = LoggerFactory.getLogger(CompanyController.class);
    @GetMapping
    public List getAllCompanies()
    {
        LOGGER.debug("Getting all companies");

        List result = new ArrayList<>();

        result.add("Google");
        result.add("Alphabet");
        result.add("SpaceX");

        LOGGER.debug("Got all companies - ", result);

        return result;
    }
}

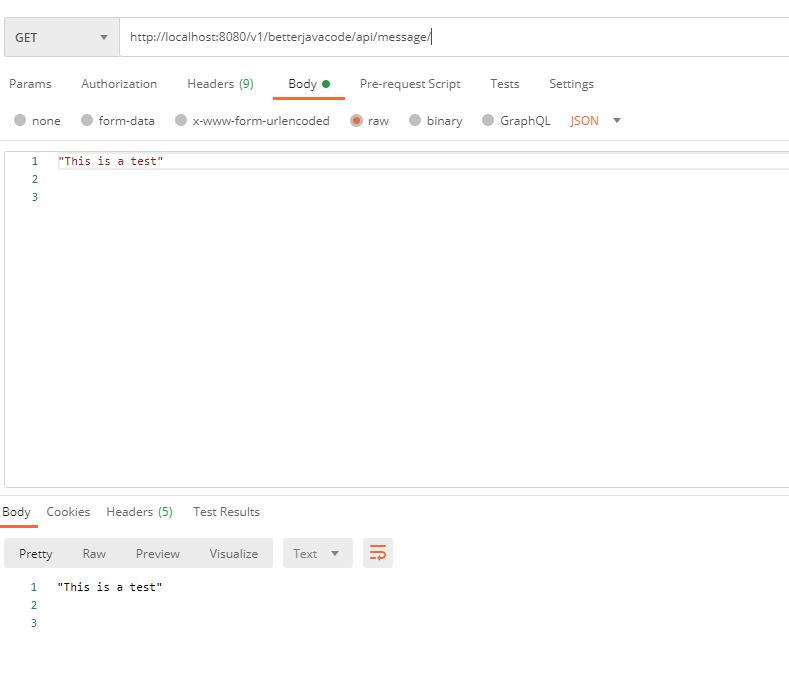
Now if execute our application and access the API http://localhost:8080/v1/companies/, we will get the list of companies, but also we will be able to view log on console as below:

Logging in Spring Boot Microservices - Console Log

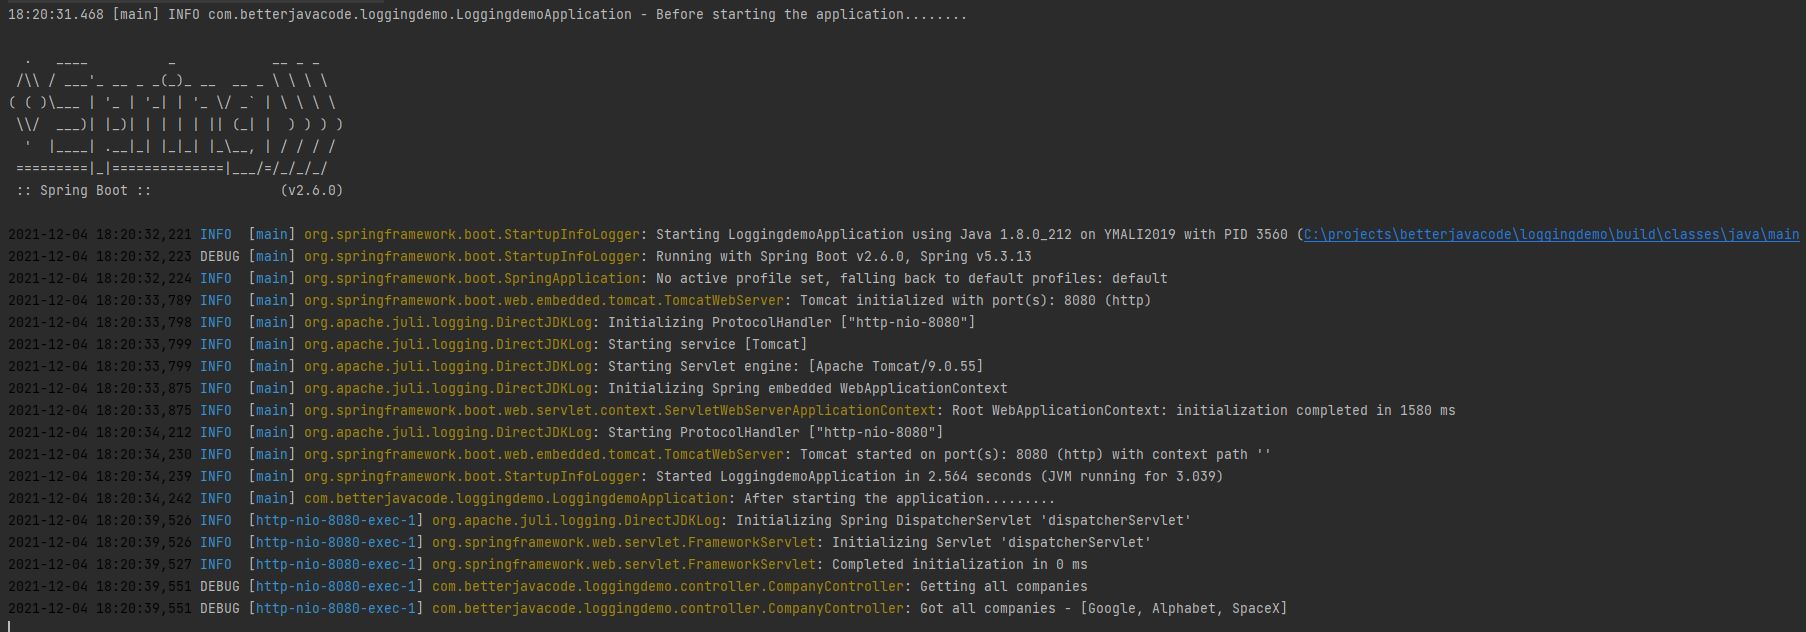
The log  file will look like below:


2021-12-04 18:20:32,221 INFO org.springframework.boot.StartupInfoLogger [main] Starting LoggingdemoApplication using Java 1.8.0_212 on YMALI2019 with PID 3560
2021-12-04 18:20:32,223 DEBUG org.springframework.boot.StartupInfoLogger [main] Running with Spring Boot v2.6.0, Spring v5.3.13
2021-12-04 18:20:32,224 INFO org.springframework.boot.SpringApplication [main] No active profile set, falling back to default profiles: default
2021-12-04 18:20:33,789 INFO org.springframework.boot.web.embedded.tomcat.TomcatWebServer [main] Tomcat initialized with port(s): 8080 (http)
2021-12-04 18:20:33,798 INFO org.apache.juli.logging.DirectJDKLog [main] Initializing ProtocolHandler ["http-nio-8080"]
2021-12-04 18:20:33,799 INFO org.apache.juli.logging.DirectJDKLog [main] Starting service [Tomcat]
2021-12-04 18:20:33,799 INFO org.apache.juli.logging.DirectJDKLog [main] Starting Servlet engine: [Apache Tomcat/9.0.55]
2021-12-04 18:20:33,875 INFO org.apache.juli.logging.DirectJDKLog [main] Initializing Spring embedded WebApplicationContext
2021-12-04 18:20:33,875 INFO org.springframework.boot.web.servlet.context.ServletWebServerApplicationContext [main] Root WebApplicationContext: initialization completed in 1580 ms
2021-12-04 18:20:34,212 INFO org.apache.juli.logging.DirectJDKLog [main] Starting ProtocolHandler ["http-nio-8080"]
2021-12-04 18:20:34,230 INFO org.springframework.boot.web.embedded.tomcat.TomcatWebServer [main] Tomcat started on port(s): 8080 (http) with context path ''
2021-12-04 18:20:34,239 INFO org.springframework.boot.StartupInfoLogger [main] Started LoggingdemoApplication in 2.564 seconds (JVM running for 3.039)
2021-12-04 18:20:34,242 INFO com.betterjavacode.loggingdemo.LoggingdemoApplication [main] After starting the application.........
2021-12-04 18:20:39,526 INFO org.apache.juli.logging.DirectJDKLog [http-nio-8080-exec-1] Initializing Spring DispatcherServlet 'dispatcherServlet'
2021-12-04 18:20:39,526 INFO org.springframework.web.servlet.FrameworkServlet [http-nio-8080-exec-1] Initializing Servlet 'dispatcherServlet'
2021-12-04 18:20:39,527 INFO org.springframework.web.servlet.FrameworkServlet [http-nio-8080-exec-1] Completed initialization in 0 ms
2021-12-04 18:20:39,551 DEBUG com.betterjavacode.loggingdemo.controller.CompanyController [http-nio-8080-exec-1] Getting all companies
2021-12-04 18:20:39,551 DEBUG com.betterjavacode.loggingdemo.controller.CompanyController [http-nio-8080-exec-1] Got all companies - [Google, Alphabet, SpaceX]

Tracing the Requests

Previously, I stated why we log. When there are multiple microservices and each microservice is communicating with other and external APIs, it is important to have a way to trace the request. One of the ways is to configure a pattern in logback-spring.xml .

Another option is to use Filter and MDC (Mapping Diagnostic Context). Basically, each request coming to API will be intercepted through Filter. In Filter, you can add a unique id to MDC map. Use the logging pattern that uses the key from MDC map. This way, your request will have tracking information. One thing to remember is to clear the context from MDC once your API has responded to the client.

Configuring Logs for Monitoring

In the enterprise world, one way to configure logs is to store the logs in files and stash these files on a central location on a cloud server. AWS offers easier flexibility to pull this information in cloud watch from storage S3 and then one can use tools like Kibana and Elastic search for monitoring the logs and metrics.

Conclusion

In this post, we detailed how to use logging in spring boot-based microservices. We also discussed Logback configuration that one can use while using Logback framework in the Spring Boot application.

Most of these practices are standard and if followed properly, ensure the troubleshooting and monitoring of applications in a production environment.

Implementing Domain-Driven Design

Implementing Domain-Driven Design is a software design approach. How do you start to design any software? A complex problem can be overwhelming. Even if you want to look at the existing code base and figure out the design, it can be a lot of work. As you build, the distributed system can get complex. This post is part of Distributed System Design.

The domain-driven approach of software development works in sync with domain experts. Usually, one would discuss the problem with domain experts to figure out what domains and rules can be created and how they are changed in the application. Object-oriented design is nothing but domain-driven design. Domains are objects. Irrespective of what language you choose, you need to create domain objects.

Discussing with domain experts

A complex problem needs a discussion with domain experts. Once you have collected all the information about rules and conditions, you can start representing the real-life problem in a domain object. Rules and conditions can help on how to represent the domain and how the domain would interact with other domain objects.

The first step is to choose domain model names. Again, this depends on your domain.

If we have to take an example of a local library, we will have domain objects like Book, Author, User and Address. A user of the library borrows the book of a particular author from the library. Of course, you can also add Genre. Either you would talk to a local library and see what they need to build an online system to track their books inventory. This discussion will give you an idea about what your end-user wants and how the user wants to use the system.

Basic Building Blocks

Once we have enough information about the domain, we create basic building blocks. The reason to start with domain-driven design as basic building blocks is that this part of the design is least changeable. Over the course of the application lifespan, this will not change. That’s why it is important to build this as accurately as possible.

Implementing Domain-Driven Design

Entities

Entities are domain objects. We identify these domain objects uniquely. A general way to identify these objects is to create a field id which can be of type UUID.

As discussed in our example for building an online library system to manage books, Book, Author, Genre will be different entities and We will add a field id in each of these entities to identify them uniquely.


public class Book
{
   private UUID id;
   
   private String title;

   private String isbn;

   private Date created;

   private Date updated;
   
}

Value Objects

Value objects are attributes or properties of entities. Like above where we created Book entity, title, isbn are value objects of this entity.

Repositories

Nevertheless, repositories are an intermediate layer between Services that need to access domain object data from the persistence technologies like a database.

Aggregates

Aggregates are a collection of entities. This collection is bound together by a root entity. Entities within aggregates have a local identity, but outside that border, they have no identity.

Services

Services drive the domain-driven design. They are the doer of the entire system. All your business logic relies on services. When you get a request to fetch or insert data, services carry out the validation of rules and data with the help of entities, repositories, and aggregates.

Factories

How do you create aggregates? Usually, factories provide help in creating aggregates. If an aggregate is simple enough, one can use aggregate’s constructor to create aggregate.

One of the ways to implement factories is to use Factory Pattern. We can also use an abstract factory pattern to build hierarchies of classes.

In conclusion, to understand all of this

  • Aggregates – are made of entities.
  • Aggregates – use services.
  • Factories – create new aggregates.
  • Repositories – retrieval, search, deletion of aggregates. 

Understanding Bounded Context in Domain-Driven Design

The challenging part of any design is how to make sure that our efforts are not duplicated. If you create feature A with certain domains and another feature B that includes part of domains from feature A, then we are duplicating the efforts. That’s why it’s important to understand the bounded context when designing your application architecture. In such cases, one can easily use Liskov Substitution Principle.

The more features you add, the more complex the design gets. With increasing models, it is even harder to guess what you will need in the future. Overall, in such scenarios, you build a bounded context. The bounded context contains unrelated models but also shares the common models. This helps in dividing the complex and large models which can share some models.

Conclusion

In this post, we learned how to use domain-driven design to build a scalable system. If you want to learn more about this topic, you can get this course on domain-driven design.

Good news for readers – a Black Friday sale on my book Simplifying Spring Security till Nov 30th. Buy it here.

A Step By Step Guide to Kubernetes

In this post, we will discuss how to use Kubernetes and how to deploy your microservice in a Kubernetes cluster. I will cover the fundamentals, so if you are a beginner, this will be a good step-by-step guide to learn Kubernetes. Since we will be building a dockerized container application, you can get started with the complete guide to use docker-compose.

What is Kubernetes?

As per original sourceKubernetes is an open-source system for automating deployment, scaling, and management of containerized applications. Kubernetes is a container orchestration platform.

Basically, once you have a containerized application, you can deploy that on the Kubernetes cluster. Specifically, the cluster contains multiple machines or servers.

In a traditional Java application, one would build a jar file and deploy that on a server machine. Sometimes, even deploy the same application on multiple machines to scale horizontally. Above all, with Kubernetes, you do not have to worry about server machines. Obviously, Kubernetes allows creating a cluster of machines and deploying your containerized application on it.

Additionally, with Kubernetes, one can

  • Orchestrate containers across multiple hosts machines
  • Control and automate application deployment
  • Manage server resources better
  • Health-check and self-heal your apps with auto-placement, auto-restart, auto replication, and autoscaling

Moreover, the Kubernetes cluster contains two parts

  1. A control plane
  2. A computing machine

Particularly, the nodes (physical machines or virtual machines) interact with the control plane using Kubernetes API.

  • Control Plane – The collection of processes that control the Kubernetes nodes.
  • Nodes – The machines that perform the tasks that are assigned through processes.
  • Pod – A group of one or more containers deployed on a single node. All containers on the pod share the resources and IP addresses.
  • Service – An abstract way to expose an application running on a set of Pods as a network service.
  • Kubelet – The Kubelet is a primary node agent that runs on each node. It reads the container manifests and keeps track of containers starting and running.
  • kubectl – The command-line configuration tool for Kubernetes

How to create a cluster?

Thereafter, depending on your environment, download Minikube. I am using a Windows environment.

minikube start will create a new Kubernetes cluster.

Eventually, if you want to look at a more detailed dashboard, you can use the command minikube dashboard. This command will launch a Kubernetes dashboard in the browser. (http://127.0.0.1:60960/api/v1/namespaces/kubernetes-dashboard/services/http:kubernetes-dashboard:/proxy/)

Learn Kubernetes Step By Step

Demo to deploy a microservice to Kubernetes

Create A Containerized Microservice

Moreover, let’s create a simple microservice that we will eventually deploy in the cluster. I will be using Spring Boot to create a microservice that returns a list of products for a REST API call.

This microservice will return a list of products on the call.


package com.betterjavacode.kubernetesdemo.controllers;

import com.betterjavacode.kubernetesdemo.dtos.ProductDTO;
import com.betterjavacode.kubernetesdemo.services.ProductService;
import org.springframework.beans.factory.annotation.Autowired;
import org.springframework.web.bind.annotation.GetMapping;
import org.springframework.web.bind.annotation.RequestMapping;
import org.springframework.web.bind.annotation.RestController;

import java.util.List;

@RestController
@RequestMapping("/v1/products")
public class ProductController
{
    @Autowired
    public ProductService productService;

    @GetMapping
    public List getAllProducts()
    {
        return productService.getAllProducts();
    }
}

Besides, the ProductService will have a single method to return all products.


package com.betterjavacode.kubernetesdemo.services;

import com.betterjavacode.kubernetesdemo.dtos.ProductDTO;
import org.springframework.stereotype.Component;

import java.util.ArrayList;
import java.util.List;

@Component
public class ProductService
{

    public List getAllProducts ()
    {
        List productDTOS = new ArrayList<>();

        ProductDTO toothbrushProductDTO = new ProductDTO("Toothbrush", "Colgate", "A toothbrush " +
                "for " +
                "all");
        ProductDTO batteryProductDTO = new ProductDTO("Battery", "Duracell", "Duracell batteries " +
                "last long");

        productDTOS.add(toothbrushProductDTO);
        productDTOS.add(batteryProductDTO);
        return productDTOS;

    }
}

I am deliberately not using any database and using a static list of products to return for demo purposes.

Before building a docker image, run

minikube docker-env

minikube docker-env | Invoke-Expression

Build docker image

Let’s build a docker image for our microservice that we just created. At first, create a dockerfile in the root directory of your project.

FROM openjdk:8-jdk-alpine
VOLUME /tmp
COPY ./build/libs/*.jar app.jar
ENTRYPOINT ["java", "-jar", "/app.jar"]

Now let’s build a docker image using this dockerfile.

docker build -t kubernetesdemo .

This will create a kubernetesdemo docker image with the latest tag.

If you want to try out this image on your local environment, you can run it with the command:

docker run --name kubernetesdemo -p 8080:8080 kubernetesdemo

This will run our microservice Docker image on port 8080. Regardless, before deploying to kubernetes, we need to push this docker image to the docker hub container registry so Kubernetes can pull from the hub.

docker login – Login to docker hub with your username and password from your terminal.

Once the login is successful, we need to create a tag for our docker image.

docker tag kubernetesdemo username/kubernetesdemo:1.0.0.

Use your docker hub username.

Now we will push this image to docker hub with the command:

docker push username/kubernetesdemo:1.0.0.

Now, our docker image is in the container registry.

Kubernetes Deployment

Kubernetes is a container orchestrator designed to run complex applications with scalability in mind.

The container orchestrator manages the containers around the servers. That’s the simple definition. As previously stated, we will create a local cluster on windows machine with the command

minikube start.

Once the cluster starts, we can look at the cluster-info with the command

kubectl get cluster-info.

Now to deploy our microservice in Kubernetes, we will use the declarative interface.

Declaring deployment file

Create a kube directory under your project’s root directory. Add a yaml file called deployment.yaml.

This file will look like below:

apiVersion: v1
kind: Service
metadata:
  name: kubernetesdemo
spec:
  selector:
    app: kubernetesdemo
  ports:
    - port: 80
      targetPort: 8080
  type: LoadBalancer

---
apiVersion: apps/v1
kind: Deployment
metadata:
  name: kubernetesdemo
spec:
  selector:
    matchLabels:
      app: kubernetesdemo
  replicas: 3
  template:
    metadata:
      labels:
        app: kubernetesdemo
    spec:
      containers:
      - name: kubernetesdemo
        image: username/kubernetesdemo:1.0.0
        imagePullPolicy: IfNotPresent
        ports:
        - containerPort: 8080

Shortly, we will go over each section of this deployment file.

Once we run this deployment file, it will create a container and a service. Let’s first look at Deployment .

apiVersion: apps/v1 
kind: Deployment 
metadata: 
  name: kubernetesdemo

These lines declare that we create a resource of type Deployment using version v1 and of name kubernetesdemo.

replicas: 3 indicate that we are running 3 replicas of the container. But the container here is nothing but a pod. A pod is a wrapper around a container. A single pod can run multiple containers while the containers share the resources of the pod. Just remember that the pod is the smallest unit of deployment in Kubernetes.

The template.metadata.labels defines the label for the pod that runs the container for the application kubernetesdemo.

The section of containers is self-explanatory. If it is not clear, this is where we declare about the container that we plan to run in a pod. The name of the container kubernetesdemo and the image of this container is username/kubernetesdemo:1.0.0 . We will be exposing the port 8080 of this container where our microservice will be running.

Service Definition

Without delay, let’s look at the earlier part of this deployment file.

apiVersion: v1
kind: Service
metadata:
  name: kubernetesdemo
spec:
  selector:
    app: kubernetesdemo
  ports:
    - port: 80
      targetPort: 8080
  type: LoadBalancer

Here, we are creating a resource of type Service.

A Service allows pods to communicate with other pods. But it also allows external users to access pods. Without a service, one can not access pods. The kind of Service we are defining here will allow us to forward the traffic to a particular pod.

In this declaration, spec.selector.app allows us to select the pod with the name kubernetesdemo. Service will expose this pod. A request coming to port 80 will be forwarded to the target port of 8080 of the selected Pod.

And lastly, the service is of type LoadBalancer. Basically, in our Kubernetes cluster, a service will act as a load balancer that will forward the traffic to different pods. A Service ensures continuous availability of applications. If a pod crashes, another pod starts and the service makes sure to route the traffic accordingly.

Service keeps track of all the replicas you are running in the cluster.

Running the deployment

So far, we have built a deployment configuration to create resources in our cluster. But we have not deployed anything yet.

To run the deployment, use

kubectl apply -f deployment.yaml

You can also just run

kubectl apply -f kube and it will pick up deployment files from the kube directory.

The response for this command will be

service/kubernetesdemo configured
deployment.apps/kubernetesdemo created

kubectl get pods will show the status of pods

Kubernetes Step By Step - Pods

Now to see the actual situation with cluster and services running, we can use

minikube dashboard.

Kubernetes Step By Step - Dashboard

We can see there are 3 pods running for our microservice kubernetesdemo.

If you run kubectl get services, we will see all the services running. Now to access our application, we will have to find the service url. In this case the name of service (not microservice) is kubernetesdemo.

minikube service kubernetesdemo --url will show an URL in the terminal window.

Now if use this URL http://127.0.0.1:49715/v1/products, we can see the output in the browser

Kubernetes Demo

How to scale?

With Kubernetes, it’s easy to scale the application. We are already using 3 replicas, but we can reduce or increase the number with a command:

kubectl scale --replicas=4 deployment/kubernetesdemo.

If you have the dashboard, you will see the 4th replica starting. That’s all.

Conclusion

Wow, we have covered a lot in this demo. I hope I was able to explain the fundamental concepts of Kubernetes step by step. If you want to learn more, comment on this post. If you are looking to learn Spring Security concepts, you can buy my book Simplifying Spring Security.

Details of Liskov Substitution Principle Example

In this post, I will cover the details of the Liskov Substitution Principle(LSP) with an example. This is a key principle to validate the object-oriented design of your system. Hopefully, you will be able to use this in your design and find out if there are any violations. You can learn more about other object oriented design principles. Let’s start with the basics of Liskov Substitution Principle first.

Liskov Substitution Principle (LSP)

Basically, the principle states that if in an object-oriented program you substitute superclass object reference with any of its subclass objects, it should not break the program.

Wikipedia definition says – If S is a subtype of T, then the objects of type T may be replaced with objects of S without altering any of the desirable properties of the program.

LSP comes into play when you have super-sub class OR interface implementation type of inheritance. Usually, when you define a superclass or an interface, it is a contract. Any inherited object from this superclass or interface implementation class must follow the contract. Any of the objects that fail to follow the contract, will violate the Liskov Substitution Principle. If you want to learn more about Object-Oriented Design, get this course from educative.

Let’s take a simple look before we look at this in detail.


public class Bird
{
    void fly()
    {
       // Fly function for bird
    }
}

public class Parrot extends Bird
{
    @Override
    void fly()
    {

    }
}

public class Ostrich extends Bird
{
   // can't implement fly since Ostrich doesn't fly
}

If you look at the above classes, Ostrich is not a bird. Technically, we can still implement the fly method in Ostrich class, but it will be without implementation or throwing some exception. In this case, Ostrich is violating LSP.

Object-Oriented Design can violate the LSP in the following circumstances:

  1. If a subclass returns an object that is completely different from what the superclass returns.
  2. If a subclass throws an exception that is not defined in the superclass.
  3. There are any side effects in subclass methods that were not part of the superclass definition.

How do programmers break this principle?

Sometimes, if a programmer ends up extending a superclass without completely following the contract of the superclass, a programmer will have to use instanceofcheck for the new subclass. If there are more similar subclasses are added to the code, it can increase the complexity of the code and violate the LSP.

Supertype abstract intends to help programmers, but instead, it can end up hindering and add more bugs in the code. That’s why it is important for programmers to be careful when creating a new subclass of a superclass.

Liskov Substitution Principle Example

Now, let’s look at an example in detail.

Many banks offer a basic account as well as a premium account. They also charge fees for these premium accounts while basic accounts are free. So, we will have an abstract class to represent BankAccount.

public abstract class BankAccount
{
   public boolean withDraw(double amount);

   public void deposit(double amount);

}

The class BankAccount has two methods withDraw and deposit.

Consequently, let’s create a class that represents a basic account.


public class BasicAccount extends BankAccount
{
    private double balance;

    @Override
    public boolean withDraw(double amount)
    {
       if(balance > 0)
       {
           balance -= amount;
           if(balance < 0)
           {
              return false;
           }
           else 
           {
              return true;
           }
       }
       else
       {
          return false;
       } 
    }

    @Override
    public void deposit(double amount)
    {
       balance += amount;
    }
}

Now, a premium account is a little different. Of course, an account holder will still be able to deposit or withdraw from that account. But with every transaction, the account holder also earns rewards points.


public class PremiumAccount extends BankAccount
{
   private double balance;
   private double rewardPoints;

   @Override
   public boolean withDraw(double amount)
   {
      if(balance > 0)
       {
           balance -= amount;
           if(balance < 0)
           {
              return false;
           }
           else 
           {
              return true;
              updateRewardsPoints();
           }
       }
       else
       {
          return false;
       } 
   }
   
   @Override
   public void deposit(double amount)
   {
      this.balance += amount;
      updateRewardsPoints();
   }

   public void updateRewardsPoints()
   {
      this.rewardsPoints++;
   }
}

So far so good. Everything looks ok. If you want to use the same class of BankAccount to create a new investment account that an account holder can’t withdraw from, it will look like below:


public class InvestmentAccount extends BankAccount
{
   private double balance;

   @Override
   public boolean withDraw(double amount)
   {
      throw new Expcetion("Not supported");
   }
   
   @Override
   public void deposit(double amount)
   {
      this.balance += amount;
   }

}

Even though, this InvestmentAccount follows most of the contract of BankAccount, it does not implement withDraw method and throws an exception that is not in the superclass. In short, this subclass violates the LSP.

How to avoid violating LSP in the design?

So how can we avoid violating LSP in our above example? There are a few ways you can avoid violating Liskov Substitution Principle. First, the superclass should contain the most generic information. We will use some other object-oriented design principles to do design changes in our example to avoid violating LSP.

  • Use Interface instead of Program.
  • Composition over inheritance

So now, we can fix BankAccount class by creating an interface that classes can implement.


public interface IBankAccount
{
  boolean withDraw(double amount) throws InvalidTransactionException;
  void deposit(double amount) throws InvalidTransactionException;
}

Now if we create classes that implement this interface, we can also include a InvestingAccount that won’t implement withDraw method.

If you have used Object-oriented programming, you must have heard both the terms composition and inheritance. Also in object-oriented design, composition over inheritance is a common pattern. One can always make objects more generic. Using composition over inheritance can help to avoid violating LSP.

Combine Object-Oriented Design principles with fundamentals of distributed system design and you will be good at system design.

Conclusion

In this post, we talked about Liskov Substitution Principle and its example, how designers usually violate this principle, and how we can avoid violating it.


Building Microservices with Event-Driven Architecture

In this post, we will discuss how we can build microservices with event-driven architecture. As part of the post, I will also show an example of an event-driven microservice. If you don’t know what a microservice is, you can start with my primer here.

Microservices – Event-Driven Architecture

Traditionally, we would use a REST Based Microservice. In this microservice, a client would request data and then the server would respond with the data. But there were disadvantages in that client has to wait for the server to respond. A server can be down or serving other requests, in-process of delaying the response to the current client requests.

In short, when a system becomes slow because of synchronized connections, we can use event-driven architecture to make the system asynchronous.

Event-Drive microservices use an eventually consistent approach.  Each service publishes event data whenever there is an update or transaction. Other services subscribe to this service publishing events. When these subscribed services receive an event, they update their data.

A simple example of this approach: When a customer redeems a gift card, a single redemption event is created and consumed by different services.

  1. A Reward Service that can write a redemption record in the database
  2. A Customer receiving getting an item bought through a gift card
  3. A Partner Service verifying the gift card and allowing the redemption and accordingly processing of the item that the customer bought.

Event-Driven architecture is either through queues or the pub-sub model. In Pub/Sub model, a service publishes the event, and subscribed services consume that event. It is not much different from what queues and topics do.

Benefits of Event-Driven Architecture

  • Loose Coupling – Services don’t need to depend on other services. Considering the architecture is reactive, services can be independent of each other.
  • Asynchronous – A publishing service will publish the event. A subscribing service can consume the event whenever it is ready to consume. The major advantage of asynchronous architecture is that services don’t block resources.
  • Scaling – Since the services are independent, most services perform a single task. It becomes easier to scale as well to find out bottle-neck.

Drawbacks of Event-Driven Architecture

Every design is a trade-off. We do not have a perfect design in distributed systems. With event-driven architecture, one can easily over-engineer the solution by separating concerns.

Event-Driven architecture needs upfront investment. Since the data is not necessarily available immediately, it can cause some concerns with transactions. Eventual consistency can be hard to investigate if there are issues with data. There can be possibilities of duplicate events, resulting in duplicate data. Event-driven models do not support ACID transactions.

Framework for Architecture

Irrespective of those drawbacks, event-driven architecture is fast and delivers results successfully. So the next question arises what framework to choose to build this architecture. Currently, there are two choices

  • Message Processing
  • Stream Processing

Message Processing

In message processing, a service creates a message and sends it to the destination. A subscribing service picks up the message from that destination. In AWS, we use SNS (Simple Notification Service) and SQS (Simple Queue Service). A service sends a message to a topic and a queue subscribing to that topic picks up that message and processes it further.

SNS and SQS are not the only frameworks out there. Message queues use a store and forward system of brokers where events travel from broker to broker. ActiveMQ and RabbitMQ are the other two examples of message queues

Stream Processing

In stream processing, a service sends an event and subscribed service picks up that event. Nevertheless, events are not for a particular target.

Usually, a producer of events emits events and can store them in storage. A consumer of events can consume those events from the data storage. The most popular framework for stream processing is Kafka. Basically, it follows a pub-sub model.

Above all, stream processors (like Kafka) offer the durability of data. Data is not lost and if the system goes offline, it can reproduce the history of events.

Demo of Event-Driven Architecture Based Microservice

As part of this demo, we will implement a Spring Boot application along with the ActiveMQ message broker service.

ActiveMQ Messaging Service

ActiveMQ is an open-source message broker. Presently, it supports clients written in Java, Python, .Net, C++, and more.

Download the ActiveMQ from here. Once, you extract the downloaded folder on your machine, you can go to bin directory to start the ActiveMQ server with a command activemq.bat start. This will start the ActiveMQ server at http://localhost:8161.

Sender Application with Spring Boot

Now, let’s create a Message Sender application using Spring Boot. We will need the following dependencies


dependencies {
 implementation 'org.springframework.boot:spring-boot-starter-activemq'
 implementation 'org.springframework.boot:spring-boot-starter-web'
 testImplementation 'org.springframework.boot:spring-boot-starter-test'
}

We will add JMS Configuration to create an ActiveMQ Queue.


@Configuration
public class JmsConfig
{
    @Bean
    public Queue queue()
    {
        return new ActiveMQQueue("demo-queue");
    }
}

This creates a bean for our queue demo-queue. To send message to this queue through our sender application, we will create a REST API as follows:


@RestController
@RequestMapping("/v1/betterjavacode/api")
public class MessageController
{
    @Autowired
    private Queue queue;

    @Autowired
    private JmsTemplate jmsTemplate;

    @GetMapping("/message/")
    public ResponseEntity sendMessage(@RequestBody String message)
    {
        jmsTemplate.convertAndSend(queue, message);
        return new ResponseEntity(message, HttpStatus.OK);
    }

}

Subsequently, we have injected queue and jmsTemplate beans in our RestController so we can send the message.

On the other hand, we will also have a receiver application which will be a destination service or consumer service consuming the message from the sender application.

Create a message consumer class in our receiver application


@Component
@EnableJms
public class MessageConsumer
{
    private final Logger logger = LoggerFactory.getLogger(MessageConsumer.class);

    @JmsListener(destination = "demo-queue")
    public void receiveMessage(String message)
    {
        // TO-DO
        logger.info("Received a message = {}", message);
    }
}

The annotation of @JmsListener with destination makes the application to listen to that queue. @EnableJms enables the annotation @JmsListener.

We still need to add ActiveMQ properties so that both applications know where ActiveMQ server is running. So, add the following properties to application.properties


spring.activemq.broker-url=tcp://localhost:61616
spring.activemq.user=admin
spring.activemq.password=admin

Now start both of the Spring Boot applications. Sender Application is running on 8080 and Receiver Application is running on 8081.
Event-Driven Architecture Microservices - Sending Message

Now if we check the logs of receiver application, we will see that it has consumed that message from ActiveMQ queue demo-queue.

Microservices - Event-Driven Architecture - Receiving Message

We can also see the status of queue in ActiveMQ server.

Apache ActiveMQ Event-Driven Architecture

Here, you can see there have been two messages that the queue has received from the sender and delivered to the consumer.  The code for this demo is available on my github repository.

Conclusion

In this post, I discussed Event-Driven architecture for microservices. We also discussed the benefits and drawbacks of this architecture. At last, we showed how we can use ActiveMQ to set up an event-driven architecture-based microservice for asynchronous communication.

On another note, if you still haven’t bought my book for Spring Security, you can buy here OR you can read about it more here.

References

Event-Driven Microservices using ActiveMQ – ActiveMQ