In this post, I will show how we can create an application with Spring Boot and ReactJS.
We will use ReactJS for frontend and Spring Boot for handling business logic in the backend. We will use MySQL as a database. The application we are building is a to-do list application.
We will cover the following instructions in this post:
- Set up Spring Boot application
- Set up MySQL Database
- Details of Spring Boot Application
- Install ReactJS and set up frontend
- Test the application on the local environment
Set up Spring Boot Application
I usually use https://start.spring.io/ to set up a boilerplate Spring Boot application with required dependencies. As part of this project, we will use spring-data-jpa, spring-data-rest, jdbc, and web dependencies. Our Gradle file will look like below:
plugins {
	id 'org.springframework.boot' version '2.3.1.RELEASE'
	id 'io.spring.dependency-management' version '1.0.9.RELEASE'
	id 'java'
}

group = 'com.betterjavacode.'
version = '0.0.1-SNAPSHOT'
sourceCompatibility = '1.8'

repositories {
	mavenCentral()
}

dependencies {
	implementation 'org.springframework.boot:spring-boot-starter-data-jpa'
	implementation 'org.springframework.boot:spring-boot-starter-data-rest'
	implementation 'org.springframework.boot:spring-boot-starter-jdbc'
	implementation 'org.springframework.boot:spring-boot-starter-web'
	runtimeOnly 'mysql:mysql-connector-java'
	testImplementation('org.springframework.boot:spring-boot-starter-test') {
		exclude group: 'org.junit.vintage', module: 'junit-vintage-engine'
	}
}

test {
	useJUnitPlatform()
}
Once we created the project at https://start.spring.io, we can download it and import it in IntelliJ or Eclipse.
Set up MySQL Database
For the To-Do list application, we will need a database and a single table. This demo is a barebone application, so we won’t have any login or registration screen.
Since we will be connecting to the database from our Spring Boot application, we will need to set up our application.properties as follows:
spring.datasource.url=jdbc:mysql://127.0.0.1/todolist?autoReconnect=true&useSSL=false
spring.datasource.username = sa
spring.datasource.password=********
spring.datasource.driver-class-name=com.mysql.cj.jdbc.Driver
spring.jpa.show-sql=true
spring.jpa.properties.hibernate.dialect = org.hibernate.dialect.MySQL5Dialect
spring.datasource.hikari.connection-test-query=SELECT 1
You can use GUI to connect to your MySQL database, I usually prefer the command-line approach.
Once you login to your MySQL database on the command line, create a database for our application.
create database todolist
We will create a database table task.
create table task (id int(6) unsigned not null auto_increment, taskname varchar(100) not null, duedate date default null, status int(1), primary key(id));
We can either have some data inserted or have our home page of the application showing the form to insert the data.
Details of Spring Boot Application
Firstly, we will create a model class for task. This class will look like below:
package com.betterjavacode.demo.models;

import com.fasterxml.jackson.annotation.JsonFormat;

import javax.persistence.*;
import java.io.Serializable;
import java.util.Date;

@Entity(name="Task")
@Table(name="task")
public class Task implements Serializable
{
    private static final long serialVersionUID = 1L;

    public Task()
    {

    }

    @Id
    @GeneratedValue(strategy = GenerationType.IDENTITY)
    @Column(name="id", nullable = false)
    private int id;

    @Column(name = "taskname", nullable=false)
    private String taskname;

    @Column(name = "duedate")
    @JsonFormat(pattern="yyyy-MM-dd")
    private Date dueDate;

    @Column(name = "status")
    private String status;

    @Override
    public String toString()
    {
        return "Task = { id = " + id + ", taskname = " + taskname + ", duedate = " + dueDate
                + ", status = " + status + "}";
    }

    public int getId ()
    {
        return id;
    }

    public void setId (int id)
    {
        this.id = id;
    }

    public String getTaskname ()
    {
        return taskname;
    }

    public void setTaskname (String taskname)
    {
        this.taskname = taskname;
    }

    public Date getDueDate ()
    {
        return dueDate;
    }

    public void setDueDate (Date dueDate)
    {
        this.dueDate = dueDate;
    }

    public String getStatus ()
    {
        return status;
    }

    public void setStatus (String status)
    {
        this.status = status;
    }
}
In this development, we will have a Controller that will handle our rest service and a manager that will handle business layer logic.
The implementation of the manager will look like below:
package com.betterjavacode.demo.managers;

import com.betterjavacode.demo.models.Task;
import com.betterjavacode.demo.repositories.TaskRepository;
import org.springframework.beans.factory.annotation.Autowired;

import java.util.List;
import java.util.Optional;

public class TaskManagerImpl implements TaskManager
{

    @Autowired
    private TaskRepository taskRepository;

    @Override
    public Task createTask (Task task)
    {
        Task t = taskRepository.save(task);
        return t;
    }

    @Override
    public Task updateTask (Task task)
    {
        Task t = taskRepository.save(task);
        return t;
    }

    @Override
    public Task getTask (int id)
    {
        Optional task = taskRepository.findById(id);
        return task.get();
    }

    @Override
    public List getAllTasks ()
    {
        List tasks = (List) taskRepository.findAll();
        return tasks;
    }

    @Override
    public void deleteTask (int id)
    {
        taskRepository.deleteById(id);
    }
}
And our RestController will look like below:
package com.betterjavacode.demo.controllers;


import com.betterjavacode.demo.managers.TaskManager;
import com.betterjavacode.demo.models.Task;
import org.springframework.beans.factory.annotation.Autowired;
import org.springframework.web.bind.annotation.*;

import java.util.List;

@RestController
@RequestMapping("/api")
@CrossOrigin(origins = "http://localhost:8080")
public class TaskController
{
    @Autowired
    private TaskManager taskManager;

    @GetMapping("/tasks")
    public List get()
    {
        return taskManager.getAllTasks();
    }

    @PostMapping("/task")
    public Task save(@RequestBody Task task)
    {
        return taskManager.createTask(task);
    }

    @GetMapping("/task/{id}")
    public Task get(@PathVariable int id)
    {
        return taskManager.getTask(id);
    }

    @DeleteMapping("/task/{id}")
    public String delete(@PathVariable int id)
    {
        taskManager.deleteTask(id);
        return "Task with id " + id + " removed";
    }

}
Now we can test these REST APIs through POSTMAN. I will not be showing that, but if you are interested you can download postman.
Install ReactJS and Set up Frontend
For frontend UI, we will be using ReactJS. Few things, you will need to use ReactJS are npm, nodejs, and create-react-app.
Once you install these three components, we are ready to use ReactJS for our current Spring Boot application.
On command-line, go to the root directory where we have the Spring Boot application. Create a react app using the following command:
npx create-react-app frontend
If you go into frontend directory on command-line, you will be able to start the frontend and it will show you the default screen of ReactJS application.
To make sure the application works smoothly, we will need couple of libraries. We will install them as follows:
npm install react-router
npm install @material-ui/core
npm install @material-ui/icons
react-router is a standard library from React that keeps your UI in sync with the URL, provides dynamic route matching, location transitioning, and lazy code handling features.
core and icons are libraries for frontend components.
We will add a proxy in package.json so that we don’t have to write an entire URL when we make call to backend API.
proxy: http://localhost:8080
Now let’s look at component files.
- App.jsIn this file, we will define our app route using react router.
AddTaskwill serve as the homepage. We will redirect a user to view page to see a list of tasks.
import React, {Component} from 'react';
import AddTask from "./Component/AddTask";
import { Route,BrowserRouter as Router} from 'react-router-dom';
import Table from "./Component/Table"

class App extends Component{
	render(){
		return(


			);
	}
}

export default App;
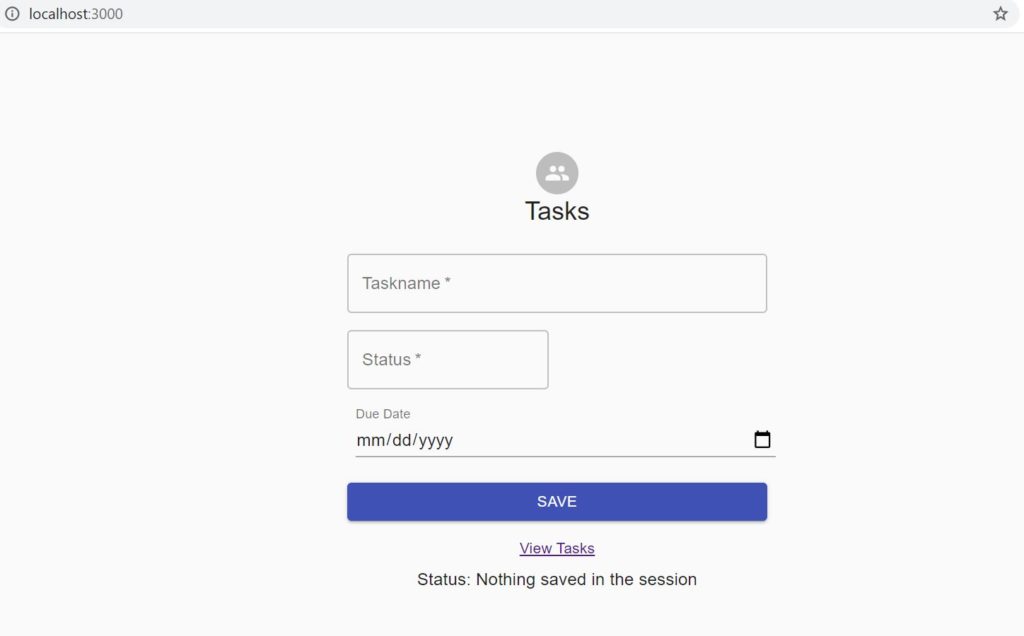
2. AddTask.js
This will be the entry of our application. In this file, we will have a form to add a task. Once the user enters all the required information, we will send a POST request to server-side code. This file will look like below:
import React from "react";
import Avatar from "@material-ui/core/Avatar";
import Button from "@material-ui/core/Button";
import CssBaseline from "@material-ui/core/CssBaseline";
import TextField from "@material-ui/core/TextField";
import { Link } from "react-router-dom";
import Grid from "@material-ui/core/Grid";
import GroupIcon from "@material-ui/icons/Group";
import Typography from "@material-ui/core/Typography";
import { makeStyles } from "@material-ui/core/styles";
import Container from "@material-ui/core/Container";

const useStyles = makeStyles(theme => ({
  paper: {
    marginTop: theme.spacing(7),
    display: "flex",
    flexDirection: "column",
    alignItems: "center"
  },
  avatar: {
    margin: theme.spacing(1),
    backgroundColor: theme.palette.secondary.main
  },
  form: {
    width: "100%", // Fix IE 11 issue.
    marginTop: theme.spacing(3)
  },
  submit: {
    margin: theme.spacing(3, 0, 2)
  },
  textField: {
    marginLeft: theme.spacing(1),
    marginRight: theme.spacing(1),
    width: "100%"
  }
}));

export default function AddTask(){
    const classes = useStyles();
    const[firstLoad, setLoad] = React.useState(true);

    const [selectedDate, setSelectedDate] = React.useState(
        new Date()
    );

    const [taskname, setTaskname] = React.useState("Write Code");
    const [status, setStatus] = React.useState("Active");

    const handleDateChange = event => setSelectedDate(event.target.value);
    const handleTasknameChange = event => setTaskname(event.target.value);
    const handleStatusChange = event => setStatus(event.target.value);

    const [message, setMessage] = React.useState("Nothing saved in the session");

    async function sampleFunc(toInput){
    	const response = await fetch("/api/task",{
			method : "POST",
			cache : "no-cache",
			credentials : "include",
			headers : {
				"Content-Type":"application/json"
			},
			redirect : "follow",
			referrerPolicy: "no-referrer", // no-referrer, *client
	      	body: JSON.stringify(toInput)

    	});
    	let body = await response.json();
    	//console.log(body.id);
    	setMessage(body.id ? "Data successfully updated" : "Data updation failed");
    }

    const handleSubmit = variables => {
    	const toInput = {taskname,status, dueDate:selectedDate};
    	sampleFunc(toInput);
    	setTaskname("");
    	setStatus("");
    };

    if(firstLoad){
    	setLoad(false);
    }

    return(
    	<Container component="main" maxWidth="xs">
    	   <CssBaseline />
    	   <div className={classes.paper}>
    	   	<Avatar className={classes.paper}>
    	   	   <GroupIcon />
    	   	</Avatar>
    	   	<Typography component="h1" variant="h5">
    	   	  Tasks
    	   	</Typography>
    	   	<form className={classes.form} noValidate>
    	   	   <Grid container spacing={2}>
    	   	    <Grid item xs={12}>
    	   	      <TextField
    	   	         variant = "outlined"
    	   	         required
			 	     fullWidth
			         id="taskname"
			         value={taskname.text}
			         label="Taskname"
			         name="taskname"
			         autoComplete="taskname"
			         onChange={handleTasknameChange}
              		/>
		   </Grid>
		   <Grid item xs={12} sm={6}>
		                 <TextField
		                   autoComplete="status"
		                   name="status"
		                   variant="outlined"
		                   required
		                   fullWidth
		                   value={status.text}
		                   id="status"
		                   label="Status"
		                   onChange={handleStatusChange}
		                 />
                   </Grid>
                   <Grid item xs={12}>
		                 <TextField
		                   id="date"
		                   label="Due Date"
		                   type="date"
		                   defaultValue={""}
		                   className={classes.textField}
		                   InputLabelProps={{
		                     shrink: true
		                   }}
		                   onChange={handleDateChange}
		                 />
                  </Grid>
                 </Grid>
                 <Button
		             // type="submit"
		             fullWidth
		             variant="contained"
		             color="primary"
		             preventDefault
		             className={classes.submit}
		             onClick={handleSubmit}
		           >
		             Save
                 </Button>
                 <Grid container justify="center">
		            <Grid item>
		               <Link to="/view">View Tasks</Link>
		            </Grid>
		 </Grid>
              </form>
    	      <Typography style={{ margin: 7 }} variant="body1">
	              Status: {message}
	      </Typography>
	    </div>
       </Container>    );
}
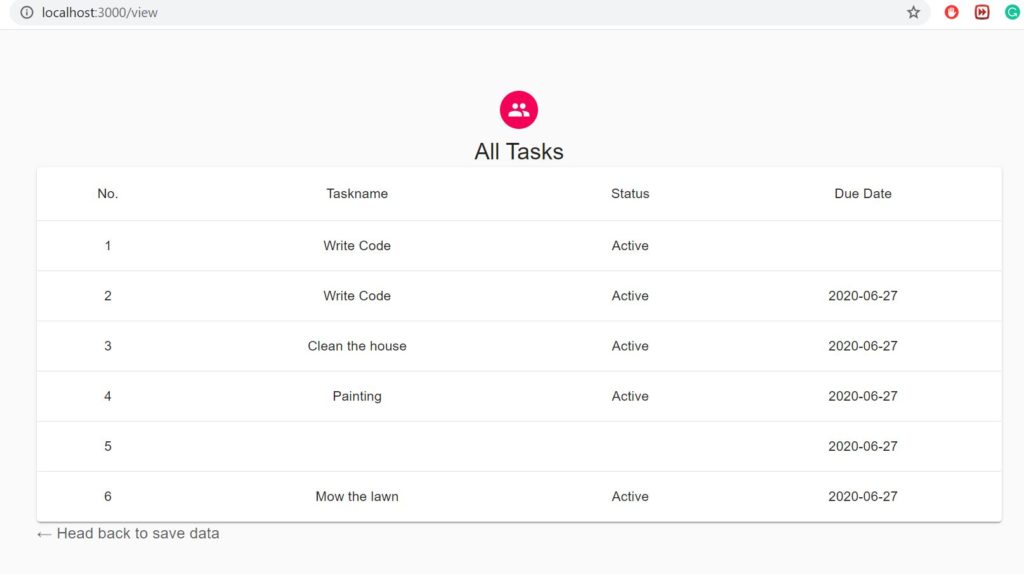
3. Table.js
This file we get the list of tasks from our database table through an API call to Spring Boot REST API. It will also show all the entries in table form.
import React from "react";
import { makeStyles } from "@material-ui/core/styles";
import Table from "@material-ui/core/Table";
import TableBody from "@material-ui/core/TableBody";
import TableCell from "@material-ui/core/TableCell";
import TableContainer from "@material-ui/core/TableContainer";
import TableHead from "@material-ui/core/TableHead";
import TableRow from "@material-ui/core/TableRow";
import Paper from "@material-ui/core/Paper";
import Avatar from "@material-ui/core/Avatar";
import GroupIcon from "@material-ui/icons/Group";
import { Link } from "react-router-dom";
import Typography from "@material-ui/core/Typography";
import CircularProgress from "@material-ui/core/CircularProgress";
const useStyles = makeStyles(theme => ({
table: {
minWidth: 600
},
avatar: {
margin: theme.spacing(1),
backgroundColor: theme.palette.secondary.main
},
paper: {
display: "flex",
flexDirection: "column",
justifyContent: "center",
alignItems: "center",
margin: `10px`,
height: "100%",
width: "99%",
marginTop: theme.spacing(7)
},
link: {
color: "rgba(0,0,0,0.65)",
textDecoration: "none",
marginLeft: "10%",
alignSelf: "flex-start",
"&:hover": {
color: "rgba(0,0,0,1)"
}
}
}));
export default function SimpleTable() {
const classes = useStyles();
const [data, upDateData] = React.useState([]);
const [firstLoad, setLoad] = React.useState(true);
let isLoading = true;
async function sampleFunc() {
let response = await fetch("/api/tasks");
let body = await response.json();
upDateData(body);
}
if (firstLoad) {
sampleFunc();
setLoad(false);
}
if (data.length > 0) isLoading = false;
return (
<div className={classes.paper}>
<Avatar className={classes.avatar}>
<GroupIcon />
</Avatar>
<Typography component="h1" variant="h5">
All Tasks
</Typography>
{isLoading ? (
<CircularProgress />
) : (
<TableContainer
style={{ width: "80%", margin: "0 10px" }}
component={Paper}
>
<Table className={classes.table} aria-label="simple table">
<TableHead>
<TableRow>
<TableCell align="center">No.</TableCell>
<TableCell align="center">Taskname</TableCell>
<TableCell align="center">Status</TableCell>
<TableCell align="center">Due Date</TableCell>
</TableRow>
</TableHead>
<TableBody>
{data?.map(row => (
<TableRow key={row.taskname}>
<TableCell align="center">{row.id}</TableCell>
<TableCell align="center">{row.taskname}</TableCell>
<TableCell align="center">{row.status}</TableCell>
<TableCell align="center">{row.dueDate}</TableCell>
</TableRow>
))}
</TableBody>
</Table>
</TableContainer>
)}
<Link className={classes.link} to="/">
{" "}
<Typography align="left">
← Head back to save data
</Typography>{" "}
</Link>
</div>
);
}
With that change, we complete most of our code changes on the frontend and backend side.
Test the application in the local environment
Now to run the application, start Spring Boot application either on command-line or in your editor
To start the frontend, use the following command from the frontend folder:
npm start
This will start the localhost at 3000 port as below:
Now if I click on View Tasks, it will take me to list of tasks as follows:
Conclusion
In this post, we showed how to create an application with Spring Boot and ReactJS. You can follow me on twitter if you have any questions. The code for this is available on Github repository. If you are looking for how to create a similar application with AngularJS, you can visit my post here.
References
- ReactJS – ReactJS Home
- Spring boot and ReactJS – Spring Boot and ReactJS