Category Archives: Spring-boot

Step by Step Spring Batch Tutorial

In this post, I want to show how you can use Spring Batch. This is a step by step Spring Batch Tutorial.

In enterprise applications, batch processing is common. But with data becoming more prevalent on the internet, it has also become important how we process this data. There are multiple solutions available. Apache Storm or Apache Spark helps with processing and transforming the data in the required format. In this post, we will be looking at Spring Batch more closely.

What is Spring Batch?

Spring Batch is a lightweight framework designed to facilitate batch processing. It allows developers to create batch applications. In turn, these batch applications process the incoming data and transform it for further usage.

Another big advantage of using the Spring Batch is that it allows for high-performance processing of this data. The applications that rely upon data heavily, it is of utmost importance that data becomes instantly available.

Spring Batch allows a developer to use POJO based approach. In this approach, a developer can transform the batch-processed data into data models that she can further use for application business logic.

In this post, I will cover an example where we will batch process a data-intensive CSV file for employee records and transform, and validate that data to load into our database.

What is Batch Processing?

Batch processing is a data processing mode. It involves consuming all the data, processing that data, transforming it, and then sending it to another data source. Usually, this is done through an automated job. Either a triggering system or a user triggers a job and that job processes the job definition. Job definition will be about consuming the data from its source.

The key advantage of batch processing is it handles a large volume of data. Nevertheless, this operation can be asynchronous. Most applications perform batch processing separately from real-time user interaction.

Next, we will learn about the Spring Batch framework and what it comprises.

Spring Batch Framework

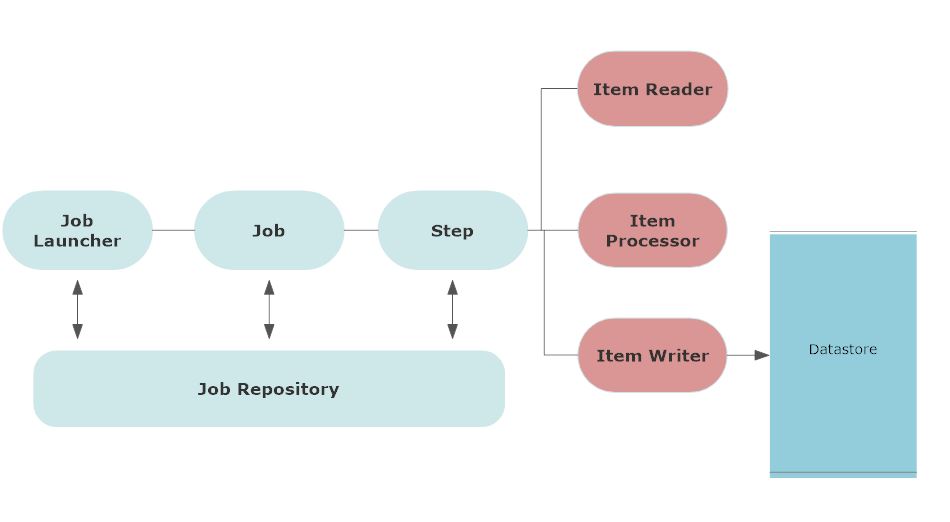
The following architecture shows the components of the Spring Batch framework.
Step by step Spring Batch Tutorial

First, the batch process involves a job. User schedules a job to be run at a certain time or based on a certain condition. This can also involve a job trigger.

Spring Batch framework also includes

  • logging and tracing
  • transaction management
  • job processing statistics
  • job restart
  • resource management

Usually, when you configure a job, it will be saved in the job repository. Job Repository keeps the metadata information of all the jobs. A trigger starts these jobs at their scheduled time.

A job launcher is an interface to launch a job or runs a job when the jobs’ scheduled time arrives.

Job is defined with job parameters. When a job starts, a job instance runs for that job. Every execution of job instance has job execution and it keeps track status of the job. A job can have multiple steps.

Step is an independent phase of a job. A job can be comprised of more than one step. Similar to the job, each step has step execution that executes the step and keeps track of the status of the step.

Each step has an item reader that basically reads the input data, an item processor that processes the data and transforms it, and an item writer that takes the processed data and output it.

Now, let’s see all these components in our demo.

Step by Step Spring Batch Tutorial with an example

As part of the demo, we will be uploading a csv file through Spring Batch Framework. So to start with, create the spring project and add the following dependency:

implementation 'org.springframework.boot:spring-boot-starter-batch'

This is the main dependency of our project. Also our main application will look like below:


package com.betterjavacode.springbatchdemo;

import org.springframework.boot.SpringApplication;
import org.springframework.boot.autoconfigure.SpringBootApplication;


@SpringBootApplication
public class SpringbatchdemoApplication
{

	public static void main(String[] args)
	{
		SpringApplication.run(SpringbatchdemoApplication.class, args);
	}

}

Create DTO Object

I will be uploading employee data through a CSV file, so I will have my DTO object for Employee created as below:


package com.betterjavacode.springbatchdemo.dtos;

import com.betterjavacode.springbatchdemo.models.Company;
import com.betterjavacode.springbatchdemo.models.Employee;
import com.betterjavacode.springbatchdemo.repositories.CompanyRepository;
import org.springframework.beans.factory.annotation.Autowired;


import java.io.Serializable;

public class EmployeeDto implements Serializable
{
    private static final long serialVersionUID = 710566148641281929L;

    @Autowired
    public CompanyRepository companyRepository;

    private int employeeId;
    private int companyId;
    private String firstName;
    private String lastName;
    private String email;
    private String jobTitle;

    public EmployeeDto()
    {

    }

    public EmployeeDto(int employeeId, String firstName, String lastName, String email,
                        String jobTitle, int companyId)
    {
        this.employeeId = employeeId;
        this.firstName = firstName;
        this.lastName = lastName;
        this.email = email;
        this.jobTitle = jobTitle;
        this.companyId = companyId;
    }

    public Employee employeeDtoToEmployee()
    {
        Employee employee = new Employee();
        employee.setEmployeeId(this.employeeId);
        employee.setFirstName(this.firstName);
        employee.setLastName(this.lastName);
        employee.setEmail(this.email);
        Company company = companyRepository.findById(this.companyId).get();
        employee.setCompany(company);
        employee.setJobTitle(this.jobTitle);
        return employee;
    }

    public int getEmployeeId ()
    {
        return employeeId;
    }

    public void setEmployeeId (int employeeId)
    {
        this.employeeId = employeeId;
    }

    public int getCompanyId ()
    {
        return companyId;
    }

    public void setCompanyId (int companyId)
    {
        this.companyId = companyId;
    }

    public String getFirstName ()
    {
        return firstName;
    }

    public void setFirstName (String firstName)
    {
        this.firstName = firstName;
    }

    public String getLastName ()
    {
        return lastName;
    }

    public void setLastName (String lastName)
    {
        this.lastName = lastName;
    }

    public String getEmail ()
    {
        return email;
    }

    public void setEmail (String email)
    {
        this.email = email;
    }

    public String getJobTitle ()
    {
        return jobTitle;
    }

    public void setJobTitle (String jobTitle)
    {
        this.jobTitle = jobTitle;
    }
}

This DTO class also uses a repository CompanyRepository to get a company object and convert DTO to a database object.

Setting up Spring Batch Configuration

Now, we will set up a batch configuration for our job that will run to upload a CSV file into the database. Our class BatchConfig contain an annotation @EnableBatchProcessing. This annotation enables Spring Batch features and provides a base configuration to set up batch jobs in a @Configuration class.


@Configuration
@EnableBatchProcessing
public class BatchConfig
{

}

This Batch Configuration will include a definition of our job, steps involved in the job. It will also include how we want to read our file data and process it further.


    @Bean
    public Job processJob(Step step)
    {
        return jobBuilderFactory.get("processJob")
                .incrementer(new RunIdIncrementer())
                .listener(listener())
                .flow(step).end().build();
    }

    @Bean
    public Step orderStep1(JdbcBatchItemWriter writer)
    {
        return stepBuilderFactory.get("orderStep1").<EmployeeDto, EmployeeDto> chunk(10)
                .reader(flatFileItemReader())
                .processor(employeeItemProcessor())
                .writer(writer).build();
    }

Above bean declares the job processJob. incrementer adds job parameters. listener will listen to job and handle job status. The bean for listener will handle job completion or job failure notification. As discussed in Spring Batch architecture, every job includes more than one step.

@Bean for step uses stepBuilderFactory to create a step. This step processes a chunk of data in a size of 10. It has a Flat File Reader flatFileItemReader(). A processor employeeItemReader will process the data that has been read by Flat File Item Reader.


    @Bean
    public FlatFileItemReader flatFileItemReader()
    {
        return new FlatFileItemReaderBuilder()
                .name("flatFileItemReader")
                .resource(new ClassPathResource("input/employeedata.csv"))
                .delimited()
                .names(format)
                .linesToSkip(1)
                .lineMapper(lineMapper())
                .fieldSetMapper(new BeanWrapperFieldSetMapper(){{
                    setTargetType(EmployeeDto.class);
                }})
                .build();
    }

    @Bean
    public LineMapper lineMapper()
    {
        final DefaultLineMapper defaultLineMapper = new DefaultLineMapper<>();
        final DelimitedLineTokenizer delimitedLineTokenizer = new DelimitedLineTokenizer();
        delimitedLineTokenizer.setDelimiter(",");
        delimitedLineTokenizer.setStrict(false);
        delimitedLineTokenizer.setNames(format);

        defaultLineMapper.setLineTokenizer(delimitedLineTokenizer);
        defaultLineMapper.setFieldSetMapper(employeeDtoFieldSetMapper);

        return defaultLineMapper;
    }

    @Bean
    public EmployeeItemProcessor employeeItemProcessor()
    {
        return new EmployeeItemProcessor();
    }

    @Bean
    public JobExecutionListener listener()
    {
        return new JobCompletionListener();
    }

    @Bean
    public JdbcBatchItemWriter writer(final DataSource dataSource)
    {
        return new JdbcBatchItemWriterBuilder()
                .itemSqlParameterSourceProvider(new BeanPropertyItemSqlParameterSourceProvider<>())
                .sql("INSERT INTO employee(employeeId, firstName, lastName, jobTitle, email, " +
                        "companyId) VALUES(:employeeId, :firstName, :lastName, :jobTitle, :email," +
                        " " +
                        ":companyId)")
                .dataSource(dataSource)
                .build();
    }

We will take a look at each of these beans now.

FlatFileItemReader will read the data from the flat file. We are using a FlatFileItemReaderBuilder to create a FlatFileItemReader of type EmployeeDto.

resource indicates the location of the file.

delimited – This builds a delimited tokenizer.

names – will show the order of fields in the file.

lineMapper is an interface to map lines from file to domain object.

fieldSetMapper will map the data from fieldset to an object.

lineMapper bean needs tokenizer and fieldsetmapper.

employeeDtoFieldSetMapper is another bean that we have autowired in this class.

package com.betterjavacode.springbatchdemo.configurations.processor;

import com.betterjavacode.springbatchdemo.dtos.EmployeeDto;
import org.springframework.batch.item.file.mapping.FieldSetMapper;
import org.springframework.batch.item.file.transform.FieldSet;
import org.springframework.stereotype.Component;
import org.springframework.validation.BindException;

@Component
public class EmployeeDtoFieldSetMapper implements FieldSetMapper
{

    @Override
    public EmployeeDto mapFieldSet (FieldSet fieldSet) throws BindException
    {
        int employeeId = fieldSet.readInt("employeeId");
        String firstName = fieldSet.readRawString("firstName");
        String lastName = fieldSet.readRawString("lastName");
        String jobTitle = fieldSet.readRawString("jobTitle");
        String email = fieldSet.readRawString("email");
        int companyId = fieldSet.readInt("companyId");

        return new EmployeeDto(employeeId, firstName, lastName, jobTitle, email, companyId);
    }
}

As you can see, this FieldSetMapper maps fields to individual objects to create an EmployeeDto.

EmployeeItemProcessor implements the interface ItemProcessor. Basically in this class, we validate EmployeeDto data to verify if the company, the employee belongs to, exists.

JobCompletionListener  checks for job completion status.


    @Override
    public void afterJob(JobExecution jobExecution)
    {
        if (jobExecution.getStatus() == BatchStatus.COMPLETED)
        {
            // Log statement
            System.out.println("BATCH JOB COMPLETED SUCCESSFULLY");
        }
    }

Now, let’s look at ItemWriter. This bean basically uses JdbcBatchItemWriter  . JdbcBatchItemWriter uses INSERT sql statement to insert processed EmployeeDto data into the configured data source.

Configuring Application Properties

Before we run our application to process a file, let’s look at application.properties.


spring.datasource.url=jdbc:mysql://127.0.0.1/springbatchdemo?autoReconnect=true&useSSL=false
spring.datasource.username = root
spring.datasource.password=*******
spring.datasource.driver-class-name=com.mysql.cj.jdbc.Driver
spring.jpa.show-sql=true
spring.jpa.properties.hibernate.dialect = org.hibernate.dialect.MySQL5Dialect
spring.datasource.hikari.connection-test-query=SELECT 1
spring.batch.initialize-schema=ALWAYS

Other than regular data source properties, we should understand the property spring.batch.initialize-schema=ALWAYS.  If we don’t use this property and start the application, the application will complain Table batch_job_instance doesn't exist.

To avoid this error, we are basically telling to create batch job-related metadata during startup. This property will create additional database tables in your database like batch_job_execution, batch_job_execution_context, batch_job_execution_params, batch_job_instance etc.

Demo

Now if I execute my Spring Boot Application, it will run and execute the job. There are different ways to trigger a job. In an enterprise application, you will receive a file or data in some kind of storage place (S3 or Amazon SNS-SQS), and you will have a job that will be monitoring this location to trigger the file loading Spring Batch job.

Step by Step Spring Batch Tutorial

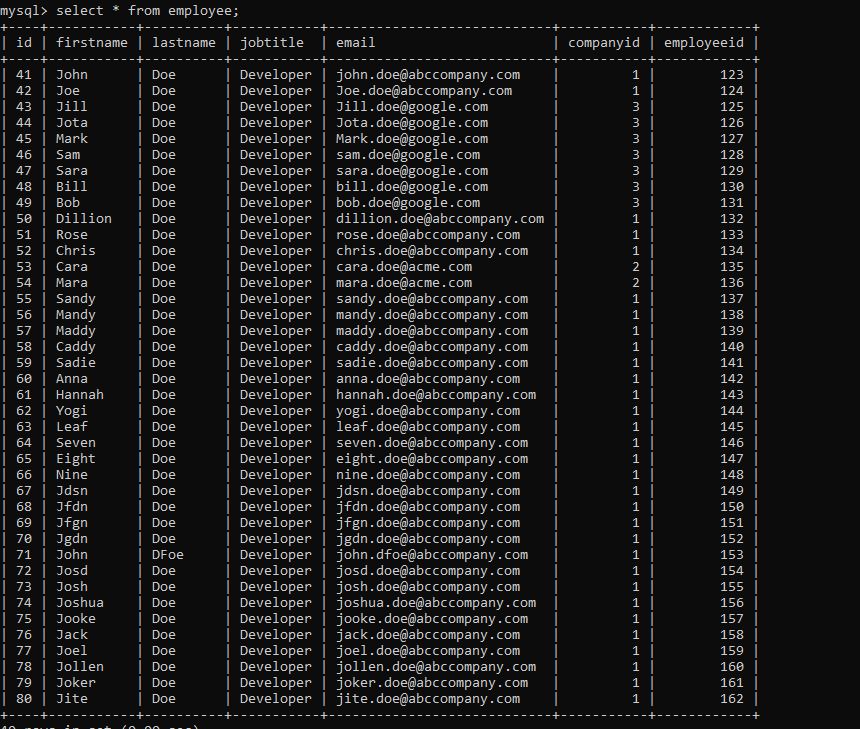
You can see in the execution a message about job completion – “BATCH JOB COMPLETED SUCCESSFULLY“. If we check our database table, we will see the data loaded.
Step By Step Spring Batch Tutorial - Employee Data

You can download the code for this demo from my github repository.

What more?

I have covered a Spring Batch tutorial here, but this is not all. There is more to Spring Batch than this introductory part. You can have different input data sources or you can also load the data from file to file with various data processing rules.

There are also ways to automate these jobs and process a high volume of data in a performant manner.

Conclusion

In this post, I showed a step by step Spring Batch Tutorial. There are many ways to handle batch jobs, but Spring Batch has made this very easy.

In other news, I recently released my new book – Simplifying Spring Security. If you are looking to learn about Spring Security, you can buy the book here. Accompany this book with this post of  Spring Boot Interview questions and you will be ready for your next job interview.
Spring Boot CRUD Application Example with MongoDB

Spring Boot CRUD MongoDB

Introduction

In this post, I will show how we can use Spring Boot to build a simple CRUD REST application example with MongoDB. I know your first question will be what is MongoDB?


What is MongoDB?

MongoDB is a NoSQL document database. In this database, records are documents which behave a lot like JSON objects. So it is mostly key-value pair.

The key advantages of using MongoDB as a database are:

  • MongoDB is a schema-less document database. One collection holds different documents.
  • The structure of a single object is clear.
  • No complex joins
  • Deep query ability.
  • Easy to scale-out

Here are the few reasons why you would use MongoDB or similar NoSQL databases in an enterprise applications:

  • If you need faster data retrieval in JSON style
  • Easy to add index on an attribute
  • For Sharding purposes – Sharding is the process of storing data records across multiple machines. You will usually partition this data according to some criteria while storing across multiple machines.
  • Fast in-place updates
  • Easier to query

Prerequisites

To create this sample application, you need:

  • Spring Boot (version 2.4.1)
  • MongoDB
  • Gradle
  • Java

Spring Boot CRUD Application

As part of this post, I will be building a REST CRUD application. This includes

  • A book library – We will be creating a collection library in our MongoDB database.
  • A library where we will be storing the books by author
  • A user can call the REST API to retrieve the book by author
  • A user can call the REST API to retrieve all the books from the library
  • POST – /v1/mongodbapp/books – To add a book to library
  • GET – /v1/mongodbapp/books – To retrieve all the books from the library
  • GET – /v1/mongodbapp/books/id – To retrieve a specific book
  • DELETE – /v1/mongodbapp/books/id – To remove a book from the library

How to use Spring Boot CRUD with MongoDB

To get started with creating this application, we will be using gradle to handle our dependencies and build the application. Add the following the dependencies in our Spring Boot application:

implementation 'org.springframework.boot:spring-boot-starter-data-mongodb'
implementation 'org.springframework.boot:spring-boot-starter-web'

MongoDB Connection Properties

Once we have these dependencies, we will be able to connect to mongo db database. But we still need to add where our database is located. We will add the required properties in our application.properties file as below:

spring.data.mongodb.host = localhost
spring.data.mongodb.port=27017
spring.data.mongodb.database=library

This will allow us to connect to MongoDB database running at host localhost on the port 27017 and the database schema is library.

Define Data Model

As part of the library, we will need books. So our main data object is Book. The data model for this will include the book title, author, and ISBN. This will be as follows:

package com.betterjavacode.mongodbdemo.mongodbapp.models;

import org.springframework.data.annotation.Id;
import org.springframework.data.mongodb.core.mapping.Document;


@Document(collection = "books")
public class Book
{
    @Id
    private String id;

    private String title;
    private String author;
    private String isbn;

    public Book()
    {

    }

    public Book(String title, String author, String isbn)
    {
        this.title = title;
        this.author = author;
        this.isbn = isbn;
    }

    public String getId ()
    {
        return id;
    }

    public void setId (String id)
    {
        this.id = id;
    }

    public String getTitle ()
    {
        return title;
    }

    public void setTitle (String title)
    {
        this.title = title;
    }

    public String getAuthor ()
    {
        return author;
    }

    public void setAuthor (String author)
    {
        this.author = author;
    }

    public String getIsbn ()
    {
        return isbn;
    }

    public void setIsbn (String isbn)
    {
        this.isbn = isbn;
    }
}

Since we are using MongoDB, @Document annotation overrides the collection books.

Add Repository Interface

We will need a repository interface to fetch, save or delete our book object.  In repositories package, we will add BookRepository interface


package com.betterjavacode.mongodbdemo.mongodbapp.repositories;

import com.betterjavacode.mongodbdemo.mongodbapp.models.Book;
import org.springframework.data.mongodb.repository.MongoRepository;

import java.util.List;

public interface BookRepository extends MongoRepository<Book, String>
{
    List findByTitleContaining(String title);
    List findByAuthor(String name);
}

This repository has two methods to fetch list of books by a title or by author name.

Add Spring REST API Controller

Now to make our application REST CRUD, we will add a REST controller. This controller will contain POST, PUT, GET and DELETE APIs.


package com.betterjavacode.mongodbdemo.mongodbapp.controller;

import com.betterjavacode.mongodbdemo.mongodbapp.models.Book;
import com.betterjavacode.mongodbdemo.mongodbapp.repositories.BookRepository;
import org.springframework.beans.factory.annotation.Autowired;
import org.springframework.http.HttpStatus;
import org.springframework.http.ResponseEntity;
import org.springframework.web.bind.annotation.*;

import java.util.ArrayList;
import java.util.List;
import java.util.Optional;

@CrossOrigin("http://localhost:8080")
@RestController
@RequestMapping("/v1/mongodbapp")
public class BookController
{
    @Autowired
    BookRepository bookRepository;

    @GetMapping("/books")
    public ResponseEntity<List> getAllBooks(@RequestParam(required = false) String bookTitle)
    {
        try
        {
            List listOfBooks = new ArrayList<>();
            if(bookTitle == null || bookTitle.isEmpty())
            {
                bookRepository.findAll().forEach(listOfBooks::add);
            }
            else
            {
                bookRepository.findByTitleContaining(bookTitle).forEach(listOfBooks::add);
            }

            if(listOfBooks.isEmpty())
            {
                return new ResponseEntity<>(HttpStatus.NO_CONTENT);
            }

            return new ResponseEntity<>(listOfBooks, HttpStatus.OK);
        }
        catch (Exception e)
        {
            return new ResponseEntity<>(null, HttpStatus.INTERNAL_SERVER_ERROR);
        }
    }

    @GetMapping("/books/{id}")
    public ResponseEntity getBookById(@PathVariable("id") String id)
    {
        try
        {
            Optional bookOptional = bookRepository.findById(id);

            return new ResponseEntity<>(bookOptional.get(), HttpStatus.OK);
        }
        catch (Exception e)
        {
            return new ResponseEntity<>(null, HttpStatus.INTERNAL_SERVER_ERROR);
        }
    }

    @PostMapping("/books")
    public ResponseEntity addABookToLibrary(@RequestBody Book book)
    {
        try
        {
            Book createdBook = bookRepository.save(new Book(book.getTitle(), book.getAuthor(),
                    book.getIsbn()));
            return new ResponseEntity<>(createdBook, HttpStatus.CREATED);
        }
        catch (Exception e)
        {
            return new ResponseEntity<>(null, HttpStatus.INTERNAL_SERVER_ERROR);
        }
    }

    @PutMapping("/books/{id}")
    public ResponseEntity updateABook(@PathVariable("id") String id, @RequestBody Book book)
    {
        Optional bookOptional = bookRepository.findById(id);

        if(bookOptional.isPresent())
        {
            Book updatedBook = bookOptional.get();
            updatedBook.setTitle(book.getTitle());
            updatedBook.setAuthor(book.getAuthor());
            updatedBook.setIsbn(book.getIsbn());
            return new ResponseEntity<>(bookRepository.save(updatedBook), HttpStatus.OK);
        }
        else
        {
            return new ResponseEntity<>(HttpStatus.NOT_FOUND);
        }
    }

    @DeleteMapping("/books/{id}")
    public ResponseEntity deleteABook(@PathVariable("id") String id)
    {
        try
        {
            bookRepository.deleteById(id);
            return new ResponseEntity<>(HttpStatus.NO_CONTENT);
        }
        catch (Exception e)
        {
            return new ResponseEntity<>(HttpStatus.INTERNAL_SERVER_ERROR);
        }
    }
}

BookController is our REST Controller class. It includes

  • @RestController – to mark this as a REST controller.
  • @CrossOrigin – This annotation allows cross-origin resource sharing (CORS). This will add CORS access control headers in the REST response. These headers are necessary because it allows servers to specify not only who can access the resources, but how they can be accessed.
  • We have added different methods – addABookToLibrary adds the book to database, getAllBooks retrieves the book from database.

The Complete Demo

Now we have added our REST controller, repository methods, we will build and run this application. As part of the demo, I will use POSTMAN to access APIs.

You can build the application from command line or from the code editor you are using. I prefer command line, so I already built the application. Once built, you can run the program as follows:

java -jar mongodbapp-0.0.1-SNAPSHOT.jar.

Let’s use POSTMAN to add books to our library.

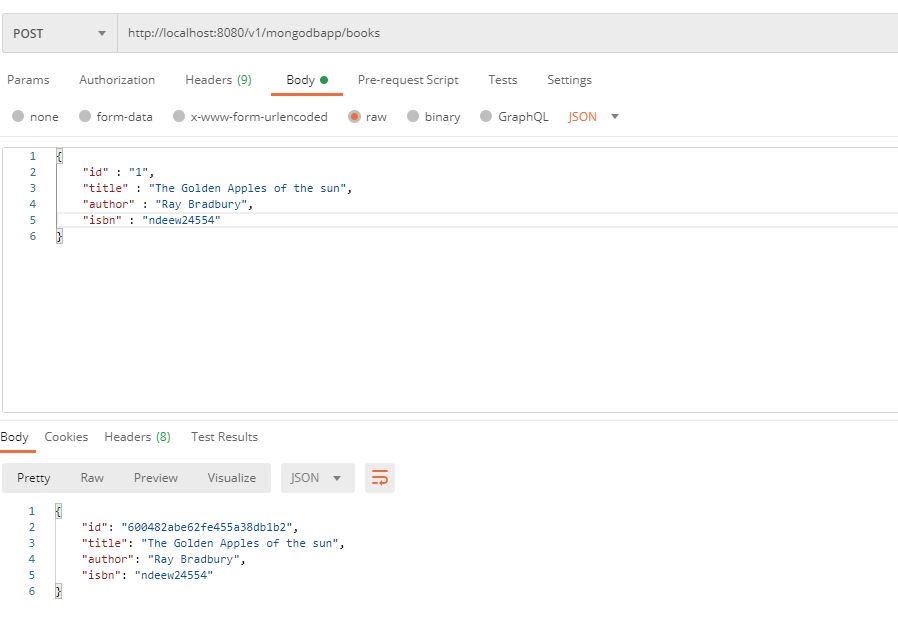
Spring Boot CRUD MongoDB POST API

As shown above, we added a book and the response shows added book in the database.

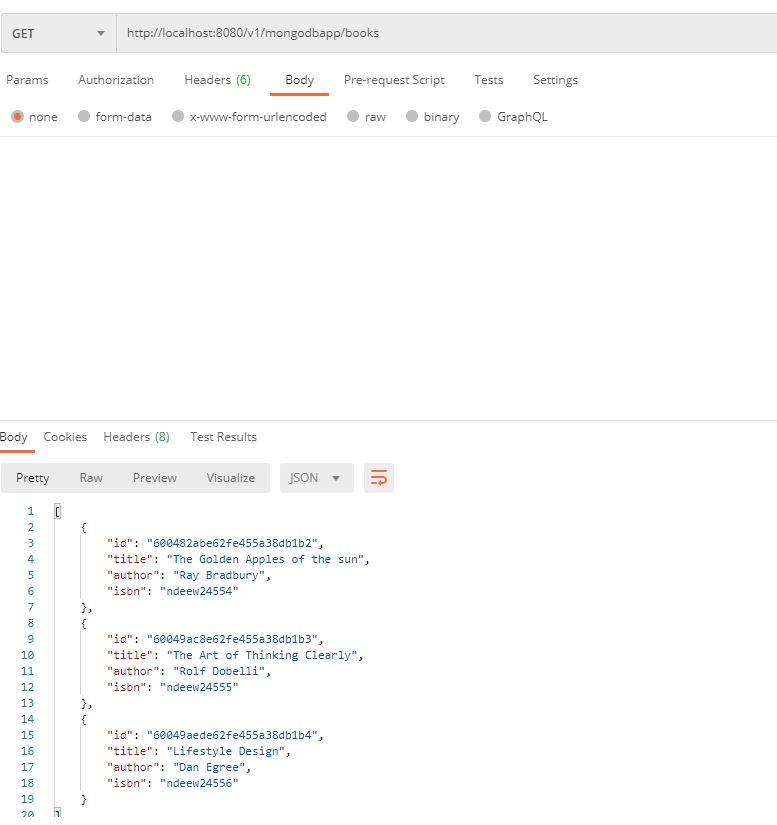
The following API is a GET API to get all the books from the database.

Spring Boot CRUD MongoDB - GET

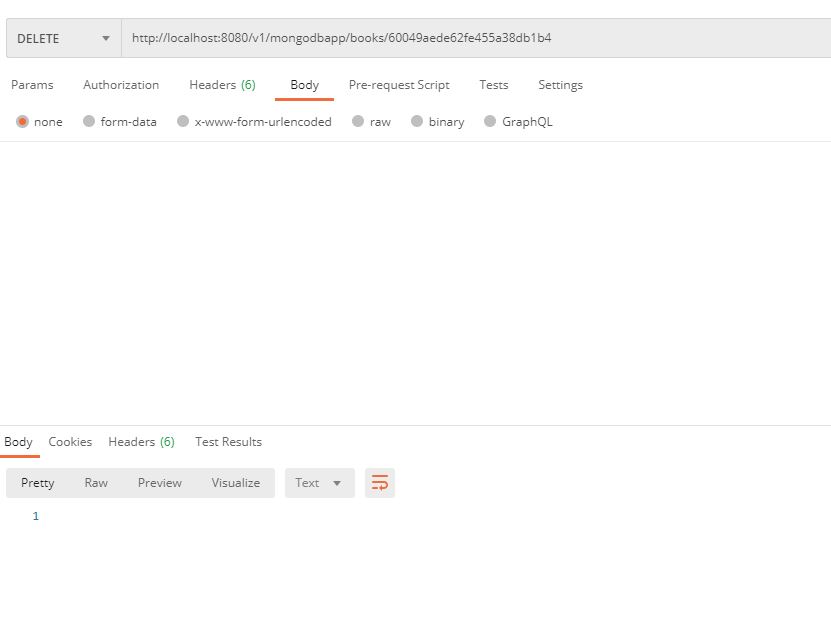
Now to show delete the book from library, we will use DELETE API.

Spring Boot CRUD MongoDB - Delete API

The code for this sample application is available in my github repository.

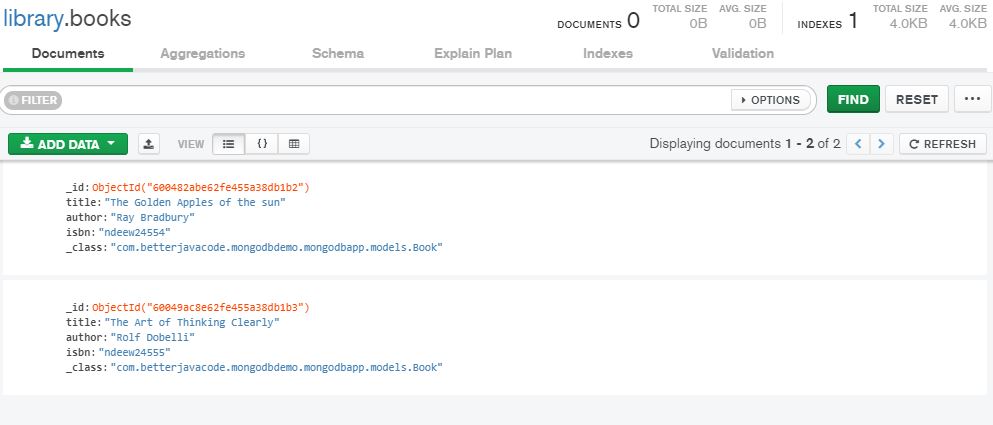
If you want to see this data in the MongoDB database, you can access MongoDB compass tool and access the collection books in the library database.

Spring Boot CRUD MongoDB - Database

Conclusion

In this post, I showed how to use Spring Boot to create REST API while using MongoDB database. The approach we used is very similar to what we have while using a regular SQL database. There are some changes that we have to add while using NoSQL database. If you find this post useful or have any questions that I can help you with, you can subscribe to my blog here. I recently pre-launched my book – Simplifying Spring Security which will be released on 7th February 2021. You can preorder it here.

References

1. Spring Boot MongoDB References – MongoDB Reference

2. Spring Boot Blog – Blog

Top 21 Spring Boot Interview Questions

In the last few months, I have received a few requests about Spring Boot Interview Questions. In this post, I will cover the top 21 Spring Boot Interview Questions. Additionally, I will also cover some Microservice architecture related questions.

I have divided these Spring Boot interview questions into three categories – for a novice, for intermediate, and for an experienced developer. So if you don’t have any experience with Spring Boot, novice questions will help you.

Spring Boot Interview Questions for Novice Developers

1. What is Spring Boot and How is it useful in Web Application Development?

Spring Boot is a framework built on top of Spring Framework for rapid application development. Similarly, Ruby on Rails, Django with Python web frameworks are famous. Particularly, Spring brought a much-needed web framework to Java to build web applications. Important features like embedded application server and auto-configuration allow rapid development and deployment.

  • Spring Boot framework allows importing dependencies easily.
  • It also eases in using Spring Security in the applications with its rich features.
  • Actuator – One can implement production-ready features for monitoring the application.

2. What are the differences between Spring Boot and Spring?

Spring framework includes multiple features that can be used in the Spring Boot framework. On the other hand, the Spring Boot framework is used for application development.

Equally, Spring framework provides features like data binding, dependency injection, aspect-oriented programming, data access, security.

In short, Spring Boot is one of the modules of Spring Framework. Spring Boot is built on the top of the Spring framework. Spring Boot is a microservice-based framework to build applications. The feature of auto-configuration in Spring Boot helps in reducing lines of code.

3. How can you set up the Spring Boot application with maven or gradle?

To set up a spring boot application, one can use maven or gradle. Both are used to pull required dependencies in the application. Particularly, for spring boot application, one can pull spring-boot-starter-parent dependency.

In maven, one uses pom.xml file and in gradle, one uses build.gradle for dependencies declaration

Maven:

    <groupId>org.springframework.boot</groupId>
    <artifactId>spring-boot</artifactId>
    <version>2.4.1</version>

Gradle:

compile group: 'org.springframework.boot', name: 'spring-boot', version: '2.4.1'

4. How can you change the default port of Spring Boot Application?

There are three ways you can change the default port of the Spring Boot Application. Consequently, the most straight forward way is to use application.properties or application.yml file.

  • server.port use this property in application.properties.
  • You can also change the port programmatically in the main @SpringBootApplication class.
  • You can use the port of your choice while starting the application as a jar file. java -jar -Dserver.port=8980 myapplication.jar

5. How would you set up an application with HTTPS port with Spring Boot?

By default, the Spring Boot application runs on HTTP port. To make your application run with HTTPS port, there are two ways.

  • One can use server.port, server.ssl.key-store-password,server.ssl.key-store ,server.ssl.key-store-type and server.ssl.key-alias.
  • Another way to use the HTTPS port is programmatically.

6. What embedded servers does Spring Boot support?

Spring Boot application supports Tomcat, Jetty, and Undertow webservers. By default, the Tomcat web server is supported by Spring Boot’s web starter.

To change the default web server, one has to exclude spring-boot-starter-tomcat and include corresponding server starter like jetty or undertow.

<dependency>
    <groupId>org.springframework.boot</groupId>
    <artifactId>spring-boot-starter-web</artifactId>
    <exclusions>
        <exclusion>
            <groupId>org.springframework.boot</groupId>
            <artifactId>spring-boot-starter-tomcat</artifactId>
        </exclusion>
    </exclusions>
</dependency>
<dependency>
    <groupId>org.springframework.boot</groupId>
    <artifactId>spring-boot-starter-jetty</artifactId>
</dependency>

7. What are the advantages of Spring Boot?

Here are the main advantages of Spring Boot

  • Allows to create stand-alone Spring applications
  • One can easily use tomcat, jetty, or undertow server
  • Rapid Development
  • Also allows using Microservice-based architecture easily

Spring Boot Interview Questions for Intermediate Developers

So far, I have covered some basic interview questions. If you are a developer with a few years of experience in Java or Spring Boot Development, the next set of questions will help you where to improve on.

8. How to deploy Spring Boot Web Application as a jar and war files?

Generally, we deploy web application as web archive file (WAR). We deploy the war file on the external web server.

Evidently, Spring offers a plugin spring-boot-maven-plugin if using maven to build the application. You can then pack the web application as an executable jar file. If using gradle, gradle build will create an executable jar file by default.

For maven,

<packaging>jar</packaging> will build a jar file.

<packaging>war</packaging> will build a war file. If the packaging element is not included, the maven will jar file by default. You also need to keep the container dependency as follows:

<dependency>
    <groupId>org.springframework.boot</groupId>
    <artifactId>spring-boot-starter-tomcat</artifactId>
    <scope>provided</scope>
</dependency>

For gradle, you need to mark the embedded container’s dependencies as belonging to the war plugin’s providedRuntime configuration.

9. Why do we use the annotation @SpringBootApplication in the main Spring Boot application class?

For applications to use auto-configuration, component scans, and extra configurations, one can include one single annotation @SpringBootApplication. This annotation includes three annotations @EnableAutoConfiguration, @ComponentScan, and @Configuration.

  • @EnableAutoConfiguration – enable Spring Boot’s auto-configuration
  • @ComponentScan – this allows scanning the packages where the application is located.
  • @Configuration – allow registering extra beans in the context or import additional configuration classes.

10. What are @RestController and @RequestMapping annotation used for?

@RestController – This annotation adds annotations @Controller and @ResponseBody. This annotation marks a class that will handle the incoming requests. Usually, this annotation is used to create RESTful APIs.

@RequestMapping – This annotation provides routing information in the class that handles incoming requests. This annotation maps the incoming HTTP requests to the corresponding method.

11. Why do we need Spring Profiles?

When building enterprise applications, we use different environments like Dev, Test, QA, and Production. Spring Boot allows configuring application properties differently for each of these environments.

To help separate the configuration for each environment, one can name the properties file according to the environment like application-dev.properties, application-test.properties, and application-prod.properties.

12. How to disable specific auto-configuration?

To disable any specific auto-configuration, one can use exclude attribute for @EnableAutoConfiguration annotation.

@EnableAutoConfiguration(exclude = DataSourceAutoConfiguration.class)
public class SampleApplication
{
}

13. What is Thymeleaf and how to use it?

Thymeleaf is a server-side template engine for a web application. Its main purpose is to bring natural templates to the web application.

Specifically, one has to include the dependency spring-boot-starter-thymeleaf in the application to use thymeleaf.

14. What are the different Spring Boot starters out there and what purpose you can use them?

Emphatically, one major advantage of Spring Boot is to be able to use various dependencies for your Spring Boot application. All starter Spring Boot dependencies are under the org.springframework.boot group. These dependencies start with spring-boot-starter-.

There are more than 50 starter dependencies, but here is a list of dependencies that most developers will use in their applications:

  • spring-boot-starter – Core starter. This includes auto-configuration, logging, and YAML.
  • spring-boot-starter-data-jpa – This includes Spring data JPA with hibernate.
  • spring-boot-starter-security – Spring Security model offers security for your web application. By default, it will add basic form-based authentication.
  • spring-boot-starter-web – This includes a web module and helps to create web, RESTful applications using Spring MVC.
  • spring-boot-starter-thymeleaf – Importing this module allows the developer to use thymeleaf template engine in the application.
  • spring-boot-starter-jdbc – This module helps in connecting to the database for your application.
  • spring-boot-starter-tomcat – Usually, this is part of the spring boot parent module. This allows a developer to use an embedded tomcat servlet container.

Spring Boot Interview Questions for Experienced Developers

The next set of questions are for an experienced developer. Despite the distinction, a beginner as well as an intermediate developer should learn about these questions.

15. How do you connect Spring Boot Application to the database using JPA?

Spring Boot provides spring-boot-starter-data-jpa dependency to connect Spring application to a relational database.

On the other hand, Spring Data JPA handles the complexity of JDBC-based database access and object-relational modeling. Consequently, it improves the implementation of data access layer handling. From the developer’s point of view, it reduces the dependency on relational database querying.

JPA allows mapping application classes to database tables.

16. Why do you use the Spring Boot Actuator?

Spring Boot Actuator brings production-ready features to the application. As a result, one can easily monitor the application.

It also provides auditing, health check, and different metrics for the application. Therefore, you include dependency as follows:

<dependency>
    <groupId>org.springframework.boot</groupId>
    <artifactId>spring-boot-starter-actuator</artifactId>
    <scope>provided</scope>
</dependency>

Here are some of the endpoints that this dependency provides for the application:

  • env – Endpoint to display all the environment properties
  • health – Endpoint to show application’s health
  • metrics – This Endpoint displays various metrics of the application
  • loggers – Display the configuration of loggers in the application
  • httptrace – Endpoint to show HTTP trace information

17. What is Spring Boot Devtools used for?

Spring Boot DevTools or Developer Tools are a set of tools that make the development process easier. To include DevTools support, one has to add the dependency spring-boot-devtools in the project.

Spring Boot DevTools helps in disabling the caching that many spring boot dependencies use. This is useful in the development process as the developer wants to see the changes immediately.

Additionally, using this library allows applications to restart whenever there is a change in files on the classpath.

Moreover, the library enables debug logging for the web group.

18. What is the advantage of using Spring Data JPA?

Spring Data Jpa provides JpaTemplate to integrate Spring application with JPA. You can also choose a specific implementation of JPA specification. By default, it will be Hibernate.

Advantages of Spring Data JPA

  • Reduces boilerplate code
  • Generated Queries help in reducing developer’s dependency on database queries
  • Repository pattern allows developers to handle persistence easily.

19. Explain Spring Boot supports relaxed binding.

Generally, the key of a property needs to be an exact match of a property name in the Spring Boot application. Spring Boot supports relaxed binding which means the key of a property doesn’t have to be an exact match of a property name.

Moreover, the environment property can be written in any case. Example – If you have a property propertyDB in your bean class with annotation @ConfigurationProperties, you can bind that property to any of these environment properties – PROPERTYDB, propertydb, or property_db.

20. If you want to use Spring Security in your application, how do you use it, and how it makes the application secure?

Presently, to secure your Spring Boot application, you can include spring-boot-starter-security dependency in your project. By default, it will add some of the security measures for your application. These default measures include adding basic form-based authentication to your application or securing REST APIs.

Subsequently, to leverage the Spring Security, one can extend WebSecurityConfigurerAdapter class to add custom security measures. In the same class, you will use @EnableWebSecurity annotation. This annotation allows Spring to find configurations and apply the class to global WebSecurity.

21. What do you use the annotation @ControllerAdvice for?

@ControllerAdvice annotation helps in managing the exceptions in Spring Boot Application. In short, it is an interceptor of exceptions thrown by methods annotated with @RequestMapping.

ResponseEntityExceptionHandler is the base class that provides centralized exception handling.

So far, I have covered Spring Boot interview questions. I will still cover a few Microservices interview questions that can help developers.

Microservices Interview Questions

1. What is Microservices?

Microservices is an architectural style. It structures an application as a collection of services that are

  • Highly maintainable
  • Loosely coupled
  • Easily deployable
  • Owned by a small team

2. What are the common tools used to build and deploy microservices?

This depends on the technology stack. Docker remains one common tool irrespective of the technology stack. Hence, docker allows creating a container for the microservice. This container then can be deployed in the cloud environment.

Wiremock is another tool for flexible API mocking for microservices.

Hysterix is a circuit breaker that helps in latency and fault-tolerance of the application.

3. How does Spring help in Microservices development?

Most importantly, Spring helps in rapid development. Spring Boot helps in building REST APIs, web applications. Spring Cloud helps in integrating with external systems.

4. What are the challenges with Microservices?

Microservices rely on each other. Consequently, communication between these services needs to be secured. Since microservices are a distributed system, it can become a complex model. There can be an operational overhead. More services mean more resources.

Conclusion

In this post, I covered the most questions on Spring Boot that you might face during an interview. If you enjoyed this post, please subscribe to my blog here.

Spring WebClient vs RestTemplate – Comparison and Features

Introduction

Spring 5 introduced a new reactive web client called WebClient. In this post, I will show when and how we can use Spring WebClient vs RestTemplate. I will also describe what features WebClient offers.

What is RestTemplate?

RestTemplate is a central Spring class that allows HTTP access from the client-side. RestTemplate offers POST, GET, PUT, DELETE, HEAD, and OPTIONS HTTP methods. The simple use case of RestTemplate is to consume Restful web services.

You can create a bean that provides the instance of RestTemplate. You can then @autowire this bean in any class where you plan to call REST services. RestTemplate is the class that implements the interface RestOperations.

The following code shows the declaration of the bean:

    @Bean
    public RestOperations restOperations()
    {
        return new RestTemplate();
    }

The following code shows a REST client `YelpClient` calling Yelp’s REST API to get rental property reviews.

   @Autowired
   private final RestOperations restOperations;

   public List getRentalPropertyReviews(String address)
   {
        String url = buildRestUrl(businessId);
        HttpHeaders httpHeaders = new HttpHeaders();
        String apiKey = getApiKey(YELP);
        httpHeaders.add("Authorization","Bearer " + apiKey);
        httpHeaders.setContentType(MediaType.APPLICATION_JSON);

        HttpEntity entity = new HttpEntity("parameters", httpHeaders);
        ResponseEntity response;

        try
        {
            response = restOperations.exchange(url, HttpMethod.GET,entity, String.class);
        }
        catch(RestClientException e)
        {
            throw new RuntimeException("Unable to retrieve reviews", e);
        }

    }

In the above code, we are building HTTP Headers by adding Yelp’s REST API key as part of the authorization. We call the GET method to get review data.

Basically, one has to do

  • Autowire the RestTemplate object
  • Build HTTP Headers with authorization and Content Type
  • Use HttpEntity to wrap the request object
  • Provide URL, Http Method, and the Return type for exchange method.

What is WebClient?

Spring 5 introduced a reactive web client called WebClient. It’s an interface to perform web requests. It is part of the Spring web reactive module. WebClient will be replacing RestTemplate eventually.

Most importantly, WebClient is reactive, nonblocking, asynchronous, and works over HTTP protocol Http/1.1.

To use WebClient, one has to do

  • Create an instance of WebClient
  • Make a request to the REST endpoint
  • handle the response


   WebClient webClient = WebClient
       .builder()
       .baseUrl("https://localhost:8443")
       .defaultCookie("cookieKey", "cookieValue")
       .defaultHeader(HttpHeaders.CONTENT_TYPE, MediaType.APPLICATION_JSON_VALUE) 
       .defaultUriVariables(Collections.singletonMap("url", "https://localhost:8443"))
       .build();

The above code shows one way to instantiate WebClient. You can also create an instance by simply using WebClient webClient = WebClient.create();

WebClient provides two methods exchange and retrieve . exchange method usually fetches the response along with status and headers. retrieve method gets the response body directly. It’s easier to use.

Also depending on if you are trying to fetch a single object in response or a list of objects, you can use mono or flux.

this.webClient =
                webClientBuilder.baseUrl("http://localhost:8080/v1/betterjavacode/").build();

this.webClient.get()
                .uri("users")
                .accept(MediaType.APPLICATION_JSON)
                .retrieve().bodyToFlux(UserDto.class).collectList();

The above code basically uses webClient to fetch a list of users from the REST API.

Spring WebClient vs RestTemplate

We already know the one key difference between these two features. WebClient is a non-blocking client and RestTemplate is a blocking client.

RestTemplate uses Java Servlet API under the hood. Servlet API is a synchronous caller. Because it is synchronous, the thread will block until webclient responds to the request.

Consequently, Requests waiting for results will increase. This will result in an increase in memory.

On the other hand, WebClient is an asynchronous non-blocking client. It uses Spring’s reactive framework under the hood. WebClient is a part of the Spring-WebFlux module.

Spring WebFlux uses reactor library. It provides Mono and Flux API to work data sequences. Reactor is a reactive streams library. And, all of its operators support non-blocking back pressure.

Example of how to use WebClient in a Spring Boot Application

We can combine the capabilities of Spring Web MVC and Spring WebFlux. In this section, I will create a sample application. This application will call a REST API using WebFlux and we will build a response to show a web page with a list of users.

RestController for this example is an API to get a list of users:

package com.betterjavacode.webclientdemo.controllers;

import com.betterjavacode.webclientdemo.dto.UserDto;
import com.betterjavacode.webclientdemo.managers.UserManager;
import org.springframework.beans.factory.annotation.Autowired;
import org.springframework.web.bind.annotation.GetMapping;
import org.springframework.web.bind.annotation.RequestMapping;
import org.springframework.web.bind.annotation.RestController;

import java.util.List;

@RestController
@RequestMapping("v1/betterjavacode")
public class UserController
{
    @Autowired
    public UserManager userManager;

    @GetMapping(value = "/users")
    public List getUsers()
    {
        return userManager.getAllUsers();
    }
}

Controller class that uses a WebClient to call REST API looks like below:

package com.betterjavacode.webclientdemo.controllers;

import com.betterjavacode.webclientdemo.clients.UserClient;
import com.betterjavacode.webclientdemo.dto.UserDto;
import com.betterjavacode.webclientdemo.managers.UserManager;
import org.springframework.beans.factory.annotation.Autowired;
import org.springframework.stereotype.Controller;
import org.springframework.ui.Model;
import org.springframework.web.bind.annotation.GetMapping;

import java.util.List;

@Controller
public class MainController
{
    @Autowired
    UserClient userClient;

    @GetMapping(value = "/")
    public String home()
    {
        return "home";
    }

    @GetMapping(value = "/users")
    public String getUsers(Model model)
    {
        List users = userClient.getUsers().block();

        model.addAttribute("userslist", users);
        return "users";
    }
}

Now, the important piece of code of UserClient is where we will be using WebClient to call REST API.

package com.betterjavacode.webclientdemo.clients;

import com.betterjavacode.webclientdemo.dto.UserDto;
import org.springframework.http.MediaType;
import org.springframework.stereotype.Service;
import org.springframework.web.reactive.function.client.WebClient;
import reactor.core.publisher.Flux;
import reactor.core.publisher.Mono;

import java.util.List;

@Service
public class UserClient
{

    private WebClient webClient;

    public UserClient(WebClient.Builder webClientBuilder)
    {
        this.webClient =
                webClientBuilder.baseUrl("http://localhost:8080/v1/betterjavacode/").build();
    }

    public Mono<List> getUsers()
    {
        return this.webClient.get()
                .uri("users")
                .accept(MediaType.APPLICATION_JSON)
                .retrieve().bodyToFlux(UserDto.class).collectList();
    }
}

Above code shows first building the WebClient and then using it to retrieve response from REST API. retrieve method offers two options of mono or flux. Since we have more than one user to get, we are using flux.

This shows we can use reactive, non-blocking WebClient which is part of WebFlux in Spring Web MVC framework.

What Else Is There in Spring WebClient?

Spring WebClient is part of Spring WebFlux framework. The major advantage of this API is that the developer doesn’t have to worry about concurrency or threads. WebClient takes care of that.

WebClient has a built-in HTTP Client library support to perform requests with. That includes Apache HttpComponents, Jetty Reactive HttpClient, or Reactor Netty.

WebClient.builder() offers following options:

  • uriBuilderFactory – customized uriBuilderFactory to use base URL
  • defaultHeader – Headers for every request
  • defaultCookie – Cookies for every request
  • defaultRequest – To customize every request
  • filter – Client filter for every request
  • exchangeStrategies – HTTP Message reader/writer customizations

I already showed retrieve method in the above code demo.

WebClient also offers a method exchange with varients like exchangeToMono and exchangeToFlux.

With attribute(), we can also add attributes to the request.

Alternatively, one can use WebClient for synchronous use also. In my example above MainController, I use block to get the final result. This basically blocks parallel calls till we get the result.

One key feature that WebClient offers is retryWhen(). For more resilient system, it is a great feature that you can add while using WebClient.

        webClient
            .get()
            .uri(String.join("", "/users", id))
            .retrieve()
            .bodyToMono(UserDto.class)
            .retryWhen(Retry.fixedDelay(5, Duration.ofMillis(100)))
            .block();

retryWhen takes Retry class as a parameter.

WebClient also offers a feature for error handling. doOnError() allows you to handle the error. It is triggered when mono ends with an error. onErrorResume() is a fallback based on the error.

Conclusion

In this post, I showed what is Spring WebClient is, how we can use Spring WebClient vs RestTemplate, and what different features it offers.

If you enjoyed this post, you can subscribe to my blog here.

References

  1. Spring WebClient – Spring Documentation
  2. WebClient Cheatsheet – Spring WebClient

The Complete Guide to Use Docker Compose

In this post, I will cover the complete guide to using docker compose. You can use it to build a multi-container application. But what is a docker compose and why one should use it?

What is Docker Compose?

If you don’t know what a docker is, you can read about that here. If you have an application that is running on a docker and if that application is using multiple other services like database, web-server, and load balancer, then you can write multiple docker files and run multiple containers. It can be cumbersome to manage these files. And if you have to change something, you might have to change all files.

Docker compose solves this problem by allowing you to write a YAML file to define multiple containers in a single file. You write one docker file and build and run that file for all the containers.

Installing Docker Compose

Based on the definition from docker.com, docker compose is a tool for defining and running multiple Docker containers.

Depending on your environment, you will have to use the instructions to install docker compose. You will also need docker engine before you can install docker compose. I use the Windows environment, so I will show those instructions here.

  • Launch Power shell in administrator mode
  • Run this command – [Net.ServicePointManager]::SecurityProtocol = [Net.SecurityProtocolType]::Tls12
  • Then run the following command – Invoke-WebRequest “https://github.com/docker/compose/releases/download/1.27.4/docker-compose-Windows-x86_64.exe” -UseBasicParsing -OutFile $Env:ProgramFiles\Docker\docker-compose.exe

This will install docker compose. Open a new command prompt and type the first command

docker-compose -v

This should provide the docker-compose version if your installation has run without any issues.

Setting up a Spring Boot application with Docker

To show the power of docker-compose, we will be using a simple To-Do list spring boot app. I will share this app in a GitHub repository along with docker compose file. But this app includes the following applications that we will be using in docker compose:

  1. Spring Boot application
  2. Java version 8
  3. MySQL for database
  4. Keycloak for Authentication

So I won’t show implementing the Spring Boot application. If you want to download this application, you can visit the github repository or you can read my previous post here.

We will create a docker file for this Spring Boot application and this will run in its own container. Now this application connects to Keycloak and MySQL database for authentication. Keycloak will use Postgres database instead of using the same MySQL database.

The docker file for the Spring Boot application will look like below:

FROM openjdk:8-jdk-alpine
VOLUME /tmp
COPY ./build/libs/*.jar app.jar
ENTRYPOINT ["java", "-jar", "/app.jar"]

This docker file basically downloads Open JDK 8. It mounts the disk at /tmp. It copies an application jar file as app.jar. And of course, it will start the application by running java -jar .

How to write Docker Compose file

Now comes the docker-compose.yml file. This will look like below:

version: "3.8"

services:
  web:
    build: .
    ports:
      - "8080:8080"
    depends_on:
      - db
      - keycloak
    environment:
      SPRING_DATASOURCE_URL: jdbc:mysql://db:3306/todolist?autoReconnect=true&useSSL=false
      SPRING_DATASOURCE_USERNAME: betterjavacode
      SPRING_DATASOURCE_PASSWORD: betterjavacode
      KEYCLOAK_URI: http://keycloak:8180/auth
      REALM: SpringBootKeycloakApp
    networks:
      - common-network
  db:
    image: mysql:5.7
    ports:
      - "3307:3306"
    restart: always
    environment:
      MYSQL_DATABASE: todolist
      MYSQL_USER: betterjavacode
      MYSQL_PASSWORD: betterjavacode
      MYSQL_ROOT_PASSWORD: root
    volumes:
      - db-data:/var/lib/mysql
    networks:
      - common-network
  postgres:
    image: postgres
    volumes:
      - postgres_data:/var/lib/postgresql/data
    environment:
      POSTGRES_DB: keycloak
      POSTGRES_USER: keycloak
      POSTGRES_PASSWORD: password
    networks:
      - common-network
  keycloak:
    image: jboss/keycloak
    ports:
      - "8180:8180"
    command: ["-Djboss.socket.binding.port-offset=100"]
    environment:
      DB_VENDOR: POSTGRES
      DB_ADDR: postgres
      DB_DATABASE: keycloak
      DB_USER: keycloak
      DB_PASSWORD: password
      DB_SCHEMA: public
      KEYCLOAK_USER: admin
      KEYCLOAK_PASSWORD: Pa55w0rd
    depends_on:
      - postgres
    networks:
      - common-network
networks:
  common-network:
    driver: bridge
volumes:
  db-data:
    driver: local
  postgres_data:
    driver: local

The first line in this docker-compose file is the version of your docker-compose.

services define different types of services that we will use to build our docker container. web service uses an image that builds from a docker file. In our case, we are building a docker image of our Spring Boot application. This application will run on port 8080. We also have to make sure to pass the required environment variables. As you see in the file, we are using our database as db and the variable SPRING_DATASOURCE_URL shows that. db is the name of our database service that our application will connect to.

Our database service db runs on host port of 3307, but uses port 3306 (default port) on the container. This is because I have MySQL running on my host machine at port 3306, so to avoid port conflict, I am using 3307.

We have another database service postgres in our docker compose file. That uses default ports of 5432 and that’s why not specified here. Keycloak uses postgres as part of this entire application. If you don’t specify postgres, Keycloak will use an in-memory H2 database by default. The problem with an in-memory database is once you stop your container, it will lose all the data. To avoid that, I am using a real database that will save our realm and users’ data.

Another service, that we are using is keycloak. This is our IDP for authentication. The service is running on port 8180. It uses the Postgres database to connect. The command part of keycloak service instructs to run the service on port 8180 in the container instead of default 8080.

networks service defines that all these containers are part of the same network common-network with a driver of type bridge.
To make sure we can use the database, we need to mount the disk volume for both MySQL and Postgres databases. We mount these volumes locally.

Running the containers

Now to execute the containers with the application, execute the following command (make sure you build your application)

docker-compose up

This will build Docker containers for all our services and start them. Now if we access our application at http://localhost:8080

Fundamentals of Docker Compose

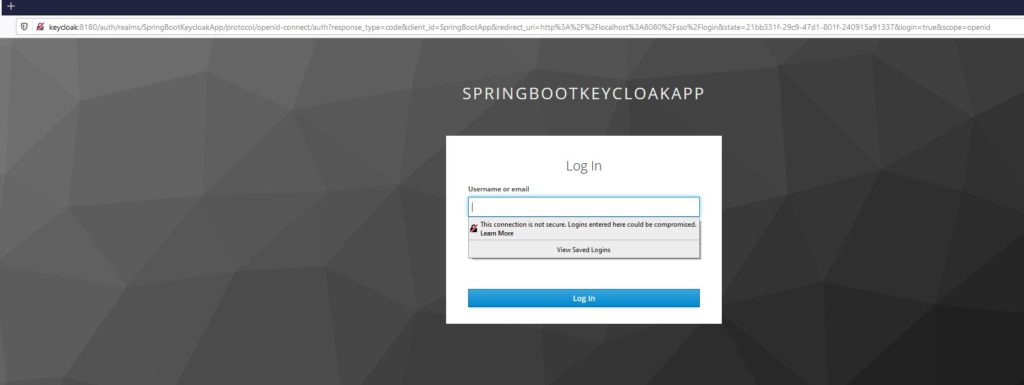
If a user clicks on Get all tasks, user will see keycloak login screen as below:

Fundamentals of Docker Compose

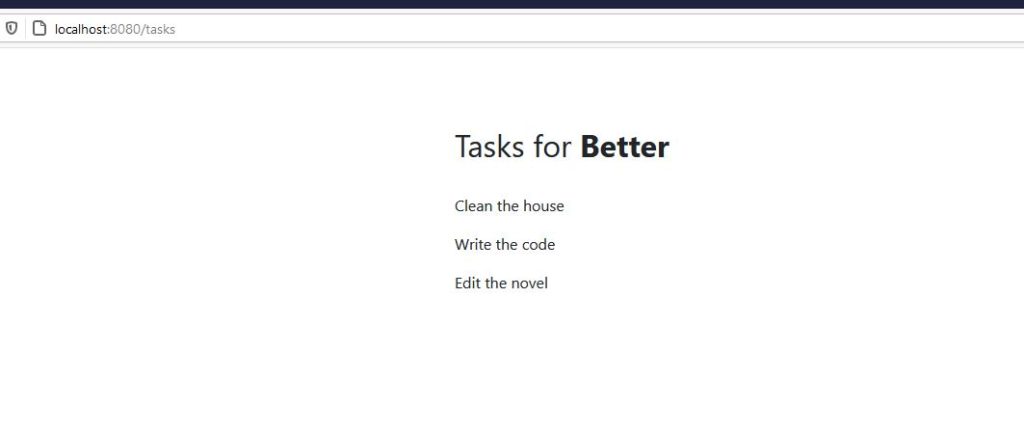
Enter the username and password, and the user will see the tasks for the logged-in user.

Docker Compose Guide

Useful commands

docker-compose up – This command will build the docker containers and start them.

docker-compose up -d – This is a similar command as above, except it will run all the processes in the background.

docker-compose stop – Stop the docker services. This will retain the previous state of containers even after you have stopped the containers.

docker-compose start – Start the docker services

docker-compose logs – Show the logs from docker containers

docker-compose ps – List the Docker containers

docker-compose run – Run one-off command. Example – docker-compose run web env – List the environment variables of web service.

Advantages of Docker Compose

  • By running most of the services in docker, you don’t have to install those services in your environment.
  • It’s easier to collaborate on the development environment with other developers by checking in the source in version control with docker-compose.
  • Quick and easy configuration. You can run your services across platforms.

Advance use of docker compose

Something I have not covered in this post is using network as  a service that you can really extend with docker compose. It also allows you to run a load balancer (or reverse proxy-like nginx) and manage the load with multiple hosts.

Instead of using environment variables, you can also use .env file for environment variables and load it while starting the containers.

Conclusion

In this post, I showed how you can use docker compose to run multiple containers with a single docker compose file. It also allows you to easily manage your environment. Similarly, you can learn about Kubernetes.

References

  1. Docker Compose – docker compose
  2. Keycloak – Keycloak containers