Category Archives: REST

Json Web Token: How to Secure Spring Boot REST API

In this post, I will show how to secure your spring boot based REST API. It has been more of a trend to secure REST APIs to avoid any unnecessary calls to public APIs. We will be using some Spring boot features for Spring security along with JSON WebTokens for authorization. You can learn more about basic authentication here.

User flow in this case is

  1. User logs in
  2. We validate user credentials
  3. A token is sent back to user agent.
  4. User tries to access a protected resource.
  5. User sends JWT when accessing the protected resource. We validate JWT.
  6. If JWT is valid, we allow the user to access the resource.

JSON WebTokens, known as JWTs are used for forming authorization for users. This helps us to build secure APIs and it is also easy to scale. During authentication, a JSON web token is returned. Whenever the user wants to access a protected resource, the browser must send JWTs in the Authorization header along with the request. One thing to understand here is that it is a good security practice to secure REST API.

Basically, we will show

  1. Verify JSON WebToken
  2. Validate the signature
  3. Check the client permissions

What you will need?

  1. Java 8,
  2. MySQL Database
  3. IntelliJ Editor
  4. Gradle

Note – This won’t be a full-fledged app, but REST APIs based on Spring Boot, and Spring security.

Spring Boot Based REST API

Since I have already shown this before on my blog, I won’t be creating any new APIs. I will be securing REST API for company that I created in this blog post REST API. This API also includes caching. A user will try to access /cachedemo/v1/companies/ and since APIs are protected, he will get a response like below:

Secure REST API - Forbidden

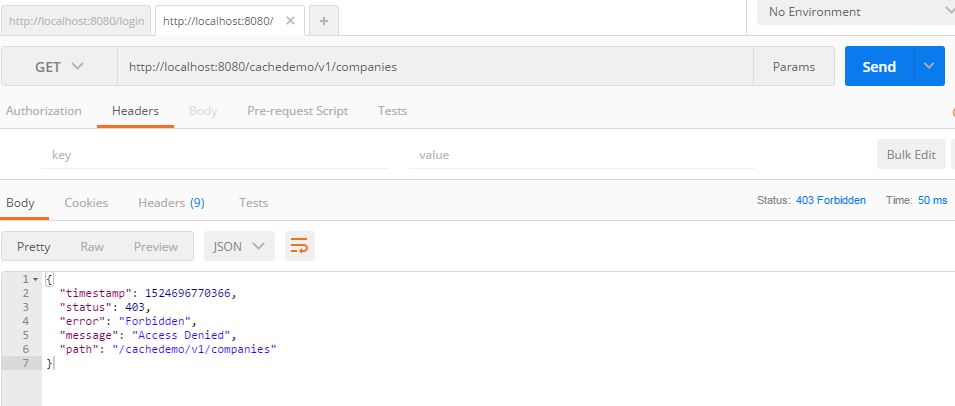
Response from protected API

Now we will implement how to protect this API and how to access it.

Adding User and User Registration

Since we want to add authorization for APIs, we will need where the user is able to log in and send credentials. These credentials will be validated and a token will be generated. This token then will be transmitted in a request to an API call. The token will be validated in the Spring security authorization filter that we will add. If a valid token, the user will be able to access the API.

Create a user model


package com.betterjavacode.models;

import javax.persistence.*;
import java.io.Serializable;

@Entity(name = "User")
@Table(name = "user")
public class User implements Serializable
{
    public User()
    {

    }

    @Id
    @GeneratedValue(strategy =  GenerationType.IDENTITY)
    private long id;

    @Column(name = "username")
    private String username;

    @Column(name = "password")
    private String password;

    public long getId()
    {
        return id;
    }

    public void setId(long id)
    {
        this.id = id;
    }

    public String getUsername()
    {
        return username;
    }

    public void setUsername(String username)
    {
        this.username = username;
    }

    public String getPassword()
    {
        return password;
    }

    public void setPassword(String password)
    {
        this.password = password;
    }
}

We will add a controller where a user can register with its details for username and password.


package com.betterjavacode.resources;

import com.betterjavacode.models.User;
import com.betterjavacode.repositories.UserRepository;
import org.springframework.security.crypto.bcrypt.BCryptPasswordEncoder;
import org.springframework.web.bind.annotation.PostMapping;
import org.springframework.web.bind.annotation.RequestBody;
import org.springframework.web.bind.annotation.RequestMapping;
import org.springframework.web.bind.annotation.RestController;

@RestController
@RequestMapping(value = "/cachedemo/v1/users")
public class UserController
{
    private UserRepository userRepository;
    private BCryptPasswordEncoder bCryptPasswordEncoder;

    public UserController(UserRepository userRepository, BCryptPasswordEncoder bCryptPasswordEncoder)
    {
        this.userRepository = userRepository;
        this.bCryptPasswordEncoder = bCryptPasswordEncoder;
    }

    @PostMapping("/signup")
    public void signUp(@RequestBody User user)
    {
        user.setPassword(bCryptPasswordEncoder.encode(user.getPassword()));
        userRepository.save(user);
    }

}

Now when we POST a request to /cachedemo/v1/users/signup , a user will be saved in the database. Password for the user will be saved in encrypted format as we are using BCryptPasswordEncoder. We will show how a user can log in to create a token.

User Login

To handle user login, we will add an AuthenticationFilter which will get added in FilterChain and Spring boot will handle the execution of it appropriately. This filter will look like below:


package com.betterjavacode.SpringAppCache;


import com.fasterxml.jackson.databind.ObjectMapper;
import io.jsonwebtoken.Jwts;
import io.jsonwebtoken.SignatureAlgorithm;
import org.springframework.security.authentication.AuthenticationManager;
import org.springframework.security.authentication.UsernamePasswordAuthenticationToken;
import org.springframework.security.core.Authentication;
import org.springframework.security.core.AuthenticationException;
import org.springframework.security.core.userdetails.User;
import org.springframework.security.web.authentication.UsernamePasswordAuthenticationFilter;

import javax.servlet.FilterChain;
import javax.servlet.http.HttpServletRequest;
import javax.servlet.http.HttpServletResponse;
import java.io.IOException;
import java.util.ArrayList;
import java.util.Date;

public class AuthenticationFilter extends UsernamePasswordAuthenticationFilter
{
    private AuthenticationManager authenticationManager;

    public AuthenticationFilter(AuthenticationManager authenticationManager)
    {
        this.authenticationManager = authenticationManager;
        setFilterProcessesUrl("/login");
    }

    @Override
    public Authentication attemptAuthentication(HttpServletRequest request, HttpServletResponse response) throws AuthenticationException
    {
        try
        {
            com.betterjavacode.models.User creds = new ObjectMapper().readValue(request.getInputStream(), com.betterjavacode .models.User.class);
            return authenticationManager.authenticate(new UsernamePasswordAuthenticationToken(creds.getUsername(), creds.getPassword(),new ArrayList<>()));
        }
        catch(IOException e)
        {
            throw new RuntimeException("Could not read request" + e);
        }
    }

    protected void successfulAuthentication(HttpServletRequest request, HttpServletResponse response, FilterChain filterChain, Authentication authentication)
    {
        String token = Jwts.builder()
                .setSubject(((User) authentication.getPrincipal()).getUsername())
                .setExpiration(new Date(System.currentTimeMillis() + 864_000_000))
                .signWith(SignatureAlgorithm.HS512, "SecretKeyToGenJWTs".getBytes())
                .compact();
        response.addHeader("Authorization","Bearer " + token);
    }
}

Basically, a user will send credentials in a request to URL ending with /login . This filter will help to authenticate the user, if there is successful authentication, a Token will be added in response header with the key Authorization.

Token Validation and Authorization

We add another filter AuthorizationFilter to validate the token that we passed through AuthenticationFilter earlier. This filter will look like below:


package com.betterjavacode.SpringAppCache;

import io.jsonwebtoken.Jwts;
import org.springframework.security.authentication.AuthenticationManager;
import org.springframework.security.authentication.UsernamePasswordAuthenticationToken;
import org.springframework.security.core.context.SecurityContextHolder;
import org.springframework.security.web.authentication.www.BasicAuthenticationFilter;

import javax.servlet.FilterChain;
import javax.servlet.ServletException;
import javax.servlet.http.HttpServletRequest;
import javax.servlet.http.HttpServletResponse;
import java.io.IOException;
import java.util.ArrayList;


public class AuthorizationFilter extends BasicAuthenticationFilter
{
    public AuthorizationFilter(AuthenticationManager authenticationManager)
    {
        super(authenticationManager);
    }

    protected void doFilterInternal(HttpServletRequest request, HttpServletResponse response, FilterChain filterChain)
            throws IOException, ServletException
    {
        String header = request.getHeader("Authorization");
        if(header == null || !header.startsWith("Bearer"))
        {
            filterChain.doFilter(request,response);
            return;
        }

        UsernamePasswordAuthenticationToken authenticationToken = getAuthentication(request);
        SecurityContextHolder.getContext().setAuthentication(authenticationToken);
        filterChain.doFilter(request,response);
    }

    private UsernamePasswordAuthenticationToken getAuthentication(HttpServletRequest request)
    {
        String token = request.getHeader("Authorization");
        if(token != null)
        {
            String user = Jwts.parser().setSigningKey("SecretKeyToGenJWTs".getBytes())
                    .parseClaimsJws(token.replace("Bearer",""))
                    .getBody()
                    .getSubject();
            if(user != null)
            {
                return new UsernamePasswordAuthenticationToken(user, null, new ArrayList<>());
            }
            return null;
        }
        return null;
    }
}

If the validation of the token is successful, the application returns a user and assigns it to a security context.

To enable Spring security, we will add a new class WebSecurityConfiguration with annotation @EnableWebSecurity. This class will extend the standard WebSecurityConfigurerAdapter . In this class, we will restrict our APIs and also add some whitelisted URLs that we will need to access without any authorization token. This will look like below:


package com.betterjavacode.SpringAppCache;

import org.springframework.context.annotation.Bean;
import org.springframework.http.HttpMethod;
import org.springframework.security.config.annotation.authentication.builders.AuthenticationManagerBuilder;
import org.springframework.security.config.annotation.web.builders.HttpSecurity;
import org.springframework.security.config.annotation.web.builders.WebSecurity;
import org.springframework.security.config.annotation.web.configuration.EnableWebSecurity;
import org.springframework.security.config.annotation.web.configuration.WebSecurityConfigurerAdapter;
import org.springframework.security.config.http.SessionCreationPolicy;
import org.springframework.security.core.userdetails.UserDetailsService;
import org.springframework.security.crypto.bcrypt.BCryptPasswordEncoder;
import org.springframework.web.cors.CorsConfiguration;
import org.springframework.web.cors.CorsConfigurationSource;
import org.springframework.web.cors.UrlBasedCorsConfigurationSource;

@EnableWebSecurity
public class WebSecurityConfiguration extends WebSecurityConfigurerAdapter
{
    private BCryptPasswordEncoder bCryptPasswordEncoder;
    private UserDetailsService userDetailsService;

    private static final String[] AUTH_WHITELIST = {
            "/v2/api-docs",
            "/swagger-resources",
            "/swagger-resources/**",
            "/configuration/ui",
            "/configuration/security",
            "/swagger-ui.html",
            "/webjars/**"
    };

    public WebSecurityConfiguration(UserDetailsService userDetailsService, BCryptPasswordEncoder bCryptPasswordEncoder)
    {
        this.bCryptPasswordEncoder = bCryptPasswordEncoder;
        this.userDetailsService = userDetailsService;
    }


    protected void configure(HttpSecurity httpSecurity) throws Exception
    {
        httpSecurity.cors().and().csrf().disable().authorizeRequests()
                .antMatchers(AUTH_WHITELIST).permitAll()
                .antMatchers(HttpMethod.POST, "/cachedemo/v1/users/signup").permitAll()
                .anyRequest().authenticated()
                .and().addFilter(new AuthenticationFilter(authenticationManager()))
                .addFilter(new AuthorizationFilter(authenticationManager()))
                .sessionManagement().sessionCreationPolicy(SessionCreationPolicy.STATELESS);
    }

    public void configure(AuthenticationManagerBuilder authenticationManagerBuilder) throws Exception
    {
        authenticationManagerBuilder.userDetailsService(userDetailsService).passwordEncoder(bCryptPasswordEncoder);
    }

    @Bean
    CorsConfigurationSource corsConfigurationSource()
    {
        final UrlBasedCorsConfigurationSource source = new UrlBasedCorsConfigurationSource();
        source.registerCorsConfiguration("/**",new CorsConfiguration().applyPermitDefaultValues());
        return source;
    }
}

In method configure we have restricted most APIs, only allowing Swagger URLs and signup URL. We also add filters to HttpSecurity. We will add our own UserDetailsServiceImpl class to validate user credentials.


package com.betterjavacode.services;

import com.betterjavacode.models.User;
import com.betterjavacode.repositories.UserRepository;
import org.springframework.security.core.userdetails.UserDetails;
import org.springframework.security.core.userdetails.UserDetailsService;
import org.springframework.security.core.userdetails.UsernameNotFoundException;
import org.springframework.stereotype.Component;

import java.util.Collections;

@Component
public class UserDetailsServiceImpl implements UserDetailsService
{
    private UserRepository userRepository;

    public UserDetailsServiceImpl(UserRepository userRepository)
    {
        this.userRepository = userRepository;
    }

    @Override
    public UserDetails loadUserByUsername(String username) throws UsernameNotFoundException
    {
        User user = userRepository.findByUsername(username);
        if(user == null)
        {
            throw new UsernameNotFoundException(username);
        }
        return new org.springframework.security.core.userdetails.User(user.getUsername(), user.getPassword(), Collections.emptyList());
    }
}

Demo

With all the code changes, now we are ready to create a user, login and access secured REST APIs. From the image above, a user gets Access Denied error for accessing secured APIs. To demo this, I have already registered a user with username `test1` and password test@123.

Secure REST API - send use credentials to login

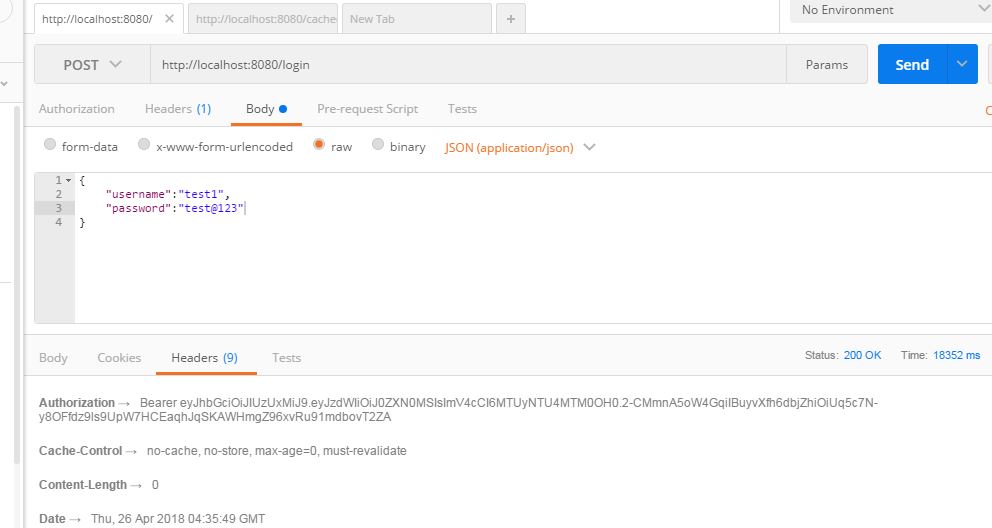
This POST request will give us Authorization token in response as shown above. Now using this token in our GET request to retrieve companies data. This GET request will look like below:

Secure REST API - Postman call

In this way, we showed how to secure REST API using JSON web token.

I will be launching the book “Simplifying Spring Security“. Do you want to get updates on launch? Sign up

References

  1. Implementing JWTs Authentication on Spring Boot API – JWT Authentication
  2. How to secure REST APIs – Secure REST APIs

Spring Boot Actuator

In this post, we will look at how we can use the spring boot actuator to add some metrics related endpoints in Spring Boot based microservice or application. Spring boot helps to monitor your production-ready application by offering a number of metrics related endpoints.

What do you need:

  • Java 8
  • Spring Boot
  • IntelliJ
  • Gradle

What are Spring boot actuator endpoints?

I will not be showing how to create a Spring boot REST in this article. You can refer my post to create a REST API based on Spring boot here.

As Spring documentation says – “Spring boot actuator let you monitor and interact with your application.” The endpoints that we will be discussing, are built in Spring Boot. Of course, the first question that comes to mind, is how do we activate these endpoints and what different endpoints are available there for what purposes.

How to activate actuator endpoints?

To activate these endpoints in a gradle-based project, we have to add the following dependency

dependencies {
  compile("org.springframework.boot:spring-boot-starter-actuator")
}

If you are using maven, this will be like below:

<dependencies>
  <dependency>
    <groupId>org.springframework.boot</groupId>
    <artifactId>spring-boot-starter-actuator</artifactId>
  </dependency>
</dependencies>

All the actuator endpoints are enabled by default.

  • auditevents – Audit events of your application
  • info– Displays information about your application – you can customize to show version information.
  • health – application’s health status
  • metrics – various metrics information of application
  • loggers – Displays and modifies configured loggers
  • logfile – Shows the contents of the log file
  • httptrace – Displays HTTP trace info for the last 100 HTTP request/response
  • env – Displays current environment information
  • flyway – Shows Flyway database migrations details
  • liquidbase – Shows details of liquibase database migrations
  • shutdown – Allows to shut down the application gracefully
  • mappings– Displays a list of all @RequestMapping paths
  • scheduledtasks – Displays the scheduled tasks in the application
  • threaddump – Performs a thread dump
  • headdump – Returns JVM head dump

Another way these endpoints can be enabled or disabled, is to add properties in application.properties as shown below:

management.endpoint.health.enabled=true

Running the spring boot application with actuator

Once we have added the required spring-boot-starter-actuator dependency, we can build our application. There is still one more change we need to add in our gradle build file to get application version information.

springBoot{
     buildInfo()
}

If you are using maven, this can be added as below:

<plugin>
    <groupId>org.springframework.boot</groupId>
    <artifactId>spring-boot-maven-plugin</artifactId>
    <executions>
        <execution>
            <goals>
                <goal>build-info</goal>
            </goals>
        </execution>
    </executions>
</plugin>

If you want to add some additional properties, add following properties in application.properties as below:

info.app.name = Reusable-Rest-Module
info.app.version = 0.1.0-SNAPSHOT
management.security.enabled=false

Now once you build the application and run it, this will give us following results:

Healthcheck metrics using Spring Boot Actuator

http://localhost:8080/health

Info Metrics using Spring Boot Actuator

http://localhost:8080/info

Logging metrics using Spring Boot Actuator

http://localhost:8080/loggers

Conclusion

In this post, we showed how we can use Spring Boot Actuator to get different metrics data for your spring boot based service.


Where are we?

Hold on to it. This is going to be a rant about what I am thinking about ideas to post, but also an update about the web application Social KPI.

I am working on a few ideas that I would like to write about. But I am not sure. Lately I have been working on microservice architecture project and that had helped me to design Social KPI application. I would like to hear from my followers if they are interested in any particular topic that I should cover. Currently most of the interests are around Spring boot and microservices. That is too specific, but also equally too big of a topic to cover. I have covered bits and pieces of Spring boot.

Here are a few ideas that I have in mind that I would like to post about:

  1. Spring boot in android applications.
  2. How to use Spring boot and deploy in cloud infrastructure
  3. What is chaos engineering?
  4. Android application and details
  5. Microservices and Service-to-Service authentication
  6. Udemy course for Spring boot and microservices.

Please leave a comment if you want me to cover something new.

Where are we with Social KPI application?

So last, I posted about this application was back in May Twitter Client. After that there had been some progress as I did figure out how to use social login for authentication purposes, but it had not been added in the application. I will be reviving the work on this project and will try to contribute daily for 30-60 minutes. As part of my planning process, I will add here the tasks that need to be finished:

  1. Add Social login UI for the application
  2. Add UI Pages for displaying Social KPI reports and user navigation
  3. Connecting front-end to back-end REST APIs through clients.
  4. Use of Jasper reports for graphical reports.

These are the 4 big stories I am planning to finish by the end of October. Once I have all the code completed, I will launch the application through Heroku.


Build a blockchain using Spring boot

So I have talked about blockchain previously here. I will not be indulging in details about what is blockchain. But I will show how to build blockchain using Spring boot.

What will you need

  • IntelliJ
  • Java 8
  • Spring boot
  • Gradle

What is blockchain?

In short, blockchain is chain of records which are called blocks, containing any kind of data or transactions in these records. They are chained together using hashes.

Build a blockchain

We will need two model classes: one each for block and for transaction. We will also need a spring rest controller to provide 3 APIs for mining, transaction, and chaining. The heart of this blockchain will be a utility class to provide us Proof of work. If you don’t know what is Proof of work, then you can revisit the article I have linked in this post where I explained the algorithm used in building a blockchain, is called as Proof of work.

Model Classes

Each block will contain an index, timestamp, transactions, proof, and a hash for previous block. This model class will look like below:

package com.betterjavacode.blockchain.model;

import com.fasterxml.jackson.core.JsonProcessingException;
import com.fasterxml.jackson.databind.ObjectMapper;
import com.google.common.hash.Hashing;

import java.nio.charset.StandardCharsets;
import java.util.List;

public class Block
{

    public Block()
    {

    }
    private Long index;

    private Long timestamp;

    private List<Transaction> transactionList;

    private Long proof;

    private String previousBlockHash;

    public static final Long GENESIS_BLOCK_PROOF = 100L;
    public static final String GENESIS_BLOCK_PREV_HASH = "1";

    public Long getIndex()
    {
        return index;
    }

    public String getPreviousBlockHash()
    {
        return previousBlockHash;
    }

    public Long getProof()
    {
        return proof;
    }

    public List<Transaction> getTransactionList()
    {
        return transactionList;
    }

    public Block(Builder builder)
    {
        this.index = builder.index;
        this.timestamp = builder.timestamp;
        this.transactionList = builder.transactionList;
        this.proof = builder.proof;
        this.previousBlockHash = builder.previousBlockHash;
    }

    public static class Builder
    {
        private Long index;
        private Long timestamp;
        private List<Transaction> transactionList;
        private Long proof;
        private String previousBlockHash;


        public Builder setIndex(Long index)
        {
            this.index = index;
            return this;
        }

        public Builder setTimestamp(Long timestamp)
        {
            this.timestamp = timestamp;
            return this;
        }

        public Builder setTransactionList(List<Transaction> transactionList)
        {
            this.transactionList = transactionList;
            return this;
        }

        public Builder setProof(Long proof)
        {
            this.proof = proof;
            return this;
        }

        public Builder setPreviousBlockHash(String previousBlockHash)
        {
            this.previousBlockHash = previousBlockHash;
            return this;
        }

        public Block build()
        {
            return new Block(this);
        }
    }

    public String hash(ObjectMapper mapper) throws JsonProcessingException
    {
        String json = mapper.writeValueAsString(this);
        return Hashing.sha256().hashString(json, StandardCharsets.UTF_8).toString();
    }
}

It will look like below when we have some transaction


{
  "message": "New Block Added",
  "index": 2,
  "transactionList": [
    {
      "sender": "0",
      "recipient": "ef55403a23af46268fb5dfcee91329ae",
      "amount": 1
    }
  ],
  "proof": 33575,
  "previousHash": "58c63eba6e93523867369a865ee363a0c89a2b76a62c677e8acd27536415daf4"
}

Rest Controller

We will write a rest controller to retrieve the chain, mine or add a transaction. A REST controller for transactions will do a POST request to add a transaction to chain. Our REST controller will look like below:

package com.betterjavacode.blockchain.controller;


import com.betterjavacode.blockchain.model.Block;
import com.betterjavacode.blockchain.model.Transaction;
import com.betterjavacode.blockchain.response.ChainResponse;
import com.betterjavacode.blockchain.response.MineResponse;
import com.betterjavacode.blockchain.response.TransactionResponse;
import com.betterjavacode.blockchain.service.Blockchain;
import com.betterjavacode.blockchain.util.BlockProofOfWorkGenerator;
import com.fasterxml.jackson.core.JsonProcessingException;
import com.fasterxml.jackson.databind.ObjectMapper;
import org.springframework.beans.factory.annotation.Autowired;
import org.springframework.web.bind.annotation.*;

import javax.validation.Valid;
import java.math.BigDecimal;
import java.util.UUID;

@RestController
@RequestMapping("/")
public class BlockchainController
{
    @Autowired
    private Blockchain blockchain;

    @Autowired
    private ObjectMapper objectMapper;

    public static final String NODE_ID = UUID.randomUUID().toString().replace("-","");
    public static final String NODE_ACCOUNT_ADDRESS = "0";
    public static final BigDecimal MINING_CASH_REWARDS = BigDecimal.ONE;

    @GetMapping("mine")
    public MineResponse mine() throws JsonProcessingException
    {
        // Calculate Proof of work
        Block lastBlock = blockchain.lastBlock();

        Long lastProof = lastBlock.getProof();

        Long proof = BlockProofOfWorkGenerator.proofOfWork(lastProof);

        // Reward the miner by adding a transaction

        blockchain.addTransaction(NODE_ACCOUNT_ADDRESS, NODE_ID, MINING_CASH_REWARDS);

        // Add the new block to the chain
        Block newBlock = blockchain.createBlock(proof, lastBlock.hash(objectMapper));

        return new MineResponse.Builder().message("New Block Added").index(newBlock.getIndex()).transactions(newBlock.getTransactionList())
                .proof(newBlock.getProof()).previousHash(newBlock.getPreviousBlockHash()).build();
    }

    @GetMapping("chain")
    public ChainResponse fullChain()
    {
        return new ChainResponse.Builder().chain(blockchain.getChain()).length(blockchain.getChain().size()).build();
    }

    @PostMapping("transactions")
    public TransactionResponse newTransaction(@RequestBody @Valid Transaction transaction)
    {
        Long index = blockchain.addTransaction(transaction.getSender(), transaction.getRecipient(), transaction.getAmount());

        return new TransactionResponse.Builder().index(index).build();
    }
}

Transaction POST call basically adds the transaction to the list and returns the index of the block to which the transaction will be added to.

Proof of work

We will discuss how we have implemented the proof of work here. This will be the heart of entire blockchain that we have built.

When new blocks are mined on the blockchain, a proof of work algorithm is used to verify if the block is justifiable. Simple idea of Proof of Work is to find a number which solves a problem. This number must be difficult to find, but easy to verify by network.

Example – Hash of an integer multiplied by another integer must end in a particular number. In our implementation for this algorithm, we verify the proof is valid as below:

public static boolean validProof(Long lastProof, Long proof)
 {
     String s = "" + lastProof + "" + proof;

     String sha256 = Hashing.sha256().hashString(s, StandardCharsets.UTF_8).toString();

     return sha256.endsWith(PROOF_OF_WORK);
 }

This is the algorithm that miners try to solve fastest and whoever solves it first and compact manner gets rewarded with a coin as part of the transaction.

Swagger API

So now once we build our implementation and run the Spring Boot Application, I can access it through Swagger APIs. These APIs are as below:

  1. /transactions – Creates a new transaction in the block
  2. /mine – mines the new block
  3. /chain – returns the full blockchain

Conclusion

In this post, we showed how to understand a blockchain by implementing one in Spring boot. Remember, one thing that I have not described is the consensus algorithm to verify the chain, though I have implemented that in my class Blockchain.

References

  1. Build Blockchain
  2. Blockchain Github


Custom Twitter Client vs Spring Boot Twitter Plugin

To use twitter data in my saas application, I was going to write my own custom Twitter client by doing a rest call. However, I found out Spring Boot offers a Twitter plugin that can be used to fetch Twitter data. Neat.

In this post, I will show some comparison of these two approaches and why one can choose over another:

Custom Twitter Client

So custom twitter client will be a standalone client which will build an HTTP entity with client secrets that are needed to authenticate with Twitter API. In this client, we will use restOperations to call API endpoint passing HTTP entity and the REST call will respond with Twitter Data Model.

This will look like below:

public TwitterDataModel getTwitterData(long accountId)
{
    String url = buildRestUrl(accountId);
    ParameterizedTypeReference<HashMap<Long, TwitterDataModel>> responseType = new ParameterizedTypeReference<HashMap<Long, TwitterDataModel>>(){};
    HttpEntity entity = buildHttpEntity(CLIENT_ID, CLIENT_SECRET);
    Map<Long, TwitterDataModel> twitterDataModelMap = restOperations.exchange(url, HttpMethod.GET, entity, responseType).getBody();

    Long keyForData = new Long(accountId);
    TwitterDataModel twitterDataModel = twitterDataModelMap.get(keyForData);

    return twitterDataModel;
}

public String buildRestUrl(long accountId)
{
    return TWITTER_REST_ENDPOINT + accountId + TWITTER_REST_API;
}

There is nothing much wrong with this approach, except the fact that we will have to write an extra TwitterDataModel business object. Also, this business model should be created before we do the actual REST call.

Spring Boot Twitter Plugin

To use this plugin, first, we need to add the plugin in Gradle or maven like below:

compile('org.springframework.social:spring-social-twitter')

Once we have this plugin, we can add an object of type Twitter in our code to call REST APIs.

This will look like below:

private final Twitter twitter;

public TwitterDataModel getTwitterData(long accountId)
    {
        String url = buildRestUrl(accountId);
        ParameterizedTypeReference<HashMap<Long, TwitterDataModel>> responseType = new ParameterizedTypeReference<HashMap<Long, TwitterDataModel>>(){};
        HttpEntity entity = buildHttpEntity(CLIENT_ID,CLIENT_SECRET);

        Map<Long, TwitterDataModel> twitterDataModelMap = twitter.restOperations().exchange(url, HttpMethod.GET, entity, responseType).getBody();

        Long keyForData = new Long(accountId);
        TwitterDataModel twitterDataModel = twitterDataModelMap.get(keyForData);

        return twitterDataModel;
    }

    public String buildRestUrl(long accountId)
    {
        return TWITTER_REST_ENDPOINT + accountId + TWITTER_REST_API;
    }

The major advantage of this plugin is that we can get the data in Twitter Data Model that twitter offers. An then we can go on to use to handle our data.

Conclusion

In this post, I showed how we can use a Spring Boot Twitter social plugin to gather Twitter data.