Category Archives: Programming

Worker Pattern in Microservices

In this post, we will discuss a new design pattern – the worker pattern and how to use this pattern in microservices. Previously, I have covered communication and event-driven patterns in microservices.

What is a Worker Pattern?

Let’s start with a scenario. You have a microservice that processes business logic. For a new set of business requirements, you need to build a new feature in microservice. This feature will be resource-intensive for processing a large set of data. One way to handle any resource-intensive processing of data is to do that processing asynchronously. There are different ways you can implement this for asynchronous handling. You can create a job and queue it in a queue system. OR you can publish an event for another service to process the data. Irrespective of your approach, you will need a way to control the flow of this data.

With either approach, you want to avoid your main service getting blocked for processing these asynchronous events. Let’s assume for a second if you went with a job approach, you can use Bull Queue (redis-based queuing mechanism).

Bull Queue offers a processor for each job that your service will add to the queue. Nevertheless, this processor runs in its own process and can perform the job. For resource-intensive operations, this can still have a bottleneck and can probably stop performing the way you wanted.

In such cases, you can create a standalone worker. This standalone worker will run on its own set of resources (like Kubernetes pod). This worker will process the same job that your service added to the queue.

When to use Worker Pattern?

Every use case is different. But the simple heuristic you can use to check how much CPU-heavy work the processor plans to do. If the job from the queue is CPU-heavy, then create a separate processor or worker. In the same service, you can write a separate processor that will execute the job in a separate process. It is also known as Sandbox Processor.

Worker will spin up the standalone service in its own resources and execute the processor. It will not interfere with other processes from the service since it is executing one job. Another advantage of worker patterns is to be able to scale the resources horizontally. If you use a sandbox processor, you might have to scale the services, and all scaled-up resources are equally divided into processes.

Example of Worker Pattern

Let’s look at a quick example of a worker pattern.

We have a simple endpoint that will add a job to a queue. This endpoint is part of a controller in a microservice.  This will look like something like below:

 export class JobController {
  constructor(@InjectQueue('file-queue') private queue: Queue) {}

  async createFileProcessingJob(): Promise {
    const job = await this.queue.add('process-file', data);
  }
}

Now, this controller is part of  app.module.ts, we will also have to register Redis for the bull queue.


@Module({
  imports: [
    BullModule.registerQueue({
      name: 'worker-pattern-queue',
      redis: {
        host: 'localhost',
        port: 6379,
      },
    }),
  ],
})
export class AppModule {}

To create a standalone worker, we can create a separate module and use that module to create a new application context. For example, we create a new module subscriber.module.ts and it has our consumer (worker/processor) as a provider.

 
@Processor('worker-pattern-queue')
export class FileQueueProcessor {

}

The module will look like

 @Module({
  imports: [
    BullModule.registerQueue({
      name: 'worker-pattern-queue',
      redis: {
        host: 'localhost',
        port: 6379,
      },
    }),
  ],
   providers: [
     FileQueueProcessor  
]
})
export class SubscriberModule {}

And create a separate folder with main.ts. This should include

 const app = await NestFactory.createApplicationContext(SubscriberModule);
await app.init();

Now you can run this main.ts as a separate worker in a docker container in Kubernetes pod. You can scale it horizontally as well.

Conclusion

In this post, I showed how to use worker pattern in microservices to handle certain requirements.

Not related to this post, but my previous post was about handling flakiness.

Handling flakiness in the Automated Tests

In a Test-Driven Development, everything starts with writing the tests first. In this post, I discuss handling flakiness in automated tests. If you start your development by writing the tests first, it can help with setting up some assumptions. The challenge with this is that you are not always aware of edge cases. As the saying goes – you don’t know what you don’t know.

What is a flaky test?

To start with, we need to understand the basic definition of a flaky test. Nobody intentionally writes a flaky test. A flaky test is an automated test that gives different results at different executions even when there are no changes in the underlying code. The non-deterministic nature of such tests makes it harder to debug them.

Let’s look at the possible reasons why tests can become flaky.

Reasons for a flaky test

With CI/CD, automated tests have become part of the development process. It goes without saying that automated tests do increase confidence in the process and the product you are trying to build. As we discussed in the previous section, sometimes a test can become flaky even if there is no code change. What are the possible reasons for a flaky test?

  • Bad Tests – If a developer does not invest enough time to understand the functionality they are trying to test, they can end up writing bad tests.  Sometimes with bad data or with wrong logic. Bad tests do represent not enough understanding of the underlying system.
  • Wrong assumptions – One of the major reasons for a flaky test is the wrong assumptions. When writing a test, the developer does not have all the information and they write the assumptions for a test with the requirements they have in hand, this can result in either wrong or incomplete assumptions. One of the easiest ways to figure out the flaky test is to challenge the assumptions for that test. I have also realized that time can be a dynamic concept and the human mind can not completely conceive the time and it does make it harder to write tests that can involve time elements. Surprisingly, the flaky tests either have time-bound or data-constraint issues.
  • Concurrency – Whether the concurrency is part of CI/CD execution or user-added for executing tests, it can cause flakiness for automated tests.

How to debug the flakiness of automated tests?

Before you can debug a flaky test, you should check all the following notes to see if anything might be causing the flakiness of the test

  • memory leak – Memory leaks can cause performance degradation, but can also cause tests to flake more often. You should check if your tests and test environment are functioning optimally.
  • wait time – Check wait times between tests and for each test. Possibly even increase the wait time allowing each test to complete all the possible requests.
  • challenge assumptions – The easiest way to debug a flaky test is to look at all the assumptions, and data and challenge them. If you challenge the assumptions and change them, you might find different results.

Remember flakiness of the test is most of the time because of assumptions made about data or the functionality.

Conclusion

In this post, we discussed the flakiness of tests in automated tests and how to debug such tests. Check the framework you are using or the assumptions you are making about the tests.

Using Custom Protocol Mapper with Keycloak

In this post, I will show how to use a custom protocol mapper with Keycloak. In my previous post, I showed how to use keycloak as an identity-broker. This post focuses on how to use Keycloak for retrieving custom attributes during authentication.

Keycloak offers basic attributes like sub, iss in the access token or id token it generates. If we need some organization-specific or user-specific attributes, we can configure a custom protocol mapper in Keycloak.

Our client application will receive a token that will have attributes from our custom mapper.

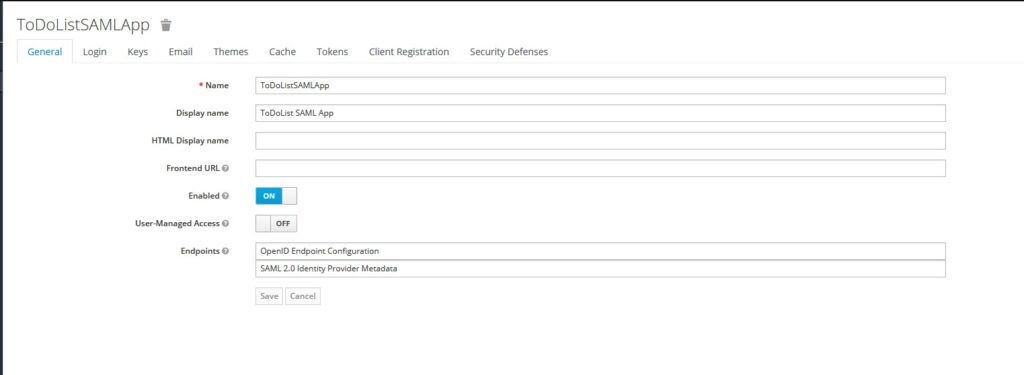
Configure Keycloak for Client

Let’s configure a client in Keycloak for OIDC Protocol.

Custom Protocol Mapper Keycloak - Client App

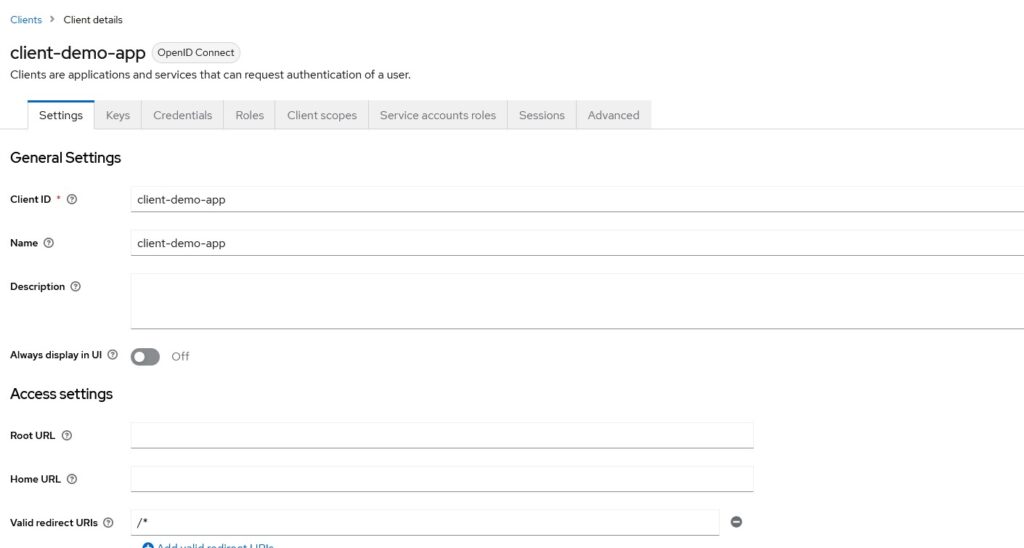
I have left Root URL, Home URL and Valid Redirect URIs almost empty. When you will have an actual application, you will need to provide a valid redirect URI that Keycloak will redirect to. Your application should handle the response from Keycloak on that URL.

You can configure what flows you will be supporting for OAuth

Keycloak OAuth Flows

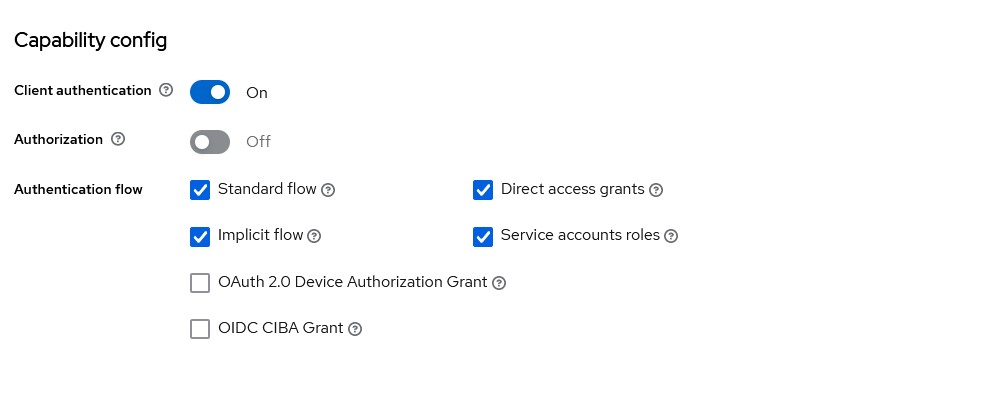
We leave the rest of the configuration as is for now and revisit when we have out custom mapper ready.

Default Protocol Mapper

If you run the Keycloak and use the client app that we created previously, we should be able to get Access Token and Id Token. That will provide us with default attributes in the token like below:

{
  "exp": 1691786636,
  "iat": 1691786576,
  "jti": "8c75305a-54fd-4ab3-a936-ef7ebd5b4a71",
  "iss": "http://keycloak:8180/realms/master",
  "aud": "account",
  "sub": "909ae4f5-e296-4c83-a18d-1406584ea43d",
  "typ": "Bearer",
  "azp": "client-demo-app",
  "acr": "1",
  "allowed-origins": [
    "/*"
  ],
  "realm_access": {
    "roles": [
      "default-roles-master",
      "offline_access",
      "uma_authorization"
    ]
  },
  "scope": "openid email offline_access profile",
  "clientId": "client-demo-app"
}

As you see in this token, most claims are standard claims that Keycloak provides. For our user, we have not configured email or any other profile attributes, otherwise, Keycloak will provide that too.

Implementing Custom Protocol Mapper

The major advantage of Keycloak is that it allows developers to write different types of extensions. One such extension is Protocol Mapper.

Dependencies

Let’s create a Maven project and add the following dependencies.


<?xml version="1.0" encoding="UTF-8"?>
<project xmlns="http://maven.apache.org/POM/4.0.0"
         xmlns:xsi="http://www.w3.org/2001/XMLSchema-instance"
         xsi:schemaLocation="http://maven.apache.org/POM/4.0.0 http://maven.apache.org/xsd/maven-4.0.0.xsd">
    <modelVersion>4.0.0</modelVersion>

    <groupId>com.betterjavacode</groupId>
    <artifactId>customKeycloakProtocolMapper</artifactId>
    <version>1.0-SNAPSHOT</version>
    <packaging>jar</packaging>

    <properties>
        <keycloak.version>21.0.0</keycloak.version>
    </properties>
    <dependencies>
        <dependency>
            <groupId>org.keycloak</groupId>
            <artifactId>keycloak-core</artifactId>
            <version>${keycloak.version}</version>
        </dependency>
        <dependency>
            <groupId>org.keycloak</groupId>
            <artifactId>keycloak-server-spi</artifactId>
            <version>${keycloak.version}</version>
            <scope>provided</scope>
        </dependency>
        <dependency>
            <groupId>org.keycloak</groupId>
            <artifactId>keycloak-server-spi-private</artifactId>
            <version>${keycloak.version}</version>
        </dependency>
        <dependency>
            <groupId>org.keycloak</groupId>
            <artifactId>keycloak-services</artifactId>
            <version>${keycloak.version}</version>
        </dependency>
        <dependency>
            <groupId>org.keycloak</groupId>
            <artifactId>keycloak-saml-core</artifactId>
            <version>${keycloak.version}</version>
            <scope>provided</scope>
        </dependency>
        <dependency>
            <groupId>org.keycloak</groupId>
            <artifactId>keycloak-saml-adapter-core</artifactId>
            <version>${keycloak.version}</version>
            <scope>provided</scope>
        </dependency>
        <dependency>
            <groupId>org.keycloak</groupId>
            <artifactId>keycloak-saml-adapter-api-public</artifactId>
            <version>${keycloak.version}</version>
            <scope>provided</scope>
        </dependency>
        <dependency>
            <groupId>org.keycloak</groupId>
            <artifactId>keycloak-saml-core-public</artifactId>
            <version>${keycloak.version}</version>
            <scope>provided</scope>
        </dependency>
    </dependencies>
    <build>
        <plugins>
            <plugin>
                <groupId>org.apache.maven.plugins</groupId>
                <artifactId>maven-surefire-plugin</artifactId>
                <configuration>
                    <excludes>
                        <exclude>**/*LiveTest.java</exclude>
                    </excludes>
                </configuration>
            </plugin>
            <plugin>
                <groupId>org.apache.maven.plugins</groupId>
                <artifactId>maven-compiler-plugin</artifactId>
                <configuration>
                    <source>6</source>
                    <target>6</target>
                </configuration>
            </plugin>
        </plugins>
    </build>

</project>

Implementing Custom Protocol Mapper

In our Maven project, we will create a new class CustomOIDCProtocolMapper. This class will implement few interfaces OIDCAccessTokenMapper, OIDCIdTokenMapper and UserInfoTokenMapper. This class will also extend an abstract class AbstractOIDCProtocolMapper.

package com.betterjavacode;

import org.keycloak.models.ClientSessionContext;
import org.keycloak.models.KeycloakSession;
import org.keycloak.models.ProtocolMapperModel;
import org.keycloak.models.UserSessionModel;
import org.keycloak.protocol.ProtocolMapperUtils;
import org.keycloak.protocol.oidc.OIDCLoginProtocol;
import org.keycloak.protocol.oidc.mappers.*;
import org.keycloak.provider.ProviderConfigProperty;
import org.keycloak.representations.AccessToken;
import org.keycloak.representations.IDToken;

import java.util.*;

/**
 * Handle Custom Claims for OIDC Protocol
 */
public class CustomOIDCProtocolMapper extends AbstractOIDCProtocolMapper
        implements OIDCAccessTokenMapper, OIDCIDTokenMapper, UserInfoTokenMapper
{
    public static final String PROVIDER_ID = "oidc-customprotocolmapper";
    private static final List configProperties = new ArrayList();

    static {
        ProviderConfigProperty property;
        property = new ProviderConfigProperty();
        property.setName(ProtocolMapperUtils.USER_ATTRIBUTE);
        property.setLabel(ProtocolMapperUtils.USER_MODEL_ATTRIBUTE_LABEL);
        property.setHelpText(ProtocolMapperUtils.USER_MODEL_ATTRIBUTE_HELP_TEXT);
        property.setType(ProviderConfigProperty.STRING_TYPE);
        configProperties.add(property);
        property = new ProviderConfigProperty();
        property.setName(ProtocolMapperUtils.MULTIVALUED);
        property.setLabel(ProtocolMapperUtils.MULTIVALUED_LABEL);
        property.setHelpText(ProtocolMapperUtils.MULTIVALUED_HELP_TEXT);
        property.setType(ProviderConfigProperty.BOOLEAN_TYPE);
        configProperties.add(property);
        OIDCAttributeMapperHelper.addTokenClaimNameConfig(configProperties);
        OIDCAttributeMapperHelper.addIncludeInTokensConfig(configProperties, CustomOIDCProtocolMapper.class);
    }

    @Override
    public String getDisplayCategory ()
    {
        return TOKEN_MAPPER_CATEGORY;
    }

    @Override
    public String getDisplayType ()
    {
        return "Custom Claim Mapper";
    }

    @Override
    public String getHelpText ()
    {
        return "Custom OIDC Protocol Mapper";
    }

    @Override
    public List getConfigProperties ()
    {
        return configProperties;
    }

    @Override
    public String getId ()
    {
        return PROVIDER_ID;
    }

    @Override
    public List getConfigMetadata ()
    {
        return super.getConfigMetadata();
    }

    @Override
    protected void setClaim(IDToken token, ProtocolMapperModel mappingModel, UserSessionModel userSession,
                            KeycloakSession keycloakSession, ClientSessionContext clientSessionCtx) {
       OIDCAttributeMapperHelper.mapClaim(token, mappingModel, "SimpleTextAttributeValue");
    }

    public IDToken transformIDToken(IDToken token, ProtocolMapperModel mappingModel,
                                    KeycloakSession session, UserSessionModel userSession,
                                    ClientSessionContext clientSessionCtx) {        
        token.getOtherClaims().put("given_name", userSession.getUser().getFirstName());
        token.getOtherClaims().put("family_name", userSession.getUser().getLastName());
        token.getOtherClaims().put("email", userSession.getUser().getEmail());
        token.getOtherClaims().put("name", userSession.getUser().getUsername());
        setClaim(token, mappingModel, userSession, session, clientSessionCtx);
        return token;
    }

    public AccessToken transformAccessToken(AccessToken token, ProtocolMapperModel mappingModel, KeycloakSession keycloakSession,
                                            UserSessionModel userSession, ClientSessionContext clientSessionCtx) {
        token.getOtherClaims().put("name", userSession.getUser().getUsername());
        setClaim(token, mappingModel, userSession, keycloakSession, clientSessionCtx);
        return token;
    }

    public static ProtocolMapperModel create(String name,
                                             boolean accessToken, boolean idToken, boolean userInfo) {
        ProtocolMapperModel mapper = new ProtocolMapperModel();
        mapper.setName(name);
        mapper.setProtocolMapper(PROVIDER_ID);
        mapper.setProtocol(OIDCLoginProtocol.LOGIN_PROTOCOL);
        Map<String, String> config = new HashMap<String, String>();
        config.put(OIDCAttributeMapperHelper.INCLUDE_IN_ACCESS_TOKEN, "true");
        config.put(OIDCAttributeMapperHelper.INCLUDE_IN_ID_TOKEN, "true");
        mapper.setConfig(config);
        return mapper;
    }

}

In the above code, there are a couple of important methods to look at

  • setClaims – it adds custom data to token. SimpleTextAttributeValue will be part of the token once we set up that claim.
  • transformAccessToken and transformIdToken – We can also add additional user attributes to the default Access Token and Id Token. In many cases, you don’t want to expose a lot of user data in Access Token.
  • Other methods like getDisplayType and getHelpText are helper methods for Keycloak admin console.

Building a jar for Protocol Mapper

Before we can use this custom protocol mapper in our Keycloak configuration, we will need to build our maven project. To be able to use this mapper, we need to add a file with the name org.keycloak.protocol.ProtocolMapper in resources/META-INF/services directory.

Add the following value to this file –

com.betterjavacode.CustomOIDCProtocolMapper

This is our class for custom mapper. Our Keycloak configuration then will be able to identify the jar file that we will add.

Run the command mvn clean install in Maven project. This should build a jar file in the target directory.

Configuring the client with Custom Protocol Mapper

Once the jar file is ready, copy that jar file into the Keycloak configuration. In our case, I am running a Keycloak through a docker container. The docker-compose file Keycloak looks like below:


version: "3.8"

services:
  postgres:
    image: postgres
    volumes:
      - postgres_data:/var/lib/postgresql/data
    environment:
      POSTGRES_DB: keycloak
      POSTGRES_USER: keycloak
      POSTGRES_PASSWORD: password
    networks:
      - common-network
  keycloak:
    image: quay.io/keycloak/keycloak:21.0.0
    ports:
      - "8180:8080"
    command:
      - start-dev
    environment:
      DB_VENDOR: POSTGRES
      DB_ADDR: postgres
      DB_DATABASE: keycloak
      DB_USER: keycloak
      DB_PASSWORD: password
      DB_SCHEMA: public
      KEYCLOAK_ADMIN: admin
      KEYCLOAK_ADMIN_PASSWORD: password
    volumes:
      - "./providers:/opt/keycloak/providers"
      - "./themes:/opt/keycloak/themes"
    depends_on:
      - postgres
    networks:
      - common-network
networks:
  common-network:
    driver: bridge
volumes:
  db-data:
    driver: local
  postgres_data:
    driver: local

Make sure you have providers directory in your root directory where this docker-compose.yml file is.

Copy the Custom protocol mapper jar file in providers directory.

Start the docker container with docker-compose -f docker-compose.yml up command.

Now let’s configure our client in Keycloak with custom protocol mapper. Once you login to Keycloak admin console, you should be able to see oidc-customprotocolmapper in provider info.

Custom Protocol Mapper in Keycloak Configuration

  • Now, go to the client and client-scopes tab.
  • Select client-demo-app-dedicated client scope.
  • On the Mappers tab, select Add Mapper - By Configuration
  • Choose Custom Claim Mapper and it will add to your mapper.

Keycloak Claim Mapper

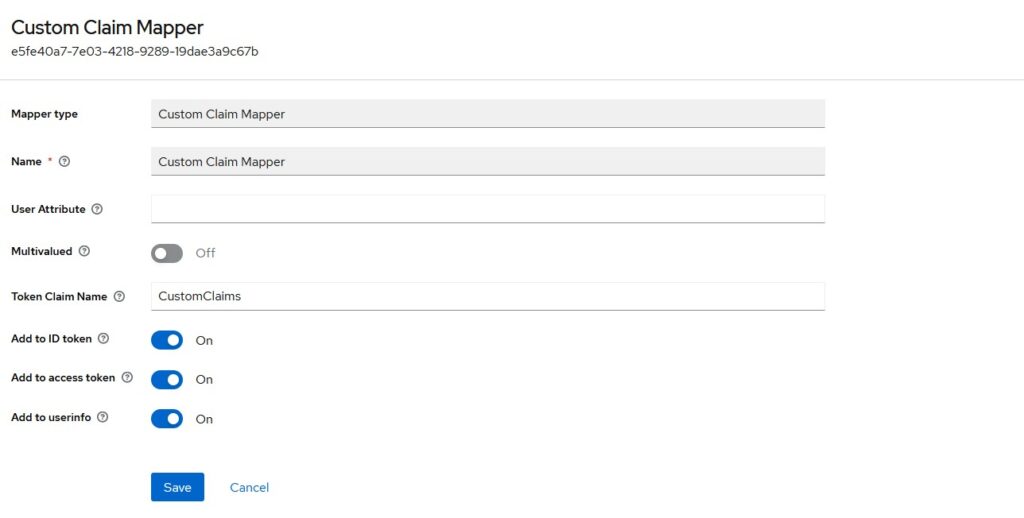
You can choose if you want to include this claim in Access Token or Id Token or Both. Click on Save and it will be added to our list of claims. Now, we are ready to test this mapper.

Demo for Custom Attributes

To test this claim mapper, I will use a postman to call the token endpoint of Keycloak configuration. You will see the access token and id token in response.

Custom Protocol Mapper Demo

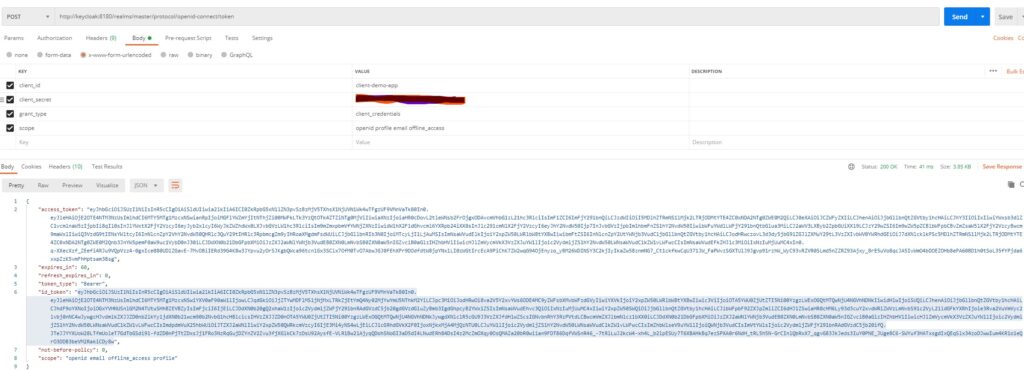
Now if we decode that id token, it will show our custom claim as below:


{
  "exp": 1691853775,
  "iat": 1691853715,
  "auth_time": 0,
  "jti": "ce6001e1-c631-4df1-bd87-6260be958d3f",
  "iss": "http://keycloak:8180/realms/master",
  "aud": "client-demo-app",
  "sub": "909ae4f5-e296-4c83-a18d-1406584ea43d",
  "typ": "ID",
  "azp": "client-demo-app",
  "at_hash": "8lXTsTJyF3cxMKnHxAdEAg",
  "acr": "1",
  "clientHost": "172.25.0.1",
  "clientId": "client-demo-app",
  "CustomClaims": "SimpleTextAttributeValue",
  "preferred_username": "service-account-client-demo-app",
  "given_name": "Service",
  "family_name": "Account",
  "email": "serviceaccount@test.com"
}

You can see the new claim CustomClaims with the attribute value that we had determined in our code.

Conclusion

In this post, we showed how to configure a custom protocol mapper with Keycloak. Keycloak is an open-source IAM tool and it provides capabilities to configure providers and themes.

How To Use Keycloak as Identity Broker

In this post, I will show how to use Keycloak as an identity broker. If you want to learn more, you can follow the guide on how to use keycloak with spring boot application.

What you will need

  • Keycloak
  • Postgres Database
  • Service Provider Application (We are using a spring boot application)
  • Identity Provider

What is Identity Broker?

An identity broker is a service that integrates two other services. An identity broker usually acts as an intermediary between a service provider and another identity provider. The identity broker creates a relationship with a third-party identity provider to use the provider’s identities to access the service provider application.

In this post, we will show how you can configure Keycloak as an identity broker between a spring boot application and an identity provider.

Start Keycloak with Postgres Database

If you download and run Keycloak as a standalone service, it will H2 (In-Memory) database. But we plan to use the Postgres database. This will also give a lot of clarity on how to use Keycloak with a relational database in an actual production environment.

  • Install Postgres (I am using version 13.11)
  • Download Postgres JDBC driver
  • Create a database called keycloak in Postgres once you set up the database server locally.

To make Keycloak to use the Postgres database, we will need to update some configuration in the Keycloak installation directory. For this demo, I am using Keycloak version 11.0.1. If you are using the latest version, I will share the information below on how to integrate that with the Postgres database.

    • Go to Keycloak_installation/standalone/configuration directory
    • Open standalone.xml file in a XML editor
    • Add the below XML tags in datasources
<datasource jndi-name="java:jboss/datasources/KeycloakDS" pool-name="KeycloakDS" enabled="true" use-java-context="true"
				statistics-enabled="${wildfly.datasources.statistics-enabled:${wildfly.statistics-enabled:false}}" >
	<connection-url>jdbc:postgresql://localhost:5432/keycloak </connection-url>
	<driver> postgres </driver>
	<security>
		<user-name>username </user-name>
		<password>password </password>
	</security>
</datasource>
<drivers>
	<driver name="postgres" module="com.postgres">
	<driver-class>org.postgresql.Driver </driver-class>
        <xa-datasource-class>org.postgresql.xa.PGXADataSource </xa-datasource-class>
	</driver>
</drivers>
    • We also need to update bindings in subsystem tags in the same standalone.xml file as below
<default-bindings context-service="java:jboss/ee/concurrency/context/default" datasource="java:jboss/datasources/KeycloakDS" 
managed-executor-service="java:jboss/ee/concurrency/executor/default" 
managed-scheduled-executor-service="java:jboss/ee/concurrency/scheduler/default" 
managed-thread-factory="java:jboss/ee/concurrency/factory/default"/>

If you are using the latest version of Keycloak, all you have to do is

    • Edit the file conf/keycloak.conf and set the following properties
db=postgresql
db-username=username
db-password=password
db-url=jdbc:postgresql://localhost:5432/keycloak

Once you set the above configuration, now we can start the Keycloak. If you are using the older version like me, you can use the following command:

standalone.bat -Djboss.socket.binding.port-offset=100

OR if you are using the latest version of Keycloak, you can use

kc.bat start-dev

Both of these commands are from a Windows environment perspective. Once the Keycloak server starts, access the Keycloak administration UI in the browser http://localhost:8180

Configure Keycloak with a realm

Let’s create a realm in Keycloak once you login as an administrator.

Keycloak Identity Broker - Realm

Once we create a realm, we don’t need to do anything yet. We will use Realm to set up our service provider later.

In the next step, we will configure another identity provider.

Configure Identity Provider in Keycloak

You can use Keycloak as an identity provider for SSO. But in this demo, Keycloak is acting as an identity broker. We will use saml-idp as an identity provider. This is a simple node-based SAML identity provider for development purposes. You can read about it more here.

npm install -g saml-idp.

Use the below command to start this identity provider. It will run on port 7000 by default.

saml-idp --acsUrl {POST URL} --audience {audience}

Now if we access http://localhost:7000 , the identity provider will be running and we can see the metadata in the browser. We can download this metadata to configure in Keycloak.

Let’s create an identity provider (SAML Version 2.0).

Enter an alias and Redirect URI

Keycloak Identity Broker - SAML Identity Provider

Let’s configure the SAML Identity provider’s details in Keycloak.

SSO URL – http://localhost:7000/saml/sso

SAML Configuration

Save the configuration. Now you should be able to download Keycloak’s metadata that you can import into the identity provider (saml-idp).

ACS URL = http://localhost:8180/auth/realms/ToDoListSAMLApp/broker/Saml-IDP-Test/endpoint

Audience = http://localhost:8180/auth/realms/ToDoListSAMLApp

Now, we can run our identity provider with the right ACS URL and Audience.

saml-idp --acsUrl http://localhost:8180/auth/realms/ToDoListSAMLApp/broker/Saml-IDP-Test/endpoint --audience http://localhost:8180/auth/realms/ToDoListSAMLApp

Next, we configure the service provider application.

Configure Service Provider in Keycloak

We already have written a spring boot application that we will use as a service provider. If you want to learn more about the Spring Boot application, you can follow this previous post.

  1. Create a new client under our realm in Keycloak
  2. Provide a client id as https://localhost:8743/saml2/service-provider-metadata/keycloak
  3. Enter Name and Description for the client
  4. Select SAMLas a protocol under Client Protocol
  5. Enable include authnstatements, sign documents, and sign assertions
  6. Select RSA_SHA256 as Signature Algorithm
  7. username as Name ID Format
  8. Root URL – https://localhost:8743
  9. Valid Redirect URLs – https://localhost:8743/*
  10. Master SAML Processing URL – https://localhost:8743/saml2/service-provider-metadata/keycloak
  11. ACS POST/REDIRECT Binding URL – https://localhost:8743/login/saml2/sso/keycloak

Keycloak Identity Broker - Service Provider app

And that’s all for Keycloak configuration is concerned.

Since we are using Spring Boot Application, we have configured the following properties in application.properties


# ====================================================================================
## Keycloak and SAML SP Properties
# ====================================================================================
spring:
    security:
        saml2:
            relyingparty:
                registration:
                    keycloak:
                        identityprovider:
                            entity-id: http://localhost:8180/auth/realms/ToDoListSAMLApp
                            singlesignon:
                                sign-request: false
                                url: http://localhost:8180/auth/realms/ToDoListSAMLApp/protocol/saml
                            verification:
                                credentials:
                                - certificate-location: classpath:credentials/idppostgres.cert

Start the spring boot application once you configure the properties.

Demo of Keycloak as Identity Broker

Assuming we are running Spring Boot Application, Keycloak, and another identity provider (saml-idp), now we can run the demo by accessing the Spring Boot Application.

Keycloak Login Screen - Spring Boot

You can select the identity provider Saml-IDP-Test and it will redirect to that identity provider.

Login Identity Provider - Keycloak Identity Broker

Once you select Sign In option, it will redirect you back to service provider application if the user already exists in Keycloak. If the user does not exist in Keycloak, keycloak will ask to enter minimal attributes and it will create that user dynamically (JIT Provisioning).

Successful Login - KeycloakAnd this way, the user was able to log in successfully.

Conclusion

In this post, I showed how to use Keycloak as an identity broker with another identity provider. Keycloak is a very well-documented SSO provider. If you have any questions or feedback, please do send me questions.

Build a NestJS Full Stack Application – Part I

With this post, we will start a series of posts to build a full-stack application using NestJS. NestJS is a popular framework to build scalable and efficient Node.JS server-side applications.

Techstack

To build this application, we will be using multiple different frameworks.

  • Backend – NestJS with Typescript
  • Frontend – NextJS with Typescript
  • Database – MySQL
  • ORM – Prisma
  • Cloud Provider – Amazon Web Services (AWS)

Application Ideation

Everything starts with an idea and execution. The idea for this application is to build an applicant tracking system for recruiting agencies.

There are two types of users in this application. A recruiter creates the job and an applicant who applies for that job. Once the applicants apply for the job, the recruiter reviews the application, contacts applicants, and invites them for an interview. Once the interview is complete, the result is updated in the system so that an applicant can view it at any time.

There are various stages that a job application goes through.

For recruiter – Job creation -> Interview in progress -> Candidate selected -> Job complete -> Job expired.

For candidate – Job application -> Interview if selected -> Result.

There will be a bunch of automation involved with respect to notification through the life-cycle of the job.

NestJS Setup

We will be using the NestJS framework with typescript to build the backend of this application. Additionally, we will use ReactJS with typescript for the front end of this application.

Nevertheless, we will set up our NestJS framework on our development machine.

Create a new app using NestJS with the following command:

nest new staffingapp

Just like in previous articles, we will use prisma as our ORM for creating this nestjs application.

  • Install Prisma dependencies

npm install prisma --save-dev

npm install @prisma/client

  • Create initial Prisma setup

npx prisma init

If you are using a Windows environment, you might run into an error while running the above command. So set environment variables

set PRISMA_CLI_QUERY_ENGINE_TYPE=binary

set PRISMA_CLIENT_ENGINE_TYPE=binary

This completes our initial backend app setup. Let’s create a data model for this application further.

Data Model for Staffing App

We have three main data objects.

  • User
  • Job
  • Company

There are more that we will require for a functioning app, but for now we will look at these three only.

These models will contain the following fields:


enum ROLE {
  CANDIDATE
  RECRUITER
  ADMIN
}

model User {
  id         String @id @default(uuid())
  email      String @unique
  first_name String 
  last_name  String 
  password   String 
  company  Company @relation(fields: [company_id], references: [id])
  company_id  String
  role       ROLE
  created_at DateTime @default(now())
  updated_at DateTime @default(now())  
}

model Company {
  id         String  @id @default(uuid())
  name       String  
  type       String 
  user       User[]
  job        Job[]
  created_at DateTime @default(now())
  updated_at DateTime @default(now())
}
enum JobType {
  FULLTIME
  PARTTIME
  CONTRACTOR
  INTERN
}
model Job {
  id         String   @id @default(uuid())
  job_type    JobType 
  job_name    String 
  job_role    String
  description String 
  job_details JobDetails @relation(fields: [job_details_id], references: [id])
  job_details_id String @unique
  company    Company @relation(fields: [company_id], references: [id])
  company_id  String
  expires_at DateTime
  created_at DateTime @default(now())
  updated_at DateTime @default(now())
}

model JobDetails {
  id              String @id @default(uuid())
  salary_details  String
  benefit_details String
  job             Job?
  created_at      DateTime @default(now())
  updated_at      DateTime @default(now())
}

With the above data model, we have set up the initial database and application. In the next post, we will create backend APIs and integrate them with the database.

Conclusion

In this post, we started building a full-stack application using NestJS framework. We set up the initial application and database along with Prisma ORM.