Introduction
Spring 5 introduced a new reactive web client called WebClient. In this post, I will show when and how we can use Spring WebClient vs RestTemplate. I will also describe what features WebClient offers.
What is RestTemplate?
RestTemplate is a central Spring class that allows HTTP access from the client-side. RestTemplate offers POST, GET, PUT, DELETE, HEAD, and OPTIONS HTTP methods. The simple use case of RestTemplate is to consume Restful web services.
You can create a bean that provides the instance of RestTemplate. You can then @autowire this bean in any class where you plan to call REST services. RestTemplate is the class that implements the interface RestOperations.
The following code shows the declaration of the bean:
    @Bean
    public RestOperations restOperations()
    {
        return new RestTemplate();
    }
The following code shows a REST client `YelpClient` calling Yelp’s REST API to get rental property reviews.
   @Autowired
   private final RestOperations restOperations;

   public List getRentalPropertyReviews(String address)
   {
        String url = buildRestUrl(businessId);
        HttpHeaders httpHeaders = new HttpHeaders();
        String apiKey = getApiKey(YELP);
        httpHeaders.add("Authorization","Bearer " + apiKey);
        httpHeaders.setContentType(MediaType.APPLICATION_JSON);

        HttpEntity entity = new HttpEntity("parameters", httpHeaders);
        ResponseEntity response;

        try
        {
            response = restOperations.exchange(url, HttpMethod.GET,entity, String.class);
        }
        catch(RestClientException e)
        {
            throw new RuntimeException("Unable to retrieve reviews", e);
        }

    }
In the above code, we are building HTTP Headers by adding Yelp’s REST API key as part of the authorization. We call the GET method to get review data.
Basically, one has to do
- Autowire the RestTemplate object
- Build HTTP Headers with authorization and Content Type
- Use HttpEntity to wrap the request object
- Provide URL, Http Method, and the Return type for exchange method.
What is WebClient?
Spring 5 introduced a reactive web client called WebClient. It’s an interface to perform web requests. It is part of the Spring web reactive module. WebClient will be replacing RestTemplate eventually.
Most importantly, WebClient is reactive, nonblocking, asynchronous, and works over HTTP protocol Http/1.1.
To use WebClient, one has to do
- Create an instance of WebClient
- Make a request to the REST endpoint
- handle the response
   WebClient webClient = WebClient
       .builder()
       .baseUrl("https://localhost:8443")
       .defaultCookie("cookieKey", "cookieValue")
       .defaultHeader(HttpHeaders.CONTENT_TYPE, MediaType.APPLICATION_JSON_VALUE)
       .defaultUriVariables(Collections.singletonMap("url", "https://localhost:8443"))
       .build();
The above code shows one way to instantiate WebClient. You can also create an instance by simply using WebClient webClient = WebClient.create();
WebClient provides two methods exchange and retrieve . exchange method usually fetches the response along with status and headers. retrieve method gets the response body directly. It’s easier to use.
Also depending on if you are trying to fetch a single object in response or a list of objects, you can use mono or flux.
this.webClient =
                webClientBuilder.baseUrl("http://localhost:8080/v1/betterjavacode/").build();

this.webClient.get()
                .uri("users")
                .accept(MediaType.APPLICATION_JSON)
                .retrieve().bodyToFlux(UserDto.class).collectList();
The above code basically uses webClient to fetch a list of users from the REST API.
Spring WebClient vs RestTemplate
We already know the one key difference between these two features. WebClient is a non-blocking client and RestTemplate is a blocking client.
RestTemplate uses Java Servlet API under the hood. Servlet API is a synchronous caller. Because it is synchronous, the thread will block until webclient responds to the request.
Consequently, Requests waiting for results will increase. This will result in an increase in memory.
On the other hand, WebClient is an asynchronous non-blocking client. It uses Spring’s reactive framework under the hood. WebClient is a part of the Spring-WebFlux module.
Spring WebFlux uses reactor library. It provides Mono and Flux API to work data sequences. Reactor is a reactive streams library. And, all of its operators support non-blocking back pressure.
Example of how to use WebClient in a Spring Boot Application
We can combine the capabilities of Spring Web MVC and Spring WebFlux. In this section, I will create a sample application. This application will call a REST API using WebFlux and we will build a response to show a web page with a list of users.
RestController for this example is an API to get a list of users:
package com.betterjavacode.webclientdemo.controllers;

import com.betterjavacode.webclientdemo.dto.UserDto;
import com.betterjavacode.webclientdemo.managers.UserManager;
import org.springframework.beans.factory.annotation.Autowired;
import org.springframework.web.bind.annotation.GetMapping;
import org.springframework.web.bind.annotation.RequestMapping;
import org.springframework.web.bind.annotation.RestController;

import java.util.List;

@RestController
@RequestMapping("v1/betterjavacode")
public class UserController
{
    @Autowired
    public UserManager userManager;

    @GetMapping(value = "/users")
    public List getUsers()
    {
        return userManager.getAllUsers();
    }
}
Controller class that uses a WebClient to call REST API looks like below:
package com.betterjavacode.webclientdemo.controllers;
import com.betterjavacode.webclientdemo.clients.UserClient;
import com.betterjavacode.webclientdemo.dto.UserDto;
import com.betterjavacode.webclientdemo.managers.UserManager;
import org.springframework.beans.factory.annotation.Autowired;
import org.springframework.stereotype.Controller;
import org.springframework.ui.Model;
import org.springframework.web.bind.annotation.GetMapping;
import java.util.List;
@Controller
public class MainController
{
@Autowired
UserClient userClient;
@GetMapping(value = "/")
public String home()
{
return "home";
}
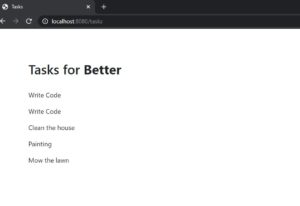
@GetMapping(value = "/users")
public String getUsers(Model model)
{
List users = userClient.getUsers().block();
model.addAttribute("userslist", users);
return "users";
}
}
Now, the important piece of code of UserClient is where we will be using WebClient to call REST API.
package com.betterjavacode.webclientdemo.clients;

import com.betterjavacode.webclientdemo.dto.UserDto;
import org.springframework.http.MediaType;
import org.springframework.stereotype.Service;
import org.springframework.web.reactive.function.client.WebClient;
import reactor.core.publisher.Flux;
import reactor.core.publisher.Mono;

import java.util.List;

@Service
public class UserClient
{

    private WebClient webClient;

    public UserClient(WebClient.Builder webClientBuilder)
    {
        this.webClient =
                webClientBuilder.baseUrl("http://localhost:8080/v1/betterjavacode/").build();
    }

    public Mono<List> getUsers()
    {
        return this.webClient.get()
                .uri("users")
                .accept(MediaType.APPLICATION_JSON)
                .retrieve().bodyToFlux(UserDto.class).collectList();
    }
}
Above code shows first building the WebClient and then using it to retrieve response from REST API. retrieve method offers two options of mono or flux. Since we have more than one user to get, we are using flux.
This shows we can use reactive, non-blocking WebClient which is part of WebFlux in Spring Web MVC framework.
What Else Is There in Spring WebClient?
Spring WebClient is part of Spring WebFlux framework. The major advantage of this API is that the developer doesn’t have to worry about concurrency or threads. WebClient takes care of that.
WebClient has a built-in HTTP Client library support to perform requests with. That includes Apache HttpComponents, Jetty Reactive HttpClient, or Reactor Netty.
WebClient.builder() offers following options:
uriBuilderFactory– customizeduriBuilderFactoryto use base URLdefaultHeader– Headers for every requestdefaultCookie– Cookies for every requestdefaultRequest– To customize every requestfilter– Client filter for every requestexchangeStrategies– HTTP Message reader/writer customizations
I already showed retrieve method in the above code demo.
WebClient also offers a method exchange with varients like exchangeToMono and exchangeToFlux.
With attribute(), we can also add attributes to the request.
Alternatively, one can use WebClient for synchronous use also. In my example above MainController, I use block to get the final result. This basically blocks parallel calls till we get the result.
One key feature that WebClient offers is retryWhen(). For more resilient system, it is a great feature that you can add while using WebClient.
        webClient
            .get()
            .uri(String.join("", "/users", id))
            .retrieve()
            .bodyToMono(UserDto.class)
            .retryWhen(Retry.fixedDelay(5, Duration.ofMillis(100)))
            .block();
retryWhen takes Retry class as a parameter.
WebClient also offers a feature for error handling. doOnError() allows you to handle the error. It is triggered when mono ends with an error. onErrorResume() is a fallback based on the error.
Conclusion
In this post, I showed what is Spring WebClient is, how we can use Spring WebClient vs RestTemplate, and what different features it offers.
If you enjoyed this post, you can subscribe to my blog here.
References
- Spring WebClient – Spring Documentation
- WebClient Cheatsheet – Spring WebClient