Category Archives: Android

Android

Migrate Android Project from Eclipse to Android Studio

I remember downloading Android Studio back in 2013 to work on an Android project. But after playing around for an hour or two, I got frustrated. I had to delete Android Studio and go back to Eclipse. One reason why Eclipse was never successful with android because of patchy user interface for building Android applications, unfortunately that’s still the case in 2018.

Well, at least Google has made significant changes with Android Studio from 2015. It is almost compulsory to use Android Studio to build any new android applications. But there are few eclipse devotes like me who were still using eclipse to build android applications.

In this post, I will show how to migrate an android project from Eclipse to Android Studio. Warning: Even though the post looks very simple, it took me sizable efforts to figure out this migration. Hope it will be easier for readers.

Steps to migrate from Eclipse to Android Studio

  1. Download Android Studio from here. I had downloaded Android Studio version 3.3 RC2, but for it kept giving me syncing error when I imported the project. So I downgraded Android Studio version 3.2.1. Install Android Studio on your environment.
  2. On starting screen of Android Studio, you will see an option to import existing ADT project. Here you choose your eclipse based android project.
    1. Other option in this scenario, is to export android project from eclipse as gradle based project and it will also make life easier to import that project in Android Studio.
  3. Once you import the project in Android Studio, it will take some time to sync. In sync, Android Studio is basically creating gradle
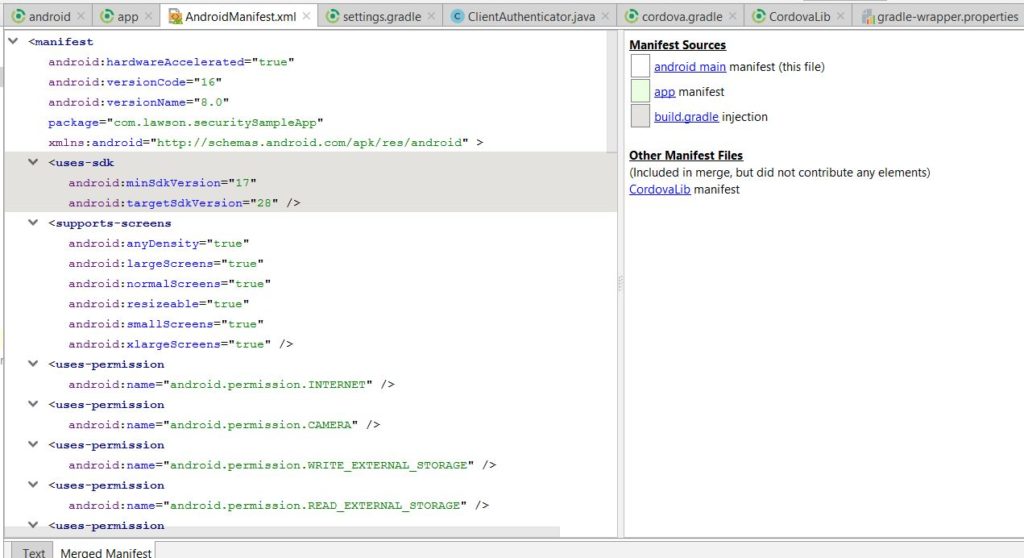
 build file for your project. Converting all your library jars into dependencies. Other task it will be doing is to merge all your AndroidManifest.xml files. If there are any errors, it will show those errors during sync. Easiest way to fix AndroidManifest.xml errors are to go to this screen:

 4. Once the sync is successful, you can still face some issue to build the project. One major change with android studio gradle build is that in dependencies compile has been replaced by implementation project OR implementation files. Also to pull most of your dependencies, you will have to add google() as maven URL. minSdkVersion and targetSdkVersion should be moved to build file now and you can remove that from AndroidManifest.xml . Most of this should let you build your project successfully.

Conclusion

In this post, I showed how to migrate from eclipse to android studio for your android project. It is straight forward, but definitely depending on the project, you will run into few issues that you will have to resolve while building the project. Send me email or comment on this post if you have any questions.


Supporting FORMS authentication for ADFS in Android applications

Scenario with ADFS Authentication

Recently I came across this scenario where an application was using ADFS for authentication. The administrator had configured Windows Integrated Authentication as well as Forms Authentication as authentication policies. But when the user accessed the Android application, passive authentication through the Android webview browser fails because it redirects to the Windows Integrated Authentication URL instead of Forms Authentication. As the webview browser does not support WIA.

Android Phone

A solution to configure ADFS

Most organizations when using Active  Directory Federation Services (ADFS), use windows integrated authentication for their intranet. This helps users in their networks to enter credentials only once. Most browser-based applications provide a seamless experience to users without asking them to enter credentials again.

However, in this scenario, a user was trying to access an android application that equally needs passive authentication with an android webview browser. But android webview browser does not support WIA that results in authentication failure.

In such a scenario, ADFS should fall back to FORMS authentication and redirect the user to the login form. ADFS for windows server provides a simple configuration trick for authentication to fall back to FORMS.

  1. WIASupportedUserAgentString property of Set-ADFSProperties command
  2. WindowsIntegratedFallbackEnabled property of Set-AdfsGlobalAuthenticationPolicy command

Set-AdfsGlobalAuthenticationPolicy -WindowsIntegratedFallbackEnabled $true

WIASupportedUserAgentString gives the user agents that support WIA. If the component of the user agent string does not match any of the components of the user agent strings that are configured in WIASupportedUserAgentString property, ADFS will fall back to providing forms-based authentication, provided WindowsIntegratedFallbackEnabled flag is set to true.

Get-AdfsProperties | Select -ExpandProperty WIASupportedUserAgents

MSIE 6.0

MSIE 7.0; Windows NT

MSIE 8.0

MSIE 9.0

MSIE 10.0; Windows NT 6

MSIE 11.0; Windows NT 10

Windows NT 6.3; Trident/7.0

Windows NT 6.3; Win64; x64; Trident/7.0

Windows NT 6.3; WOW64; Trident/7.0

Windows NT 6.2; Trident/7.0

Windows NT 6.2; Win64; x64; Trident/7.0

Windows NT 6.2; WOW64; Trident/7.0

Windows NT 6.1; Trident/7.0

Windows NT 6.1; Win64; x64; Trident/7.0

Windows NT 6.1; WOW64; Trident/7.0

Windows NT 10.0; Trident/7.0

Windows NT 10.0; Win64; x64; Trident/7.0

Windows NT 10.0; WOW64; Trident/7.0

MSIPC

In this particular case, we removed Safari and Chrome from the list of user-agent strings, that’s when the authentication for application worked through passive authentication.

Conclusion

In conclusion, I showed in this post how to use FORMS authentication with ADFS for an android application. If you enjoyed this post, subscribe to my blog.

References

  1. Configuring Forms based authentication
  2. Forms based authentication


How to add SSLContext with TLSv1.2 in Android Kitkat

coding

Recently, I came across an issue where a server was not responding in my android application running in Kitkat version of Android. Yes, Kitkat is old, and why one should use it when we can always upgrade to a higher version of Android. We can argue, find pros and cons, but that’s not the point. If we have the technology, it should be more flexible and sometimes, a customer will not be able to go for a higher version of Android. When technology plays with time, certain things are not in control. So if websites had made TLSv1.2 compulsory when Android Kitkat was released, Google had no choice but to release a solution. But that wasn’t the case.

Back to the present time, my Android application is trying to contact a server that has TLSv1.2 enabled. In my Android application, I used Android provided DefaultHttpClient.

So the issue is “How do we add a SSLContext in this DefaultHttpClient“?

Solution –

Create a HTTP Client Socket Factory –

We will build a socket factory that will implement LayeredSocketFactory like below:

public class TlsSniSocketFactory implements LayeredSocketFactory {

  private final static HostnameVerifier hostnameVerifier = new StrictHostnameVerifier();

  private final boolean acceptAllCertificates;
  private final String selfSignedCertificateKey;

  public TlsSniSocketFactory() 
        {
    this.acceptAllCertificates = false;
    this.selfSignedCertificateKey = null;
  }

  public TlsSniSocketFactory(String certKey) 
        {
    this.acceptAllCertificates = false;
    this.selfSignedCertificateKey = certKey;
  }

  public TlsSniSocketFactory(boolean acceptAllCertificates) 
        {
    this.acceptAllCertificates = acceptAllCertificates;
    this.selfSignedCertificateKey = null;
  }

  // Plain TCP/IP (layer below TLS)

  @Override
  public Socket connectSocket(Socket s, String host, int port, InetAddress localAddress, int localPort,
                HttpParams params) throws IOException {
    return null;
  }

  @Override
  public Socket createSocket() throws IOException {
    return null;
  }

  @Override
  public boolean isSecure(Socket s) throws IllegalArgumentException {
    if (s instanceof SSLSocket) {
      return s.isConnected();
    }
    return false;
  }

  // TLS layer

  @Override	
  public Socket createSocket(Socket plainSocket, String host, int port, boolean autoClose) throws IOException 
        {
    if (autoClose) 
                {
      plainSocket.close();
    }

    SSLCertificateSocketFactory sslSocketFactory =
        (SSLCertificateSocketFactory) SSLCertificateSocketFactory.getDefault(0);

    // For self-signed certificates use a custom trust manager
    if (acceptAllCertificates) {
      sslSocketFactory.setTrustManagers(new TrustManager[]{new IgnoreSSLTrustManager()});
    } else if (selfSignedCertificateKey != null) {
      sslSocketFactory.setTrustManagers(new TrustManager[]{new SelfSignedTrustManager(selfSignedCertificateKey)});
    }

    // create and connect SSL socket, but don't do hostname/certificate verification yet
    SSLSocket ssl = (SSLSocket) sslSocketFactory.createSocket(InetAddress.getByName(host), port);

    // enable TLSv1.1/1.2 if available
    // ssl.setEnabledProtocols(ssl.getSupportedProtocols());
                // this can be hard coded too
                ssl.setEnabledProtocols(new String[] {"TLSv1.2"});

    // set up SNI before the handshake
    if (Build.VERSION.SDK_INT >= Build.VERSION_CODES.JELLY_BEAN_MR1) {
      sslSocketFactory.setHostname(ssl, host);
    } else {
      try {
        java.lang.reflect.Method setHostnameMethod = ssl.getClass().getMethod("setHostname", String.class);
        setHostnameMethod.invoke(ssl, host);
      } catch (Exception e) {
        Log.d(TlsSniSocketFactory.class.getSimpleName(), "SNI not usable: " + e);
      }
    }

    // verify hostname and certificate
    SSLSession session = ssl.getSession();
    if (!(acceptAllCertificates || selfSignedCertificateKey != null) && !hostnameVerifier.verify(host, session)) {
      throw new SSLPeerUnverifiedException("Cannot verify hostname: " + host);
    }

    return ssl;
  }

}

Register a HTTPS Scheme

We will register a scheme that will use our custom socket factory.

SchemeRegistry schemeRegistry = new SchemeRegistry();
schemeRegistry.register(new Scheme("https", new TlsSniSocketFactory(),443));

ClientConnectionManager ccm = new ThreadSafeClientConnManager(httpparams, schemeRegistry);
DefaultHttpClient defaultHttpClient = new DefaultHttpClient(ccm, httpparams);

Now if use defaultHttpClient to call a GET or POST request, we should be able to connect to a server that is enabled with TLSv1.2.

Conclusion

In this post, we showed how to use DefaultHttpClient in Android Kitkat with TLSv1.2. If you enjoyed this post, subscribe to my blog here.

References

  1. TLS Socket Factory
  2. Default HTTP Client