In this post, we will add an user interface using AngularJS to the REST api we created here.
Controller for home page
First we will create a controller in Spring Boot rest API to call our home page. All the requests that will come to web server, will go through this controller and the controller will return a home page for the request based on path.
MainController.java will look like below:
package com.betterjavacode.benefits.controller;

import org.apache.logging.log4j.LogManager;
import org.apache.logging.log4j.Logger;
import org.springframework.stereotype.Controller;
import org.springframework.web.bind.annotation.RequestMapping;
import org.springframework.web.bind.annotation.RequestMethod;

@Controller
public class MainController
{

     public static final Logger LOGGER = LogManager.getLogger(MainController.class);

     @RequestMapping(value = "/home", method = RequestMethod.GET)
     public String homepage()
     {
         LOGGER.info(" Enter >> homepage() ");
         return "index";
     }
}
Any request coming to https://localhost:8443/home will return a page from index.html.
Create a Home Page
Now, we will create an index.html page. We will also be using angular JS framework as part of this home page so that we can build a single page application. If you are not aware of Angular JS or new to this framework, you can read about it AngularJS. One thing to remember while creating this page is a directory structure. Lot of issues that arise to create html pages are because of directory structure. Directory structure will look like below:
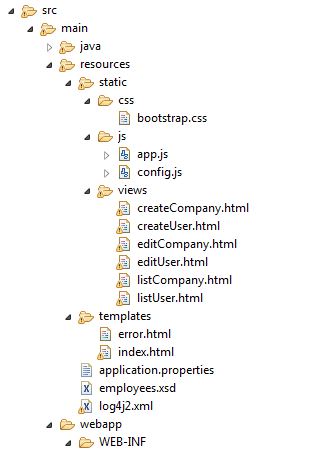
The home page index.html page is under main/resources/templates/ directory and it looks like below
<html ng-app="benefitApp">

<head><meta http-equiv="Content-Type" content="text/html; charset=ISO-8859-1" /><title>Benefit Application</title>

<script>document.write('<base href="' + document.location + '" />');</script>

<link rel="stylesheet" href="/css/bootstrap.css" />

<script src="https://code.angularjs.org/1.6.1/angular.js"></script>

<script src="https://cdnjs.cloudflare.com/ajax/libs/angular.js/1.6.1/angular-route.js"></script>

<script src="https://cdnjs.cloudflare.com/ajax/libs/angular.js/1.6.1/angular-resource.js"></script>

<script type="text/javascript" src="./js/app.js"></script>

</head>

<body ng-controller="MainCtrl">

Hello {{name}}!
<div>
<ul class="menu">
<li><a href="listUser">user-list</a></li>
<li><a href="listCompany">company-list</a></li>
</ul>
<div ng-view="ng-view"></div>
</div>
</body></html>
Home page shows that this is an angular app with name benefitApp. This also declares a controller MainCtrl with an angular view. Important to see we are importing angular.js, angular-route.js and angular-resource.js modules. Click on user-list or company-list, will show list of users and list of companies respectively.
Create a controller
Now to handle the controller (MainCtrl), we added in index.html, we will add app.js which will declare the controller. This javascript file also contains config data to handle all the routing of pages. That’s why we will be importing “ngRoute” and “ngResource” angular modules.
var app = angular.module('benefitApp', ['ngRoute','ngResource']);

var app = angular.module('benefitApp', ['ngRoute','ngResource']);
app.controller('MainCtrl', function($scope, $routeParams) {

$scope.name = 'World';

$scope.$routeParams = $routeParams;

})
Through out the interaction on web pages, we will be using different controllers for editing user or company information and creating user or company. The same file app.js will also handle routing of these pages which is shown below
app.config(function($routeProvider,$locationProvider) {

$locationProvider.html5Mode(true);

$routeProvider.when('/listUser',

{templateUrl: 'views/listUser.html', controller: 'userController'});

$routeProvider.when('/listCompany',

{templateUrl: 'views/listCompany.html', controller: 'companyController'});

$routeProvider .when('/editUser/:userId',

{ templateUrl : 'views/editUser.html' }) ;

$routeProvider .when('/editCompany/:companyId',

{ templateUrl : 'views/editCompany.html' }) ;

$routeProvider.when('/createUser',

{templateUrl:'views/createUser.html'});

$routeProvider.when('/createCompany',

{templateUrl:'views/createCompany.html'});

});
Rest of the code showing all controllers’ logic has been skipped for post purposes. It is available on github repository.
UserController or CompanyController are calling rest apis which we have built using Spring boot.
Demo
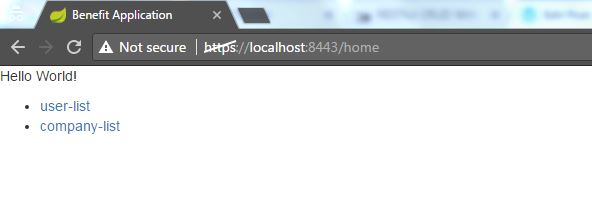
Now build the code and run our embedded tomcat webserver. Fire up the url https://localhost:8443/home – it will look like below:
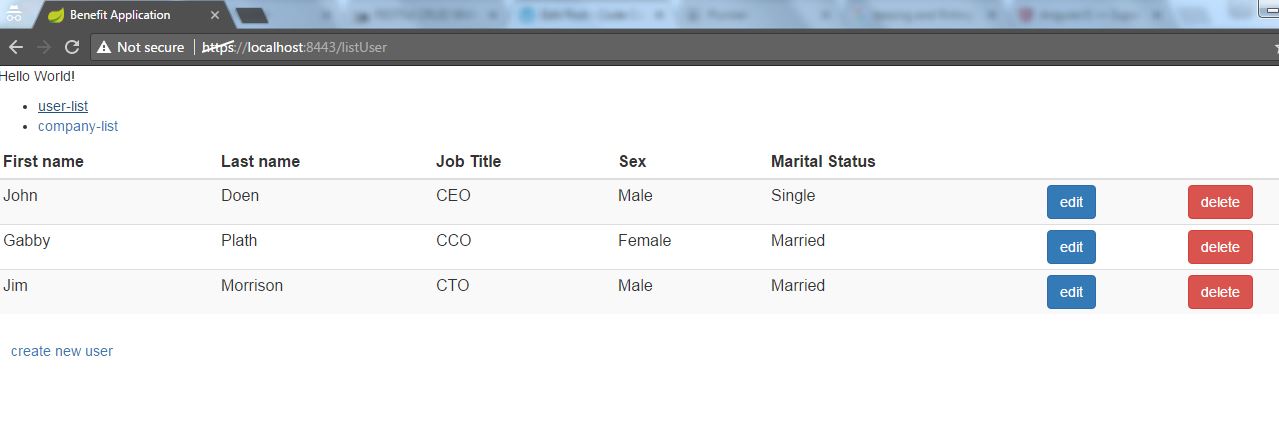
Click on user-list and it will show list of users inside the same page as below:
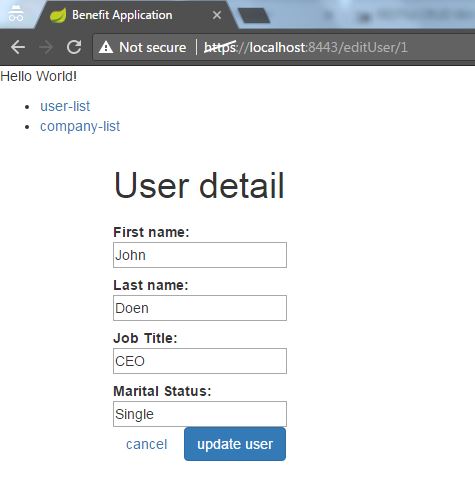
Click on edit button and we will see a form to update user information:
Download –
In this post, we showed how to create a simple CRUD user interface using angular JS for Spring Boot REST API. The code for this is available in repository
Pingback: How to use Spring Boot Security in web application – Part VIII | Code Complete